- Protractor - Home
- Protractor - Introduction
- Concepts of Javascript Testing
- Protractor - Getting Started
- Protractor and Selenium Server
- Protractor - Writing the First Test
- Protractor - Core APIs
- Protractor - Core APIs(Contd..)
- Protractor - Objects
- Protractor - Debugging
- Protractor - Style Guide for Protractor
- Protractor Useful Resources
- Protractor - Quick Guide
- Protractor - Useful Resources
- Protractor - Discussion
Protractor - Writing the First Test
In this chapter, let us understand how to write the first test in Protractor.
Files required by Protractor
Protractor needs the following two files to run −
Spec or test file
It is one of the important files to run Protractor. In this file, we will write our actual test code. The test code is written by using the syntax of our testing framework.
For example, if we are using Jasmine framework, then the test code will be written by using the syntax of Jasmine. This file will contain all the functional flows and assertions of the test.
In simple words, we can say that this file contains the logic and locators to interact with the application.
Example
The following is a simple script, TestSpecification.js, having the test case to navigate to an URL and check for the page title −
//TestSpecification.js
describe('Protractor Demo', function() {
   it('to check the page title', function() {
      browser.ignoreSynchronization = true;
      browser.get('https://www.tutorialspoint.com/tutorialslibrary.htm');
      browser.driver.getTitle().then(function(pageTitle) {
         expect(pageTitle).toEqual('Free Online Tutorials and Courses');
      });
   });
});
Code Explanation
The code of above specification file can be explained as follows −
Browser
It is the global variable created by Protractor to handle all the browser level commands. It is basically a wrapper around an instance of WebDriver. browser.get() is a simple Selenium method that will tell Protractor to load a particular page.
describe and it − Both are the syntaxes of Jasmine test framework. The Describe is used to contain the end to end flow of our test case whereas it contains some of the test scenarios. We can have multiple it blocks in our test case program.
Expect − It is an assertion where we are comparing the web page title with some predefined data.
ignoreSynchronization − It is a tag of browser which is used when we will try to test non-angular websites. Protractor expects to work with angular websites only but if we want to work with non-angular websites, then this tag must be set to true.
Configuration File
As the name suggests, this file provides explanations for all the Protractor configuration options. It basically tells Protractor the following −
- Where to find the test or specs files
- Which browser to pick
- Which testing framework to use
- Where to talk with the Selenium Server
Example
The following is the simple script, config.js, having the test
// config.js
exports.config = {
   directConnect: true,

   // Capabilities to be passed to the webdriver instance.
   capabilities: {
      'browserName': 'chrome'
   },

   // Framework to use. Jasmine is recommended.
   framework: 'jasmine',

   // Spec patterns are relative to the current working directory when
   // protractor is called.
   specs: ['TestSpecification.js'],
Code Explanation
The code of above configuration file having three basic parameters, can be explained as follows −
Capabilities Parameter
This parameter is used to specify the name of the browser. It can be seen in the following code block of conf.js file −
exports.config = {
   directConnect: true,

   // Capabilities to be passed to the webdriver instance.
   capabilities: {
      'browserName': 'chrome'
},
As seen above, the name of the browser given here is chrome which is by default browser for Protractor. We can also change the name of the browser.
Framework Parameter
This parameter is used to specify the name of the testing framework. It can be seen in the following code block of config.js file −
exports.config = {
   directConnect: true,

   // Framework to use. Jasmine is recommended.
   framework: 'jasmine',
Here we are using jasmine test framework.
Source File Declaration Parameter
This parameter is used to specify the name of the source file declaration. It can be seen in the following code block of conf.js file −
exports.config = {
   directConnect: true,
   // Spec patterns are relative to the current working
   directory when protractor is called.
   specs: ['TsetSpecification.js'],
As seen above, the name of the source file declaration given here is TestSpecification.js. It is because, for this example we have created the specification file with name TestSpecification.js.
Executing the code
As we have got basic understanding about the necessary files and their coding for running Protractor, let us try to run the example. We can follow the following steps to execute this example −
Step 1 − First, open command prompt.
Step 2 − Next, we need go to the directory where we have saved our files namely config.js and TestSpecification.js.
Step 3 − Now, execute the config.js file by running the command Protrcator config.js.
The screen shot shown below will explain the above steps for executing the example −
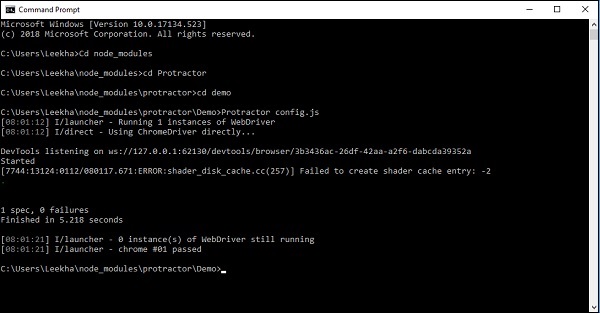
It is seen in the screen shot that the test has been passed.
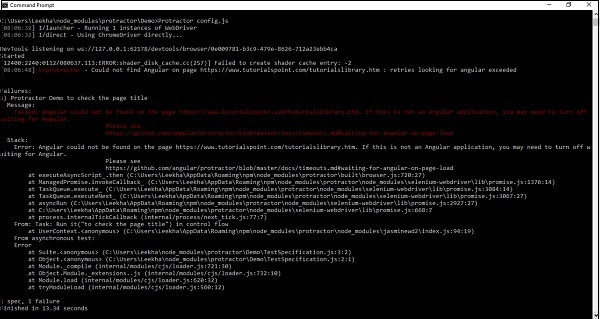
Now, suppose if we are testing non-angular websites and not putting the ignoreSynchronization tag to true then after executing the code we will get the error Angular could not be found on the page.
It can be seen in the following screen shot −
Report Generation
Till now, we have discussed about the necessary files and their coding for running test cases. Protractor is also able to generate the report for test cases. For this purpose, it supports Jasmine. JunitXMLReporter can be used to generate test execution reports automatically.
But before that, we need to install Jasmine reporter with the help of following command −
npm install -g jasmine-reporters
As you can see, -g option is used while installing Jasmine Reporters, it is because we have installed Protractor globally, with -g option.
After successfully installing jasmine-reporters, we need to add the following code into our previously used config.js file −
onPrepare: function(){ //configure junit xml report

   var jasmineReporters = require('jasmine-reporters');
   jasmine.getEnv().addReporter(new jasmineReporters.JUnitXmlReporter({
      consolidateAll: true,
      filePrefix: 'guitest-xmloutput',
      savePath: 'test/reports'
   }));
Now, our new config.js file would be as follows −
// An example configuration file.
exports.config = {
   directConnect: true,

   // Capabilities to be passed to the webdriver instance.
   capabilities: {
      'browserName': 'chrome'
   },

   // Framework to use. Jasmine is recommended.
   framework: 'jasmine',

   // Spec patterns are relative to the current working directory when
   // protractor is called.
   specs: ['TestSpecification.js'],
   //framework: "jasmine2", //must set it if you use JUnitXmlReporter

   onPrepare: function(){ //configure junit xml report

      var jasmineReporters = require('jasmine-reporters');
      jasmine.getEnv().addReporter(new jasmineReporters.JUnitXmlReporter({
         consolidateAll: true,
         filePrefix: 'guitest-xmloutput',
         savePath: 'reports'
      }));
   },
};
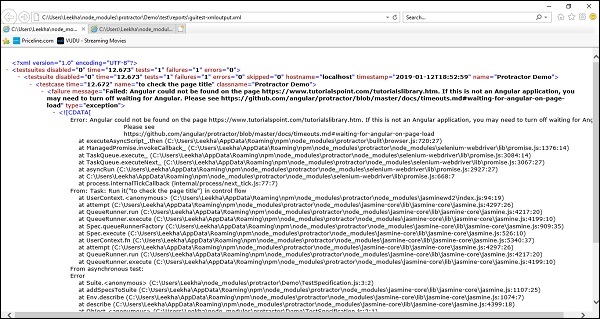
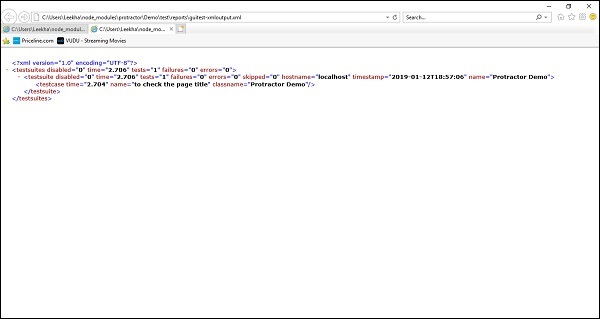
After running the above config file in the same way, we have run previously, it will generate an XML file containing the report under the root directory in reports folder. If the test got successful, the report will look like below −
But, if the test failed, the report will look as shown below −