- Protractor - Home
- Protractor - Introduction
- Concepts of Javascript Testing
- Protractor - Getting Started
- Protractor and Selenium Server
- Protractor - Writing the First Test
- Protractor - Core APIs
- Protractor - Core APIs(Contd..)
- Protractor - Objects
- Protractor - Debugging
- Protractor - Style Guide for Protractor
- Protractor Useful Resources
- Protractor - Quick Guide
- Protractor - Useful Resources
- Protractor - Discussion
Protractor - Protractor And Selenium Server
As discussed earlier, Protractor is an open source, end-to-end testing framework for Angular and AngularJS applications. It is Node.js program. On the other hand, Selenium is a browser automation framework that includes the Selenium Server, the WebDriver APIs and the WebDriver browser drivers.
Protractor with Selenium
If we talk about the conjunction of Protractor and Selenium, Protractor can work with Selenium server to provide an automated test infrastructure. The infrastructure can simulate users interaction with an angular application that is running in a browser or on mobile device. The conjunction of Protractor and Selenium can be divided into three partitions namely test, server and Browser, as shown in the following diagram −
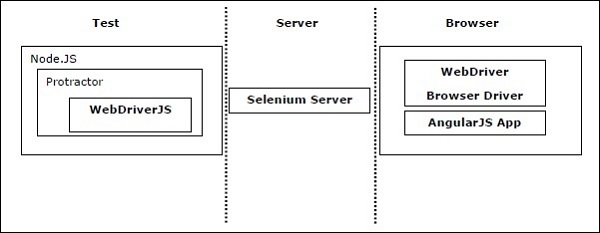
Selenium WebDriver Processes
As we have seen in the above diagram, a test using Selenium WebDriver involves the following three processes −
- The test scripts
- The server
- The browser
In this section, let us discuss the communication between these three processes.
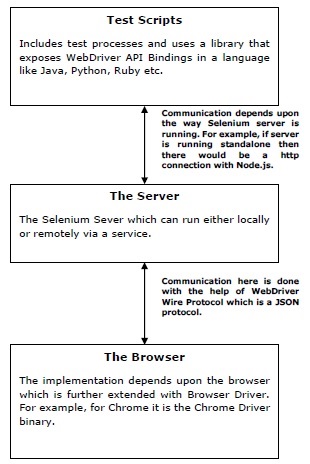
Communication between Test Scripts & Server
The communication between the first two processes - the test scripts and the server depends upon the working of Selenium Server. In other words, we can say that the way Selenium server is running will give the shape to the communication process between test scripts and server.
Selenium server can run locally on our machine as standalone Selenium Server (selenium-server-standalone.jar) or it can run remotely via a service (Sauce Labs). In case of standalone Selenium server, there would be an http communication between Node.js and selenium server.
Communication between the server and the browser
As we know that the server is responsible for forwarding commands to the browser after interpreting the same from the test scripts. That is why server and the browser also require a communication medium and here the communication is done with the help of JSON WebDriver Wire Protocol. The browser extended with Browser Driver that is used to interpret the commands.
The above concept about Selenium WebDriver processes and their communication can be understood with the help of following diagram −
While working with Protractor, the very first process, that is test script is run using Node.js but before performing any action on the browser it will send an extra command to make it sure that the application being tested is stabilized.
Setting up Selenium Server
Selenium Server acts like a proxy server in between our test script and the browser driver. It basically forwards the command from our test script to the WebDriver and returns the responses from the WebDriver to our test script. There are following options for setting up the Selenium server which are included in conf.js file of test script −
Standalone Selenium Server
If we want to run the server on our local machine, we need to install standalone selenium server. The prerequisite to install standalone selenium server is JDK (Java Development Kit). We must have JDK installed on our local machine. We can check it by running the following command from command line −
java -version
Now, we have the option to install and start Selenium Server manually or from test script.
Installing and starting Selenium server manually
For installing and starting Selenium server manually, we need to use WebDriver-Manager command line tool that comes with Protractor. The steps for installing and starting Selenium server are as follows −
Step 1 − The first step is to install the Selenium server and ChromeDriver. It can be done with the help of running following command −
webdriver-manager update
Step 2 − Next, we need to start the server. It can be done with the help of running following command −
webdriver-manager start
Step 3 − At last we need to set seleniumAddress in config file to the address of the running server. The default address would be http://localhost:4444/wd/hub.
Starting Selenium server from a Test Script
For starting Selenium server from a Test Script, we need to set the following options in our config file −
Location of jar file − We need to set the location of jar file for standalone Selenium server in config file by setting seleniumServerJar.
Specifying the port − We also need to specify the port to use to start the standalone Selenium Server. It can be specified in config file by setting seleniumPort. The default port is 4444.
Array of command line options − We also need to set the array of command line options to pass to the server. It can be specified in config file by setting seleniumArgs. If you need full list of array of commands, then start the server with the -help flag.
Working with Remote Selenium Server
Another option for running our test is to use Selenium server remotely. The prerequisite for using server remotely is that we must have an account with a service that hosts the server. While working with Protractor we have the built-in support for the following services hosting the server −
TestObject
For using TestObject as the remote Selenium Server, we need to set the testobjectUser, the user name of our TestObject account and testobjectKey, the API key of our TestObject account.
BrowserStack
For using BrowserStack as the remote Selenium Server, we need to set the browserstackUser, the user name of our BrowserStack account and browserstackKey, the API key of our BrowserStack account.
Sauce Labs
For using Sauce Labs as the remote Selenium Server, we need to set the sauceUser, the user name of our Sauce Labs account and SauceKey, the API key of our Sauce Labs account.
Kobiton
For using Kobiton as the remote Selenium Server we need to set the kobitonUser, the user name of our Kobiton account and kobitonKey, the API key of our Kobiton account.
Directly connecting to Browser Driver without using Selenium Server
One more option for running our test is to connect to the Browser Driver directly without using Selenium server. Protractor can test directly, without the use of Selenium Server, against Chrome and Firefox by setting directConnect: true in config file.
Setting up the Browser
Before configuring and setting up the browser, we need to know which browsers are supported by Protractor. The following is the list of browsers supported by Protractor −
- ChromeDriver
- FirefoxDriver
- SafariDriver
- IEDriver
- Appium-iOS/Safari
- Appium-Android/Chrome
- Selendroid
- PhantomJS
For setting and configuring the browser, we need to move to config file of Protractor because the browser setup is done within the capabilities object of config file.
Setting up Chrome
For setting up the Chrome Browser, we need to set the capabilities object as follows
capabilities: {
   'browserName': 'chrome'
}
We can also add Chrome-Specific options which are nested in the chromeOptions and its full list can be seen at https://sites.google.com/a/chromium.org/chromedriver/capabilities.
For example, if you want to add FPS-counter in the upper right, then it can be done as follows in the config file −
capabilities: {
   'browserName': 'chrome',
   'chromeOptions': {
      'args': ['show-fps-counter=true']
   }
},
Setting up Firefox
For setting up the Firefox browser, we need to set the capabilities object as follows −
capabilities: {
   'browserName': 'firefox'
}
We can also add Firefox-Specific options which are nested in the moz:firefoxOptions object and its full list can be seen at https://github.com/mozilla/geckodriver#firefox-capabilities.
For example, if you want to run your test on Firefox in safe mode then it can be done as follows in the config file −
capabilities: {
   'browserName': 'firefox',
   'moz:firefoxOptions': {
     'args': ['safe-mode']
   }
},
Setting up other browser
For setting up any other browser than Chrome or Firefox, we need to install a separate binary from https://docs.seleniumhq.org/download/.
Setting up PhantonJS
Actually, PhantomJS is no longer supported because of its crashing issues. Instead of that it is recommended to use headless Chrome or headless Firefox. They can be set up as follows −
For setting up headless Chrome, we need to start Chrome with the headless flag as follows −
capabilities: {
   'browserName': 'chrome',
   'chromeOptions': {
      'args': [--headless, --disable-gpu, --window-size=800,600]
   }
},
For setting up headless Firefox, we need to start Firefox with the headless flag as follows −
capabilities: {
   'browserName': 'firefox',
   'moz:firefoxOptions': {
      'args': [--headless]
   }
},
Setting up multiple browsers for testing
We can also test against multiple browsers. For this we need to use multiCapabilities configuration option as follows −
multiCapabilities: [{
   'browserName': 'chrome'
},{
   'browserName': 'firefox'
}]
Which Framework?
Two BDD (Behavior driven development) test frameworks, Jasmine and Mocha are supported by Protractor. Both frameworks are based on JavaScript and Node.js. The syntax, report and scaffolding, required for writing and managing the tests, are provided by these frameworks.
Next, we see how we can install various frameworks −
Jasmine framework
It is the default test framework for Protractor. When you install Protractor, you will get Jasmine 2.x version with it. We do not need to get it installed separately.
Mocha framework
Mocha is another JavaScript test framework basically running on Node.js. For using Mocha as our test framework, we need to use the BDD (Behavior driven development) interface and Chai assertions with Chai As Promised. The installation can be done with the help of following commands −
npm install -g mocha
npm install chai
npm install chai-as-promised
As you can see, -g option is used while installing mocha, it is because we have installed Protractor globally using the -g option. After installing it, we need to require and set up Chai inside our test files. It can be done as follows −
var chai = require('chai');
var chaiAsPromised = require('chai-as-promised');
chai.use(chaiAsPromised);
var expect = chai.expect;
After this, we can use Chai As Promised as such −
expect(myElement.getText()).to.eventually.equal('some text');
Now, we need to set the framework property to mocha of config file by adding framework: mocha. The options like reporter and slow for mocha can be added in config file as follows −
mochaOpts: {
   reporter: "spec", slow: 3000
}
Cucumber Framework
For using Cucumber as our test framework, we need to integrate it with Protractor with framework option custom. The installation can be done with the help of following commands
npm install -g cucumber
npm install --save-dev protractor-cucumber-framework
As you can see, -g option is used while installing Cucumber, it is because we have installed Protractor globally i.e. with -g option. Next, we need to set the framework property to custom of config file by adding framework: custom and frameworkPath: Protractor-cucumber-framework to the config file named cucumberConf.js.
The sample code shown below is a basic cucumberConf.js file which can be used to run cucumber feature files with Protractor −
exports.config = {
   seleniumAddress: 'http://localhost:4444/wd/hub',

   baseUrl: 'https://angularjs.org/',

   capabilities: {
      browserName:'Firefox'
   },

   framework: 'custom',

   frameworkPath: require.resolve('protractor-cucumber-framework'),

   specs: [
      './cucumber/*.feature'
   ],

   // cucumber command line options
   cucumberOpts: {
      require: ['./cucumber/*.js'],
      tags: [],
      strict: true,
      format: ["pretty"],
      'dry-run': false,
      compiler: []
   },
   onPrepare: function () {
      browser.manage().window().maximize();
   }
};
