- Protractor - Home
- Protractor - Introduction
- Concepts of Javascript Testing
- Protractor - Getting Started
- Protractor and Selenium Server
- Protractor - Writing the First Test
- Protractor - Core APIs
- Protractor - Core APIs(Contd..)
- Protractor - Objects
- Protractor - Debugging
- Protractor - Style Guide for Protractor
- Protractor Useful Resources
- Protractor - Quick Guide
- Protractor - Useful Resources
- Protractor - Discussion
Protractor - Quick Guide
Protractor - Introduction
This chapter gives you an introduction to Protractor, where you will learn about the origin of this testing framework and why you have to choose this, working and limitations of this tool.
What is Protractor?
Protractor is an open source end-to-end testing framework for Angular and AngularJS applications. It was built by Google on the top of WebDriver. It also serves as a replacement for the existing AngularJS E2E testing framework called Angular Scenario Runner.
It also works as a solution integrator that combines powerful technologies such as NodeJS, Selenium, Jasmine, WebDriver, Cucumber, Mocha etc. Along with testing of AngularJS application, it also writes automated regression tests for normal web applications. It allows us to test our application just like a real user because it runs the test using an actual browser.
The following diagram will give a brief overview of Protractor −
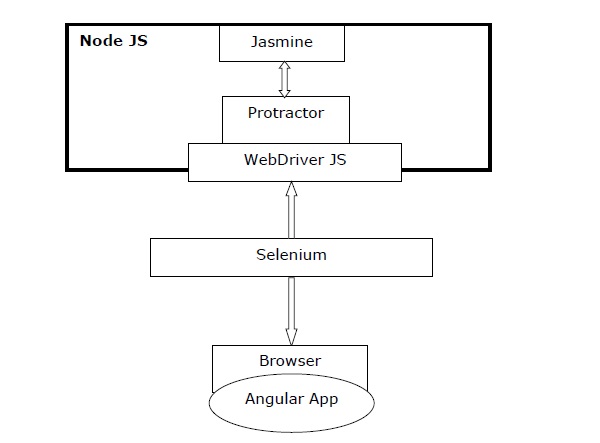
Observe that in the above diagram, we have −
Protractor − As discussed earlier, it is a wrapper over WebDriver JS especially designed for angular apps.
Jasmine − It is basically a behavior-driven development framework for testing the JavaScript code. We can write the tests easily with Jasmine.
WebDriver JS − It is a Node JS bindings implementation for selenium 2.0/WebDriver.
Selenium − It simply automates the browser.
Origin
As said earlier, Protractor is a replacement for the existing AngularJS E2E testing framework called Angular Scenario Runner. Basically, the origin of Protractor starts with the end of Scenario Runner. A question that arises here is why do we need to build Protractor? To understand this, we first need to check about its predecessor - Scenario Runner.
Protractors Inception
Julie Ralph, the prime contributor to the development of Protractor, had the following experience with Angular Scenario Runner on other project within Google. This further became the motivation to build Protractor, specially to fill the gaps −
We tried using Scenario Runner and we found that it really just couldnt do the things that we needed to test. We needed to test things like logging in. Your login page is not an Angular page, and the Scenario Runner couldnt deal with that. And it couldnt deal with things like popups and multiple windows, navigating the browser history, stuff like that.
The biggest advantage to the Protractor was the maturity of Selenium project and it wraps up its methods so that it can be easily used for Angular projects. The design of Protractor is built in such a way that it tests all layers such that web UI, backend services, persistence layer and so on of an application.
Why Protractor?
As we know that almost all the applications are using JavaScript for development. The task of testers becomes difficult when JavaScript increases in size and becomes complex for applications due to the increasing number of the applications itself. Most of the times it becomes very difficult to capture the web elements in AngularJS applications, uses extended HTML syntax to express web application components, by using JUnit or Selenium WebDriver.
The question here is that why Selenium Web Driver is not able to find AngularJS web elements? The reason is because AngularJS applications are having some extended HTML attributes like ng-repeater, ng-controller and ng-model etc. which are not included in Selenium locators.
Here, the importance of Protractor comes into existence because Protractor on the top of Selenium can handle and control those extended HTML elements in AngularJS web applications. That is why we can say that most of the frameworks focus on conducting unit tests for AngularJS applications, Protractor used to do testing of the actual functionality of an application.
Working of Protractor
Protractor, the testing framework, works in conjunction with Selenium to provide an automated test infrastructure for simulating a users interaction with an AngularJS application that is running in browser or mobile device.
The working of Protractor can be understood with the help of following steps −
Step 1 − In the first step, we need to write the tests. It can be done with the help of Jasmine or Mocha or Cucumber.
Step 2 − Now, we need to run the test which can be done with the help of Protractor. It is also called test runner.
Step 3 − In this step, Selenium server will help to manage the browsers.
Step 4 − At last, the browser APIs are invoked with the help of Selenium WebDriver.
Advantages
This open source end-to-end testing framework offers the following advantages −
An open source tool, Protractor is very easy to install and setup.
Works well with Jasmine framework to create the test.
Supports test driven development (TDD).
Contains automatic waits which means we do not need to explicitly add waits and sleeps to our test.
Offers all the advantages of Selenium WebDriver.
Supports parallel testing through multiple browsers.
Provides the benefit of auto-synchronization.
Has excellent testing speed.
Limitations
This open source end-to-end testing framework possesses the following limitations −
Does not uncover any verticals in browser automation because it is a wrapper for WebDriver JS.
Knowledge of JavaScript is essential for the user, because it is available only for JavaScript.
Only provides front-end testing because it is a UI driven testing tool.
Protractor - Concepts of Javascript Testing
Since the knowledge of JavaScript is essential for working with Protractor, in this chapter, let us understand the concepts of JavaScript testing in detail.
JavaScript Testing and Automation
JavaScript is the most popular dynamically typed and interpreted scripting language, but the most challenging task is to test the code. It is because, unlike other compiled languages like JAVA, and C++, there are no compilation steps in JavaScript that can help the tester to figure out errors. Besides, browser-based testing is very time consuming; hence there is a necessity for tools that support automated testing for JavaScript.
Concepts of Automated Testing
It is always a good practice to write the test because it makes the code better; the issue with manual testing is that it is a bit time consuming and error prone. The process of manual testing is quite boring for programmer too as they need to repeat the process, writing test specs, change the code and refresh the browser several times. Besides, manual testing also slows down the development process.
Due to the above reasons, it is always useful to have some tools that can automate these tests and help programmers to get rid of these repetitive and boring steps. What should a developer do to make the testing process automated?
Basically, a developer can implement the tool set in the CLI (Command Line Interpreter) or in the development IDE (Integrated development environment). Then, these tests will run continuously in a separate process even without the input from the developer. Automated testing of JavaScript is also not new and lots of tools like Karma, Protractor, CasperJS etc. have been developed.
Types of Testing for JavaScript
There can be different tests for different purposes. For example, some tests are written to check the behavior of functions in a program, while some other are written to test the flow of a module or feature. Thus, we have the following two types of testing −
Unit Testing
The testing is done on the smallest testable part of the program called unit. The unit is basically tested in isolation without any kind of dependency of that unit on the other parts. In case of JavaScript, the individual method or function having a specific behavior can be a unit of code and these units of code must be tested in an isolated way.
One of the advantages of unit testing is that the testing of units can be done in any order because the units are independent of each other. Another advantage of unit testing which really counts is that it can run the test at any time as follows −
- From the very beginning of the development process.
- After completing the development of any module/feature.
- After modifying any module/feature.
- After adding any new feature in the existing application.
For automated unit testing of JavaScript applications, we can choose from many testing tools and frameworks such as Mocha, Jasmine and QUnit.
End-to-End Testing
It may be defined as the testing methodology used to test whether the flow of the application from start to finish (from one end to another end) is working fine as per design.
End-to-end testing is also called function/flow testing. Unlike unit testing, end-to-end testing tests how individual components work together as an application. This is the main difference between unit testing and end-to-end testing.
For example, suppose if we have a registration module where the user needs to provide some valid information to complete the registration then the E2E testing for that particular module will follow following steps to complete the testing −
- First, it will load/compile the form or module.
- Now, it will get the DOM (Document object model) of the forms elements.
- Next, trigger the click event of the submit button for checking if it is working or not.
- Now, for validation purpose collect the value from the input fields.
- Next, the input fields should be validated.
- For testing purpose, call a fake API to store the data.
Every step gives its own results which will be compared with the expected result set.
Now, the question that arises is, while this kind of E2E or functional testing can be performed manually also, why we need automation for this? The main reason is that automation will make this test process easy. Some of the available tools that can be easily integrate with any application, for this purpose are Selenium, PhantomJS and Protractor.
Testing Tools & Frameworks
We have various testing tools and frameworks for Angular testing. The following are some of the well-known tools and frameworks −
Karma
Karma, created by Vojta Jina, is a test runner. Originally this project was called Testacular. It is not a test framework, which means that it gives us the ability to easily and automatically run JavaScript unit tests on real browsers. Karma was built for AngularJS because before Karma there was no automated testing tool for web-based JavaScript developers. On the other hand, with the automation provided by Karma, developers can run a simple single command and determine whether an entire test suite has passed or failed.
Pros of using Karma
The following are some pros of using Karma in comparison to the manual process −
- Automates tests in multiple browsers as well as devices.
- Monitors files for errors and fixes them.
- Provides online support and documentation.
- Eases the integration with a continuous integration server.
Cons of Using Karma
The followings are some cons of using Karma −
The main disadvantage of using Karma is that it requires an additional tool to configure and maintain.
If you are using Karma test runner with Jasmine, then less documentation is available for finding information about setting up your CSS in the case of having multiple ids for one element.
Jasmine
Jasmine, a behavior-driven development framework for testing JavaScript code, is developed at Pivotal Labs. Before the active development of Jasmine framework, a similar unit testing framework named JsUnit was also developed by Pivotal Labs, which has an inbuilt test runner. The browsers tests can be run through Jasmine tests by including SpecRunner.html file or by using it as a command line test runner also. It can be used with or without Karma also.
Pros of Using Jasmine
The followings are some pros of using Jasmine −
A framework independent of browser, platform and language.
Supports test driven development (TDD) along with behavioral driven development.
Has default integration with Karma.
Easy to understand syntax.
Provides test spies, fakes and pass-through functionalities which assist with testing as additional functions.
Cons of Using Jasmine
The following is a con of using Jasmine −
The tests must be return by the user as they change because there is no file-watching feature available in Jasmine while running test.
Mocha
Mocha, written for Node.js applications, is a testing framework but it also supports browser testing. It is quite like Jasmine but the major difference between them is that Mocha needs some plugin and library because it cannot run standalone as a test framework. On the other hand, Jasmine is standalone. However, Mocha is more flexible to use than Jasmine.
Pros of using Mocha
The following are some pros of using Mocha −
- Mocha is very easy to install and configure.
- User-friendly and simple documentation.
- Contains plugins with several node projects.
Cons of using Mocha
The following are some cons of using Mocha −
- It needs separate modules for assertions, spies etc.
- It also requires additional configuration for using with Karma.
QUnit
QUint, originally developed by John Resig in 2008 as part of jQuery, is a powerful yet easy-to-use JavaScript unit test suite. It can be used to test any generic JavaScript code. Although it focuses on testing JavaScript in the browser, yet it is very convenient to use by the developer.
Pros of using QUnit
The following are some pros of using QUnit −
- Easy to install and configure.
- User-friendly and simple documentation.
Cons of using QUnit
The following is a con of using QUnit −
- It was mainly developed for jQuery and hence not so good for use with other frameworks.
Selenium
Selenium, originally developed by Jason Huggins in 2004 as an internal tool at ThoughtWorks, is an open source testing automation tool. Selenium defines itself as Selenium automates browsers. Thats it!. Automation of browsers means that the developers can interact with the browsers very easily.
Pros of using Selenium
The following are some pros of using Selenium −
- Contains large feature set.
- Supports distributed testing.
- Has SaaS support through services such as Sauce Labs.
- Easy to use with simple documentations and rich resources available.
Cons of using Selenium
The followings are some cons of using Selenium −
- A main disadvantage of using Selenium is that it must be run as a separate process.
- Configuration is a bit cumbersome as the developer needs to follow several steps.
Protractor - Getting Started
In the previous chapters, we have learnt the basics of Protractor. In this chapter, let us learn how to install and configure it.
Prerequisites
We need to satisfy the following prerequisites before installing Protractor on your computer −
Node.js
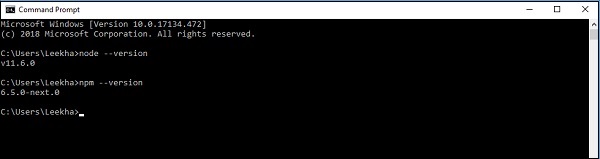
Protractor is a Node.js module, hence the very important prerequisite is that we must have Node.js installed on our computer. We are going to install Protractor package using npm (a JavaScript package manager), that comes with Node.js.
For installing Node.js please follow the official link − https://nodejs.org/en/download/. After installing Node.js, you can check the version of Node.js and npm by writing the command node --version and npm --version in the command prompt as shown below −
Chrome
Google Chrome, a web browser built by Google, will be used to run end-to-end tests in Protractor without the need for a Selenium server. You can download chrome by clicking on the link − https://www.google.com/chrome/.
Selenium WebDriver for Chrome
This tool is provided with the Protractor npm module and allows us to interact with web applications.
Installing Protractor
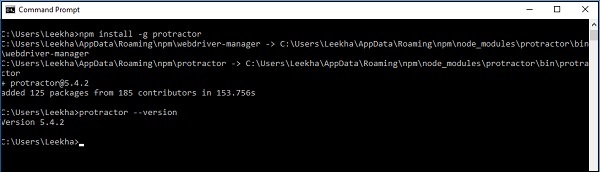
After installing Node.js on our computer, we can install Protractor with the help of following command −
npm install -g protractor
Once protractor is successfully installed, we can check its version by writing protractor --version command in the command prompt as shown below −
Installing WebDriver for Chrome
After installing Protractor, we need to install Selenium WebDriver for Chrome. It can be installed with the help of following command −
webdriver-manager update
The above command will create a Selenium directory which contains the required Chrome driver used in the project.
Confirming Installation & Configuration
We can confirm the installation and configurati on of Protractor by doing a slightly changing the conf.js provided in the example after installing Protractor. You can find this conf.js file in the root directory node_modules/Protractor/example.
For this, first create a new file named testingconfig.js in the same directory i.e. node_modules/Protractor/example.
Now, in the conf.js file, under the source file declaration parameter, write testingconfig.js.
Next, save and close all the files and open command prompt. Run the conf.js file as shown in the screenshot given below.
The configuration and installation of Protractor is successful if you got the output as shown below −
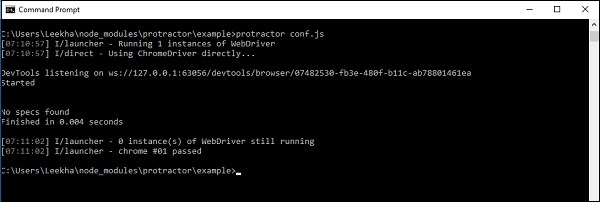
The above output shows that there is no specification because we provided the empty file at source file declaration parameter in conf.js file. But from the above output, we can see that both protractor and WebDriver are running successfully.
Issues in installation & configuration
While installing and configuring Protractor and WebDriver, we might come across the following common issues −
Selenium not installed correctly
It is the most common issue while installing WebDriver. This issue arises if you do not update the WebDriver. Note that we must update WebDriver, otherwise we would not be able to reference it to Protractor installation.
Not able to find tests
Another common issue is that after running Protractor, it shows that unable to find tests. For this,we must have to ensure that the relative paths, filenames or extensions are correct. We also need to write conf.js file very carefully because it starts with configuration file itself.
Protractor - Protractor And Selenium Server
As discussed earlier, Protractor is an open source, end-to-end testing framework for Angular and AngularJS applications. It is Node.js program. On the other hand, Selenium is a browser automation framework that includes the Selenium Server, the WebDriver APIs and the WebDriver browser drivers.
Protractor with Selenium
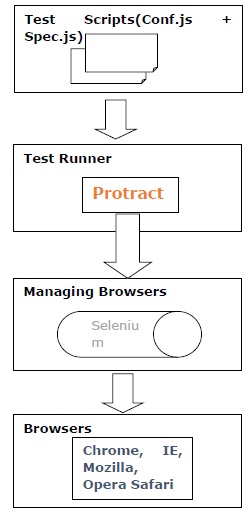
If we talk about the conjunction of Protractor and Selenium, Protractor can work with Selenium server to provide an automated test infrastructure. The infrastructure can simulate users interaction with an angular application that is running in a browser or on mobile device. The conjunction of Protractor and Selenium can be divided into three partitions namely test, server and Browser, as shown in the following diagram −
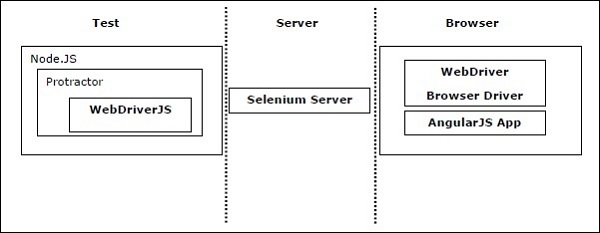
Selenium WebDriver Processes
As we have seen in the above diagram, a test using Selenium WebDriver involves the following three processes −
- The test scripts
- The server
- The browser
In this section, let us discuss the communication between these three processes.
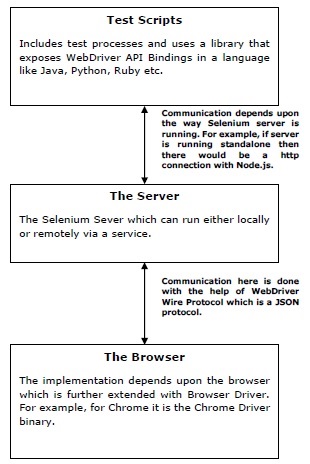
Communication between Test Scripts & Server
The communication between the first two processes - the test scripts and the server depends upon the working of Selenium Server. In other words, we can say that the way Selenium server is running will give the shape to the communication process between test scripts and server.
Selenium server can run locally on our machine as standalone Selenium Server (selenium-server-standalone.jar) or it can run remotely via a service (Sauce Labs). In case of standalone Selenium server, there would be an http communication between Node.js and selenium server.
Communication between the server and the browser
As we know that the server is responsible for forwarding commands to the browser after interpreting the same from the test scripts. That is why server and the browser also require a communication medium and here the communication is done with the help of JSON WebDriver Wire Protocol. The browser extended with Browser Driver that is used to interpret the commands.
The above concept about Selenium WebDriver processes and their communication can be understood with the help of following diagram −
While working with Protractor, the very first process, that is test script is run using Node.js but before performing any action on the browser it will send an extra command to make it sure that the application being tested is stabilized.
Setting up Selenium Server
Selenium Server acts like a proxy server in between our test script and the browser driver. It basically forwards the command from our test script to the WebDriver and returns the responses from the WebDriver to our test script. There are following options for setting up the Selenium server which are included in conf.js file of test script −
Standalone Selenium Server
If we want to run the server on our local machine, we need to install standalone selenium server. The prerequisite to install standalone selenium server is JDK (Java Development Kit). We must have JDK installed on our local machine. We can check it by running the following command from command line −
java -version
Now, we have the option to install and start Selenium Server manually or from test script.
Installing and starting Selenium server manually
For installing and starting Selenium server manually, we need to use WebDriver-Manager command line tool that comes with Protractor. The steps for installing and starting Selenium server are as follows −
Step 1 − The first step is to install the Selenium server and ChromeDriver. It can be done with the help of running following command −
webdriver-manager update
Step 2 − Next, we need to start the server. It can be done with the help of running following command −
webdriver-manager start
Step 3 − At last we need to set seleniumAddress in config file to the address of the running server. The default address would be http://localhost:4444/wd/hub.
Starting Selenium server from a Test Script
For starting Selenium server from a Test Script, we need to set the following options in our config file −
Location of jar file − We need to set the location of jar file for standalone Selenium server in config file by setting seleniumServerJar.
Specifying the port − We also need to specify the port to use to start the standalone Selenium Server. It can be specified in config file by setting seleniumPort. The default port is 4444.
Array of command line options − We also need to set the array of command line options to pass to the server. It can be specified in config file by setting seleniumArgs. If you need full list of array of commands, then start the server with the -help flag.
Working with Remote Selenium Server
Another option for running our test is to use Selenium server remotely. The prerequisite for using server remotely is that we must have an account with a service that hosts the server. While working with Protractor we have the built-in support for the following services hosting the server −
TestObject
For using TestObject as the remote Selenium Server, we need to set the testobjectUser, the user name of our TestObject account and testobjectKey, the API key of our TestObject account.
BrowserStack
For using BrowserStack as the remote Selenium Server, we need to set the browserstackUser, the user name of our BrowserStack account and browserstackKey, the API key of our BrowserStack account.
Sauce Labs
For using Sauce Labs as the remote Selenium Server, we need to set the sauceUser, the user name of our Sauce Labs account and SauceKey, the API key of our Sauce Labs account.
Kobiton
For using Kobiton as the remote Selenium Server we need to set the kobitonUser, the user name of our Kobiton account and kobitonKey, the API key of our Kobiton account.
Directly connecting to Browser Driver without using Selenium Server
One more option for running our test is to connect to the Browser Driver directly without using Selenium server. Protractor can test directly, without the use of Selenium Server, against Chrome and Firefox by setting directConnect: true in config file.
Setting up the Browser
Before configuring and setting up the browser, we need to know which browsers are supported by Protractor. The following is the list of browsers supported by Protractor −
- ChromeDriver
- FirefoxDriver
- SafariDriver
- IEDriver
- Appium-iOS/Safari
- Appium-Android/Chrome
- Selendroid
- PhantomJS
For setting and configuring the browser, we need to move to config file of Protractor because the browser setup is done within the capabilities object of config file.
Setting up Chrome
For setting up the Chrome Browser, we need to set the capabilities object as follows
capabilities: {
   'browserName': 'chrome'
}
We can also add Chrome-Specific options which are nested in the chromeOptions and its full list can be seen at https://sites.google.com/a/chromium.org/chromedriver/capabilities.
For example, if you want to add FPS-counter in the upper right, then it can be done as follows in the config file −
capabilities: {
   'browserName': 'chrome',
   'chromeOptions': {
      'args': ['show-fps-counter=true']
   }
},
Setting up Firefox
For setting up the Firefox browser, we need to set the capabilities object as follows −
capabilities: {
   'browserName': 'firefox'
}
We can also add Firefox-Specific options which are nested in the moz:firefoxOptions object and its full list can be seen at https://github.com/mozilla/geckodriver#firefox-capabilities.
For example, if you want to run your test on Firefox in safe mode then it can be done as follows in the config file −
capabilities: {
   'browserName': 'firefox',
   'moz:firefoxOptions': {
     'args': ['safe-mode']
   }
},
Setting up other browser
For setting up any other browser than Chrome or Firefox, we need to install a separate binary from https://docs.seleniumhq.org/download/.
Setting up PhantonJS
Actually, PhantomJS is no longer supported because of its crashing issues. Instead of that it is recommended to use headless Chrome or headless Firefox. They can be set up as follows −
For setting up headless Chrome, we need to start Chrome with the headless flag as follows −
capabilities: {
   'browserName': 'chrome',
   'chromeOptions': {
      'args': [--headless, --disable-gpu, --window-size=800,600]
   }
},
For setting up headless Firefox, we need to start Firefox with the headless flag as follows −
capabilities: {
   'browserName': 'firefox',
   'moz:firefoxOptions': {
      'args': [--headless]
   }
},
Setting up multiple browsers for testing
We can also test against multiple browsers. For this we need to use multiCapabilities configuration option as follows −
multiCapabilities: [{
   'browserName': 'chrome'
},{
   'browserName': 'firefox'
}]
Which Framework?
Two BDD (Behavior driven development) test frameworks, Jasmine and Mocha are supported by Protractor. Both frameworks are based on JavaScript and Node.js. The syntax, report and scaffolding, required for writing and managing the tests, are provided by these frameworks.
Next, we see how we can install various frameworks −
Jasmine framework
It is the default test framework for Protractor. When you install Protractor, you will get Jasmine 2.x version with it. We do not need to get it installed separately.
Mocha framework
Mocha is another JavaScript test framework basically running on Node.js. For using Mocha as our test framework, we need to use the BDD (Behavior driven development) interface and Chai assertions with Chai As Promised. The installation can be done with the help of following commands −
npm install -g mocha
npm install chai
npm install chai-as-promised
As you can see, -g option is used while installing mocha, it is because we have installed Protractor globally using the -g option. After installing it, we need to require and set up Chai inside our test files. It can be done as follows −
var chai = require('chai');
var chaiAsPromised = require('chai-as-promised');
chai.use(chaiAsPromised);
var expect = chai.expect;
After this, we can use Chai As Promised as such −
expect(myElement.getText()).to.eventually.equal('some text');
Now, we need to set the framework property to mocha of config file by adding framework: mocha. The options like reporter and slow for mocha can be added in config file as follows −
mochaOpts: {
   reporter: "spec", slow: 3000
}
Cucumber Framework
For using Cucumber as our test framework, we need to integrate it with Protractor with framework option custom. The installation can be done with the help of following commands
npm install -g cucumber
npm install --save-dev protractor-cucumber-framework
As you can see, -g option is used while installing Cucumber, it is because we have installed Protractor globally i.e. with -g option. Next, we need to set the framework property to custom of config file by adding framework: custom and frameworkPath: Protractor-cucumber-framework to the config file named cucumberConf.js.
The sample code shown below is a basic cucumberConf.js file which can be used to run cucumber feature files with Protractor −
exports.config = {
   seleniumAddress: 'http://localhost:4444/wd/hub',

   baseUrl: 'https://angularjs.org/',

   capabilities: {
      browserName:'Firefox'
   },

   framework: 'custom',

   frameworkPath: require.resolve('protractor-cucumber-framework'),

   specs: [
      './cucumber/*.feature'
   ],

   // cucumber command line options
   cucumberOpts: {
      require: ['./cucumber/*.js'],
      tags: [],
      strict: true,
      format: ["pretty"],
      'dry-run': false,
      compiler: []
   },
   onPrepare: function () {
      browser.manage().window().maximize();
   }
};
Protractor - Writing the First Test
In this chapter, let us understand how to write the first test in Protractor.
Files required by Protractor
Protractor needs the following two files to run −
Spec or test file
It is one of the important files to run Protractor. In this file, we will write our actual test code. The test code is written by using the syntax of our testing framework.
For example, if we are using Jasmine framework, then the test code will be written by using the syntax of Jasmine. This file will contain all the functional flows and assertions of the test.
In simple words, we can say that this file contains the logic and locators to interact with the application.
Example
The following is a simple script, TestSpecification.js, having the test case to navigate to an URL and check for the page title −
//TestSpecification.js
describe('Protractor Demo', function() {
   it('to check the page title', function() {
      browser.ignoreSynchronization = true;
      browser.get('https://www.tutorialspoint.com/tutorialslibrary.htm');
      browser.driver.getTitle().then(function(pageTitle) {
         expect(pageTitle).toEqual('Free Online Tutorials and Courses');
      });
   });
});
Code Explanation
The code of above specification file can be explained as follows −
Browser
It is the global variable created by Protractor to handle all the browser level commands. It is basically a wrapper around an instance of WebDriver. browser.get() is a simple Selenium method that will tell Protractor to load a particular page.
describe and it − Both are the syntaxes of Jasmine test framework. The Describe is used to contain the end to end flow of our test case whereas it contains some of the test scenarios. We can have multiple it blocks in our test case program.
Expect − It is an assertion where we are comparing the web page title with some predefined data.
ignoreSynchronization − It is a tag of browser which is used when we will try to test non-angular websites. Protractor expects to work with angular websites only but if we want to work with non-angular websites, then this tag must be set to true.
Configuration File
As the name suggests, this file provides explanations for all the Protractor configuration options. It basically tells Protractor the following −
- Where to find the test or specs files
- Which browser to pick
- Which testing framework to use
- Where to talk with the Selenium Server
Example
The following is the simple script, config.js, having the test
// config.js
exports.config = {
   directConnect: true,

   // Capabilities to be passed to the webdriver instance.
   capabilities: {
      'browserName': 'chrome'
   },

   // Framework to use. Jasmine is recommended.
   framework: 'jasmine',

   // Spec patterns are relative to the current working directory when
   // protractor is called.
   specs: ['TestSpecification.js'],
Code Explanation
The code of above configuration file having three basic parameters, can be explained as follows −
Capabilities Parameter
This parameter is used to specify the name of the browser. It can be seen in the following code block of conf.js file −
exports.config = {
   directConnect: true,

   // Capabilities to be passed to the webdriver instance.
   capabilities: {
      'browserName': 'chrome'
},
As seen above, the name of the browser given here is chrome which is by default browser for Protractor. We can also change the name of the browser.
Framework Parameter
This parameter is used to specify the name of the testing framework. It can be seen in the following code block of config.js file −
exports.config = {
   directConnect: true,

   // Framework to use. Jasmine is recommended.
   framework: 'jasmine',
Here we are using jasmine test framework.
Source File Declaration Parameter
This parameter is used to specify the name of the source file declaration. It can be seen in the following code block of conf.js file −
exports.config = {
   directConnect: true,
   // Spec patterns are relative to the current working
   directory when protractor is called.
   specs: ['TsetSpecification.js'],
As seen above, the name of the source file declaration given here is TestSpecification.js. It is because, for this example we have created the specification file with name TestSpecification.js.
Executing the code
As we have got basic understanding about the necessary files and their coding for running Protractor, let us try to run the example. We can follow the following steps to execute this example −
Step 1 − First, open command prompt.
Step 2 − Next, we need go to the directory where we have saved our files namely config.js and TestSpecification.js.
Step 3 − Now, execute the config.js file by running the command Protrcator config.js.
The screen shot shown below will explain the above steps for executing the example −
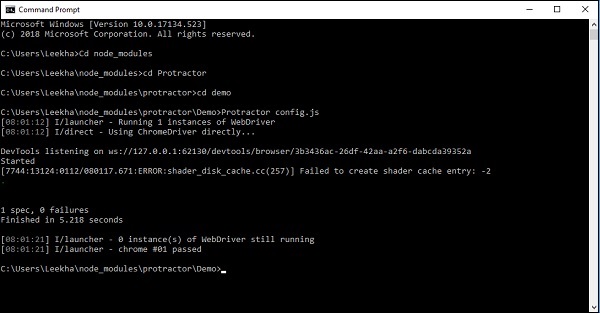
It is seen in the screen shot that the test has been passed.
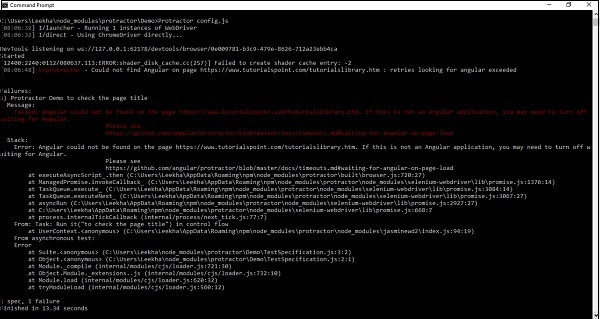
Now, suppose if we are testing non-angular websites and not putting the ignoreSynchronization tag to true then after executing the code we will get the error Angular could not be found on the page.
It can be seen in the following screen shot −
Report Generation
Till now, we have discussed about the necessary files and their coding for running test cases. Protractor is also able to generate the report for test cases. For this purpose, it supports Jasmine. JunitXMLReporter can be used to generate test execution reports automatically.
But before that, we need to install Jasmine reporter with the help of following command −
npm install -g jasmine-reporters
As you can see, -g option is used while installing Jasmine Reporters, it is because we have installed Protractor globally, with -g option.
After successfully installing jasmine-reporters, we need to add the following code into our previously used config.js file −
onPrepare: function(){ //configure junit xml report

   var jasmineReporters = require('jasmine-reporters');
   jasmine.getEnv().addReporter(new jasmineReporters.JUnitXmlReporter({
      consolidateAll: true,
      filePrefix: 'guitest-xmloutput',
      savePath: 'test/reports'
   }));
Now, our new config.js file would be as follows −
// An example configuration file.
exports.config = {
   directConnect: true,

   // Capabilities to be passed to the webdriver instance.
   capabilities: {
      'browserName': 'chrome'
   },

   // Framework to use. Jasmine is recommended.
   framework: 'jasmine',

   // Spec patterns are relative to the current working directory when
   // protractor is called.
   specs: ['TestSpecification.js'],
   //framework: "jasmine2", //must set it if you use JUnitXmlReporter
   onPrepare: function(){ //configure junit xml report
      var jasmineReporters = require('jasmine-reporters');
      jasmine.getEnv().addReporter(new jasmineReporters.JUnitXmlReporter({
         consolidateAll: true,
         filePrefix: 'guitest-xmloutput',
         savePath: 'reports'
      }));
   },
};
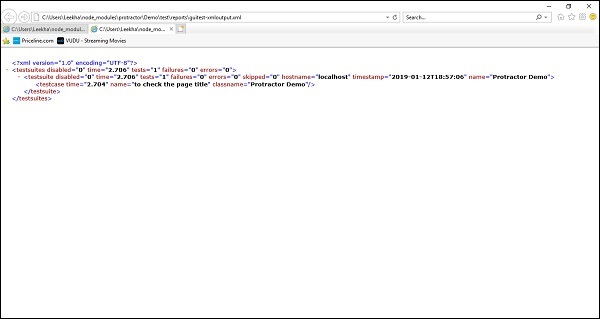
After running the above config file in the same way, we have run previously, it will generate an XML file containing the report under the root directory in reports folder. If the test got successful, the report will look like below −
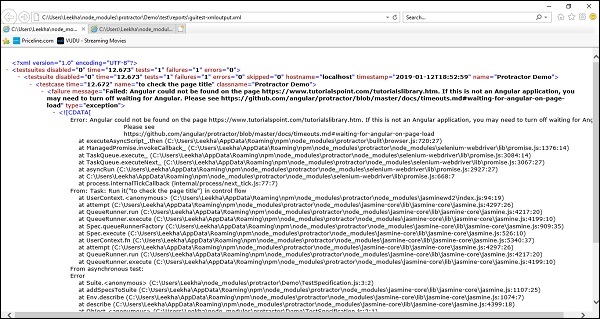
But, if the test failed, the report will look as shown below −
Protractor - Core APIS
This chapter lets you understand various core APIs that are key to the functioning of protractor.
Importance of Protractor APIs
Protractor provides us a wide range of APIs which are very important in order to perform the following actions for getting the current state of the website −
- Getting the DOM elements of the web page we are going to test.
- Interacting with the DOM elements.
- Assigning actions to them.
- Sharing information to them.
To perform the above tasks, it is very important to understand Protractor APIs.
Various Protractor APIs
As we know that Protractor is a wrapper around Selenium-WebDriver which is the WebDriver bindings for Node.js. Protractor has the following APIs −
Browser
It is a wrapper around an instance of WebDriver which is used to handle browser level commands such as navigation, page-wide information etc. For example, the browser.get method loads a page.
Element
It is used to search and interact with DOM element on the page we are testing. For this purpose, it requires one parameter for locating the element.
Locators (by)
It is a collection of element locator strategies. The elements, for example, can be found by CSS selector, by ID or by any other attribute they are bound to with ng-model.
Next, we are going to discuss in detail about these APIs and their functions.
Browser API
As discussed above, it is a wrapper around an instance of WebDriver for handling browser level commands. It performs various functions as follows −
Functions and Their Descriptions
The functions of ProtractorBrowser API are as follows−
browser.angularAppRoot
This function of Browser API sets the CSS selector for an element on which we are going to find Angular. Usually, this function is in body, but in case if our ng-app, it is on a sub-section of the page; it may be a sub-element also.
browser.waitForAngularEnabled
This function of Browser API can be set to true or false. As the name suggests, if this function is set for false then Protractor will not wait for Angular $http and $timeout tasks to complete before interacting with the browser. We can also read the current state without changing it by calling waitForAngularEnabled() without passing a value.
browser.getProcessedConfig
With the help of this browser APIs function we can get the processed configuration object, including specification & capabilities, that is currently being run.
browser.forkNewDriverInstance
As the name suggests this function will fork another instance of browser to be used in interactive tests. It can be run with control flow enabled and disabled. Example is given below for both the cases −
Example 1
Running browser.forkNewDriverInstance() with control flow enabled −
var fork = browser.forkNewDriverInstance();
fork.get(page1);
Example 2
Running browser.forkNewDriverInstance() with control flow disabled −
var fork = await browser.forkNewDriverInstance().ready;
await forked.get(page1);
browser.restart
As the name suggests, it will restart the browser by closing browser instance and creating new one. It can also run with control flow enabled and disabled. Example is given below for both the cases −
Example 1 − Running browser.restart() with control flow enabled −
browser.get(page1);
browser.restart();
browser.get(page2);
Example 2 − Running browser.forkNewDriverInstance() with control flow disabled −
await browser.get(page1);
await browser.restart();
await browser.get(page2);
browser.restartSync
It is similar to browser.restart() function. The only difference is that it returns the new browser instance directly rather than returning a promise resolving to the new browser instance. It can only run when the control flow is enabled.
Example − Running browser.restartSync() with control flow enabled −
browser.get(page1);
browser.restartSync();
browser.get(page2);
browser.useAllAngular2AppRoots
As the name suggests, it is compatible with Angular2 only. It will search through all the angular apps available on the page while finding elements or waiting for stability.
browser.waitForAngular
This browser API function instructs the WebDriver to wait until Angular has finished rendering and has no outstanding $http or $timeout calls before continuing.
browser.findElement
As the name suggests, this browser API function waits for Angular to finish rendering before searching for element.
browser.isElementPresent
As the name suggests, this browser API function will test for the for the element to be present on the page or not.
browser.addMockModule
It will add a module to load before Angular every time Protractor.get method is called.
Example
browser.addMockModule('modName', function() {
   angular.module('modName', []).value('foo', 'bar');
});
browser.clearMockModules
unlike browser.addMockModule, it will clear the list of registered mock modules.
browser.removeMockModule
As the name suggests, it will remove a register mock modules. Example: browser.removeMockModule(modName);
browser.getRegisteredMockModules
Opposite to browser.clearMockModule, it will get the list of registered mock modules.
browser.get
We can use browser.get() to navigate the browser to a particular web address and load the mock modules for that page before the Angular load.
Example
browser.get(url);
browser.get('http://localhost:3000');
// This will navigate to the localhost:3000 and will load mock module if needed
browser.refresh
As the name suggests, this will reload the current page and loads mock modules before Angular.
browser.navigate
As the name suggests, it is used to mix navigation methods back into the navigation object so that they are invoked as before. Example: driver.navigate().refresh().
browser.setLocation
It is use to browse to another page using in-page navigation.
Example
browser.get('url/ABC');
browser.setLocation('DEF');
expect(browser.getCurrentUrl())
   .toBe('url/DEF');
It will navigate from ABC to DEF page.
browser.debugger
As the name suggests, this must be used with protractor debug. This function basically adds a task to the control flow to pause the test and inject helper functions into the browser so that debugging can be done in browser console.
browser.pause
It is used for debugging WebDriver tests. We can use browser.pause() in our test to enter the protractor debugger from that point in the control flow.
Example
element(by.id('foo')).click();
browser.pause();
// Execution will stop before the next click action.
element(by.id('bar')).click();
browser.controlFlowEnabled
It is used to determine whether the control flow is enabled or not.
Protractor - Core APIS(CONTD)
In this chapter, let us learn some more core APIs of Protractor.
Elements API
Element is one of the global functions exposed by protractor. This function takes a locater and returns the following −
- ElementFinder, that finds a single element based on the locator.
- ElementArrayFinder, that finds an array of elements based on the locator.
Both the above support chaining methods as discussed below.
Chaining functions of ElementArrayFinder and their descriptions
The Followings are the functions of ElementArrayFinder −
element.all(locator).clone
As the name suggests, this function will create a shallow copy of the array of the elements i.e. ElementArrayFinder.
element.all(locator).all(locator)
This function basically returns a new ElementArrayFinder which could be empty or contain the children elements. It can be used for selecting multiple elements as an array as follows
Example
element.all(locator).all(locator)
elementArr.all(by.css(.childselector));
// it will return another ElementFindArray as child element based on child locator.
element.all(locator).filter(filterFn)
As the name suggests, after applying filter function to each element within ElementArrayFinder, it returns a new ElementArrayFinder with all elements that pass the filter function. It is basically having two arguments, first is ElementFinder and second is index. It can also be used in page objects.
Example
View
<ul class = "items">
   <li class = "one">First</li>
   <li class = "two">Second</li>
   <li class = "three">Third</li>
</ul>
Code
element.all(by.css('.items li')).filter(function(elem, index) {
   return elem.getText().then(function(text) {
      return text === 'Third';
   });
}).first().click();
element.all(locator).get(index)
With the help of this, we can get an element within the ElementArrayFinder by index. Note that the index starts at 0 and negative indices are wrapped.
Example
View
<ul class = "items">
   <li>First</li>
   <li>Second</li>
   <li>Third</li>
</ul>
Code
let list = element.all(by.css('.items li'));
expect(list.get(0).getText()).toBe('First');
expect(list.get(1).getText()).toBe('Second');
element.all(locator).first()
As the name suggests, this will get the first element for ElementArrayFinder. It will not retrieve the underlying element.
Example
View
<ul class = "items">
   <li>First</li>
   <li>Second</li>
   <li>Third</li>
</ul>
Code
let first = element.all(by.css('.items li')).first();
expect(first.getText()).toBe('First');
element.all(locator).last()
As name suggest, this will get the last element for ElementArrayFinder. It will not retrieve the underlying element.
Example
View
<ul class = "items">
   <li>First</li>
   <li>Second</li>
   <li>Third</li>
</ul>
Code
let first = element.all(by.css('.items li')).last();
expect(last.getText()).toBe('Third');
element.all(locator).all(selector)
It is used to find an array of elements within a parent when calls to $$ may be chained.
Example
View
<div class = "parent">
   <ul>
      <li class = "one">First</li>
      <li class = "two">Second</li>
      <li class = "three">Third</li>
   </ul>
</div>
Code
let items = element(by.css('.parent')).$$('li');
element.all(locator).count()
As the name suggests, this will count the number of elements represented by ElementArrayFinder. It will not retrieve the underlying element.
Example
View
<ul class = "items">
   <li>First</li>
   <li>Second</li>
   <li>Third</li>
</ul>
Code
let list = element.all(by.css('.items li'));
expect(list.count()).toBe(3);
element.all(locator).isPresent()
It will match the elements with the finder. It can return true or false. True, if there are any elements present that match the finder and False otherwise.
Example
expect($('.item').isPresent()).toBeTruthy();
element.all(locator).locator
As the name suggests, it will return the most relevant locator.
Example
$('#ID1').locator();
// returns by.css('#ID1')
$('#ID1').$('#ID2').locator();
// returns by.css('#ID2')
$$('#ID1').filter(filterFn).get(0).click().locator();
// returns by.css('#ID1')
element.all(locator).then(thenFunction)
It will retrieve the elements represented by the ElementArrayFinder.
Example
View
<ul class = "items">
   <li>First</li>
   <li>Second</li>
   <li>Third</li>
</ul>
Code
element.all(by.css('.items li')).then(function(arr) {
   expect(arr.length).toEqual(3);
});
element.all(locator).each(eachFunction)
As the name suggests, it will call the input function on each ElementFinder represented by the ElementArrayFinder.
Example
View
<ul class = "items">
   <li>First</li>
   <li>Second</li>
   <li>Third</li>
</ul>
Code
element.all(by.css('.items li')).each(function(element, index) {
   // It will print First 0, Second 1 and Third 2.
   element.getText().then(function (text) {
      console.log(index, text);
   });
});
element.all(locator).map(mapFunction)
As name suggest, it will apply a map function on each element within the ElementArrayFinder. It is having two arguments. First would be the ElementFinder and second would be the index.
Example
View
<ul class = "items">
   <li>First</li>
   <li>Second</li>
   <li>Third</li>
</ul>
Code
let items = element.all(by.css('.items li')).map(function(elm, index) {
   return {
      index: index,
      text: elm.getText(),
      class: elm.getAttribute('class')
   };
});
expect(items).toEqual([
   {index: 0, text: 'First', class: 'one'},
   {index: 1, text: 'Second', class: 'two'},
   {index: 2, text: 'Third', class: 'three'}
]);
element.all(locator).reduce(reduceFn)
As the name suggests, it will apply a reduce function against an accumulator and every element found using the locator. This function will reduce every element into a single value.
Example
View
<ul class = "items">
   <li>First</li>
   <li>Second</li>
   <li>Third</li>
</ul>
Code
let value = element.all(by.css('.items li')).reduce(function(acc, elem) {
   return elem.getText().then(function(text) {
      return acc + text + ' ';
   });
}, '');

expect(value).toEqual('First Second Third ');
element.all(locator).evaluate
As the name suggests, it will evaluate the input whether it is in the scope of the current underlying elements or not.
Example
View
<span class = "foo">{{letiableInScope}}</span>
Code
let value =
element.all(by.css('.foo')).evaluate('letiableInScope');
element.all(locator).allowAnimations
As name suggest, it will determine whether the animation is allowed on the current underlying elements or not.
Example
element(by.css('body')).allowAnimations(false);
Chaining functions of ElementFinder and their descriptions
Chaining functions of ElementFinder and their descriptions −
element(locator).clone
As the name suggests, this function will create a shallow copy of the ElementFinder.
element(locator).getWebElement()
It will return the WebElement represented by this ElementFinder and a WebDriver error will be thrown if the element does not exist.
Example
View
<div class="parent">
   some text
</div>
Code
// All the four following expressions are equivalent.
$('.parent').getWebElement();
element(by.css('.parent')).getWebElement();
browser.driver.findElement(by.css('.parent'));
browser.findElement(by.css('.parent'));
element(locator).all(locator)
It will find an array of elements within a parent.
Example
View
<div class = "parent">
   <ul>
      <li class = "one">First</li>
      <li class = "two">Second</li>
      <li class = "three">Third</li>
   </ul>
</div>
Code
let items = element(by.css('.parent')).all(by.tagName('li'));
element(locator).element(locator)
It will find elements within a parent.
Example
View
<div class = "parent">
   <div class = "child">
      Child text
      <div>{{person.phone}}</div>
   </div>
</div>
Code
// Calls Chain 2 element.
let child = element(by.css('.parent')).
   element(by.css('.child'));
expect(child.getText()).toBe('Child text\n981-000-568');

// Calls Chain 3 element.
let triple = element(by.css('.parent')).
   element(by.css('.child')).
   element(by.binding('person.phone'));
expect(triple.getText()).toBe('981-000-568');
element(locator).all(selector)
It will find an array of elements within a parent when calls to $$ may be chained.
Example
View
<div class = "parent">
   <ul>
      <li class = "one">First</li>
      <li class = "two">Second</li>
      <li class = "three">Third</li>
   </ul>
</div>
Code
let items = element(by.css('.parent')).$$('li'));
element(locator).$(locator)
It will find elements within a parent when calls to $ may be chained.
Example
View
<div class = "parent">
   <div class = "child">
      Child text
      <div>{{person.phone}}</div>
  </div>
</div>
Code
// Calls Chain 2 element.
let child = element(by.css('.parent')).
   $('.child'));
expect(child.getText()).toBe('Child text\n981-000-568');

// Calls Chain 3 element.
let triple = element(by.css('.parent')).
   $('.child')).
   element(by.binding('person.phone'));
expect(triple.getText()).toBe('981-000-568');
element(locator).isPresent()
It will determine whether the element is presented on page or not.
Example
View
<span>{{person.name}}</span>
Code
expect(element(by.binding('person.name')).isPresent()).toBe(true);
// will check for the existence of element

expect(element(by.binding('notPresent')).isPresent()).toBe(false);
// will check for the non-existence of element
element(locator).isElementPresent()
It is same as element(locator).isPresent(). The only difference is that it will check whether the element identified by sublocator is present rather than the current element finder.
element.all(locator).evaluate
As the name suggests, it will evaluate the input whether it is on the scope of the current underlying elements or not.
Example
View
<span id = "foo">{{letiableInScope}}</span>
Code
let value = element(by.id('.foo')).evaluate('letiableInScope');
element(locator).allowAnimations
As the name suggests, it will determine whether the animation is allowed on the current underlying elements or not.
Example
element(by.css('body')).allowAnimations(false);
element(locator).equals
As the name suggests, it will compare an element for equality.
Locators(by) API
It is basically a collection of element locator strategies that provides ways of finding elements in Angular applications by binding, model etc.
Functions and their descriptions
The functions of ProtractorLocators API are as follows −
by.addLocator(locatorName,fuctionOrScript)
It will add a locator to this instance of ProtrcatorBy which further can be used with element(by.locatorName(args)).
Example
View
<button ng-click = "doAddition()">Go!</button>
Code
// Adding the custom locator.
by.addLocator('buttonTextSimple',
      function(buttonText, opt_parentElement, opt_rootSelector) {

      var using = opt_parentElement || document,
         buttons = using.querySelectorAll('button');

      return Array.prototype.filter.call(buttons, function(button) {
      return button.textContent === buttonText;
   });
});
element(by.buttonTextSimple('Go!')).click();// Using the custom locator.
by.binding
As the name suggests, it will find an element by text binding. A partial match will be done so that any elements bound to the variables containing the input string will be returned.
Example
View
<span>{{person.name}}</span>
<span ng-bind = "person.email"></span>
Code
var span1 = element(by.binding('person.name'));
expect(span1.getText()).toBe('Foo');

var span2 = element(by.binding('person.email'));
expect(span2.getText()).toBe('foo@bar.com');
by.exactbinding
As the name suggests, it will find an element by exact binding.
Example
View
<spangt;{{ person.name }}</spangt;
<span ng-bind = "person-email"gt;</spangt;
<spangt;{{person_phone|uppercase}}</span>
Code
expect(element(by.exactBinding('person.name')).isPresent()).toBe(true);
expect(element(by.exactBinding('person-email')).isPresent()).toBe(true);
expect(element(by.exactBinding('person')).isPresent()).toBe(false);
expect(element(by.exactBinding('person_phone')).isPresent()).toBe(true);
expect(element(by.exactBinding('person_phone|uppercase')).isPresent()).toBe(true);
expect(element(by.exactBinding('phone')).isPresent()).toBe(false);
by.model(modelName)
As the name suggests, it will find an element by ng-model expression.
Example
View
<input type = "text" ng-model = "person.name">
Code
var input = element(by.model('person.name'));
input.sendKeys('123');
expect(input.getAttribute('value')).toBe('Foo123');
by.buttonText
As the name suggests, it will find a button by text.
Example
View
<button>Save</button>
Code
element(by.buttonText('Save'));
by.partialButtonText
As the name suggests, it will find a button by partial text.
Example
View
<button>Save my file</button>
Code
element(by.partialButtonText('Save'));
by.repeater
As the name suggests, it will find an element inside an ng-repeat.
Example
View
<div ng-repeat = "cat in pets">
   <span>{{cat.name}}</span>
   <span>{{cat.age}}</span>
<</div>
<div class = "book-img" ng-repeat-start="book in library">
   <span>{{$index}}</span>
</div>
<div class = "book-info" ng-repeat-end>
   <h4>{{book.name}}</h4>
   <p>{{book.blurb}}</p>
</div>
Code
var secondCat = element(by.repeater('cat in
pets').row(1)); // It will return the DIV for the second cat.
var firstCatName = element(by.repeater('cat in pets').
   row(0).column('cat.name')); // It will return the SPAN for the first cat's name.
by.exactRepeater
As the name suggests, it will find an element by exact repeater.
Example
View
<li ng-repeat = "person in peopleWithRedHair"></li>
<li ng-repeat = "car in cars | orderBy:year"></li>
Code
expect(element(by.exactRepeater('person in
peopleWithRedHair')).isPresent())
   .toBe(true);
expect(element(by.exactRepeater('person in
people')).isPresent()).toBe(false);
expect(element(by.exactRepeater('car in cars')).isPresent()).toBe(true);
by.cssContainingText
As name suggest, it will find the elements, containing exact string, by CSS
Example
View
<ul>
<li class = "pet">Dog</li>
<li class = "pet">Cat</li>
</ul>
Code
var dog = element(by.cssContainingText('.pet', 'Dog'));
// It will return the li for the dog, but not for the cat.
by.options(optionsDescriptor)
As the name suggests, it will find an element by ng-options expression.
Example
View
<select ng-model = "color" ng-options = "c for c in colors">
   <option value = "0" selected = "selected">red</option>
   <option value = "1">green</option>
</select>
Code
var allOptions = element.all(by.options('c for c in colors'));
expect(allOptions.count()).toEqual(2);
var firstOption = allOptions.first();
expect(firstOption.getText()).toEqual('red');
by.deepCSS(selector)
As name suggest, it will find an element by CSS selector within the shadow DOM.
Example
View
<div>
   <span id = "outerspan">
      <"shadow tree">
         <span id = "span1"></span>
      <"shadow tree">
      <span id = "span2"></span>
   </>
   </>
</div>
Code
var spans = element.all(by.deepCss('span'));
expect(spans.count()).toEqual(3);
Protractor - Objects
This chapter discusses in detail about the objects in Protractor.
What are Page Objects?
Page object is a design pattern which has become popular for writing e2e tests in order to enhance the test maintenance and reducing the code duplication. It may be defined as an object-oriented class serving as an interface to a page of your AUT (application under test). But, before diving deep into page objects, we must have to understand the challenges with automated UI testing and the ways to handle them.
Challenges with automated UI testing
Followings are some common challenges with automates UI testing −
UI Changes
The very common issues while working with UI testing is the changes happens in UI. For example, it happens most of the time that buttons or textboxes etc. usually got change and creates issues for UI testing.
Lack of DSL(Domain Specific Language) support
Another issue with UI testing is the lack of DSL support. With this issue, it becomes very hard to understand what is being tested.
Lots of repetition/Code duplication
The next common problem in UI testing is that there is lots of repetition or code duplication. It can be understood with the help of following lines of code −
element(by.model(event.name)).sendKeys(An Event);
element(by.model(event.name)).sendKeys(Module 3);
element(by.model(event.name));
Tough maintenance
Due to the above challenges, it becomes headache for maintenance. It is because we have to find all the instances, replace with the new name, selector & other code. We also need to spend lots of time to keep tests in line with refactoring.
Broken tests
Another challenge in UI testing is the happening of lots of failures in tests.
Ways to Handle Challenges
We have seen some common challenges of UI testing. Some of the ways to handle such challenges are as follows −
Updating References Manually
The very first option for handling the above challenges is to update the references manually. The problem with this option is that we must do the manual change in the code as well as our tests. This can be done when you have one or two tests files but what if you have hundreds of tests files in a project?
Using Page Objects
Another option for handling above challenges is to use page objects. A page object is basically a plain JavaScript that encapsulates the properties of an Angular template. For example, the following specification file is written without and with page objects to understand the difference −
Without Page Objects
describe('angularjs homepage', function() {
   it('should greet the named user', function() {
      browser.get('http://www.angularjs.org');
      element(by.model('yourName')).sendKeys('Julie');
      var greeting = element(by.binding('yourName'));
      expect(greeting.getText()).toEqual('Hello Julie!');
   });
});
With Page Objects
For writing the code with Page Objects, the first thing we need to do is to create a Page Object. Hence, a Page Object for the above example could look like this −
var AngularHomepage = function() {
   var nameInput = element(by.model('yourName'));
   var greeting = element(by.binding('yourName'));

   this.get = function() {
      browser.get('http://www.angularjs.org');
   };

   this.setName = function(name) {
      nameInput.sendKeys(name);
   };

   this.getGreetingText = function() {
      return greeting.getText();
   };
};
module.exports = new AngularHomepage();
Using Page Objects to Organize Tests
We have seen the use of page objects in the above example to handle the challenges of UI testing. Next, we are going to discuss how we can use them to organize the tests. For this we need to modify the test script without modifying the functionality of the test script.
Example
To understand this concept we are taking the above configuration file with page objects. We need to modify the test script as follows −
var angularHomepage = require('./AngularHomepage');
describe('angularjs homepage', function() {
   it('should greet the named user', function() {
      angularHomepage.get();

      angularHomepage.setName('Julie');

      expect(angularHomepage.getGreetingText()).toEqual
      ('Hello Julie!');
   });
});
Here, note that the path to the page object will be relative to your specification.
On the same note, we can also separate our test suite into various test suites. The configuration file then can be changed as follows
exports.config = {
   // The address of a running selenium server.
   seleniumAddress: 'http://localhost:4444/wd/hub',

   // Capabilities to be passed to the webdriver instance.
   capabilities: {
      'browserName': 'chrome'
   },
   // Spec patterns are relative to the location of the spec file. They may
   // include glob patterns.
   suites: {
      homepage: 'tests/e2e/homepage/**/*Spec.js',
      search: ['tests/e2e/contact_search/**/*Spec.js',
         'tests/e2e/venue_search/**/*Spec.js']
   },

   // Options to be passed to Jasmine-node.
   jasmineNodeOpts: {
      showColors: true, // Use colors in the command line report.
   }
};
Now, we can easily switch between running one or the other suite of tests. The following command will run only the homepage section of the test −
protractor protractor.conf.js --suite homepage
Similarly, we can run specific suites of tests with the command as follows −
protractor protractor.conf.js --suite homepage,search
Protractor - Debugging
Now that we have seen all the concepts of Protractor in the previous chapters, let us understand the debugging concepts in detail in this chapter.
Introduction
End-to-end (e2e) tests are very difficult to debug because they depend on the whole ecosystem of that application. We have seen that they depend upon various actions or particularly we can say that on prior actions like login and sometimes they depend on the permission. Another difficulty in debugging e2e tests is its dependency on WebDriver because it acts differently with different operating systems and browsers. Finally, debugging e2e tests also generates long error messages and makes it difficult to separate browser related issues and test process errors.
Types of Failure
There can be various reasons for the failure of test suites and followings are some well-known failure types −
WebDriver failure
When a command cannot be completed, an error is thrown by WebDriver. For example, a browser cannot get the defined address, or an element is not found as expected.
WebDriver unexpected failure
An unexpected browser and OS-related failure happens when it fails to update the web driver manager.
Protractor failure for Angular
The failure of Protractor for Angular happens when Protractor didnt find Angular in the library as expected.
Protractor Angular2 failure
In this kind of failure, Protractor will fail when the useAllAngular2AppRoots parameter is not found in the configuration. It happens because, without this, the test process will look at one single root element while expecting more than one element in the process.
Protractor failure for timeout
This kind of failure happens when the test specification hit a loop or a long pool and fails to return the data in time.
Expectation failure
One of the most common test failures that shows what a normal expectation failure looks like.
Why debugging is important in Protractor?
Suppose, if you have written test cases and they got failed then it is very important to know how to debug those test cases because it would be very hard to find the exact place where the error has occurred. While working with Protractor, you will get some long errors in red color font in the command line.
Pausing and Debugging the Test
The ways to debug in Protractor are explained here &miuns;
Pause Method
Using the pause method to debug the test cases in Protractor is one of the easiest ways. We can type the following command at the place we want to pause our test code &miuns;
browser.pause();
When the running codes hits the above command, it will pause the running program at that point. After that we can give the following commands according to our preference −
Type C for Moving Forward
Whenever a command has exhausted, we must type C to move forward. If you will not type C, the test will not run the full code and it will fail due to Jasmine time out error.
Type repl for entering interactive mode
The benefit of interactive mode is that we can send the WebDriver commands to our browser. If we want to enter into the interactive mode, then type repl.
Type Ctrl-C for exiting and continuing the tests
For exiting the test from pause state and continuing the test from where it has stopped, we need to type Ctrl-C.
Example
In this example, we are having the below specification file named example_debug.js, protractor tries to identify an element with locator by.binding(mmmm) but the URL(https://angularjs.org/ page has no element with specified locator.
describe('Suite for protractor debugger',function(){
   it('Failing spec',function(){
      browser.get("http://angularjs.org");
      element(by.model('yourName')).sendKeys('Vijay');
         //Element doesn't exist
         var welcomeText =
         element(by.binding('mmmm')).getText();
         expect('Hello '+welcomeText+'!').toEqual('Hello Ram!')
   });
});
Now, for executing the above test we need to add browser.pause() code, where you want to pause the test, in the above specification file. It will look as follows −
describe('Suite for protractor debugger',function(){
   it('Failing spec',function(){
      browser.get("http://angularjs.org");
      browser.pause();
      element(by.model('yourName')).sendKeys('Vijay');
      //Element doesn't exist
      var welcomeText =
      element(by.binding('mmmm')).getText();
      expect('Hello '+welcomeText+'!').toEqual('Hello Ram!')
   });
});
But before executing, we need to do some changes in the configuration file also. We are doing the following changes in earlier used configuration file, named example_configuration.js in previous chapter −
// An example configuration file.
exports.config = {
   directConnect: true,

   // Capabilities to be passed to the webdriver instance.
   capabilities: {
      'browserName': 'chrome'
   },

   // Framework to use. Jasmine is recommended.
   framework: 'jasmine',

   // Spec patterns are relative to the current working directory when

   // protractor is called.
   specs: ['example_debug.js'],
      allScriptsTimeout: 999999,
      jasmineNodeOpts: {
      defaultTimeoutInterval: 999999
   },
   onPrepare: function () {
      browser.manage().window().maximize();
      browser.manage().timeouts().implicitlyWait(5000);
   }
};
Now, run the following command −
protractor example_configuration.js
The debugger will start after the above command.
Debugger Method
Using the pause method to debug the test cases in Protractor is a bit advanced way. We can type the following command at the place we want to break our test code −
browser.debugger();
It uses the node debugger to debug the test code. For running the above command, we must type the following command in a separate command prompt which has opened from the test project location −
protractor debug protractor.conf.js
In this method, we also need to type C in the terminal for continuing the test code. But opposite to pause method, in this method it is to be typed for only one time.
Example
In this example, we are using the same specification file named bexample_debug.js, used above. The only difference is that instead of browser.pause(), we need to use browser.debugger() where we want to break the test code. It will look as follows −
describe('Suite for protractor debugger',function(){
   it('Failing spec',function(){
      browser.get("http://angularjs.org");
      browser.debugger();
      element(by.model('yourName')).sendKeys('Vijay');
      //Element doesn't exist
      var welcomeText = element(by.binding('mmmm')).getText();
      expect('Hello '+welcomeText+'!').toEqual('Hello Ram!')
   });
});
We are using the same configuration file, example_configuration.js, used in above example.
Now, run the protractor test with following debug command line option
protractor debug example_configuration.js
The debugger will start after the above command.
Protractor - Style Guide For Protractor
In this chapter, let us learn in detail about style guide for protractor.
Introduction
The style guide was created by two software engineers named, Carmen Popoviciu, front-end engineer at ING and Andres Dominguez, software engineer at Google. Hence, this style guide is also called Carmen Popoviciu and Googles style guide for protractor.
This style guide can be divided into the following five keypoints −
- Generic rules
- Project Structure
- Locator strategies
- Page Objects
- Test suites
Generic Rules
The following are some generic rules that must be taken care while using protractor for testing −
Do not end-to-end test what has been already unit tested
This is the very first generic rule given by Carmen and Andres. They suggested that we must not perform e2e test on the code that already been unit tested. The main reason behind it is that the unit tests are much faster than e2e tests. Another reason is that we must have to avoid duplicate tests (dont perform both unit and e2e testing) for saving our time.
Use only one configuration file
Another important point recommended is that we must have to use only one configuration file. Do not create configuration file for each environment you are testing. You can use grunt-protractor-coverage in order to set up different environments.
Avoid using logic to your test
We must have to avoid using IF statements or FOR loops in our test cases because if we do so then the test may pass without testing anything or it may run very slow.
Make the test independent at file level
Protractor can run the test parallelly when sharing is enabled. These files are then executed across different browsers as and when they become available. Carmen and Andres recommended to make the test independent at least at file level because the order in which they will be run by protractor is uncertain and moreover it is quite easy to run a test in isolation.
Project Structure
Another important key point regarding the style guide of Protractor is the structure of your project. The following is the recommendation about project structure −
Groping e2e test in a sensible structure
Carmen and Andres recommended that we must group our e2e tests in a structure that makes sense to the structure of your project. The reason behind this recommendation is that the finding of files would become easy and the folder structure would be more readable. This step will also separate e2e tests from unit tests. They recommended that the following kind of structure should be avoided −
|-- project-folder
   |-- app
      |-- css
      |-- img
      |-- partials
         home.html
         profile.html
         contacts.html
      |-- js
         |-- controllers
         |-- directives
         |-- services
         app.js
         ...
      index.html
   |-- test
      |-- unit
      |-- e2e
         home-page.js
         home-spec.js
         profile-page.js
         profile-spec.js
         contacts-page.js
         contacts-spec.js
On the other hand, they recommended the following kind of structure −
|-- project-folder
   |-- app
      |-- css
      |-- img
      |-- partials
         home.html
         profile.html
         contacts.html
      |-- js
         |-- controllers
         |-- directives
         |-- services
         app.js
         ...
      index.html
   |-- test
      |-- unit
      |-- e2e
         |-- page-objects
            home-page.js
            profile-page.js
            contacts-page.js
         home-spec.js
         profile-spec.js
         contacts-spec.js
Locator Strategies
The following are some locator strategies that must be taken care while using protractor for testing −
Never use XPATH
This is the first locator strategies that is recommended in protractor style guide. The reasons behind the same is that XPath is requires lots of maintenance because markup is very easily subject to change. Moreover, XPath expressions are the slowest and very hard to debug.
Always prefer protractor-specific locators such as by.model and by.binding
Protractor-specific locators such as by.model and by.binding are short, specific and easy to read. With the help of them it is very easy to write our locator also.
Example
View
<ul class = "red">
   <li>{{color.name}}</li>
   <li>{{color.shade}}</li>
   <li>{{color.code}}</li>
</ul>

<div class = "details">
   <div class = "personal">
      <input ng-model = "person.name">
   </div>
</div>
For the above code, it is recommended to avoid the following −
var nameElement = element.all(by.css('.red li')).get(0);
var personName = element(by.css('.details .personal input'));
On the other hand, the following is recommended to use −
var nameElement = element.all(by.css('.red li')).get(0);
var personName = element(by.css('.details .personal input'));
var nameElement = element(by.binding('color.name'));
var personName = element(by.model('person.name'));
When no Protractor locators are available, then it is recommended to prefer by.id and by.css.
Always avoid text locators for frequently changing text
We must have to avoid text-based locators such as by.linkText, by.buttonText and by.cssContaningText because text for buttons, links and labels frequently change over time.
Page Objects
As discussed earlier, page objects encapsulate information about the elements on our application page and due to this help us write cleaner test cases. A very useful advantage of page objects is that they can be reused across multiple tests and in case if the template of our application has been changed, we only need to update the page object. Followings are some recommendations for page objects that must be taken care while using protractor for testing −
To interact with page under test, use page objects
It is recommended to use page objects to interact with the page under test because they can encapsulate information about the element on the page under test and they can be reused also.
Always declare one-page object per file
We should define each page object in its own file because it keeps the code clean and finding of things becomes easy.
At the end of page object file always uses a single module.exports
It is recommended that each page object should declare a single class so that we only need to export one class. For example, the following use of object file should be avoided −
var UserProfilePage = function() {};
var UserSettingsPage = function() {};
module.exports = UserPropertiesPage;
module.exports = UserSettingsPage;
But on the other hand, following is recommended to use −
/** @constructor */
var UserPropertiesPage = function() {};

module.exports = UserPropertiesPage;
Declare all the required modules at the top
We should declare all the required modules at the top of the page object because it makes module dependencies clear and easy to find.
Instantiate all page objects at the beginning of the test suite
It is recommended to instantiate all the page objects at the beginning of the test suite because this will separate dependencies from the test code as well as makes the dependencies available to all the specifications of the suite.
Do not use expect() in page objects
We should not use expect() in page objects i.e. we should not make any assertions in our page objects because all the assertions must be done in test cases.
Another reason is that the reader of the test should be able to understand the behavior of the application by reading the test cases only.
