- Polymer - Home
- Polymer - Overview
- Polymer - Installation
- Polymer - Elements
- Polymer - Custom Elements
- Polymer - Shadow DOM and Styling
- Polymer - Events
- Polymer - Data System
Polymer - Events
Events are used by the elements that can communicate with state changes of DOM tree to parent elements and uses the standard DOM APIs for creating, dispatching, and listening for events. The annotated event listeners are used by Polymer, which defines the event listeners as small chunks of DOM template and can be added to DOM children using onevent annotations in the template.
Example
The following example adds annotated event listeners in the template. Create a file called index.html and put the following code in it.
<!doctype html>
<html>
   <head>
      <title>Polymer Example</title>
      <script src = "bower_components/webcomponentsjs/webcomponents-lite.js"></script>
      <link rel = "import" href="bower_components/polymer/polymer.html">
      <link rel = "import" href = "annotated-eventlistners.html">
   </head>

   <body>
      <template id = "myapp" is = "dom-bind">
         //tap event is part of gesture events that fires consistently across both mobile
         //and desktop devices
         <annotated-eventlistners on-tap = "myClick"></annotated-eventlistners>
      </template>

      <script>
         var myval = document.querySelector('#myapp');
         myval.myClick =  function(e) {
            console.log('Hello World!!!');
         };
      </script>
   </body>
</html>
Output
To run the application, navigate to the created project directory and run the following command.
polymer serve
Now open the browser and navigate to http://127.0.0.1:8000/. Following will be the output.
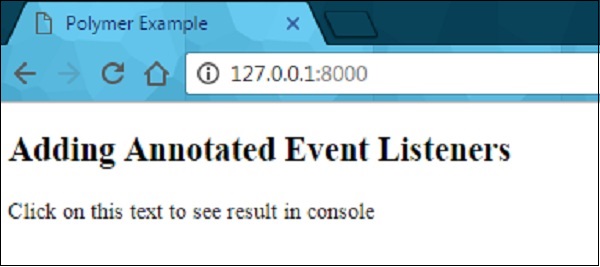
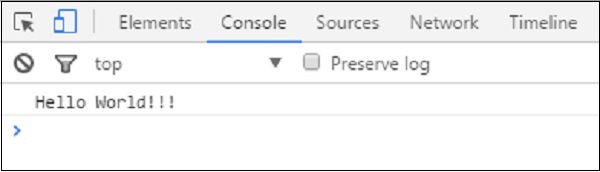
Click the text to see the result in the console as shown in the following screenshot.
Custom Events
Custom events can be triggered using the standard CustomEvent constructor and the dispatchEvent method from the host element.
Consider the following example that triggers the custom event from the host element. Open the index.html file and add the following code in it.
<!doctype html>
<html>
   <head>
      <title>Polymer Example</title>
      <script src = "bower_components/webcomponentsjs/webcomponents-lite.js"></script>
      <link rel = "import" href = "bower_components/polymer/polymer.html">
      <link rel = "import" href = "custom-event.html">
   </head>

   <body>
      <custom-event></custom-event>
      <script>
         document.querySelector('custom-event').addEventListener('customValue', function (e) {
            console.log(e.detail.customval); // true
         })
      </script>
   </body>
</html>
Now, create another file called custom-event.html and include the following code.
<link rel = "import" href = "bower_components/polymer/polymer-element.html">

//it specifies the start of an element's local DOM
<dom-module id = "custom-event">
   <template>
      <h2>Custom Event Example</h2>
      <button on-click = "myClick">Click Here</button>
   </template>

   <script>
      Polymer ({
         is: "custom-event", myClick(e) {
            this.dispatchEvent(new CustomEvent('customValue', {detail: {customval: true}}));
         }
      });
   </script>
</dom-module>
Output
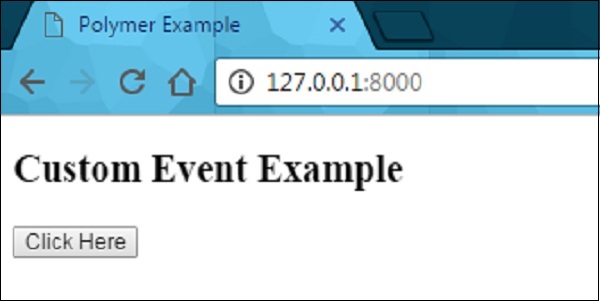
Run the application as shown in the previous example and navigate to http://127.0.0.1:8000/. Following will be the output.
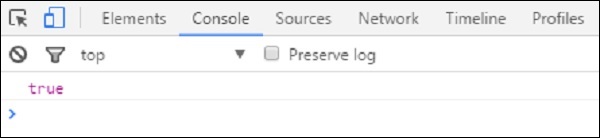
Now click the button, open the console, and see the true value for the custom event as shown in the following screenshot.
Now moving with "event retargeting", which specifies the event's target where the element can be represented in the same scope as the listening element. For instance, the target can be considered as an element in the main document, while using a listener in the main document, not in a shadow tree. You can refer the Polymer shadow dom styling chapter for more explanation and example.
Gesture Events
Gesture events can be used for user interactions, which define better interaction on both touch and mobile devices. For instance, the tap event is a part of gesture events that fires consistently across both mobile and desktop devices.
You can refer the example for gesture event explained at the beginning of this chapter, which uses on-tap event that adds annotated event listeners in the template.
The following table lists different types of gesture event types.
| Sr.No. | Event Type & Description | Properties |
|---|---|---|
| 1 | down It specifies that the finger/button has moved down. |
|
| 2 | up It specifies that the finger/button has moved up. |
|
| 3 | tap It specifies the occurrence of up and down actions. |
|
| 4 | track It specifies the occurrence of up and down actions. |
|
Example
The following example specifies the use of gesture event types in the template. Create a file called index.html and place the following code in it.
<!doctype html>
<html>
   <head>
      <title>Polymer Example</title>
      <script src = "bower_components/webcomponentsjs/webcomponents-lite.js"></script>
      <link rel = "import" href = "bower_components/polymer/polymer.html">
      <link rel = "import" href = "gesture-event.html">
   </head>

   <body>
      <gesture-event></gesture-event>
   </body>
</html>
Now, create another file called gesture-event.html and include the following code.
<link rel = "import" href = "bower_components/polymer/polymer-element.html">

//it specifies the start of an element's local DOM
<dom-module id = "gesture-event">
   <template>
      <style>
         #box {
            width: 200px;
            height: 200px;
            background: #D7D0B7;
         }
      </style>

      <h2>Gesture Event Types Example</h2>
      <div id = "box" on-track = "myClick">{{track_message}}</div>
   </template>

   <script>
      Polymer ({
         is: 'gesture-event', myClick: function(e) {
            switch(e.detail.state) {
               case 'start':
               this.track_message = 'Tracking event started...';
               break;
               case 'track':
                  this.track_message = 'Tracking event is in progress... ' +
                  e.detail.x + ', ' + e.detail.y;
               break;
               case 'end':
                  this.track_message = 'Tracking event ended...';
               break;
            }
         }
      });
   </script>
</dom-module>
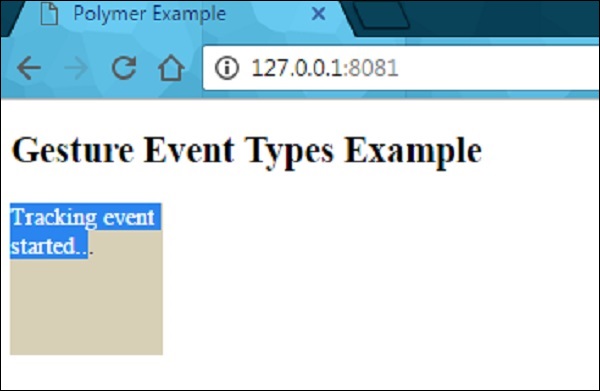
Output
Run the application as shown in the previous example and navigate to http://127.0.0.1:8081/. Now start dragging the mouse in the element, it will display the state as shown in the following screenshot.
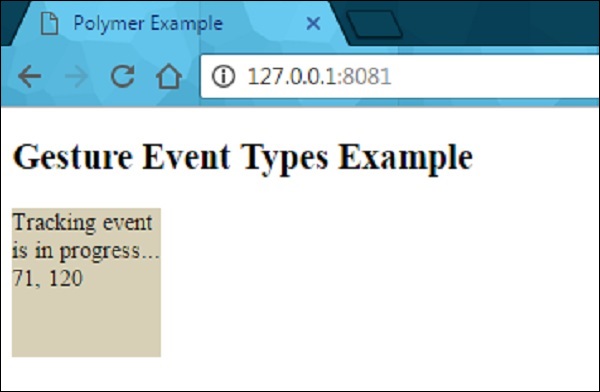
After dragging the mouse in the element, it will show the progress of event tracking as shown in the following screenshot.
When you stop dragging the mouse, it will end the tracking event on the element as shown in the following screenshot.

