- phpMyAdmin - Home
- phpMyAdmin - Overview
- phpMyAdmin - Environment Setup
- phpMyAdmin - Features
- phpMyAdmin - Pros & Cons
- phpMyAdmin vs MySQL Workbench
- phpMyAdmin Sections
- phpMyAdmin - Databases
- phpMyAdmin - SQL
- phpMyAdmin - Status
- phpMyAdmin - User Accounts
- phpMyAdmin - Export
- phpMyAdmin - Import
- phpMyAdmin - Settings
- phpMyAdmin - Binary Logs
- phpMyAdmin - Replication
- phpMyAdmin - Variables
- phpMyAdmin - Charsets
- phpMyAdmin - Engines
- phpMyAdmin - Plugins
- phpMyAdmin Useful Resources
- phpMyAdmin - Quick Guide
- phpMyAdmin - Useful Resources
- phpMyAdmin - Discussion
phpMyAdmin - Quick Guide
phpMyAdmin - Overview
phpMyAdmin is one the most popular, free and open source administration tool which can manage MySQL and MariaDB. It is licensed under GNU GPLv2. It has a web based interface and can be used on any platform easily. It is available in 79 languages. It is PHP based and is provided by almost all the Web hosting solution providers who supports WAMP/LAMP development stack.
phpMyAdmin can be used to do useful functions like managing databases, tables, relations, indexes, user permissions etc using its web based user interface. It also support a query interface, where user can type SQL commands and run.
phpMyAdmin is neatly documented and lots of learning material is available in form of books, blogs and articles for it. phpMyAdmin supports for LTR and RTL languages.
phpMyAdmin development is community driven and is hosted on GitHub. It is also a member of Software Freedom Conservancy which is not-for-profit organization and helps promote, improve, develop and defends free and open source projects.
Prerequisites
Following are the vital components which are required to work with phpMyAdmin.
Web Server − Apache, Nginx, IIS.
PHP − PHP 7.1.3+ is required to work with phpMyAdmin 5.1.1. mysqli and openssl extensions should be enabled.
Database − MySQL 5.5 or MariaDB 5.5 onwards
Web Browser − As phpMyAdmin is a web based application, web browser is required to access it like Google Chrome, Edge, Firefox etc.
phpMyAdmin - Environment Setup
As phpMyAdmin is PHP based, following four vital components need to be installed on your computer system before installing phpMyAdmin.
Web Server − PHP works with virtually all Web Server software, including Microsoft's Internet Information Server (IIS) but most often used is Apache Server. Download Apache for free here − https://httpd.apache.org/download.cgi. Apache 2.4 is used in this tutorial.
Database − phpMyAdmin manages MySQL or MariaDB databases. In this tutorial, we can using MySQL database. Download MySQL for free here − https://www.mysql.com/downloads/. MySQL 8.0 is used in this tutorial.
PHP Parser − In order to process PHP script instructions, a parser must be installed to generate HTML output that can be sent to the Web Browser. This tutorial will guide you how to install PHP parser on your computer. Php 7.4 is used in this tutorial.
Web Browser − phpMyAdmin is a web based software, so web browser is needed with javascript and cookies enabled. We are using Google Chrome in this tutorial.
PHP Parser Installation
Before you proceed, it is important to make sure that you have proper environment setup on your machine to develop your web programs using PHP. Store the following php file in Apache's htdocs folder.
phpinfo.php
Example
<?php
   phpinfo();
?>
Output
Type the following address into your browser's address box.
http://127.0.0.1/phpinfo.php
If this displays a page showing your PHP installation related information, then it means you have PHP and Webserver installed properly. Otherwise, you have to follow the given procedure to install PHP on your computer.
This section will guide you to install and configure PHP over the following four platforms −
Apache Configuration
If you are using Apache as a Web Server, then this section will guide you to edit Apache Configuration Files.
Check here − PHP Configuration in Apache Server
PHP.INI File Configuration
The PHP configuration file, php.ini, is the final and immediate way to affect PHP's functionality.
Check here − PHP.INI File Configuration
Windows IIS Configuration
To configure IIS on your Windows machine, you can refer your IIS Reference Manual shipped along with IIS.
Install MySQL Database
The most important thing you will need, of course is an actual running database with a table that you can query and modify.
MySQL DB − MySQL is an open source database. You can download it from MySQL Official Site. We recommend downloading the full Windows installation.
In addition, download and install MySQL Administrator as well as MySQL Query Browser. These are GUI based tools that will make your development much easier.
Finally, download and unzip MySQL Connector/J (the MySQL JDBC driver) in a convenient directory. For the purpose of this tutorial we will assume that you have installed the driver at C:\Program Files\MySQL\mysql-connector-java-5.1.8.
Accordingly, set CLASSPATH variable to C:\Program Files\MySQL\mysql-connector-java-5.1.8\mysql-connector-java-5.1.8-bin.jar. Your driver version may vary based on your installation.
Set Database Credential
When we install MySQL database, its administrator ID is set to root and it gives provision to set a password of your choice.
Using root ID and password you can either create another user ID and password, or you can use root ID and password for your JDBC application.
There are various database operations like database creation and deletion, which would need administrator ID and password.
We would use MySQL Database with root as ID and root@123 as password.
If you do not have sufficient privilege to create new users, then you can ask your Database Administrator (DBA) to create a user ID and password for you.
For a complete understanding on MySQL database, study the MySQL Tutorial.
phpMyAdmin installation
Download and unzip phpMyAdmin-5.1.1-all-languages.zip phpMyAdmin web application in a convenient directory. Then copy the folder to htdocs directory of Apache Web Server. We've renamed the phpMyAdmin-5.1.1-all-languages to phpMyAdmin and placed it inside the htdocs directory.
Before restarting Apache Server, we need to make changes to Apache Configuration and PHP Configuration to allow phpMyAdmin to work with MySQL and OpenSSL. Please do the following changes.
Apache Configuration Update
Locate /conf/httpd.conf file in Apache Web Server directory and update DirectoryIndex > index.html to index.php.
#
# DirectoryIndex: sets the file that Apache will serve if a directory
# is requested.
#
<IfModule dir_module>
   DirectoryIndex index.php
</IfModule>
PHP Configuration Updates
Locate php.ini in PHP Installation directory and uncomment extensions for mysqli and openssl.
extension=mysqli
extension=openssl
Now enable the extension_dir to load extensions for mysqli and openssl.
; Directory in which the loadable extensions (modules) reside.
; http://php.net/extension-dir
;extension_dir = "./"
; On windows:
extension_dir = "ext"
That's it, now start the Apache Server and open localhost/phpmyadmin phpmyadmin in web browser to open the phpMyAdmin interface.
phpMyAdmin - Features
Following is some of the key features of phpMyAdmin.
User friendly Web Interface − phpMyAdmin UI is quite intuitive and easy to use.
Most of Database Operations are supported − phpMyAdmin supports most of the MySQL/MariaDB features as listed below −
Browse databases, tables, view, fields and indexes.
Create/Copy/Drop/Rename databases, tables, view, fields and indexes.
Server maintenance, database/tables configuration proposal.
Execute, Edit and bookmark SQL statements, batch queries.
Manage user accounts and privilleges.
Manage stored procedures and triggers.
Import Data − Data can be imported from from CSV and SQL files.
Export Data − Data can be exported to various formats like CSV, SQL, XML, PDF, ISO/IEC 26300 - OpenDocument Text and Spreadsheet, Word, LATEX and others
Multiserver support − phpMyAdmin can be used to administrater multiple servers together.
Graphics Support − phpMyAdmin can show graphics of database layout in various formats.
Query-by-example − phpMyAdmin Query-by-example (QBE) can be used to create complex queries.
Search − phpMyAdmin allows to searching globally in a database or a subset of database.
Transformation − phpMyAdmin can help in transforming stored data into any format using a set of built-in functions, for example displaying BLOB-data as image or download-link.
phpMyAdmin - Pros & Cons
Pros
Following are some of the key advantages that phpMyAdmin provides −
Web Based − Being web based, phpMyAdmin UI is accessible using Web Browser and this interface is available on all the platforms where a web browser can work.
Graphical Interface phpMyAdmin provides graphical interface to run SQL commands and do SQL operations and makes it quite easy to use as compared to console based sql editors.
Script Interface phpMyAdmin provides script interface to run PHP scripts to connect to databases and do customized operations.
Multi-Server phpMyAdmin allows to operate multiple servers at a time.
Backup formats phpMyAdmin allows to take database backups in various formats like XML, CSV, SQL, PDF, OpenDocument Text, Excel, Word, and Spreadsheet, etc.
Complex Query Made Easy phpMyAdmin's easy to use interface allows to create and run complex queries, create and edit functions, triggers etc easily.
Cons
There are certain disadvantages as well in using phpMyAdmin.
Difficult Installation − phpMyAdmin installation is not straight forward. User needs to install Apache Web Server, PHP and MySQL and then configure each softwares seperately. As an alternate solution is to use XAMPP, which bundles them as a package and have phpMyAdmin module as well. In case of fresh installation, XAMPP is the best choice to install WAMP/LAMP stack to use phpMyAdmin.
No schema visualization − schema visualization capability is not present in phpMyAdmin.
No auto-compilation − Auto-compilation functionality is not available as well.
No scheduled backup − Automatic backup scheduling is not feasible.
No Encryption − phpMyAdmin exports database in common text files thus needs high storage and poor security.
phpMyAdmin vs MySQL WorkBench
MySQL WorkBench is part of MySQL database and it provides a full featured administrative interface to execute SQL queries and MySQL management where as phpMyAdmin is a web based tool to administer the MySQL database. Following are the some of the key differences in both interfaces.
Supported Versions − phpMyAdmin supports MySQL 5.5 onwards whereas MySQL Workbench can support any version of MySQL database.
Graphical Interface phpMyAdmin provides an easy to understand graphical interface to run SQL commands and do SQL operations and makes it quite easy to use as compared to MySQL workbench which is quite complex for beginners.
Script Interface phpMyAdmin provides script interface to run PHP scripts to connect to databases and do customized operations. MySQL workbench has no such option.
Web Based phpMyAdmin is web based and may be slow and depends upon web browser heavily where as MySQL workbench is a specilized software to work with databases.
Code Highlight phpMyAdmin does not have smart code highlight capabilities or auto-complete functionalities whereas MySQL workbench provides code highlighting and auto-complete features.
Pricing phpMyAdmin is completely free to use. It is open source and is provided by almost all hosting service providers whereas MySQL Workbench has a community based version which is free and open source. There are other commercial versions for enterprises which are subscription based. These commercial versions have enterprise level features and support.
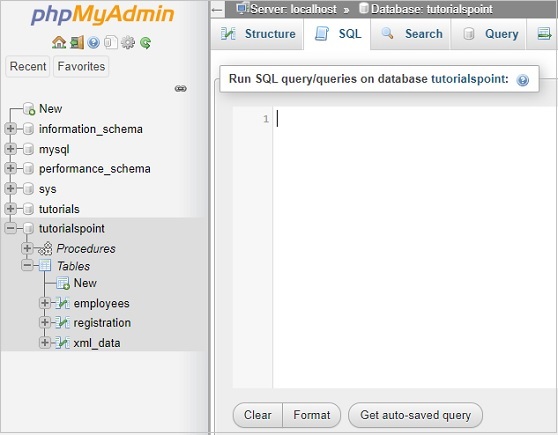
phpMyAdmin - Databases
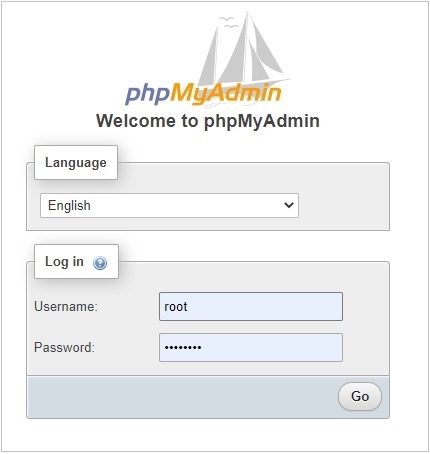
Start the Apache Server and open /localhost/phpmyadmin phpmyadmin in web browser to open the phpMyAdmin interface.
As we have configured a database MySQL during Environment Setup, we've root user with password as root@123. Once phpMyAdmin opens up, you need to enter same credential to login to database.
Dashboard
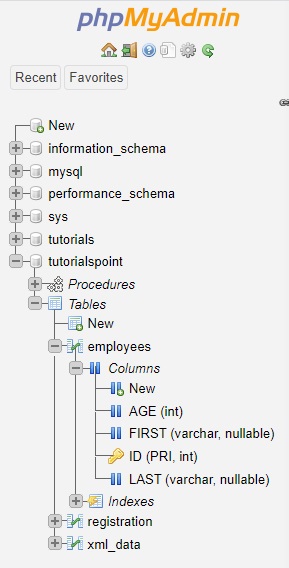
Once logged in, you can see the following sections on the phpMyAdmin page loaded. The left section shows the databases available, it shows system as well user created databases.
On the right side, dashboard shows a tabbed interface to do all the database administration operations as shown below.
Databases
Click on Database Tab, to see the list of databases with more details. We can create database, iterate databases and do other operations here.
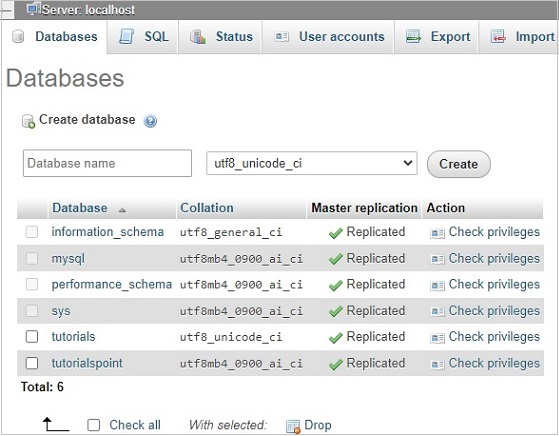
Click on any listed database to see the list of tables with more details. Tabs changes as per the context. Now tabs will shows as per the database.
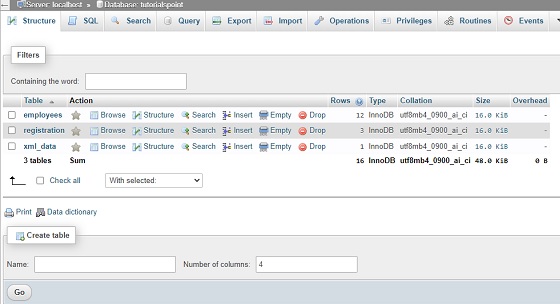
Tables
Now in the schema browser, click on any table, right side section will load the table details as shown with updated tabbed interface to do various operations on that table as shown below −

Double clicking on any cell, makes it editable, where you can edit and save data. Pressing esc key, will not save data. Once you move out of editing cell, it will show the update query and status of operation as shown below −
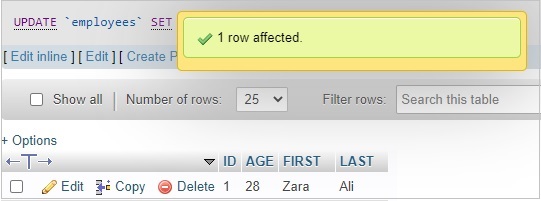
You can verify the update statement as well as show below −
UPDATE `employees` SET `AGE` = '28' WHERE `employees`.`ID` = 1;
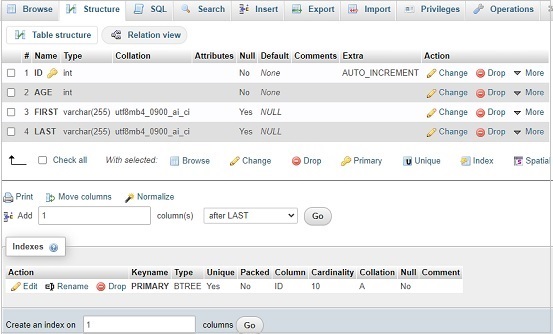
Now click on Structure tab, it will show the table structural details as shown below −
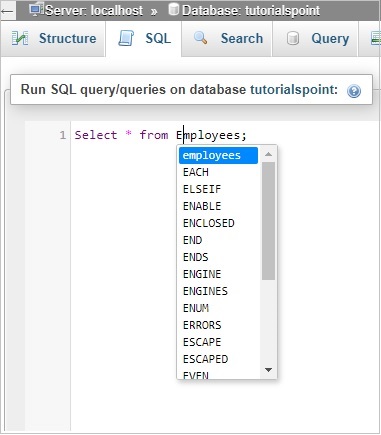
phpMyAdmin - SQL
phpMyAdmin provides a SQL console under SQL Tab. Its context varies as per the selection. If no database is selected, then SQL console opens in localhost context otherwise in relevant database context. In given example, we've selected a database TutorialsPoint. Now switching to SQL shows the following screen.
Now let's run a simple query to see SQL Tab in action. SQL interface will keep suggesting keywords while user types. You can press Ctrl+Space to open the relevant suggestion as well.
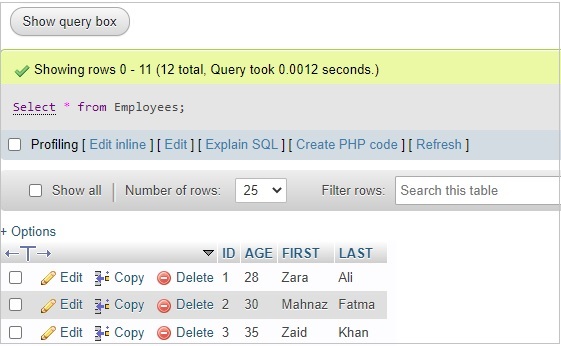
Now click on Go Button and phpMyAdmin will run the query and show the result as shown below −
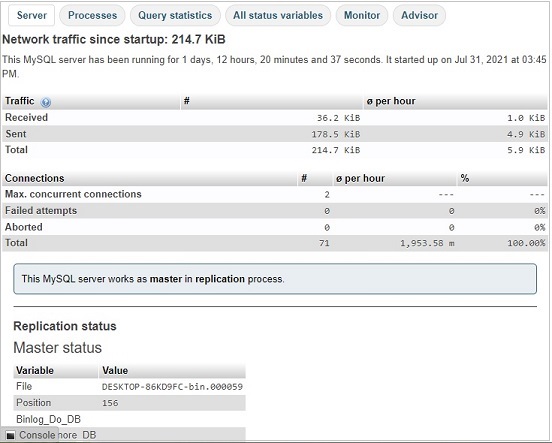
phpMyAdmin - Status
phpMyAdmin provides a six types of statuses under Status Tab.
Server − Server Status tab describes the MySQL/MariaDB server status in terms of traffic and connections that server is handling. It also shares the replication status.
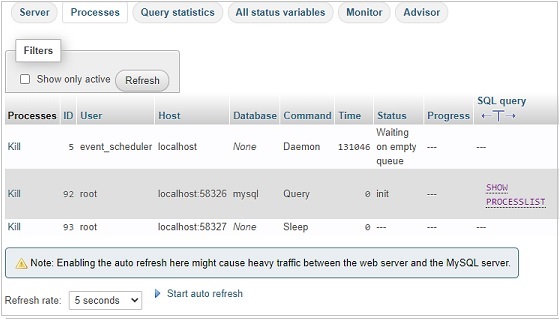
Processes − Processes like root, event scheduler are shared on this dashboard. We can kill them as well.
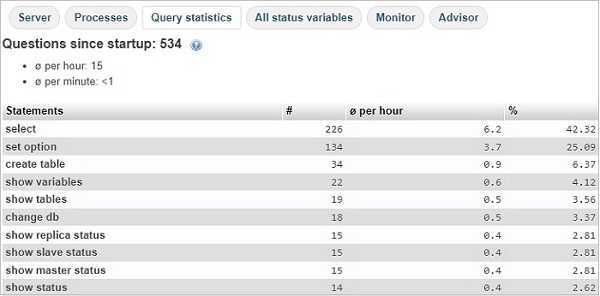
Queries − Query Statistics tell about the types and count of queries that has been run using phpMyAdmin interface. It includes the queries run plus the queries run by phpMyAdmin in background.
All Status Variables − All kind of status variables are listed here with their value and description. User can filter on these variables as well.
Monitor − Monitor dashboard helps in visual way to check and control traffic, cpu usages, connections, processes, questions, system memory and system swaps.
Advisor − Advisor helps in analyzing the problems and provides advices for performance bottlenecks. It also provides insights on generally faced problems.
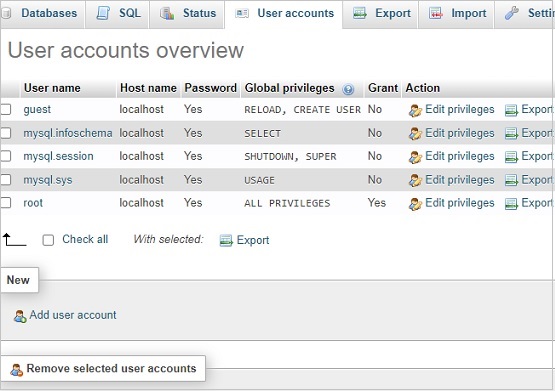
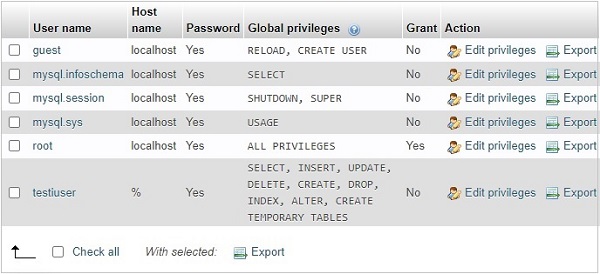
phpMyAdmin - User Accounts
phpMyAdmin provides an intuitive user interface for user management. We can view users, edit their previleges etc.
Let's create a user using phpMyAdmin say testuser. Click on the Add User Account link under New Section.
Create user with a strong password.
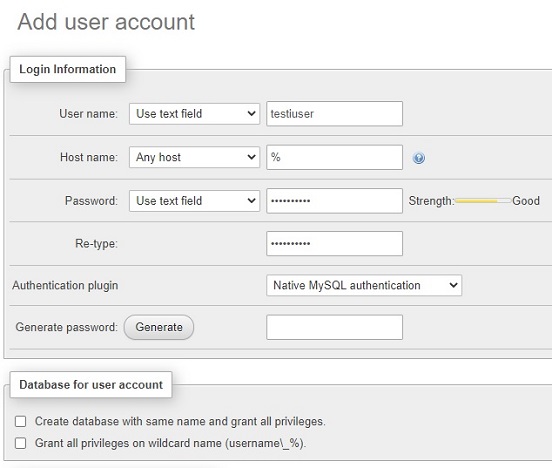
Grant Privileges.

Now click on go button and phpMyAdmin will create the user and shows the SQL used to create the user.
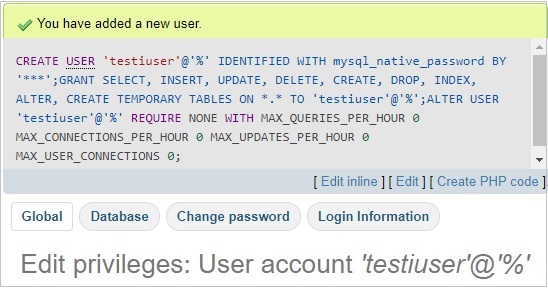
Now click on User accounts and verify the user with required privileges.
phpMyAdmin - Exports
phpMyAdmin provides an intuitive user interface to export database(s).
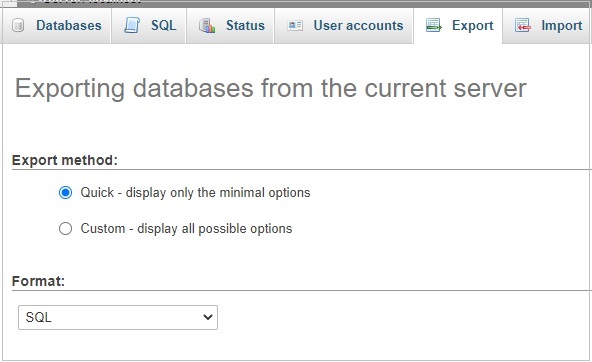
Click on Go button and phpMyAdmin will generate SQL required to create databases/tables and other relevant entities.
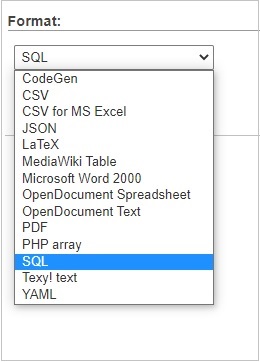
Instead of SQL, user can choose other popular options as well like csv, json, yaml etc.
Now select the custom option and phpMyAdmin will show lots of options like
Databases − A list of databases to be selected. User can select multiple databases.
Output − Options to save output to a file with customization options like name, charset, compression. It also provides options to skip large tables, rename exported databases/tables/columns and so on.
Format Specific Options − Options to display/hide comments, enclose export in a transaction, export views as tables, export metadata and database selection for compatabilities and so.
Object Creation Options − Options to add drop database/tables etc if exists, auto increment id, add create view, add create trigger statements, using backquotes to enclose table and column names etc.
Data Creation Options − Options to truncate table before insert delayed statements and insert ignore statements. Options to choose format while preparing sql for insert data, set the maximum length of created query, dump timestamp columns in UTC etc.
phpMyAdmin - Imports
phpMyAdmin provides an intuitive user interface to import database(s).
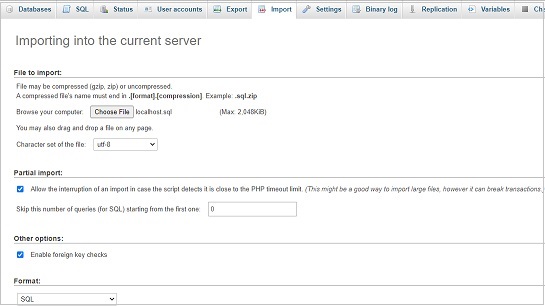
Choose a file to import. phpMyAdmin allows to import zip file as well as uncompressed file. Max size limit is 2GB. Click on Go button and phpMyAdmin will import the databases and show the success/failure/error messages accordingly.

Now select the custom option and phpMyAdmin will show lots of options like

Partial Import − This option is very handy while importing large databases. It allows to prevent PHP timeout and allows to skip queries as well.
Other Options − Options to check foreign integrity checks.
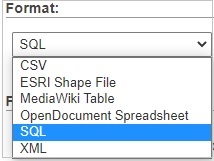
Format − phpMyAdmin allows six differents format to be used in import process.
Format Specific Options − Options to choose database specific formats. For zero values, auto increment can be disabled.
phpMyAdmin - Settings
phpMyAdmin provides an intuitive user interface to manage and set settings for its interface.

Following is the description of various sections of Settings tab.
Manage Your Settings − Main Dashboard shows the Import/Export and Reset Options. User can set up a setup script to do this process automatically as well. Script provide more fine grain control as well. Saved settings can be exported in JSON/PHP format or to browser storage and in similar fashion, it can be imported.
Two Factor Authentication − Two factor authentication is very important for security purpose. It enables to authenticate user with additional authentication mechanism like HOTP and TOTP applications such as FreeOTP, Google Authenticator or Authy or using hardware security tokens supporting FIDO U2F, along with password authentication.
Features − Features covers the configuration setting related to databases, text fields, page titles, warning messages, console and general settings like natural order, version checks etc.
SQL Queries − Options related to SQL queries like show SQL queries, confirmation on drop queries and configurations on sql query box like to show explain SQL, create PHP Code, refresh options and so.
Navigation Panel − Options covering navigation panel, navigation tree and to configure display settings for servers, databases and tables display.
Main Panel − Options to customize startup screen, database structure, table structure, browse mode, edit mode, tabs and relational schema display.
Export/Import − Options to customize export and import settings.
phpMyAdmin - Binary Logs
phpMyAdmin Binary Logs tabs helps in checking the log history. It shows a glimpse of whatever we've done using phpMyAdmin.
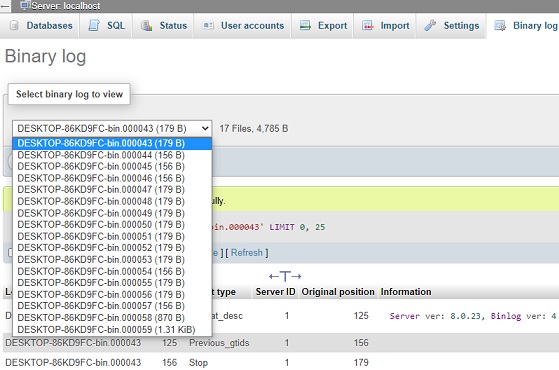
Let's select any binary logs file and click on Go button, It will display the logs history of that log file.

Here, you can check which activities has been carried out by phpMyAdmin behind the scene.
phpMyAdmin - Replication
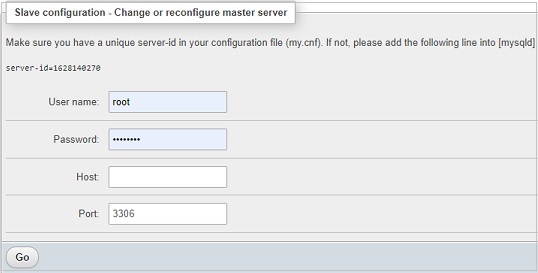
phpMyAdmin Replication tab handles the database replication. Marking one database as master database and other as slave databases is made easy using this feature.
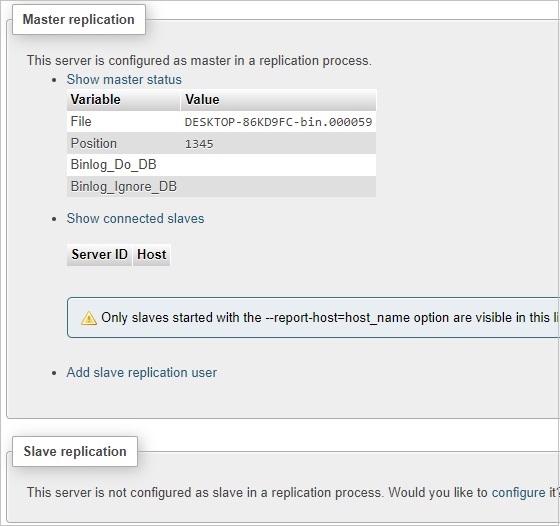
Master Replication − This section shows the master status and connected slaves status. We can add slave replication user as well using this section.
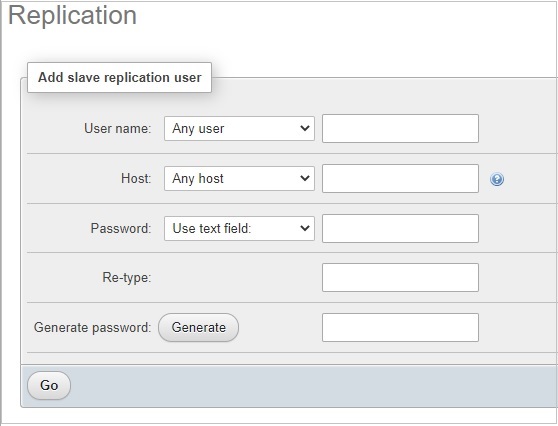
Slave Replication − This section allows to add a slave using username, password, host and port details.
phpMyAdmin - Variables
phpMyAdmin Variables tab handles nearly 600 variables of MySQL where we can edit set them on/off and update their values.
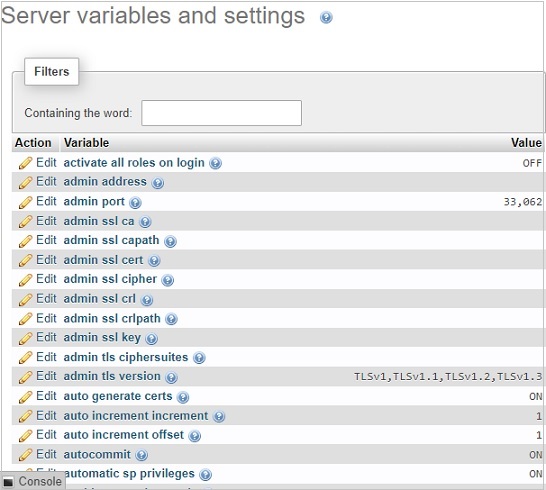
Click on edit button, and you can edit the variable value.
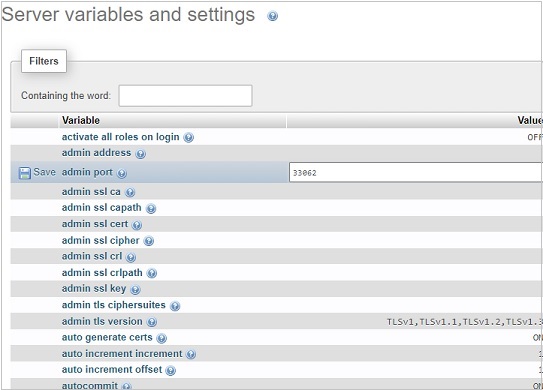
After updating the value, click on save button or press esc key to cancel.
An important point to note is that these variables can be edited only one user logged in as root user.
phpMyAdmin - Charsets
phpMyAdmin Charsets tab displays all the charsets and collations which are supported by MySQL server.
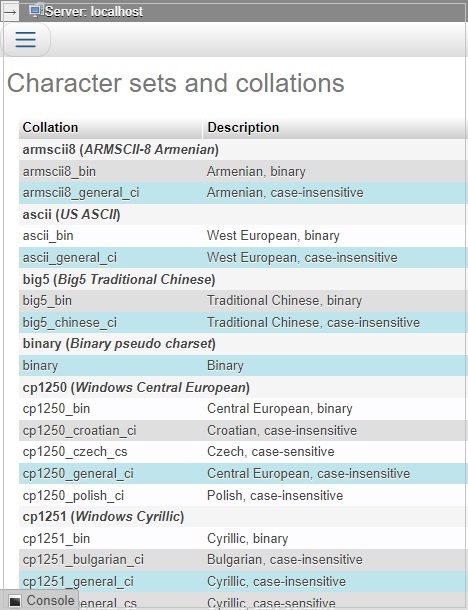
You cannot edit anything here. It is a readonly information.
phpMyAdmin - Storage Engines
phpMyAdmin Storage Engines tab displays all the engines which are supported by MySQL server.
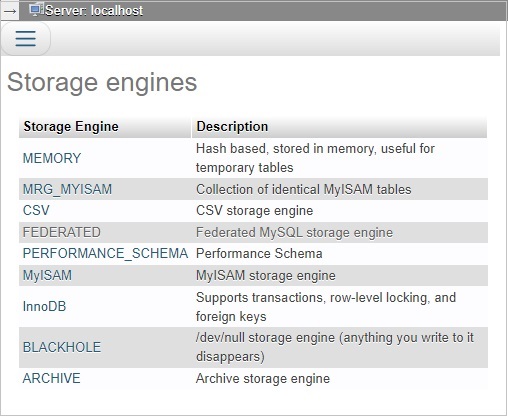
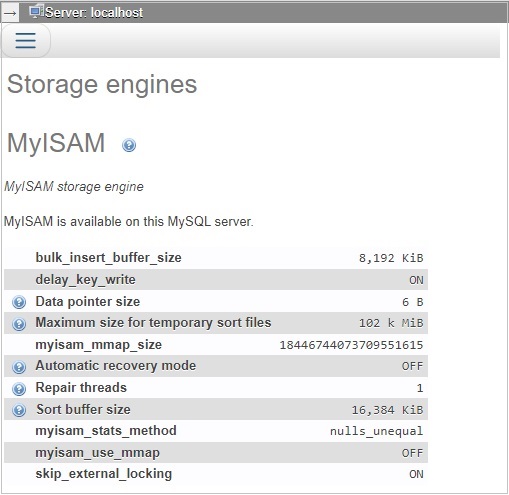
You cannot edit anything here. It is a readonly information. When we click on any engine name, it displays the details further. For example, when user clicks on the default engine myISAM, it displays as following −
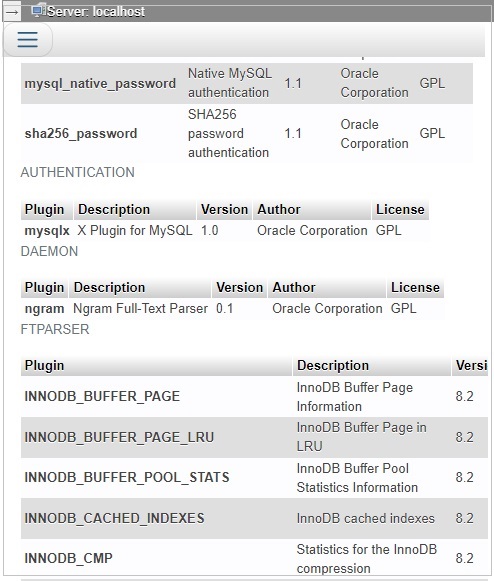
phpMyAdmin - Plugins
phpMyAdmin Plugins tab displays all the plugins which are presently installed in MySQL server. It contains information like their version and description.
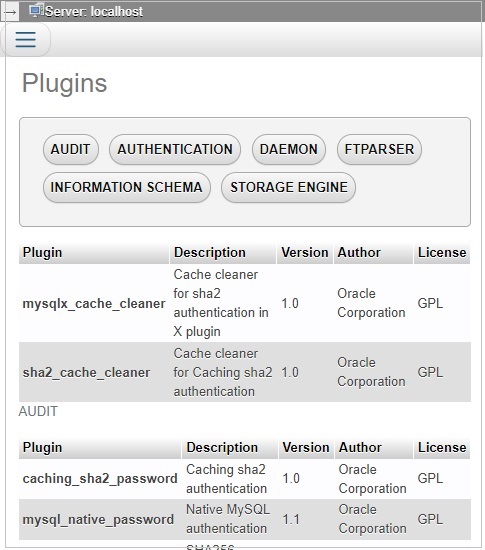
Plugins are broadly categorized in six categories −
AUDIT
AUTHENTICATION
DAEMON
FTPPARSER
INFORMATION SCHEMA
STORAGE ENGINE
If you click on any of the category, it will scroll to the related list of plugins.