- PHP ImageMagick - Home
- PHP ImageMagick - Introduction
- Background Color
- Image Reflections
- Image Cropping
- Image Bordering
- Image Resizing
- Composite Images
- Contrast & Brightness
- Enhancing &Equalizing
- Sharpening & Blurring
- Image Tiling
- Image Threshold
- Modifying Colors
- Different effects
- Securing The Images
- Simulation Of Sketches
- Editing TheAppearance
- Rotation and Rolling
- Splicing & Spreading
- Miscellaneous Functions
- PHP ImageMagick Useful Resources
- PHP ImageMagick - Quick Guide
- PHP ImageMagick - Resources
- PHP ImageMagick - Discussion
PHP ImageMagick - Editing TheAppearance
In this chapter, you will explore how to use Imagemagick's built-in functions to edit an image. You'll learn how to create a faded and rounded look on the edges of your image, wrap it in a parallelogram shape, and even simulate a polaroid effect.
Vignette Image
The word vignette means a small photograph or image which has a faded appearance with its background and doesnt have a definite border. Having this effect highlights certain aspects of the image. So, to get images in this filter, Imagemagick provided an inbuilt function vignetteImage(). This function takes an image as input, applies a vignette filter, and obtained image has its borders blurred.
Syntax
public Imagick::vignetteImage(float $blackPoint, float $whitePoint, int $x, int $y): bool
This function has 4 parameters: blackpoint, whitepoint, x, and y. Blackpoint and whitepoint are float values. x is an integer value that specifies the x offset of the ellipse and y is an integer value that specifies the y offset of the ellipse.
Example
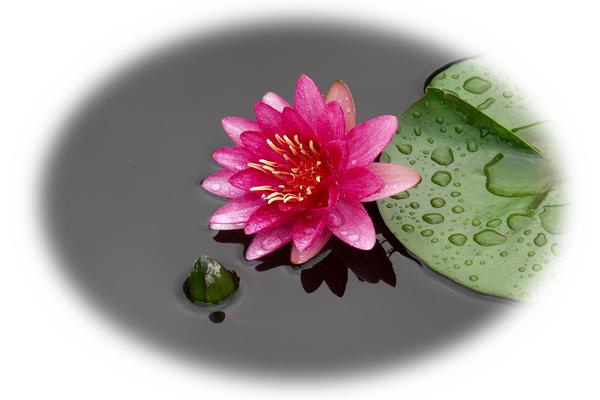
To have a better understanding of vignetteImage() function, look at the below example. An imagick object is created at first and an image is taken as input. Then, vignetteImage function is applied with all the parameters specified (blackpoint=30, whitepoint=10, x=40, y=20). Finally, the output is obtained using writeImage() function.
<?php
   $image=new Imagick($_SERVER['DOCUMENT_ROOT']."/test/image.png");
   $image->vignetteImage(30, 10, 40, 20);
   $image->writeImage($_SERVER['DOCUMENT_ROOT']."/test/vignetteImage.png");
?>
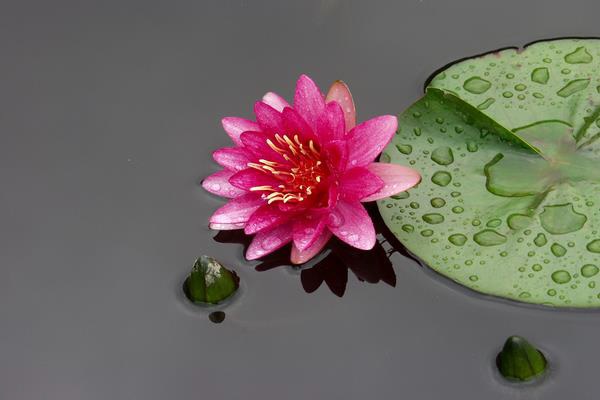
Assume that the following is the input image (image.png) in the program −
Output
Rounding corners
There is a basic belief that rounded corners are easier on the eyes. That is, they are suitable for the natural movement of the head and eyes respectively. Rounding image corners can also make the image look more organized and neater.
To round the corners of an image, there are an inbuilt function roundCorners() provided by Imagemagick. This function takes an image as input, rounds the corners, and produces that image as output.
Syntax
public Imagick::roundCorners(
   float $x_rounding,
   float $y_rounding,
   float $stroke_width =10,
   float $displace =5,
   float $size_correction =-6
): bool
This function has 5 parameters: x_rounding, y_rounding, strike_width, displace, and size_correction. x_rounding and y_rounding are float values and they control the amount of rounding. stroke_width, displace, and size-correction are also float values which are used to fine-tune the rounding process.
Example
From this example, you will be able to clearly understand the usage of this function. The image is taken as input at first by creating a new Imagick object. roundCorners() function is applied to that image with the help of the parameters specified (x_rounding=20, y_rounding=20, stroke-width=5, displace=5, size-correction=-10). Then, the output image is obtained using the function writeImage().
<?php
   $image=new Imagick($_SERVER['DOCUMENT_ROOT']."/test/imagee.png");
   $image->roundCorners(20, 20, 5, 5, -10);
   $image->writeImage($_SERVER['DOCUMENT_ROOT']."/test/roundCornerImage.png");
?>
Assume that the following is the input image (image.png) in the program −

Output

Polaroid Image
In this chapter, you will be learning to simulate the polaroid picture. A polaroid picture is a picture that is taken by a polaroid camera. It is a type of camera that takes a picture and prints it after a few seconds. It is a type of instant print and has a special type of film holder. For simulating a polaroid image, Imagemagick has provided an inbuilt function polaroidImage().
Syntax
public Imagick::polaroidImage(ImagickDraw $properties, float $angle): bool
This function takes in 2 parameters: properties and angle. Properties specifies the polaroid properties and angle specifies the polaroid angle in float value.
Example
In this example, you create a new imagick object and takes an image as input. Then, apply polaroidImage() function on that image by specifying the parameters. The polaroid image is obtained as output.
<?php
   $image=new Imagick($_SERVER['DOCUMENT_ROOT']."/test/imagee.png");
   $image->polaroidImage(new ImagickDraw(), 30);
   $image->writeImage($_SERVER['DOCUMENT_ROOT']."/test/polaroidImage.png");
?>
Assume that the following is the input image (image.png) in the program −

Output

Creation of Parallelogram
In this section, you will be learning about the function shearImage(). It is an inbuilt function provided by Imagemagick. The functionality of this is to create a parallelogram. This function takes an image as input and shears the image on the X and Y axis to create a parallelogram and adds a background color.
Syntax
public Imagick::shearImage(mixed $background, float $x_shear, float $y_shear): bool
This function takes in 3 parameters: background, x_shear, and y_shear. Background specifies the background color, x_shear specifies the number of degrees to shear on the X-axis, and y_shear specifies the number of degrees to shear on the Y-axis.
Example
In the below example, the image is taken as input, and shearImage () function is applied on that image. It takes in 3 parameters (background color= rgb (100, 200, 150), x_shear=10 and y_shear=10). The obtained output is displayed using the function writeImage ().
<?php
   $image=new Imagick($_SERVER['DOCUMENT_ROOT']."/test/image.png");
   $image->shearImage('rgb(100, 200, 150)', 10, 10);
   $image->writeImage($_SERVER['DOCUMENT_ROOT']."/test/shearImage.png");
?>
Assume that the following is the input image (image.png) in the program −

Output