- MFC - Home
- MFC - Overview
- MFC - Environment Setup
- MFC - VC++ Projects
- MFC - Getting Started
- MFC - Windows Fundamentals
- MFC - Dialog Boxes
- MFC - Windows Resources
- MFC - Property Sheets
- MFC - Windows Layout
- MFC - Controls Management
- MFC - Windows Controls
- MFC - Messages & Events
- MFC - Activex Controls
- MFC - File System
- MFC - Standard I/O
- MFC - Document View
- MFC - Strings
- MFC - Carray
- MFC - Linked Lists
- MFC - Database Classes
- MFC - Serialization
- MFC - Multithreading
- MFC - Internet Programming
- MFC - GDI
- MFC - Libraries
MFC - List Box
A list box displays a list of items, such as filenames, that the user can view and select. A List box is represented by CListBox class. In a single-selection list box, the user can select only one item. In a multiple-selection list box, a range of items can be selected. When the user selects an item, it is highlighted and the list box sends a notification message to the parent window.
Here are some mapping entries for Listbox −
| Message | Map entry | Description |
|---|---|---|
| LBN_DBLCLK | ON_LBN_DBLCLK( <id>, <memberFxn> ) | The framework calls this member function when list item is double clicked. |
| LBN_KILLFOCUS | ON_LBN_KILLFOCUS( <id>, <memberFxn> ) | The framework calls this member function immediately before losing the input focus. |
| LBN_SELCHANGE | ON_LBN_SELCHANGE( <id>, <memberFxn> ) | The framework calls this member function when selection is changed. |
| LBN_SETFOCUS | ON_LBN_SETFOCUS( <id>, <memberFxn> ) | The framework calls this member function after gaining the input focus. |
Let us look into a simple example of List box by creating a new MFC dialog based application.
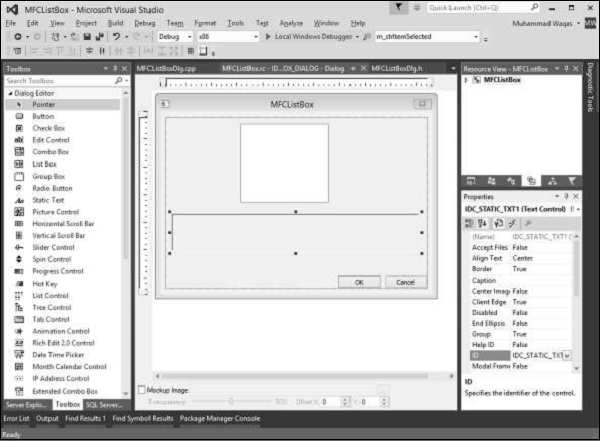
Step 1 − Once the project is created, you will see the TODO line which is the Caption of Text Control. Remove the Caption and set its ID to IDC_STATIC_TXT.
Step 2 − Drag List Box from the Toolbox.
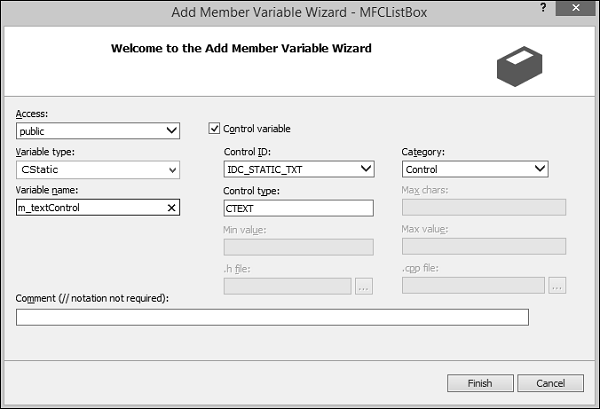
Step 3 − Add the control variable for the Text control.
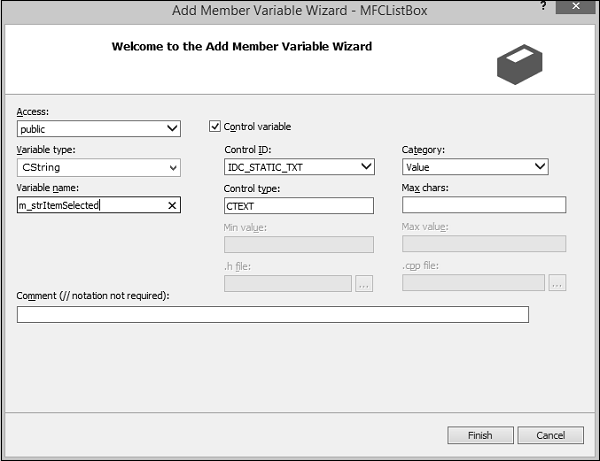
Step 4 − Add the Value variable for the Text control.
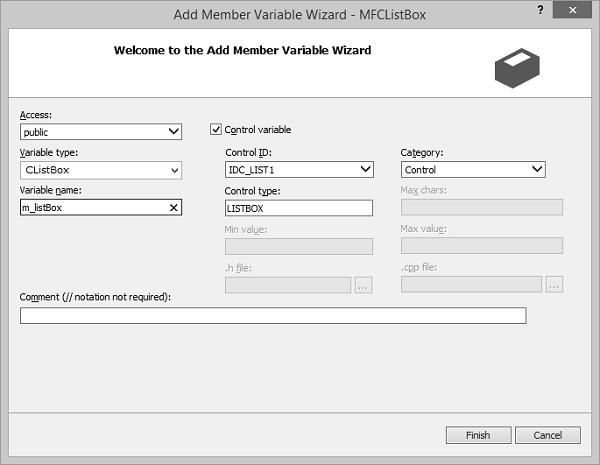
Step 5 − Add the control variable for the List Box control.
Step 6 − Add the event handler for the List Box control.
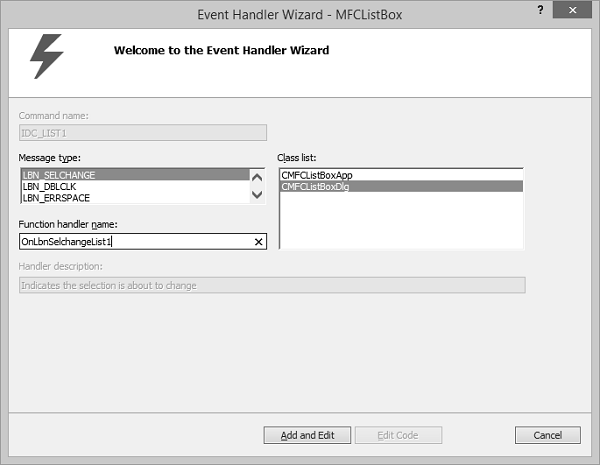
Step 7 − Select the LBN_SELCHANGE from the message type and enter name for the event handler.
Step 8 − Add one function, which will load the list box.
void CMFCListBoxDlg::LoadListBox() {
   CString str = _T("");
   for (int i = 0; i<10; i++) {

      str.Format(_T("Item %d"), i);
      m_listBox.AddString(str);
   }
}
Step 9 − Call the function from CMFCListBoxDlg::OnInitDialog() as shown in the following code.
BOOL CMFCListBoxDlg::OnInitDialog() {
   CDialogEx::OnInitDialog();

   // Set the icon for this dialog. The framework does this automatically
   // when the application's main window is not a dialog
   SetIcon(m_hIcon, TRUE);       // Set big icon
   SetIcon(m_hIcon, FALSE);      // Set small icon

   // TODO: Add extra initialization here
   LoadListBox();
   return TRUE; // return TRUE unless you set the focus to a control
}
Step 10 − Here is the event handler implementation. This will display the current selected item from the List Box.
void CMFCListBoxDlg::OnLbnSelchangeList1() {
   // TODO: Add your control notification handler code here
   m_listBox.GetText(m_listBox.GetCurSel(),m_strItemSelected);
   UpdateData(FALSE);
}
Step 11 − When the above code is compiled and executed, you will see the following output.

Step 12 − When you select any item, it will be displayed on the Text Control.
