- PHP - Home
- PHP - Roadmap
- PHP - Introduction
- PHP - Installation
- PHP - History
- PHP - Features
- PHP - Syntax
- PHP - Hello World
- PHP - Comments
- PHP - Variables
- PHP - Echo/Print
- PHP - var_dump
- PHP - $ and $$ Variables
- PHP - Constants
- PHP - Magic Constants
- PHP - Data Types
- PHP - Type Casting
- PHP - Type Juggling
- PHP - Strings
- PHP - Boolean
- PHP - Integers
- PHP - Files & I/O
- PHP - Maths Functions
- PHP - Heredoc & Nowdoc
- PHP - Compound Types
- PHP - File Include
- PHP - Date & Time
- PHP - Scalar Type Declarations
- PHP - Return Type Declarations
- PHP - Operators
- PHP - Arithmetic Operators
- PHP - Comparison Operators
- PHP - Logical Operators
- PHP - Assignment Operators
- PHP - String Operators
- PHP - Array Operators
- PHP - Conditional Operators
- PHP - Spread Operator
- PHP - Null Coalescing Operator
- PHP - Spaceship Operator
- PHP Control Statements
- PHP - Decision Making
- PHP - If…Else Statement
- PHP - Switch Statement
- PHP - Loop Types
- PHP - For Loop
- PHP - Foreach Loop
- PHP - While Loop
- PHP - Do…While Loop
- PHP - Break Statement
- PHP - Continue Statement
- PHP Arrays
- PHP - Arrays
- PHP - Indexed Array
- PHP - Associative Array
- PHP - Multidimensional Array
- PHP - Array Functions
- PHP - Constant Arrays
- PHP Functions
- PHP - Functions
- PHP - Function Parameters
- PHP - Call by value
- PHP - Call by Reference
- PHP - Default Arguments
- PHP - Named Arguments
- PHP - Variable Arguments
- PHP - Returning Values
- PHP - Passing Functions
- PHP - Recursive Functions
- PHP - Type Hints
- PHP - Variable Scope
- PHP - Strict Typing
- PHP - Anonymous Functions
- PHP - Arrow Functions
- PHP - Variable Functions
- PHP - Local Variables
- PHP - Global Variables
- PHP Superglobals
- PHP - Superglobals
- PHP - $GLOBALS
- PHP - $_SERVER
- PHP - $_REQUEST
- PHP - $_POST
- PHP - $_GET
- PHP - $_FILES
- PHP - $_ENV
- PHP - $_COOKIE
- PHP - $_SESSION
- PHP File Handling
- PHP - File Handling
- PHP - Open File
- PHP - Read File
- PHP - Write File
- PHP - File Existence
- PHP - Download File
- PHP - Copy File
- PHP - Append File
- PHP - Delete File
- PHP - Handle CSV File
- PHP - File Permissions
- PHP - Create Directory
- PHP - Listing Files
- Object Oriented PHP
- PHP - Object Oriented Programming
- PHP - Classes and Objects
- PHP - Constructor and Destructor
- PHP - Access Modifiers
- PHP - Inheritance
- PHP - Class Constants
- PHP - Abstract Classes
- PHP - Interfaces
- PHP - Traits
- PHP - Static Methods
- PHP - Static Properties
- PHP - Namespaces
- PHP - Object Iteration
- PHP - Encapsulation
- PHP - Final Keyword
- PHP - Overloading
- PHP - Cloning Objects
- PHP - Anonymous Classes
- PHP Web Development
- PHP - Web Concepts
- PHP - Form Handling
- PHP - Form Validation
- PHP - Form Email/URL
- PHP - Complete Form
- PHP - File Inclusion
- PHP - GET & POST
- PHP - File Uploading
- PHP - Cookies
- PHP - Sessions
- PHP - Session Options
- PHP - Sending Emails
- PHP - Sanitize Input
- PHP - Post-Redirect-Get (PRG)
- PHP - Flash Messages
- PHP AJAX
- PHP - AJAX Introduction
- PHP - AJAX Search
- PHP - AJAX XML Parser
- PHP - AJAX Auto Complete Search
- PHP - AJAX RSS Feed Example
- PHP XML
- PHP - XML Introduction
- PHP - Simple XML Parser
- PHP - SAX Parser Example
- PHP - DOM Parser Example
- PHP Login Example
- PHP - Login Example
- PHP - Facebook Login
- PHP - Paypal Integration
- PHP - MySQL Login
- PHP Advanced
- PHP - MySQL
- PHP.INI File Configuration
- PHP - Array Destructuring
- PHP - Coding Standard
- PHP - Regular Expression
- PHP - Error Handling
- PHP - Try…Catch
- PHP - Bugs Debugging
- PHP - For C Developers
- PHP - For PERL Developers
- PHP - Frameworks
- PHP - Core PHP vs Frame Works
- PHP - Design Patterns
- PHP - Filters
- PHP - JSON
- PHP - Exceptions
- PHP - Special Types
- PHP - Hashing
- PHP - Encryption
- PHP - is_null() Function
- PHP - System Calls
- PHP - HTTP Authentication
- PHP - Swapping Variables
- PHP - Closure::call()
- PHP - Filtered unserialize()
- PHP - IntlChar
- PHP - CSPRNG
- PHP - Expectations
- PHP - Use Statement
- PHP - Integer Division
- PHP - Deprecated Features
- PHP - Removed Extensions & SAPIs
- PHP - PEAR
- PHP - CSRF
- PHP - FastCGI Process
- PHP - PDO Extension
- PHP - Built-In Functions
- PHP Useful Resources
- PHP - Cheatsheet
- PHP - Questions & Answers
- PHP - Quick Guide
- PHP - Useful Resources
- PHP - Discussion
- PHP - Online Compiler
PHP - Installation
To develop PHP applications fully, especially those involving databases and web servers, installing PHP on your local machine is necessary.
You can start learning the basics of programming in PHP with the help of any of the online PHP compilers freely available on the Internet. This will help in getting acquainted with the features of PHP without installing it on your computer. Later on, install a full-fledged PHP environment on your local machine.
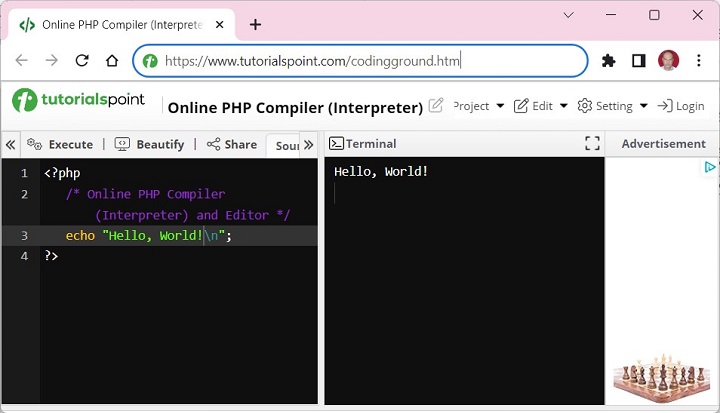
PHP Online Compiler / Editor
One such online PHP compiler is provided by Tutorialpoint's "Coding Ground for Developers". Visit https://www.tutorialspoint.com/codingground.htm, enter PHP script and execute it.
However, to be able to learn the advanced features of PHP, particularly related to the web concepts such as server variables, using backend databases, etc., you need to install the PHP environment on your local machine.
In order to develop and run PHP Web pages, you neeed to install three vital components on your computer system.
Web Server − PHP will work with virtually all Web Server software, including Microsoft's Internet Information Server (IIS), NGNIX, or Lighttpd etc. The most often used web server software is the freely available Apache Server. Download Apache for free here https://httpd.apache.org/download.cgi
Database − PHP will work with virtually all database software, including Oracle and Sybase but most commonly used is freely available MySQL database. Download MySQL for free here - https://www.mysql.com/downloads/
PHP Parser − In order to process PHP script instructions a parser must be installed to generate HTML output that can be sent to the Web Browser.
Although it is possible to install these three components separately, and configure the installation correctly, it is a little complex process, particularly for the beginners. Instead, using any all-in-one packaged distribution that contains precompiled Apache, MySQL and PHP binaries is convenient.
Installing PHP
Install PHP by following the instructions below. There are various ways to configure Apache and PHP, but this is probably the easiest.
Step 1 − Download the PHP files
Get the most recent PHP x64 Thread Safe ZIP package from https://windows.php.net/download/.
Step 2 − Extract the files
Create a new php folder in the root of your C:\ drive and extract the ZIP contents there. PHP can be installed anywhere on your system, but if you do not use C:\php, you must edit the folders listed below.
Step 3 − Configure php.ini
PHP's configuration file is php.ini. This is not present by default, therefore copy C:\php\php.ini-development to C:\php\php.ini. This default configuration creates a development environment that records all PHP errors and warnings. You can edit php.ini using a text editor and you may need to change lines like the ones shown below. To uncomment a value, normally you must remove the leading semicolon (;). First, enable any required extensions for the libraries you wish to use. The following extensions should be suitable for most applications, including WordPress −
extension=curl
extension=gd
extension=mbstring
extension=pdo_mysql
If you want to send emails via PHP's mail() function, insert the details of an SMTP server in the [mail function] section (your ISP's settings should is enough) −
[mail function]
; For Win32 only.
; http://php.net/smtp
SMTP = mail.myisp.com
; http://php.net/smtp-port
smtp_port = 25

; For Win32 only.
; http://php.net/sendmail-from
sendmail_from = my@emailaddress.com
Step 4 − Add C:\php to the PATH environment variable
To ensure that Windows can discover the PHP executable, add it to the PATH environment variable. Click the Windows Start button, type "environment", and then select Edit the system environment variables. Select the Advanced tab and then click the Environment Variables option. Scroll down the System variables list and select Path, then the Edit button. Select New and enter C:\php.
Step 5 − Configure PHP as an Apache module
Make sure Apache is not running, then open the C:\Apache24\conf\httpd.conf configuration file with a text editor. at configure PHP as an Apache module, add the following lines at the bottom of the file (change the file paths as needed, but use forward slashes rather than Windows backslashes) −
# PHP8 module
PHPIniDir "C:/php"
LoadModule php_module "C:/php/php8apache2_4.dll"
AddType application/x-httpd-php .php
Optionally, change the DirectoryIndex setting to set index.php the default instead of index.html. Initial parameters are −
<IfModule dir_module>
   DirectoryIndex index.html
</IfModule>
You have to change it to −
<IfModule dir_module>
   DirectoryIndex index.php index.html
</IfModule>
Save httpd.conf and test your changes with the cmd command line.
cd C:\Apache24\bin
httpd -t
Step 6 − Test a PHP file
Create a new index.php file in Apache's web page root folder C:\Apache24\htdocs. Include the following PHP code −
<?php
   phpinfo();
?>
XAMPP Installation
There are many precompiled bundles available both in open-source as well as proprietary distributions. XAMPP, from Apache Friends (https://www.apachefriends.org/) is one of the most popular PHP enabled web server packages. We shall be using XAMPP in this tutorial.
XAMPP is an easy to install Apache distribution that contains Apache, MariaDB, PHP and Perl. The letter X in the acronym indicates that it is a cross-platform software, available for use on Windows, Linux and OS X. Note that XAMPP includes MariaDB, which is a fork of MySQL, with no difference in its functionality.
To download the respective installer for your operating system, visit https://www.apachefriends.org/download.html, and download one of the following −
Windows − https://sourceforge.net/projects/
Using the installer on Windows is a completely wizard based installation. All you need to provide is an administrator access and the location of the installation directory which is "c:\xampp" by default.
Install XAMPP on Linux
To install XAMPP on Linux, use the following steps −
Step 1 − Change the permissions to the installer −
chmod 755 xampp-linux-*-installer.run
Run the installer −
sudo ./xampp-linux-*-installer.run
XAMPP is now installed below the "/opt/lamp" directory.
Step 2 − To start XAMPP simply call this command −
sudo /opt/lampp/lampp start
You should now see something like this on your screen −
Starting XAMPP ...
LAMPP: Starting Apache...
LAMPP: Starting MySQL...
LAMPP started.
Ready. Apache and MySQL are running.
You can also use a graphical tool to manage your servers easily. You can start this tool with the following commands −
cd /opt/lampp
sudo ./manager-linux.run (or manager-linux-x64.run)
Step 3 − To stop XAMPP simply call this command −
sudo /opt/lampp/lampp stop
You should now see something like this on your screen −
Stopping XAMPP ...
LAMPP: Stopping Apache...
LAMPP: Stopping MySQL...
LAMPP stopped.
Also, note that there is a graphical tool that you can use to start/stop your servers easily. You can start this tool with the following commands −
cd /opt/lampp
sudo ./manager-linux.run (or manager-linux-x64.run)
If you are using OS X, follow these steps −
To start the installation, Open the DMG-Image, and double-click the image to start the installation process.
To start XAMPP simply open XAMPP Control and start Apache, MySQL and ProFTPD. The name of the XAMPP Control is "manager-osx".
To stop XAMPP simply open XAMPP Control and stop the servers. The name of the XAMPP Control is "manager-osx".
The XAMPP control panel is a GUI tool from which the Apache server, and MySQL can be easily started and stopped.
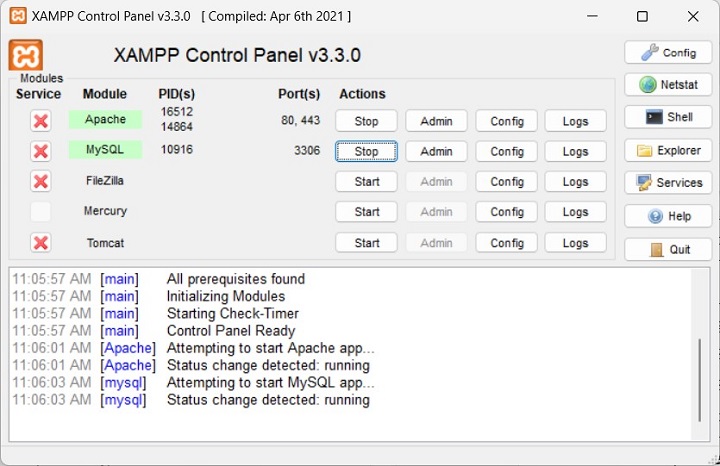
Press the Admin button after starting the Apache module. The XAMPP homepage appears like the one shown below −

PHP Parser Installation
Before you proceed it is important to make sure that you have proper environment setup on your machine to develop your web programs using PHP. Type the following address into your browser's address box.
http://127.0.0.1/info.php
If this displays a page showing your PHP installation related information then it means you have PHP and Webserver installed properly. Otherwise you have to follow given procedure to install PHP on your computer.
This section will guide you to install and configure PHP over the following four platforms −
Apache Configuration
If you are using Apache as a Web Server then this section will guide you to edit Apache Configuration Files.
Just Check it here − PHP Configuration in Apache Server
PHP.INI File Configuration
The PHP configuration file, php.ini, is the final and most immediate way to affect PHP's functionality.
Just Check it here − PHP.INI File Configuration
Windows IIS Configuration
To configure IIS(Internet Information Services) on your Windows machine you can refer your IIS Reference Manual shipped along with IIS.
You now have a complete PHP development environment on your local machine.
