- Impala - Home
- Impala - Overview
- Impala - Environment
- Impala - Architecture
- Impala - Shell
- Impala - Query Language Basics
- Table Specific Statements
- Impala - Create Table Statement
- Impala - Insert Statement
- Impala - Select Statement
- Impala - Describe Statement
- Impala - Alter Table
- Impala - Drop a Table
- Impala - Truncate a Table
- Impala - Show Tables
- Impala - Create View
- Impala - Alter View
- Impala - Drop a View
- Impala - Clauses
- Impala - Order By Clause
- Impala - Group By Clause
- Impala - Having Clause
- Impala - Limit Clause
- Impala - Offset Clause
- Impala - Union Clause
- Impala - With Clause
- Impala - Distinct Operator
- Impala Useful Resources
- Impala - Quick Guide
- Impala - Useful Resources
- Impala - Discussion
Impala - Quick Guide
Impala - Introduction
What is Impala?
Impala is a MPP (Massive Parallel Processing) SQL query engine for processing huge volumes of data that is stored in Hadoop cluster. It is an open source software which is written in C++ and Java. It provides high performance and low latency compared to other SQL engines for Hadoop.
In other words, Impala is the highest performing SQL engine (giving RDBMS-like experience) which provides the fastest way to access data that is stored in Hadoop Distributed File System.
Why Impala?
Impala combines the SQL support and multi-user performance of a traditional analytic database with the scalability and flexibility of Apache Hadoop, by utilizing standard components such as HDFS, HBase, Metastore, YARN, and Sentry.
With Impala, users can communicate with HDFS or HBase using SQL queries in a faster way compared to other SQL engines like Hive.
Impala can read almost all the file formats such as Parquet, Avro, RCFile used by Hadoop.
Impala uses the same metadata, SQL syntax (Hive SQL), ODBC driver, and user interface (Hue Beeswax) as Apache Hive, providing a familiar and unified platform for batch-oriented or real-time queries.
Unlike Apache Hive, Impala is not based on MapReduce algorithms. It implements a distributed architecture based on daemon processes that are responsible for all the aspects of query execution that run on the same machines.
Thus, it reduces the latency of utilizing MapReduce and this makes Impala faster than Apache Hive.
Advantages of Impala
Here is a list of some noted advantages of Cloudera Impala.
Using impala, you can process data that is stored in HDFS at lightning-fast speed with traditional SQL knowledge.
Since the data processing is carried where the data resides (on Hadoop cluster), data transformation and data movement is not required for data stored on Hadoop, while working with Impala.
Using Impala, you can access the data that is stored in HDFS, HBase, and Amazon s3 without the knowledge of Java (MapReduce jobs). You can access them with a basic idea of SQL queries.
To write queries in business tools, the data has to be gone through a complicated extract-transform-load (ETL) cycle. But, with Impala, this procedure is shortened. The time-consuming stages of loading & reorganizing is overcome with the new techniques such as exploratory data analysis & data discovery making the process faster.
Impala is pioneering the use of the Parquet file format, a columnar storage layout that is optimized for large-scale queries typical in data warehouse scenarios.
Features of Impala
Given below are the features of cloudera Impala −
Impala is available freely as open source under the Apache license.
Impala supports in-memory data processing, i.e., it accesses/analyzes data that is stored on Hadoop data nodes without data movement.
You can access data using Impala using SQL-like queries.
Impala provides faster access for the data in HDFS when compared to other SQL engines.
Using Impala, you can store data in storage systems like HDFS, Apache HBase, and Amazon s3.
You can integrate Impala with business intelligence tools like Tableau, Pentaho, Micro strategy, and Zoom data.
Impala supports various file formats such as, LZO, Sequence File, Avro, RCFile, and Parquet.
Impala uses metadata, ODBC driver, and SQL syntax from Apache Hive.
Relational Databases and Impala
Impala uses a Query language that is similar to SQL and HiveQL. The following table describes some of the key dfferences between SQL and Impala Query language.
| Impala | Relational databases |
|---|---|
| Impala uses an SQL like query language that is similar to HiveQL. | Relational databases use SQL language. |
| In Impala, you cannot update or delete individual records. | In relational databases, it is possible to update or delete individual records. |
| Impala does not support transactions. | Relational databases support transactions. |
| Impala does not support indexing. | Relational databases support indexing. |
| Impala stores and manages large amounts of data (petabytes). | Relational databases handle smaller amounts of data (terabytes) when compared to Impala. |
Hive, Hbase, and Impala
Though Cloudera Impala uses the same query language, metastore, and the user interface as Hive, it differs with Hive and HBase in certain aspects. The following table presents a comparative analysis among HBase, Hive, and Impala.
| HBase | Hive | Impala |
|---|---|---|
| HBase is wide-column store database based on Apache Hadoop. It uses the concepts of BigTable. | Hive is a data warehouse software. Using this, we can access and manage large distributed datasets, built on Hadoop. | Impala is a tool to manage, analyze data that is stored on Hadoop. |
| The data model of HBase is wide column store. | Hive follows Relational model. | Impala follows Relational model. |
| HBase is developed using Java language. | Hive is developed using Java language. | Impala is developed using C++. |
| The data model of HBase is schema-free. | The data model of Hive is Schema-based. | The data model of Impala is Schema-based. |
| HBase provides Java, RESTful and, Thrift APIs. | Hive provides JDBC, ODBC, Thrift APIs. | Impala provides JDBC and ODBC APIs. |
| Supports programming languages like C, C#, C++, Groovy, Java PHP, Python, and Scala. | Supports programming languages like C++, Java, PHP, and Python. | Impala supports all languages supporting JDBC/ODBC. |
| HBase provides support for triggers. | Hive does not provide any support for triggers. | Impala does not provide any support for triggers. |
All these three databases −
Are NOSQL databases.
Available as open source.
Support server-side scripting.
Follow ACID properties like Durability and Concurrency.
Use sharding for partitioning.
Drawbacks of Impala
Some of the drawbacks of using Impala are as follows −
- Impala does not provide any support for Serialization and Deserialization.
- Impala can only read text files, not custom binary files.
- Whenever new records/files are added to the data directory in HDFS, the table needs to be refreshed.
Impala - Environment
This chapter explains the prerequisites for installing Impala, how to download, install and set up Impala in your system.
Similar to Hadoop and its ecosystem software, we need to install Impala on Linux operating system. Since cloudera shipped Impala, it is available with Cloudera Quick Start VM.
This chapter describes how to download Cloudera Quick Start VM and start Impala.
Downloading Cloudera Quick Start VM
Follow the steps given below to download the latest version of Cloudera QuickStartVM.
Step 1
Open the homepage of cloudera website http://www.cloudera.com/. You will get the page as shown below.
Step 2
Click the Sign in link on the cloudera homepage, which will redirect you to the Sign in page as shown below.
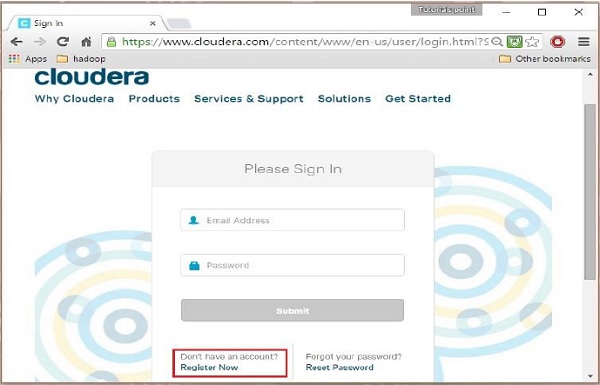
If you havent registered yet, click the Register Now link which will give you Account Registration form. Register there and sign in to cloudera account.
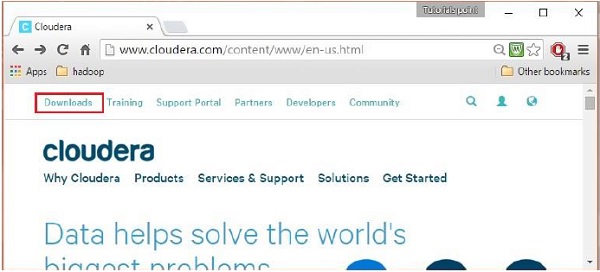
Step 3
After signing in, open the download page of cloudera website by clicking on the Downloads link highlighted in the following snapshot.
Step 4 - Download QuickStartVM
Download the cloudera QuickStartVM by clicking on the Download Now button, as highlighted in the following snapshot
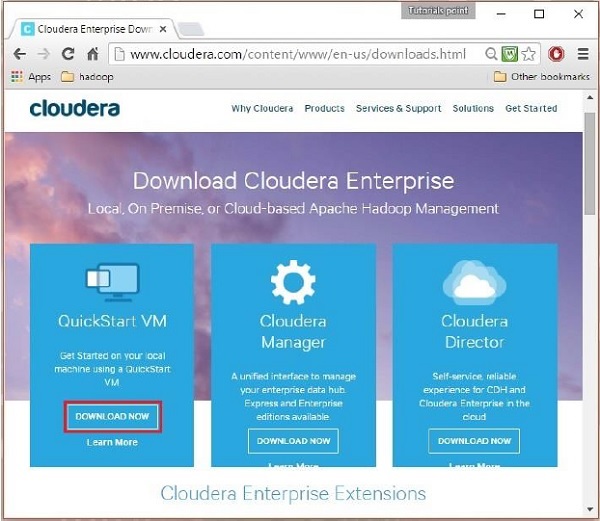
This will redirect you to the download page of QuickStart VM.
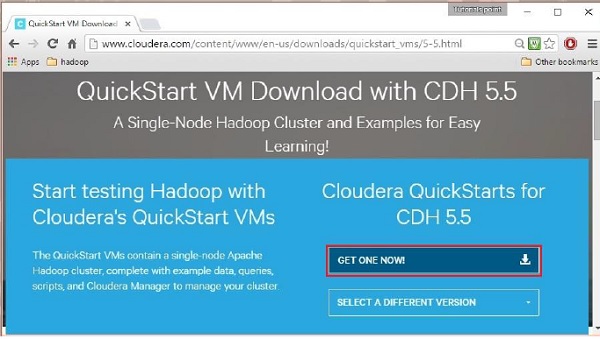
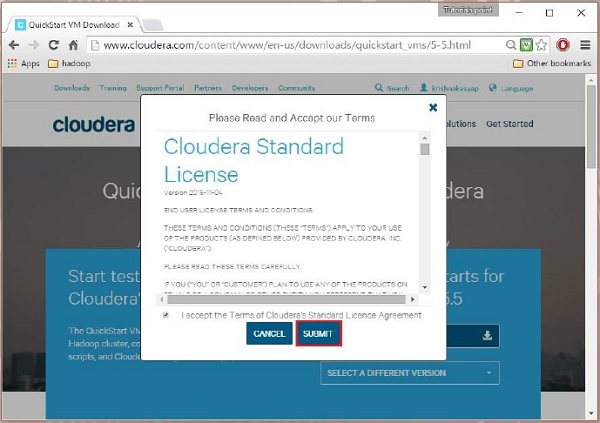
Click the Get ONE NOW button, accept the license agreement, and click the submit button as shown below.
Cloudera provides its VM compatible VMware, KVM and VIRTUALBOX. Select the required version. Here in our tutorial, we are demonstrating the Cloudera QuickStartVM setup using virtual box, therefore click the VIRTUALBOX DOWNLOAD button, as shown in the snapshot given below.
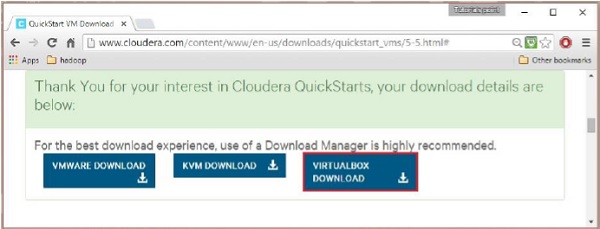
This will start downloading a file named cloudera-quickstart-vm-5.5.0-0-virtualbox.ovf which is a virtual box image file.
Importing the Cloudera QuickStartVM
After downloading the cloudera-quickstart-vm-5.5.0-0-virtualbox.ovf file, we need to import it using virtual box. For that, first of all, you need to install virtual box in your system. Follow the steps given below to import the downloaded image file.
Step 1
Download virtual box from the following link and install it https://www.virtualbox.org/
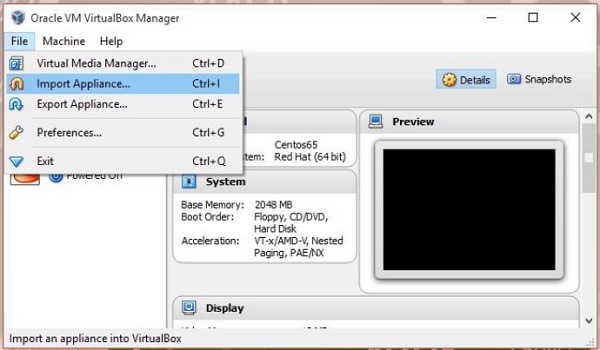
Step 2
Open the virtual box software. Click File and choose Import Appliance, as shown below.
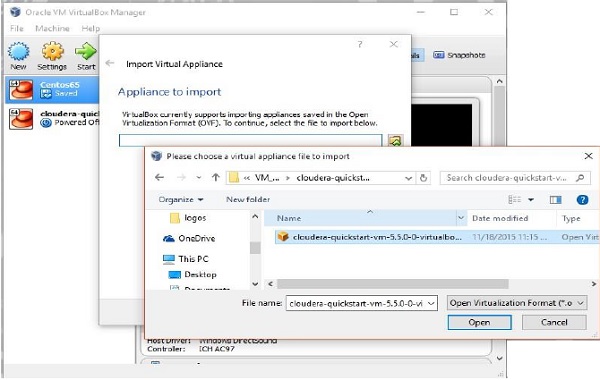
Step 3
On clicking Import Appliance, you will get the Import Virtual Appliance window. Select the location of the downloaded image file as shown below.
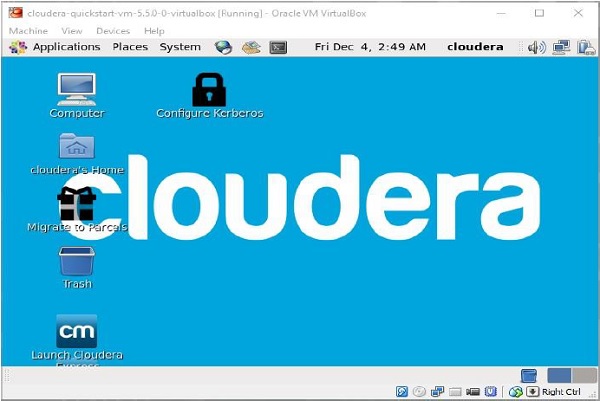
After importing Cloudera QuickStartVM image, start the virtual machine. This virtual machine has Hadoop, cloudera Impala, and all the required software installed. The snapshot of the VM is shown below.
Starting Impala Shell
To start Impala, open the terminal and execute the following command.
[cloudera@quickstart ~] $ impala-shell
This will start the Impala Shell, displaying the following message.
Starting Impala Shell without Kerberos authentication
Connected to quickstart.cloudera:21000
Server version: impalad version 2.3.0-cdh5.5.0 RELEASE (build
0c891d79aa38f297d244855a32f1e17280e2129b)
********************************************************************************
 Welcome to the Impala shell. Copyright (c) 2015 Cloudera, Inc. All rights reserved.
(Impala Shell v2.3.0-cdh5.5.0 (0c891d7) built on Mon Nov 9 12:18:12 PST 2015)

Press TAB twice to see a list of available commands.
********************************************************************************
[quickstart.cloudera:21000] >
Note − We will discuss all the impala-shell commands in later chapters.
Impala Query editor
In addition to Impala shell, you can communicate with Impala using the Hue browser. After installing CDH5 and starting Impala, if you open your browser, you will get the cloudera homepage as shown below.
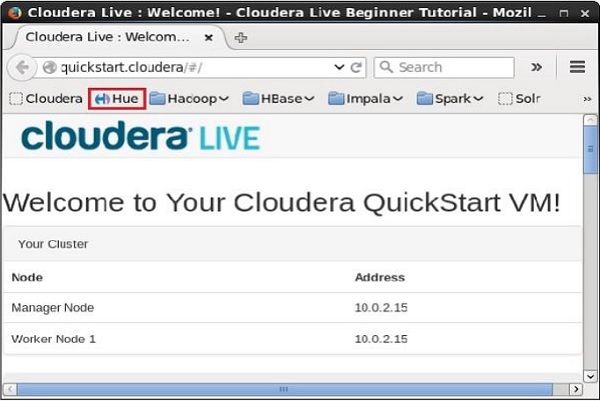
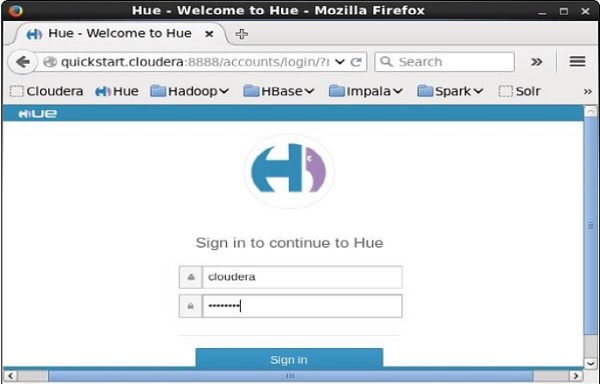
Now, click the bookmark Hue to open the Hue browser. On clicking, you can see the login page of the Hue Browser, logging with the credentials cloudera and cloudera.
As soon as you log on to the Hue browser, you can see the Quick Start Wizard of Hue browser as shown below.
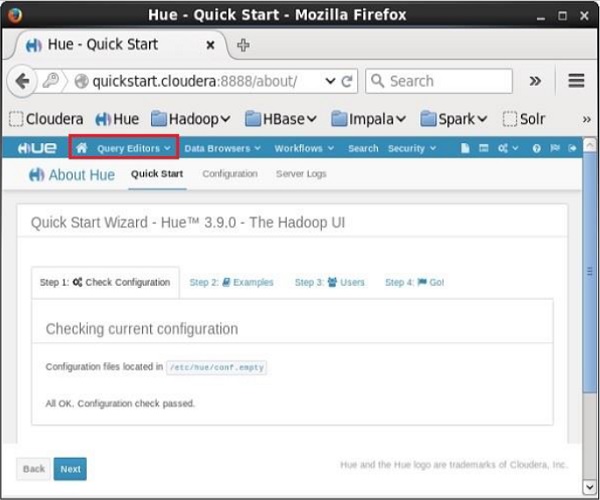
On clicking the Query Editors drop-down menu, you will get the list of editors Impala supports as shown in the following screenshot.
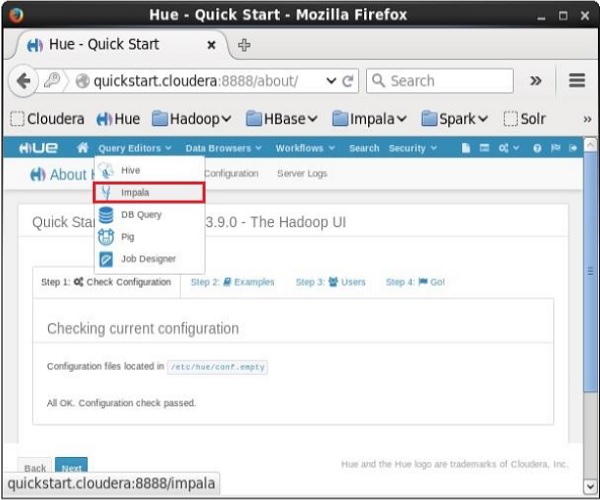
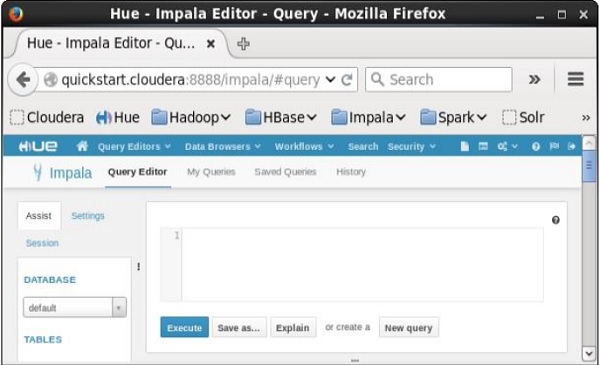
On clicking Impala in the drop-down menu, you will get the Impala query editor as shown below.
Impala - Architecture
Impala is an MPP (Massive Parallel Processing) query execution engine that runs on a number of systems in the Hadoop cluster. Unlike traditional storage systems, impala is decoupled from its storage engine. It has three main components namely, Impala daemon (Impalad), Impala Statestore, and Impala metadata or metastore.
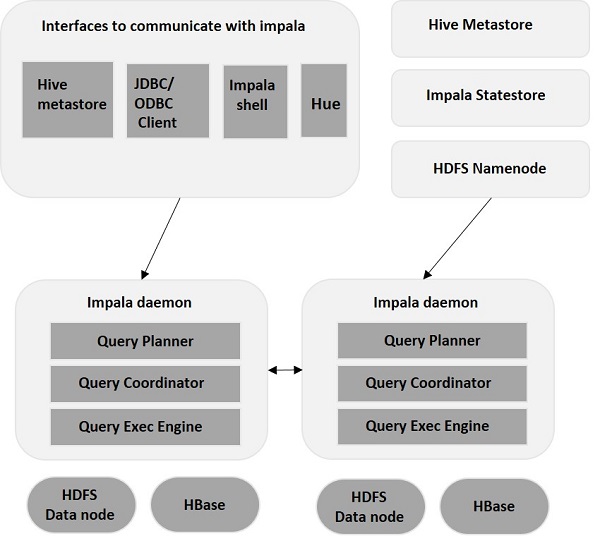
Impala daemon(Impalad)
Impala daemon (also known as impalad) runs on each node where Impala is installed. It accepts the queries from various interfaces like impala shell, hue browser, etc. and processes them.
Whenever a query is submitted to an impalad on a particular node, that node serves as a coordinator node for that query. Multiple queries are served by Impalad running on other nodes as well. After accepting the query, Impalad reads and writes to data files and parallelizes the queries by distributing the work to the other Impala nodes in the Impala cluster. When queries are processing on various Impalad instances, all of them return the result to the central coordinating node.
Depending on the requirement, queries can be submitted to a dedicated Impalad or in a load balanced manner to another Impalad in your cluster.
Impala State Store
Impala has another important component called Impala State store, which is responsible for checking the health of each Impalad and then relaying each Impala daemon health to the other daemons frequently. This can run on same node where Impala server or other node within the cluster is running.
The name of the Impala State store daemon process is State stored. Impalad reports its health status to the Impala State store daemon, i.e., State stored.
In the event of a node failure due to any reason, Statestore updates all other nodes about this failure and once such a notification is available to the other impalad, no other Impala daemon assigns any further queries to the affected node.
Impala Metadata & Meta Store
Impala metadata & meta store is another important component. Impala uses traditional MySQL or PostgreSQL databases to store table definitions. The important details such as table & column information & table definitions are stored in a centralized database known as a meta store.
Each Impala node caches all of the metadata locally. When dealing with an extremely large amount of data and/or many partitions, getting table specific metadata could take a significant amount of time. So, a locally stored metadata cache helps in providing such information instantly.
When a table definition or table data is updated, other Impala daemons must update their metadata cache by retrieving the latest metadata before issuing a new query against the table in question.
Query Processing Interfaces
To process queries, Impala provides three interfaces as listed below.
Impala-shell − After setting up Impala using the Cloudera VM, you can start the Impala shell by typing the command impala-shell in the editor. We will discuss more about the Impala shell in coming chapters.
Hue interface − You can process Impala queries using the Hue browser. In the Hue browser, you have Impala query editor where you can type and execute the impala queries. To access this editor, first of all, you need to logging to the Hue browser.
ODBC/JDBC drivers − Just like other databases, Impala provides ODBC/JDBC drivers. Using these drivers, you can connect to impala through programming languages that supports these drivers and build applications that process queries in impala using those programming languages.
Query Execution Procedure
Whenever users pass a query using any of the interfaces provided, this is accepted by one of the Impalads in the cluster. This Impalad is treated as a coordinator for that particular query.
After receiving the query, the query coordinator verifies whether the query is appropriate, using the Table Schema from the Hive meta store. Later, it collects the information about the location of the data that is required to execute the query, from HDFS name node and sends this information to other impalads in order to execute the query.
All the other Impala daemons read the specified data block and processes the query. As soon all the daemons complete their tasks, the query coordinator collects the result back and delivers it to the user.
Impala - Shell
In the earlier chapters, we have seen the installation of Impala using cloudera and its architecture.
- Impala shell (command prompt)
- Hue (User Interface)
- ODBC and JDBC (Third party libraries)
This chapter explains how to start Impala Shell and the various options of the shell.
Impala Shell Command Reference
The commands of Impala shell are classified as general commands, query specific options, and table and database specific options, as explained below.
General Commands
- help
- version
- history
- shell (or) !
- connect
- exit | quit
Query specific options
- Set/unset
- Profile
- Explain
Table and Database specific options
- Alter
- describe
- drop
- insert
- select
- show
- use
Starting Impala Shell
Open the cloudera terminal, sign in as superuser, and type cloudera as password as shown below.
[cloudera@quickstart ~]$ su
Password: cloudera
[root@quickstart cloudera]#
Start Impala shell by typing the following command −
[root@quickstart cloudera] # impala-shell
Starting Impala Shell without Kerberos authentication
Connected to quickstart.cloudera:21000
Server version: impalad version 2.3.0-cdh5.5.0 RELEASE
(build 0c891d79aa38f297d244855a32f1e17280e2129b)
*********************************************************************

Welcome to the Impala shell. Copyright (c) 2015 Cloudera, Inc. All rights reserved.
(Impala Shell v2.3.0-cdh5.5.0 (0c891d7) built on Mon Nov 9 12:18:12 PST 2015)

Want to know what version of Impala you're connected to? Run the VERSION command to
find out!
*********************************************************************
[quickstart.cloudera:21000] >
Impala General Purpose Commands
The general purpose commands of Impala are explained below −
help command
The help command of Impala shell gives you a list of the commands available in Impala −
[quickstart.cloudera:21000] > help;

Documented commands (type help <topic>):
========================================================
compute  describe  insert  set     unset  with  version
connect  explain   quit    show    values use
exit     history   profile select  shell  tip

Undocumented commands:
=========================================
alter create desc drop help load summary
version command
The version command gives you the current version of Impala, as shown below.
[quickstart.cloudera:21000] > version;
Shell version: Impala Shell v2.3.0-cdh5.5.0 (0c891d7) built on Mon Nov 9
12:18:12 PST 2015

Server version: impalad version 2.3.0-cdh5.5.0 RELEASE (build
0c891d79aa38f297d244855a32f1e17280e2129b)
history command
The history command of Impala displays the last 10 commands executed in the shell. Following is the example of the history command. Here we have executed 5 commands, namely, version, help, show, use, and history.
[quickstart.cloudera:21000] > history;
[1]:version;
[2]:help;
[3]:show databases;
[4]:use my_db;
[5]:history;
quit/exit command
You can come out of the Impala shell using the quit or exit command, as shown below.
[quickstart.cloudera:21000] > exit;
Goodbye cloudera
connect command
The connect command is used to connect to a given instance of Impala. In case you do not specify any instance, then it connects to the default port 21000 as shown below.
[quickstart.cloudera:21000] > connect;
Connected to quickstart.cloudera:21000
Server version: impalad version 2.3.0-cdh5.5.0 RELEASE (build
0c891d79aa38f297d244855a32f1e17280e2129b)
Impala Query Specific Options
The query specific commands of Impala accept a query. They are explained below −
Explain
The explain command returns the execution plan for the given query.
[quickstart.cloudera:21000] > explain select * from sample;
Query: explain select * from sample
+------------------------------------------------------------------------------------+
| Explain String                                                                     |
+------------------------------------------------------------------------------------+
| Estimated Per-Host Requirements: Memory = 48.00MB VCores = 1                       |
| WARNING: The following tables are missing relevant table and/or column statistics. |
| my_db.customers                                                                    |
| 01:EXCHANGE [UNPARTITIONED]                                                        |
| 00:SCAN HDFS [my_db.customers]                                                     |
| partitions = 1/1 files = 6 size = 148B                                             |
+------------------------------------------------------------------------------------+
Fetched 7 row(s) in 0.17s
Profile
The profile command displays the low-level information about the recent query. This command is used for diagnosis and performance tuning of a query. Following is the example of a profile command. In this scenario, the profile command returns the low-level information of explain query.
[quickstart.cloudera:21000] > profile;

Query Runtime Profile:
Query (id=164b1294a1049189:a67598a6699e3ab6):

   Summary:
      Session ID: e74927207cd752b5:65ca61e630ad3ad
      Session Type: BEESWAX
      Start Time: 2016-04-17 23:49:26.08148000 End Time: 2016-04-17 23:49:26.2404000
      Query Type: EXPLAIN
      Query State: FINISHED
      Query Status: OK
      Impala Version: impalad version 2.3.0-cdh5.5.0 RELEASE (build 0c891d77280e2129b)
      User: cloudera
      Connected User: cloudera
      Delegated User:
      Network Address:10.0.2.15:43870
      Default Db: my_db
      Sql Statement: explain select * from sample
      Coordinator: quickstart.cloudera:22000
      : 0ns
      Query Timeline: 167.304ms
         - Start execution: 41.292us (41.292us) - Planning finished: 56.42ms (56.386ms)
         - Rows available: 58.247ms (1.819ms)
         - First row fetched: 160.72ms (101.824ms)
         - Unregister query: 166.325ms (6.253ms)

   ImpalaServer:
      - ClientFetchWaitTimer: 107.969ms
      - RowMaterializationTimer: 0ns
Table and Database Specific Options
The following table lists out the table and data specific options in Impala.
| Sr.No | Command & Explanation |
|---|---|
| 1 |
Alter The alter command is used to change the structure and name of a table in Impala. |
| 2 |
Describe The describe command of Impala gives the metadata of a table. It contains the information like columns and their data types. The describe command has desc as a short cut. |
| 3 |
Drop The drop command is used to remove a construct from Impala, where a construct can be a table, a view, or a database function. |
| 4 |
insert The insert command of Impala is used to,
|
| 5 |
select The select statement is used to perform a desired operation on a particular dataset. It specifies the dataset on which to complete some action. You can print or store (in a file) the result of the select statement. |
| 6 |
show The show statement of Impala is used to display the metastore of various constructs such as tables, databases, and tables. |
| 7 |
use The use statement of Impala is used to change the current context to the desired database. |
Impala - Query Language Basics
Impala Data types
The following table describes the Impala data types.
| Sr.No | Data Type & Description |
|---|---|
| 1 |
BIGINT This datatype stores numerical values and the range of this data type is -9223372036854775808 to 9223372036854775807. This datatype is used in create table and alter table statements. |
| 2 |
BOOLEAN This data type stores only true or false values and it is used in the column definition of create table statement. |
| 3 |
CHAR This data type is a fixed length storage, it is padded with spaces, you can store up to the maximum length of 255. |
| 4 |
DECIMAL This data type is used to store decimal values and it is used in create table and alter table statements. |
| 5 |
DOUBLE This data type is used to store the floating point values in the range of positive or negative 4.94065645841246544e-324d -1.79769313486231570e+308. |
| 6 |
FLOAT This data type is used to store single precision floating value datatypes in the range of positive or negative 1.40129846432481707e-45 .. 3.40282346638528860e+38. |
| 7 |
INT This data type is used to store 4-byte integer up to the range of -2147483648 to 2147483647. |
| 8 |
SMALLINT This data type is used to store 2-byte integer up to the range of -32768 to 32767. |
| 9 |
STRING This is used to store string values. |
| 10 |
TIMESTAMP This data type is used to represent a point in a time. |
| 11 |
TINYINT This data type is used to store 1-byte integer value up to the range of -128 to 127. |
| 12 |
VARCHAR This data type is used to store variable length character up to the maximum length 65,535. |
| 13 |
ARRAY This is a complex data type and it is used to store variable number of ordered elements. |
| 14 |
Map This is a complex data type and it is used to store variable number of key-value pairs. |
| 15 |
Struct This is a complex data type and used to represent multiple fields of a single item. |
Comments in Impala
Comments in Impala are similar to those in SQL.In general we have two types of comments in programming languages namely Single-line Comments and Multiline Comments.
Single-line comments − Every single line that is followed by "" is considered as a comment in Impala. Following is an example of a single-line comments in Impala.
-- Hello welcome to tutorials point.
Multiline comments − All the lines between /* and */ are considered as multiline comments in Impala. Following is an example of a multiline comments in Impala.
/*
Hi this is an example
Of multiline comments in Impala
*/
The operators in Impala are similar to those in SQL. Refer our SQL tutorial by clicking the following link sql-operators.
Impala - Create a Database
In Impala, a database is a construct which holds related tables, views, and functions within their namespaces. It is represented as a directory tree in HDFS; it contains tables partitions, and data files. This chapter explains how to create a database in Impala.
CREATE DATABASE Statement
The CREATE DATABASE Statement is used to create a new database in Impala.
Syntax
Following is the syntax of the CREATE DATABASE Statement.
CREATE DATABASE IF NOT EXISTS database_name;
Here, IF NOT EXISTS is an optional clause. If we use this clause, a database with the given name is created, only if there is no existing database with the same name.
Example
Following is an example of the create database statement. In this example, we have created a database with the name my_database.
[quickstart.cloudera:21000] > CREATE DATABASE IF NOT EXISTS my_database;
On executing the above query in cloudera impala-shell, you will get the following output.
Query: create DATABASE my_database

Fetched 0 row(s) in 0.21s
Verification
The SHOW DATABASES query gives the list of the databases in Impala, therefore you can verify whether the database is created, using the SHOW DATABASES statement. Here you can observe the newly created database my_db in the list.
[quickstart.cloudera:21000] > show databases;

Query: show databases
+-----------------------------------------------+
| name                                          |
+-----------------------------------------------+
| _impala_builtins                              |
| default                                       |
|  my_db                                        |
+-----------------------------------------------+
Fetched 3 row(s) in 0.20s
[quickstart.cloudera:21000] >
Hdfs Path
In order to create a database in HDFS file system, you need to specify the location where the database is to be created.
CREATE DATABASE IF NOT EXISTS database_name LOCATION hdfs_path;
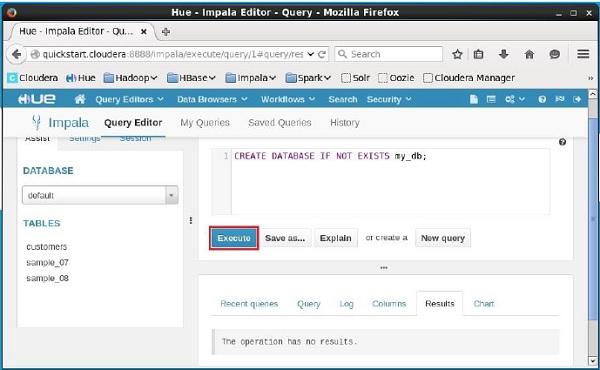
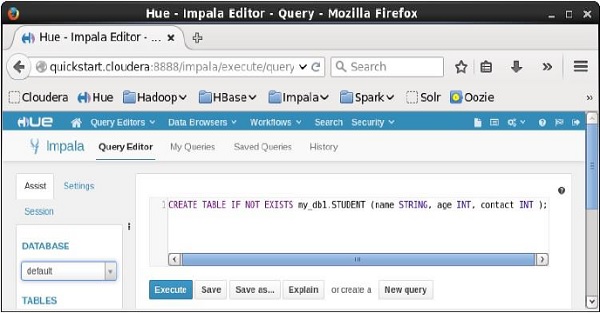
Creating a Database using Hue Browser
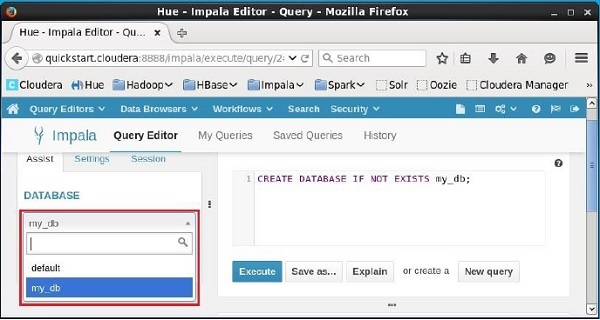
Open Impala Query editor and type the CREATE DATABASE statement in it. Thereafter, click the execute button as shown in the following screenshot.
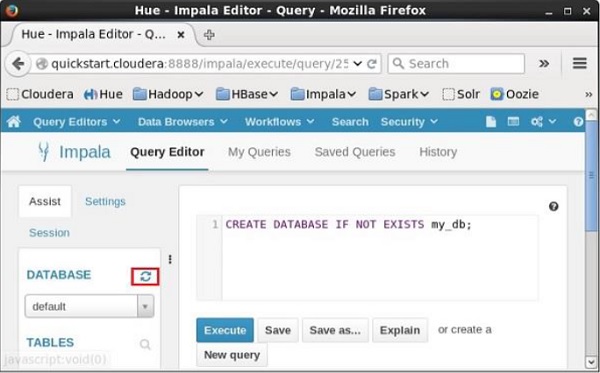
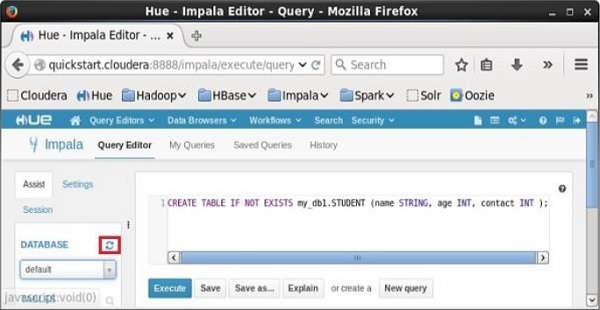
After executing the query, gently move the curser to the top of the dropdown menu and you will find a refresh symbol. If you click on the refresh symbol, the list of databases will be refreshed and the recent changes are applied to it.
Verification
Click the drop-down box under the heading DATABASE on the left-hand side of the editor. There you can see a list of databases in the system. Here you can observe the newly created database my_db as shown below.
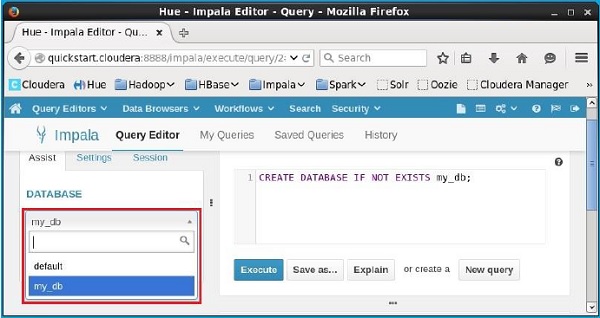
If you observe carefully, you can see only one database, i.e., my_db in the list along with the default database.
Impala - Drop a Database
The DROP DATABASE Statement of Impala is used to remove a database from Impala. Before deleting the database, it is recommended to remove all the tables from it.
Syntax
Following is the syntax of DROP DATABASE Statement.
DROP (DATABASE|SCHEMA) [IF EXISTS] database_name [RESTRICT |
CASCADE] [LOCATION hdfs_path];
Here, IF EXISTS is an optional clause. If we use this clause when a database with the given name exists, then it will be deleted. And if there is no existing database with the given name, then no operation is performed.
Example
Following is an example of DROP DATABASE statement. Assume you have a database in Impala with the name sample_database.
And, if you verify the list of databases using the SHOW DATABASES statement, you will observe the name in it.
[quickstart.cloudera:21000] > SHOW DATABASES;

Query: show DATABASES
+-----------------------+
| name                  |
+-----------------------+
| _impala_builtins      |
| default               |
| my_db                 |
| sample_database       |
+-----------------------+
Fetched 4 row(s) in 0.11s
Now, you can delete this database using the DROP DATABASE Statement as shown below.
< DROP DATABASE IF EXISTS sample_database;
This will delete the specified database and gives you the following output.
Query: drop DATABASE IF EXISTS sample_database;
Verification
You can verify whether the given database is deleted, using the SHOW DATABASES statement. Here you can observe that the database named sample_database is removed from the list of databases.
[quickstart.cloudera:21000] > SHOW DATABASES;

Query: show DATABASES
+----------------------+
| name                 |
+----------------------+
| _impala_builtins     |
| default              |
| my_db                |
+----------------------+
Fetched 3 row(s) in 0.10s
[quickstart.cloudera:21000] >
Cascade
In general, to delete a database, you need to remove all the tables in it manually. If you use cascade, Impala removes the tables within the specified database before deleting it.
Example
Suppose there is a database in Impala named sample, and it contains two tables, namely, student and test. If you try to remove this database directly, you will get an error as shown below.
[quickstart.cloudera:21000] > DROP database sample;
Query: drop database sample
ERROR:
ImpalaRuntimeException: Error making 'dropDatabase' RPC to Hive Metastore:
CAUSED BY: InvalidOperationException: Database sample is not empty. One or more
tables exist.
Using cascade, you can delete this database directly (without deleting its contents manually) as shown below.
[quickstart.cloudera:21000] > DROP database sample cascade;
Query: drop database sample cascade
Note − You cannot delete the current database in Impala. Therefore, before deleting a database, you need to make sure that the current context is set to the database other than the one which you are going to delete.
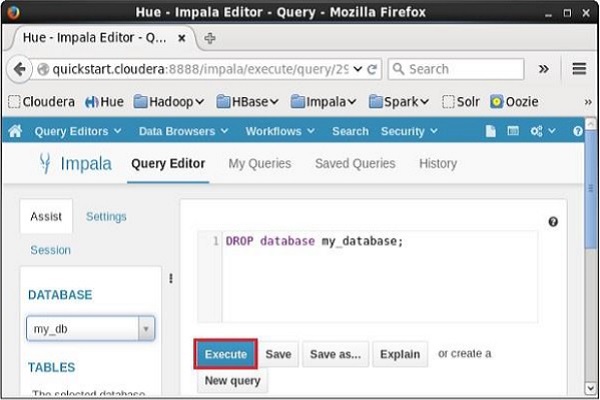
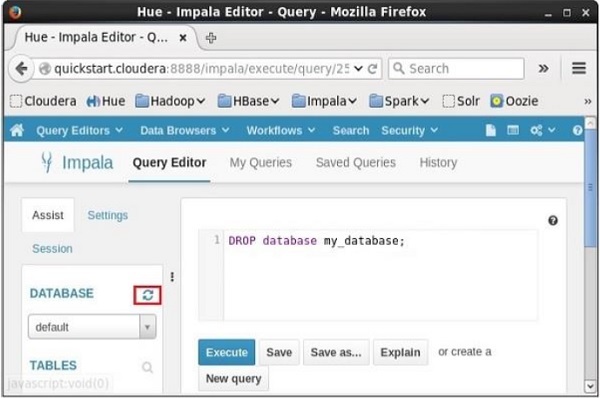
Deleting a Database using Hue Browser
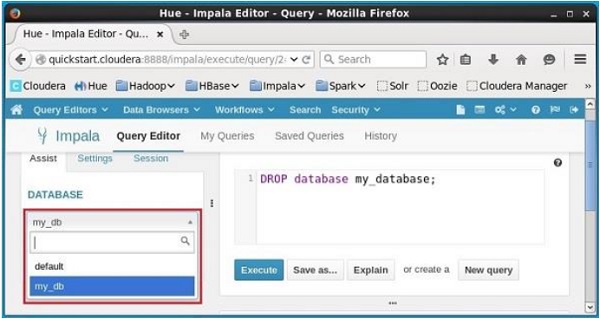
Open Impala Query editor and type the DELETE DATABASE statement in it and click on the execute button as shown below. Suppose there are three databases, namely, my_db, my_database, and sample_database along with the default database. Here we are deleting the database named my_database.
After executing the query, gently move the cursor to the top of the dropdown menu. Then, you will find a refresh symbol as shown in the screenshot given below. If you click on the refresh symbol, the list of databases will be refreshed and the recent changes done will be applied to it.
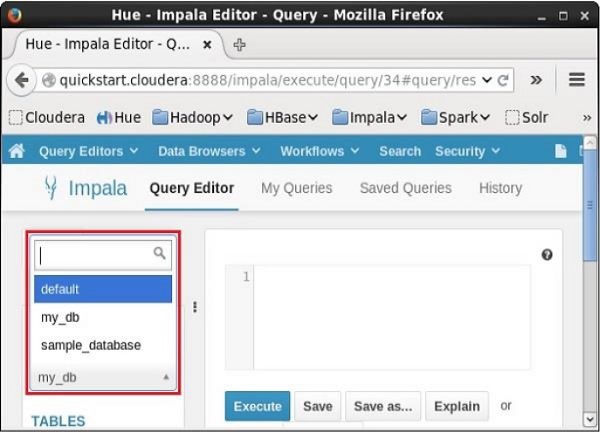
Verification
Click on the drop down under the heading DATABASE on the left-hand side of the editor. There, you can see a list of databases in the system. Here you can observe the newly created database my_db as shown below.
If you observe carefully, you can see only one database, i.e., my_db in the list along with the default database.
Impala - Select a Database
Once you get connected to Impala, it is required to select one among the available databases. The USE DATABASE Statement of Impala is used to switch the current session to another database.
Syntax
Following is the syntax of USE Statement.
USE db_name;
Example
Following is an example of USE statement. First of all, let us create a database with the name sample_database as shown below.
> CREATE DATABASE IF NOT EXISTS sample_database;
This will create a new database and give you the following output.
Query: create DATABASE IF NOT EXISTS my_db2

Fetched 0 row(s) in 2.73s
If you verify the list of databases using the SHOW DATABASES statement, you can observe the name of newly created database in it.
> SHOW DATABASES;

Query: show DATABASES
+-----------------------+
| name                  |
+-----------------------+
| _impala_builtins      |
| default               |
| my_db                 |
| sample_database       |
+-----------------------+
Fetched 4 row(s) in 0.11s
Now, lets switch the session to the newly created database (sample_database) using the USE Statement as shown below.
> USE sample_database;
This will change the current context to sample_database and display a message as shown below.
Query: use sample_database
Selecting a Database using Hue Browser
On the left-hand side of the Query Editor of Impala, you will find a dropdown menu as shown in the following screenshot.
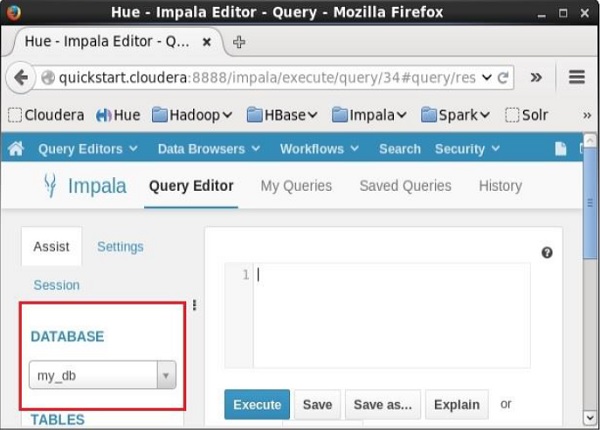
If you click on the dropdown menu, you will find the list of all the databases in Impala as shown below.
Simply select the database to which you need to change the current context.
Impala - Create Table Statement
The CREATE TABLE Statement is used to create a new table in the required database in Impala. Creating a basic table involves naming the table and defining its columns and each column's data type.
Syntax
Following is the syntax of the CREATE TABLE Statement. Here, IF NOT EXISTS is an optional clause. If we use this clause, a table with the given name is created, only if there is no existing table in the specified database with the same name.
create table IF NOT EXISTS database_name.table_name (
   column1 data_type,
   column2 data_type,
   column3 data_type,

   columnN data_type
);
CREATE TABLE is the keyword that instructs the database system to create a new table. The unique name or identifier for the table follows the CREATE TABLE statement. Optionally you can specify database_name along with table_name.
Example
Following is an example of the create table statement. In this example, we have created a table named student in the database my_db.
[quickstart.cloudera:21000] > CREATE TABLE IF NOT EXISTS my_db.student
   (name STRING, age INT, contact INT );
On executing the above statement, a table with the specified name will be created, displaying the following output.
Query: create table student (name STRING, age INT, phone INT)

Fetched 0 row(s) in 0.48s
Verification
The show Tables query gives a list of tables in the current database in Impala. Therefore, you can verify whether the table is created, using the Show Tables statement.
First of all, you need to switch the context to the database in which the required table exists, as shown below.
[quickstart.cloudera:21000] > use my_db;
Query: use my_db
Then, if you get the list of tables using the show tables query, you can observe the table named student in it as shown below.
[quickstart.cloudera:21000] > show tables;

Query: show tables
+-----------+
| name      |
+-----------+
| student   |
+-----------+
Fetched 1 row(s) in 0.10s
HDFS path
In order to create a database in HDFS file system, you need to specify the location where the database is to be created as shown below.
CREATE DATABASE IF NOT EXISTS database_name LOCATION hdfs_path;
Creating a Database using Hue Browser
Open impala Query editor and type the CREATE Table Statement in it. And click on the execute button as shown in the following screenshot.
After executing the query, gently move the cursor to the top of the dropdown menu and you will find a refresh symbol. If you click on the refresh symbol, the list of databases will be refreshed and the recent changes done are applied to it.
Verification
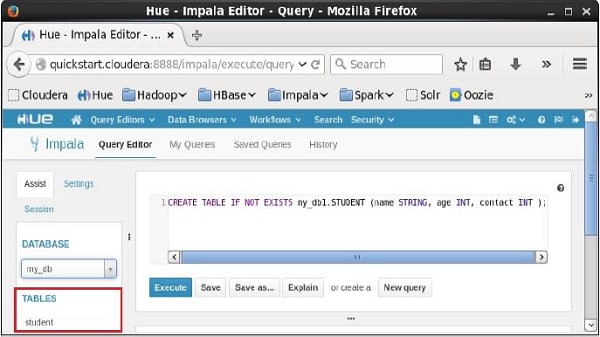
Click on the drop down under the heading DATABASE on the left-hand side of the editor. There you can see a list of databases. Select the database my_db as shown below.

On selecting the database my_db you can see a list of tables in it as shown below. Here you can find the newly created table student as shown below.
Impala - Insert Statement
The INSERT Statement of Impala has two clauses − into and overwrite. Insert statement with into clause is used to add new records into an existing table in a database.
Syntax
There are two basic syntaxes of INSERT statement as follows −
insert into table_name (column1, column2, column3,...columnN)

values (value1, value2, value3,...valueN);
Here, column1, column2,...columnN are the names of the columns in the table into which you want to insert data.
You can also add values without specifying the column names but, for that you need to make sure the order of the values is in the same order as the columns in the table as shown below.
Insert into table_name values (value1, value2, value2);
CREATE TABLE is the keyword telling the database system to create a new table. The unique name or identifier for the table follows the CREATE TABLE statement. Optionally you can specify database_name along with the table_name.
Example
Suppose we have created a table named student in Impala as shown below.
create table employee (Id INT, name STRING, age INT,address STRING, salary BIGINT);
Following is an example of creating a record in the table named employee.
[quickstart.cloudera:21000] > insert into employee
(ID,NAME,AGE,ADDRESS,SALARY)VALUES (1, 'Ramesh', 32, 'Ahmedabad', 20000 );
On executing the above statement, a record is inserted into the table named employee displaying the following message.
Query: insert into employee (ID,NAME,AGE,ADDRESS,SALARY) VALUES (1, 'Ramesh',
   32, 'Ahmedabad', 20000 )
Inserted 1 row(s) in 1.32s
You can insert another record without specifying the column names as shown below.
[quickstart.cloudera:21000] > insert into employee values (2, 'Khilan', 25,
   'Delhi', 15000 );
On executing the above statement, a record is inserted into the table named employee displaying the following message.
Query: insert into employee values (2, 'Khilan', 25, 'Delhi', 15000 )
Inserted 1 row(s) in 0.31s
You can insert a few more records in the employee table as shown below.
Insert into employee values (3, 'kaushik', 23, 'Kota', 30000 );

Insert into employee values (4, 'Chaitali', 25, 'Mumbai', 35000 );

Insert into employee values (5, 'Hardik', 27, 'Bhopal', 40000 );

Insert into employee values (6, 'Komal', 22, 'MP', 32000 );
After inserting the values, the employee table in Impala will be as shown below.
+----+----------+-----+-----------+--------+
| id | name     | age | address   | salary |
+----+----------+-----+-----------+--------+
| 1  | Ramesh   | 32  | Ahmedabad | 20000  |
| 2  | Khilan   | 25  | Delhi     | 15000  |
| 5  | Hardik   | 27  | Bhopal    | 40000  |
| 4  | Chaitali | 25  | Mumbai    | 35000  |
| 3  | kaushik  | 23  | Kota      | 30000  |
| 6  | Komal    | 22  | MP        | 32000  |
+----+----------+-----+-----------+--------+
Overwriting the Data in a Table
We can overwrite the records of a table using overwrite clause. The overwritten records will be permanently deleted from the table. Following is the syntax of using the overwrite clause.
Insert overwrite table_name values (value1, value2, value2);
Example
Following is an example of using the clause overwrite.
[quickstart.cloudera:21000] > Insert overwrite employee values (1, 'Ram', 26,
   'Vishakhapatnam', 37000 );
On executing the above query, this will overwrite the table data with the specified record displaying the following message.
Query: insert overwrite employee values (1, 'Ram', 26, 'Vishakhapatnam', 37000 )
Inserted 1 row(s) in 0.31s
On verifying the table, you can observe that all the records of the table employee are overwritten by new records as shown below.
+----+------+-----+---------------+--------+
| id | name | age | address       | salary |
+----+------+-----+---------------+--------+
| 1  | Ram  | 26  | Vishakhapatnam| 37000  |
+----+------+-----+---------------+--------+
Inserting Data using Hue Browser
Open Impala Query editor and type the insert Statement in it. And click on the execute button as shown in the following screenshot.
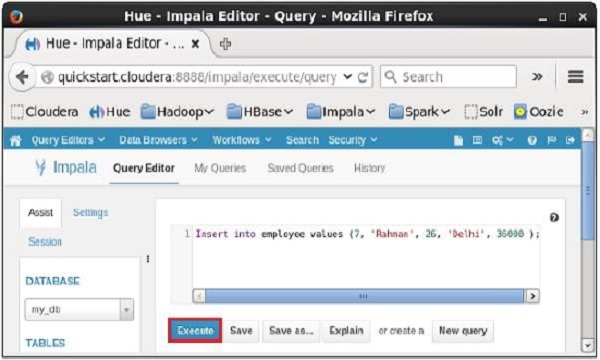
After executing the query/statement, this record is added to the table.
Impala - Select Statement
Impala SELECT statement is used to fetch the data from one or more tables in a database. This query returns data in the form of tables.
Syntax
Following is the syntax of the Impala select statement.
SELECT column1, column2, columnN from table_name;
Here, column1, column2...are the fields of a table whose values you want to fetch. If you want to fetch all the fields available in the field, then you can use the following syntax −
SELECT * FROM table_name;
Example
Assume we have a table named customers in Impala, with the following data −
ID    NAME       AGE    ADDRESS      SALARY
---   -------    ---    ----------   -------
1     Ramesh     32     Ahmedabad    20000
2     Khilan     25     Delhi        15000
3     Hardik     27     Bhopal       40000
4     Chaitali   25     Mumbai       35000
5     kaushik    23     Kota         30000
6     Komal      22     Mp           32000
You can fetch the id, name, and age of all the records of the customers table using select statement as shown below −
[quickstart.cloudera:21000] > select id, name, age from customers;
On executing the above query, Impala fetches id, name, age of all the records from the specified table and displays them as shown below.
Query: select id,name,age from customers

+----+----------+-----+
| id | name     | age |
| 1  | Ramesh   | 32  |
| 2  | Khilan   | 25  |
| 3  | Hardik   | 27  |
| 4  | Chaitali | 25  |
| 5  | kaushik  | 23  |
| 6  | Komal    | 22  |
+----+----------+-----+

Fetched 6 row(s) in 0.66s
You can also fetch all the records from the customers table using the select query as shown below.
[quickstart.cloudera:21000] > select name, age from customers;
Query: select * from customers
On executing the above query, Impala fetches and displays all the records from the specified table as shown below.
+----+----------+-----+-----------+--------+
| id | name     | age | address   | salary |
+----+----------+-----+-----------+--------+
| 1  | Ramesh   | 32  | Ahmedabad | 20000  |
| 2  | Khilan   | 25  | Delhi     | 15000  |
| 3  | Hardik   | 27  | Bhopal    | 40000  |
| 4  | Chaitali | 25  | Mumbai    | 35000  |
| 5  | kaushik  | 23  | Kota      | 30000  |
| 6  | Komal    | 22  | MP        | 32000  |
+----+----------+-----+-----------+--------+

Fetched 6 row(s) in 0.66s
Fetching the Records using Hue
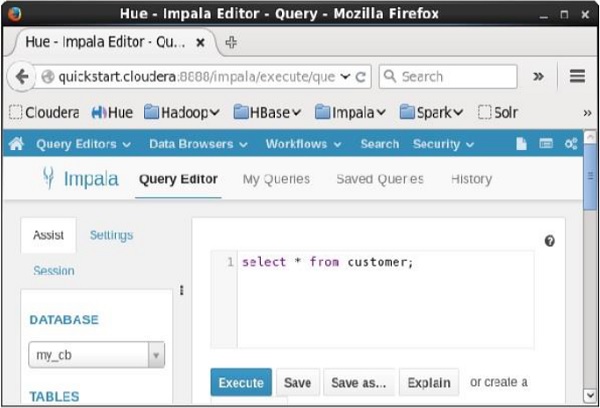
Open Impala Query editor and type the select Statement in it. And click on the execute button as shown in the following screenshot.
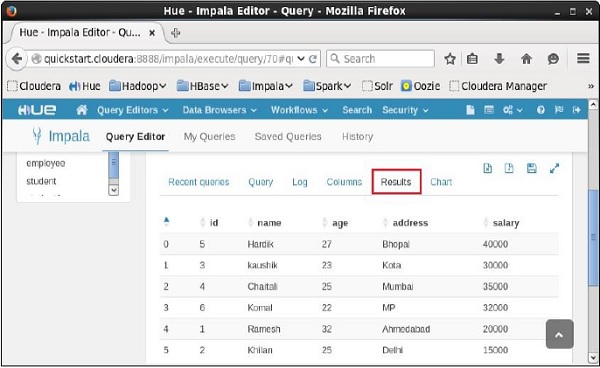
After executing the query, if you scroll down and select the Results tab, you can see the list of the records of the specified table as shown below.
Impala - Describe Statement
The describe statement in Impala is used to give the description of the table. The result of this statement contains the information about a table such as the column names and their data types.
Syntax
Following is the syntax of the Impala describe statement.
Describe table_name;
Example
For example, assume we have a table named customer in Impala, with the following data −
ID    NAME     AGE    ADDRESS     SALARY
--- --------- ----- ----------- -----------
1   Ramesh     32    Ahmedabad    20000
2   Khilan     25    Delhi        15000
3   Hardik     27    Bhopal       40000
4   Chaitali   25    Mumbai       35000
5   kaushik    23    Kota         30000
6   Komal      22    Mp           32000
You can get the description of the customer table using the describe statement as shown below −
[quickstart.cloudera:21000] > describe customer;
On executing the above query, Impala fetches the metadata of the specified table and displays it as shown below.
Query: describe customer

+---------+--------+---------+
| name    | type   | comment |
+---------+--------+---------+
| id      | int    |         |
| name    | string |         |
| age     | int    |         |
| address | string |         |
| salary  | bigint |         |
+---------+--------+---------+

Fetched 5 row(s) in 0.51s
Describing the Records using Hue
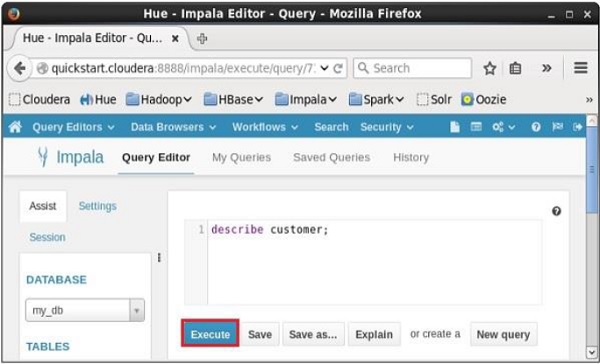
Open Impala Query editor and type the describe statement in it and click on the execute button as shown in the following screenshot.
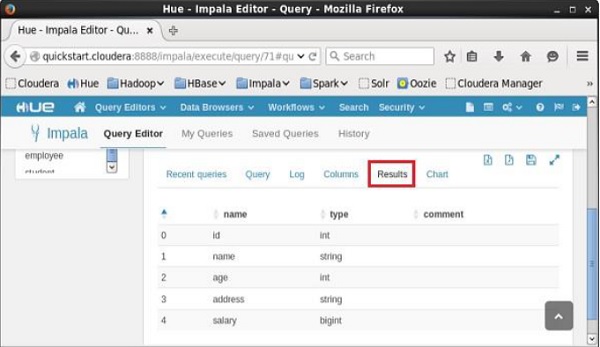
After executing the query, if you scroll down and select the Results tab, you can see the metadata of the table as shown below.
Impala - Alter Table
The Alter table statement in Impala is used to perform changes on a given table. Using this statement, we can add, delete, or modify columns in an existing table and we can also rename it.
This Chapter explains various types of alter statements with syntax and examples. First of all assume that we have a table named customers in the my_db database in Impala, with the following data
ID   NAME     AGE   ADDRESS    SALARY
--- --------- ----- ----------- --------
1   Ramesh    32    Ahmedabad   20000
2   Khilan    25    Delhi       15000
3   Hardik    27    Bhopal      40000
4   Chaitali  25    Mumbai      35000
5   kaushik   23    Kota        30000
6   Komal     22    Mp          32000
And, if you get the list of tables in the database my_db, you can find the customers table in it as shown below.
[quickstart.cloudera:21000] > show tables;

Query: show tables
+-----------+
| name      |
+-----------+
| customers |
| employee  |
| student   |
| student1  |
+-----------+
Altering the name of a table
Syntax
The basic syntax of ALTER TABLE to rename an existing table is as follows −
ALTER TABLE [old_db_name.]old_table_name RENAME TO [new_db_name.]new_table_name
Example
Following is an example of changing the name of the table using the alter statement. Here we are changing the name of the table customers to users.
[quickstart.cloudera:21000] > ALTER TABLE my_db.customers RENAME TO my_db.users;
After executing the above query, Impala changes the name of the table as required, displaying the following message.
Query: alter TABLE my_db.customers RENAME TO my_db.users
You can verify the list of tables in the current database using the show tables statement. You can find the table named users instead of customers.
Query: show tables
+----------+
| name     |
+----------+
| employee |
| student  |
| student1 |
| users    |
+----------+
Fetched 4 row(s) in 0.10s
Adding columns to a table
Syntax
The basic syntax of ALTER TABLE to add columns to an existing table is as follows −
ALTER TABLE name ADD COLUMNS (col_spec[, col_spec ...])
Example
The following query is an example demonstrating how to add columns to an existing table. Here we are adding two columns account_no and phone_number (both are of bigint data type) to the users table.
[quickstart.cloudera:21000] > ALTER TABLE users ADD COLUMNS (account_no BIGINT,
phone_no BIGINT);
On executing the above query, it will add the specified columns to the table named student, displaying the following message.
Query: alter TABLE users ADD COLUMNS (account_no BIGINT, phone_no BIGINT)
If you verify the schema of the table users, you can find the newly added columns in it as shown below.
quickstart.cloudera:21000] > describe users;

Query: describe users
+------------+--------+---------+
| name       | type   | comment |
+------------+--------+---------+
| id         | int    |         |
| name       | string |         |
| age        | int    |         |
| address    | string |         |
| salary     | bigint |         |
| account_no | bigint |         |
| phone_no   | bigint |         |
+------------+--------+---------+
Fetched 7 row(s) in 0.20s
Dropping columns from a table
Syntax
The basic syntax of ALTER TABLE to DROP COLUMN in an existing table is as follows −
ALTER TABLE name DROP [COLUMN] column_name
Example
The following query is an example of deleting columns from an existing table. Here we are deleting the column named account_no.
[quickstart.cloudera:21000] > ALTER TABLE users DROP account_no;
On executing the above query, Impala deletes the column named account_no displaying the following message.
Query: alter TABLE users DROP account_no
If you verify the schema of the table users, you cannot find the column named account_no since it was deleted.
[quickstart.cloudera:21000] > describe users;

Query: describe users
+----------+--------+---------+
| name     | type   | comment |
+----------+--------+---------+
| id       | int    |         |
| name     | string |         |
| age      | int    |         |
| address  | string |         |
| salary   | bigint |         |
| phone_no | bigint |         |
+----------+--------+---------+
Fetched 6 row(s) in 0.11s
Changing the name and type of a column
Syntax
The basic syntax of ALTER TABLE to change the name and datatype of a column in an existing table is as follows −
ALTER TABLE name CHANGE column_name new_name new_type
Example
Following is an example of changing the name and datatype of a column using the alter statement. Here we are changing the name of the column phone_no to email and its data type to string.
[quickstart.cloudera:21000] > ALTER TABLE users CHANGE phone_no e_mail string;
On executing the above query, Impala does the specified changes, displaying the following message.
Query: alter TABLE users CHANGE phone_no e_mail string
You can verify the metadata of the table users using the describe statement. You can observe that Impala has done the required changes to the specified column.
[quickstart.cloudera:21000] > describe users;
Query: describe users
+----------+--------+---------+
| name     | type   | comment |
+----------+--------+---------+
| id       | int    |         |
| name     | string |         |
| age      | int    |         |
| address  | string |         |
| salary   | bigint |         |
| phone_no | bigint |         |
+----------+--------+---------+
Fetched 6 row(s) in 0.11s
Altering a Table using Hue
Open the Impala Query editor and type the alter statement in it and click on the execute button as shown in the following screenshot.
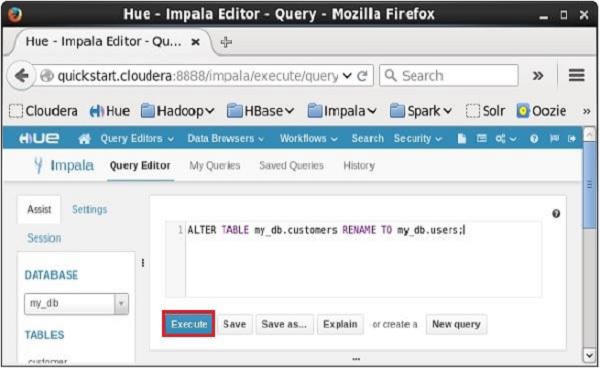
On executing the above query, it will change the name of the table customers to users. In the same way, we can execute all the alter queries.
Impala - Drop a Table
The Impala drop table statement is used to delete an existing table in Impala. This statement also deletes the underlying HDFS files for internal tables
NOTE − You have to be careful while using this command because once a table is deleted, then all the information available in the table would also be lost forever.
Syntax
Following is the syntax of the DROP TABLE Statement. Here, IF EXISTS is an optional clause. If we use this clause, a table with the given name is deleted, only if it exists. Otherwise, no operation will be carried out.
DROP table database_name.table_name;
If you try to delete a table that doesnt exist without the IF EXISTS clause, an error will be generated. Optionally you can specify database_name along with table_name.
Example
Let us first verify the list of tables in the database my_db as shown below.
[quickstart.cloudera:21000] > show tables;

Query: show tables
+------------+
| name       |
+------------+
| customers  |
| employee   |
| student    |
+------------+
Fetched 3 row(s) in 0.11s
From the above result, you can observe that the database my_db contains 3 tables
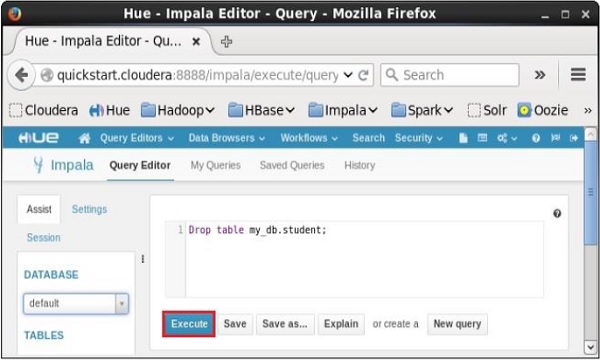
Following is an example of the drop table statement. In this example, we are deleting the table named student from the database my_db.
[quickstart.cloudera:21000] > drop table if exists my_db.student;
On executing the above query, a table with the specified name will be deleted, displaying the following output.
Query: drop table if exists student
Verification
The show Tables query gives a list of the tables in the current database in Impala. Therefore, you can verify whether a table is deleted, using the Show Tables statement.
First of all, you need to switch the context to the database in which the required table exists, as shown below.
[quickstart.cloudera:21000] > use my_db;
Query: use my_db
Then, if you get the list of tables using the show tables query, you can observe the table named student is not in the list.
[quickstart.cloudera:21000] > show tables;

Query: show tables
+-----------+
| name      |
+-----------+
| customers |
| employee  |
| student   |
+-----------+
Fetched 3 row(s) in 0.11s
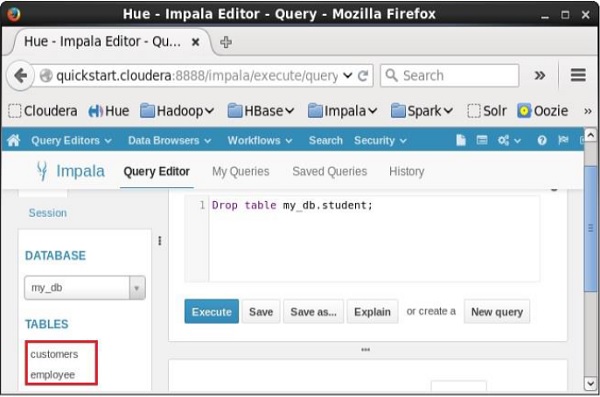
Creating a Database using Hue Browser
Open Impala Query editor and type the drop Table Statement in it. And click on the execute button as shown in the following screenshot.
After executing the query, gently move the cursor to the top of the dropdown menu and you will find a refresh symbol. If you click on the refresh symbol, the list of databases will be refreshed and the recent changes done are applied to it.
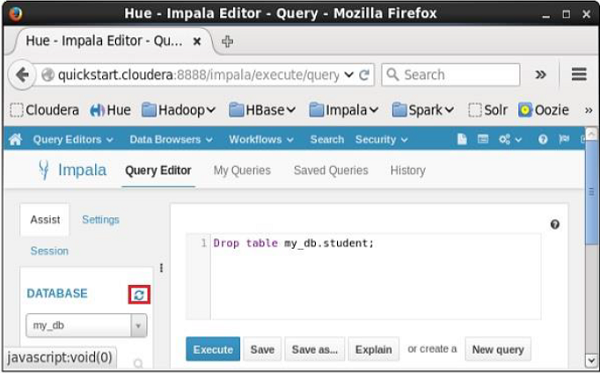
Verification
Click on the drop down under the heading DATABASE on the left-hand side of the editor. There you can see a list of databases; select the database my_db as shown below.
On selecting the database my_db, you can see a list of tables in it as shown below. Here you cannot find the deleted table student in the list as shown below.
Impala - Truncate a Table
The Truncate Table Statement of Impala is used to remove all the records from an existing table.
You can also use DROP TABLE command to delete a complete table, but it would remove the complete table structure from the database and you would need to re-create this table once again if you wish you store some data.
Syntax
Following is the syntax of the truncate table statement.
truncate table_name;
Example
Suppose, we have a table named customers in Impala, and if you verify its contents, you are getting the following result. This means that the customers table contains 6 records.
[quickstart.cloudera:21000] > select * from customers;

Query: select * from customers
+----+----------+-----+-----------+--------+--------+
| id | name     | age | address   | salary | e_mail |
+----+----------+-----+-----------+--------+--------+
| 1  | Ramesh   | 32  | Ahmedabad | 20000  | NULL   |
| 2  | Khilan   | 25  | Delhi     | 15000  | NULL   |
| 3  | kaushik  | 23  | Kota      | 30000  | NULL   |
| 4  | Chaitali | 25  | Mumbai    | 35000  | NULL   |
| 5  | Hardik   | 27  | Bhopal    | 40000  | NULL   |
| 6  | Komal    | 22  | MP        | 32000  | NULL   |
+----+----------+-----+-----------+--------+--------+
Following is an example of truncating a table in Impala using truncate statement. Here we are removing all the records of the table named customers.
[quickstart.cloudera:21000] > truncate customers;
On executing the above statement, Impala deletes all the records of the specified table, displaying the following message.
Query: truncate customers

Fetched 0 row(s) in 0.37s
Verification
If you verify the contents of the customers table, after the delete operation, using select statement, you will get an empty row as shown below.
[quickstart.cloudera:21000] > select * from customers;
Query: select * from customers

Fetched 0 row(s) in 0.12s
Truncating a Table using Hue Browser
Open Impala Query editor and type the truncate Statement in it. And click on the execute button as shown in the following screenshot.
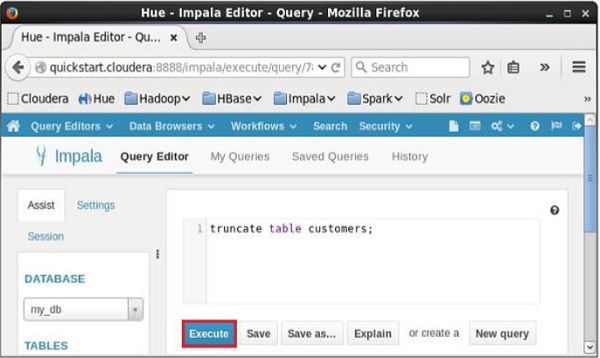
After executing the query/statement, all the records from the table are deleted.
Impala - Show Tables
The show tables statement in Impala is used to get the list of all the existing tables in the current database.
Example
Following is an example of the show tables statement. If you want to get the list of tables in a particular database, first of all, change the context to the required database and get the list of tables in it using show tables statement as shown below.
[quickstart.cloudera:21000] > use my_db;
Query: use my_db
[quickstart.cloudera:21000] > show tables;
On executing the above query, Impala fetches the list of all the tables in the specified database and displays it as shown below.
Query: show tables
+-----------+
| name      |
+-----------+
| customers |
| employee  |
+-----------+
Fetched 2 row(s) in 0.10s
Listing the Tables using Hue
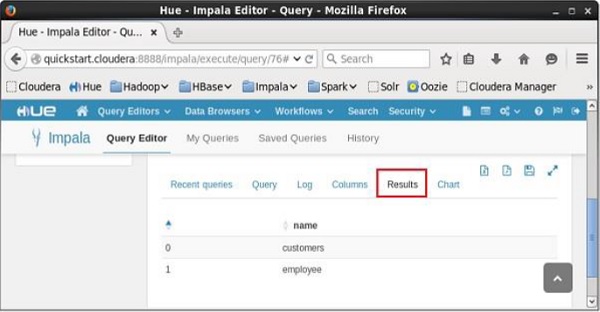
Open impala Query editor, select the context as my_db and type the show tables statement in it and click on the execute button as shown in the following screenshot.

After executing the query, if you scroll down and select the Results tab, you can see the list of the tables as shown below.
Impala - Create View
A view is nothing more than a statement of Impala query language that is stored in the database with an associated name. It is a composition of a table in the form of a predefined SQL query.
A view can contain all the rows of a table or selected ones. A view can be created from one or many tables. Views allow users to −
Structure data in a way that users or classes of users find natural or intuitive.
Restrict access to the data such that a user can see and (sometimes) modify exactly what they need and no more.
Summarize data from various tables which can be used to generate reports.
You can create a view using the Create View statement of Impala.
Syntax
Following is the syntax of the create view statement. IF NOT EXISTS is an optional clause. If we use this clause, a table with the given name is created, only if there is no existing table in the specified database with the same name.
Create View IF NOT EXISTS view_name as Select statement
Example
For example, assume we have a table named customers in the my_db database in Impala, with the following data.
ID  NAME      AGE   ADDRESS     SALARY
--- --------- ----- ----------- --------
1   Ramesh    32    Ahmedabad   20000
2   Khilan    25    Delhi       15000
3   Hardik    27    Bhopal      40000
4   Chaitali  25    Mumbai      35000
5   kaushik   23    Kota        30000
6   Komal     22    MP          32000
Following is an example of Create View Statement. In this example, we are creating a view as customers table which contains the columns, name, and age.
[quickstart.cloudera:21000] > CREATE VIEW IF NOT EXISTS customers_view AS
select name, age from customers;
On executing the above query, a view with the desired columns is created, displaying the following message.
Query: create VIEW IF NOT EXISTS sample AS select * from customers
Fetched 0 row(s) in 0.33s
Verification
You can verify the contents of the view just created, using the select statement as shown below.
[quickstart.cloudera:21000] > select * from customers_view;
This will produce the following result.
Query: select * from customers_view
+----------+-----+
| name     | age |
+----------+-----+
| Komal    | 22  |
| Khilan   | 25  |
| Ramesh   | 32  |
| Hardik   | 27  |
| Chaitali | 25  |
| kaushik  | 23  |
+----------+-----+
Fetched 6 row(s) in 4.80s
Creating a View using Hue
Open Impala Query editor, select the context as my_db, and type the Create View statement in it and click on the execute button as shown in the following screenshot.
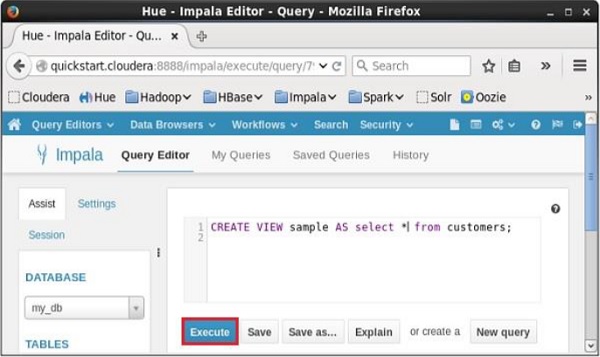
After executing the query, if you scroll down, you can see the view named sample created in the list of tables as shown below.
Impala - Alter View
The Alter View statement of Impala is used to change a view. Using this statement, you can change the name of a view, change the database, and the query associated with it.
Since a view is a logical construct, no physical data will be affected by the alter view query.
Syntax
Following is the syntax of the Alter View statement
ALTER VIEW database_name.view_name as Select statement
Example
For example, assume we have a view named customers_view in the my_db database in Impala with the following contents.
+----------+-----+
| name     | age |
+----------+-----+
| Komal    | 22  |
| Khilan   | 25  |
| Ramesh   | 32  |
| Hardik   | 27  |
| Chaitali | 25  |
| kaushik  | 23  |
+----------+-----+
Following is an example of Alter View Statement. In this example, we are including the columns id, name, and salary instead of name and age to the customers_view.
[quickstart.cloudera:21000] > Alter view customers_view as select id, name,
salary from customers;
On executing the above query, Impala does the specified changes to the customers_view, displaying the following message.
Query: alter view customers_view as select id, name, salary from customers
Verification
You can verify the contents of the view named customers_view, using the select statement as shown below.
[quickstart.cloudera:21000] > select * from customers_view;
Query: select * from customers_view
This will produce the following result.
+----+----------+--------+
| id | name     | salary |
+----+----------+--------+
| 3  | kaushik  | 30000  |
| 2  | Khilan   | 15000  |
| 5  | Hardik   | 40000  |
| 6  | Komal    | 32000  |
| 1  | Ramesh   | 20000  |
| 4  | Chaitali | 35000  |
+----+----------+--------+
Fetched 6 row(s) in 0.69s
Altering a View using Hue
Open Impala Query editor, select the context as my_db, and type the Alter View statement in it and click on the execute button as shown in the following screenshot.
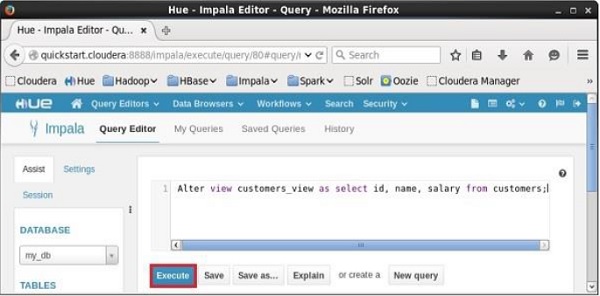
After executing the query, the view named sample will be altered accordingly.
Impala - Drop a View
The Drop View query of Impala is used to delete an existing view. Since a view is a logical construct, no physical data will be affected by the drop view query.
Syntax
Following is the syntax of the drop view statement.
DROP VIEW database_name.view_name;
Example
For example, assume we have a view named customers_view in the my_db database in Impala with the following contents.
+----------+-----+
| name     | age |
+----------+-----+
| Komal    | 22  |
| Khilan   | 25  |
| Ramesh   | 32  |
| Hardik   | 27  |
| Chaitali | 25  |
| kaushik  | 23  |
+----------+-----+
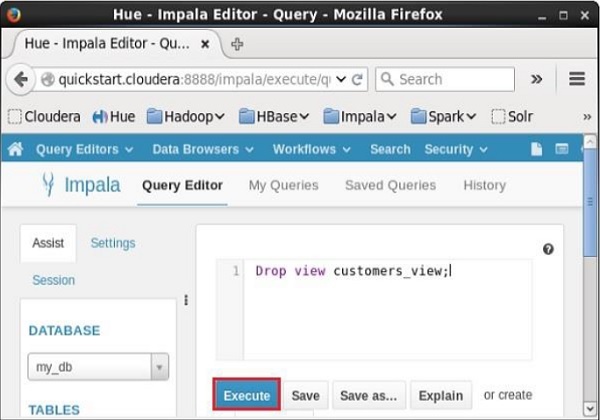
Following is an example of Drop View Statement. In this example, we are trying to delete the view named customers_view using the drop view query.
[quickstart.cloudera:21000] > Drop view customers_view;
On executing the above query, Impala deletes the specified view, displaying the following message.
Query: drop view customers_view
Verification
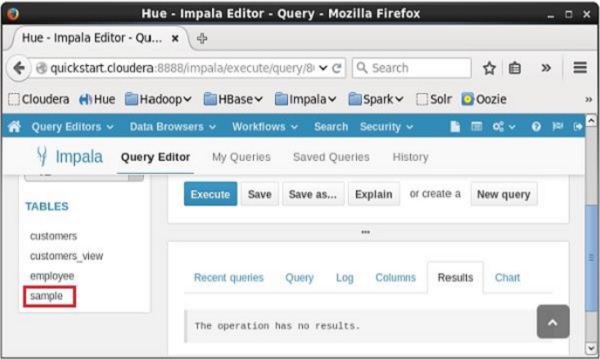
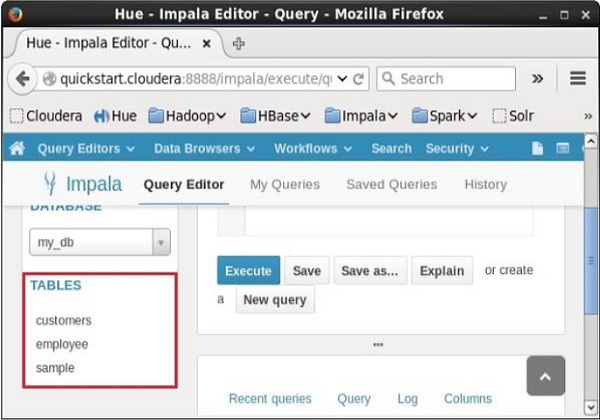
If you verify the list of tables using show tables statement, you can observe that the view named customers_view is deleted.
[quickstart.cloudera:21000] > show tables;
This will produce the following result.
Query: show tables
+-----------+
| name      |
+-----------+
| customers |
| employee  |
| sample    |
+-----------+
Fetched 3 row(s) in 0.10s
Dropping a View using Hue
Open Impala Query editor, select the context as my_db, and type the Drop view statement in it and click on the execute button as shown in the following screenshot.
After executing the query, if you scroll down, you can see a list named TABLES. This list contains all the tables and views in the current database. From this list, you can find that the specified view was deleted.
Impala - Order By Clause
The Impala ORDER BY clause is used to sort the data in an ascending or descending order, based on one or more columns. Some databases sort the query results in ascending order by default.
Syntax
Following is the syntax of the ORDER BY clause.
select * from table_name ORDER BY col_name [ASC|DESC] [NULLS FIRST|NULLS LAST]
You can arrange the data in the table in ascending or descending order using the keywords ASC or DESC respectively.
In the same way, if we use NULLS FIRST, all the null values in the table are arranged in the top rows; and if we use NULLS LAST, the rows containing null values will be arranged last.
Example
Assume we have a table named customers in the database my_db and its contents are as follows −
[quickstart.cloudera:21000] > select * from customers;
Query: select * from customers
+----+----------+-----+-----------+--------+
| id | name     | age | address   | salary |
+----+----------+-----+-----------+--------+
| 3  | kaushik  | 23  | Kota      | 30000  |
| 1  | Ramesh   |  32 | Ahmedabad | 20000  |
| 2  | Khilan   | 25  | Delhi     | 15000  |
| 6  | Komal    | 22  | MP        | 32000  |
| 4  | Chaitali | 25  | Mumbai    | 35000  |
| 5  | Hardik   | 27  | Bhopal    | 40000  |
+----+----------+-----+-----------+--------+
Fetched 6 row(s) in 0.51s
Following is an example of arranging the data in the customers table, in ascending order of their ids using the order by clause.
[quickstart.cloudera:21000] > Select * from customers ORDER BY id asc;
On executing, the above query produces the following output.
Query: select * from customers ORDER BY id asc
+----+----------+-----+-----------+--------+
| id | name     | age | address   | salary |
+----+----------+-----+-----------+--------+
| 1  | Ramesh   | 32  | Ahmedabad | 20000  |
| 2  | Khilan   | 25  | Delhi     | 15000  |
| 3  | kaushik  | 23  | Kota      | 30000  |
| 4  | Chaitali | 25  | Mumbai    | 35000  |
| 5  | Hardik   | 27  | Bhopal    | 40000  |
| 6  | Komal    | 22  | MP        | 32000  |
+----+----------+-----+-----------+--------+
Fetched 6 row(s) in 0.56s
In the same way, you can arrange the data of customers table in descending order using the order by clause as shown below.
[quickstart.cloudera:21000] > Select * from customers ORDER BY id desc;
On executing, the above query produces the following output.
Query: select * from customers ORDER BY id desc
+----+----------+-----+-----------+--------+
| id | name     | age | address   | salary |
+----+----------+-----+-----------+--------+
| 6  | Komal    | 22  | MP        | 32000  |
| 5  | Hardik   | 27  | Bhopal    | 40000  |
| 4  | Chaitali | 25  | Mumbai    | 35000  |
| 3  | kaushik  | 23  | Kota      | 30000  |
| 2  | Khilan   | 25  | Delhi     | 15000  |
| 1  | Ramesh   | 32  | Ahmedabad | 20000  |
+----+----------+-----+-----------+--------+
Fetched 6 row(s) in 0.54s
Impala - Group By Clause
The Impala GROUP BY clause is used in collaboration with the SELECT statement to arrange identical data into groups.
Syntax
Following is the syntax of the GROUP BY clause.
select data from table_name Group BY col_name;
Example
Assume we have a table named customers in the database my_db and its contents are as follows −
[quickstart.cloudera:21000] > select * from customers;
Query: select * from customers
+----+----------+-----+-----------+--------+
| id | name     | age | address   | salary |
+----+----------+-----+-----------+--------+
| 1  | Ramesh   | 32  | Ahmedabad | 20000  |
| 2  | Khilan   | 25  | Delhi     | 15000  |
| 3  | kaushik  | 23  | Kota      | 30000  |
| 4  | Chaitali | 25  | Mumbai    | 35000  |
| 5  | Hardik   | 27  | Bhopal    | 40000  |
| 6  | Komal    | 22  | MP        | 32000  |
+----+----------+-----+-----------+--------+
Fetched 6 row(s) in 0.51s
You can get the total amount of salary of each customer using GROUP BY query as shown below.
[quickstart.cloudera:21000] > Select name, sum(salary) from customers Group BY name;
On executing, the above query gives the following output.
Query: select name, sum(salary) from customers Group BY name
+----------+-------------+
| name     | sum(salary) |
+----------+-------------+
| Ramesh   | 20000       |
| Komal    | 32000       |
| Hardik   | 40000       |
| Khilan   | 15000       |
| Chaitali | 35000       |
| kaushik  | 30000       |
+----------+-------------+
Fetched 6 row(s) in 1.75s
Assume that this table has multiple records as shown below.
+----+----------+-----+-----------+--------+
| id | name     | age | address   | salary |
+----+----------+-----+-----------+--------+
| 1  | Ramesh   | 32  | Ahmedabad | 20000  |
| 2  | Ramesh   | 32  | Ahmedabad | 1000|  |
| 3  | Khilan   | 25  | Delhi     | 15000  |
| 4  | kaushik  | 23  | Kota      | 30000  |
| 5  | Chaitali | 25  | Mumbai    | 35000  |
| 6  | Chaitali | 25  | Mumbai    | 2000   |
| 7  | Hardik   | 27  | Bhopal    | 40000  |
| 8  | Komal    | 22  | MP        | 32000  |
+----+----------+-----+-----------+--------+
Now again, you can get the total amount of salaries of the employees, considering the repeated entries of records, using the Group By clause as shown below.
Select name, sum(salary) from customers Group BY name;
On executing, the above query gives the following output.
Query: select name, sum(salary) from customers Group BY name
+----------+-------------+
| name     | sum(salary) |
+----------+-------------+
| Ramesh   | 21000       |
| Komal    | 32000       |
| Hardik   | 40000       |
| Khilan   | 15000       |
| Chaitali | 37000       |
| kaushik  | 30000       |
+----------+-------------+
Fetched 6 row(s) in 1.75s
Impala - Having Clause
The Having clause in Impala enables you to specify conditions that filter which group results appear in the final results.
In general, the Having clause is used along with group by clause; it places conditions on groups created by the GROUP BY clause.
Syntax
Following is the syntax of the Havingclause.
select * from table_name ORDER BY col_name [ASC|DESC] [NULLS FIRST|NULLS LAST]
Example
Assume we have a table named customers in the database my_db and its contents are as follows −
[quickstart.cloudera:21000] > select * from customers;
Query: select * from customers
+----+----------+-----+-------------+--------+
| id | name     | age | address     | salary |
+----+----------+-----+-------------+--------+
| 1  | Ramesh   | 32  | Ahmedabad   | 20000  |
| 2  | Khilan   | 25  | Delhi       | 15000  |
| 3  | kaushik  | 23  | Kota        | 30000  |
| 4  | Chaitali | 25  | Mumbai      | 35000  |
| 5  | Hardik   | 27  | Bhopal      | 40000  |
| 6  | Komal    | 22  | MP          | 32000  |
| 7  | ram      | 25  | chennai     | 23000  |
| 8  | rahim    | 22  | vizag       | 31000  |
| 9  | robert   | 23  | banglore    | 28000  |
+----+----------+-----+-----------+--------+
Fetched 9 row(s) in 0.51s
Following is an example of using Having clause in Impala −
[quickstart.cloudera:21000] > select max(salary) from customers group by age having max(salary) > 20000;
This query initially groups the table by age and selects the maximum salaries of each group and displays those salaries, which are greater than 20000 as shown below.
20000
+-------------+
| max(salary) |
+-------------+
| 30000       |
| 35000       |
| 40000       |
| 32000       |
+-------------+
Fetched 4 row(s) in 1.30s
Impala - Limit Clause
The limit clause in Impala is used to restrict the number of rows of a resultset to a desired number, i.e., the resultset of the query does not hold the records beyond the specified limit.
Syntax
Following is the syntax of the Limit clause in Impala.
select * from table_name order by id limit numerical_expression;
Example
Assume we have a table named customers in the database my_db and its contents are as follows −
[quickstart.cloudera:21000] > select * from customers;
Query: select * from customers
+----+----------+-----+-----------+--------+
| id | name     | age | address   | salary |
+----+----------+-----+-----------+--------+
| 3  | kaushik  | 23  | Kota      | 30000  |
| 6  | Komal    | 22  | MP        | 32000  |
| 1  | Ramesh   | 32  | Ahmedabad | 20000  |
| 5  | Hardik   | 27  | Bhopal    | 40000  |
| 2  | Khilan   | 25  | Delhi     | 15000  |
| 8  | ram      | 22  | vizag     | 31000  |
| 9  | robert   | 23  | banglore  | 28000  |
| 7  | ram      | 25  | chennai   | 23000  |
| 4  | Chaitali | 25  | Mumbai    | 35000  |
+----+----------+-----+-----------+--------+
Fetched 9 row(s) in 0.51s
You can arrange the records in the table in the ascending order of their ids using the order by clause as shown below.
[quickstart.cloudera:21000] > select * from customers order by id;
Query: select * from customers order by id
+----+----------+-----+-----------+--------+
| id | name     | age | address   | salary |
+----+----------+-----+-----------+--------+
| 1  | Ramesh   | 32  | Ahmedabad | 20000  |
| 2  | Khilan   | 25  | Delhi     | 15000  |
| 3  | kaushik  | 23  | Kota      | 30000  |
| 4  | Chaitali | 25  | Mumbai    | 35000  |
| 5  | Hardik   | 27  | Bhopal    | 40000  |
| 6  | Komal    | 22  | MP        | 32000  |
| 7  | ram      | 25  | chennai   | 23000  |
| 8  | ram      | 22  | vizag     | 31000  |
| 9  | robert   | 23  | banglore  | 28000  |
+----+----------+-----+-----------+--------+
Fetched 9 row(s) in 0.54s
Now, using the limit clause, you can restrict the number of records of the output to 4, using the limit clause as shown below.
[quickstart.cloudera:21000] > select * from customers order by id limit 4;
On executing, the above query gives the following output.
Query: select * from customers order by id limit 4
+----+----------+-----+-----------+--------+
| id | name     | age | address   | salary |
+----+----------+-----+-----------+--------+
| 1  | Ramesh   | 32  | Ahmedabad | 20000  |
| 2  | Khilan   | 25  | Delhi     | 15000  |
| 3  | kaushik  | 23  | Kota      | 30000  |
| 4  | Chaitali | 25  | Mumbai    | 35000  |
+----+----------+-----+-----------+--------+
Fetched 4 row(s) in 0.64s
Impala - Offset Clause
In general, the rows in the resultset of a select query starts from 0. Using the offset clause, we can decide from where the output should be considered. For example, if we choose the offset as 0, the result will be as usual and if we choose the offset as 5, the result starts from the fifth row.
Syntax
Following is the syntax of the offsetclause in Impala.
select data from table_name Group BY col_name;
Example
Assume we have a table named customers in the database my_db and its contents are as follows −
[quickstart.cloudera:21000] > select * from customers;
Query: select * from customers
+----+----------+-----+-----------+--------+
| id | name     | age | address   | salary |
+----+----------+-----+-----------+--------+
| 3  | kaushik  | 23  | Kota      | 30000  |
| 6  | Komal    | 22  | MP        | 32000  |
| 1  | Ramesh   | 32  | Ahmedabad | 20000  |
| 5  | Hardik   | 27  | Bhopal    | 40000  |
| 2  | Khilan   | 25  | Delhi     | 15000  |
| 8  | ram      | 22  | vizag     | 31000  |
| 9  | robert   | 23  | banglore  | 28000  |
| 7  | ram      | 25  | chennai   | 23000  |
| 4  | Chaitali | 25  | Mumbai    | 35000  |
+----+----------+-----+-----------+--------+
Fetched 9 row(s) in 0.51s
You can arrange the records in the table in the ascending order of their ids and limit the number of records to 4, using limit and order by clauses as shown below.
Query: select * from customers order by id limit 4
+----+----------+-----+-----------+--------+
| id | name     | age | address   | salary |
+----+----------+-----+-----------+--------+
| 1  | Ramesh   | 32  | Ahmedabad | 20000  |
| 2  | Khilan   | 25  | Delhi     | 15000  |
| 3  | kaushik  | 23  | Kota      | 30000  |
| 4  | Chaitali | 25  | Mumbai    | 35000  |
+----+----------+-----+-----------+--------+
Fetched 4 row(s) in 0.64s
Following is an example of the offset clause. Here, we are getting the records in the customers table in the order of their ids and printing the first four rows starting from the 0th row.
[quickstart.cloudera:21000] > select * from customers order by id limit 4 offset 0;
On executing, the above query gives the following result.
Query: select * from customers order by id limit 4 offset 0
+----+----------+-----+-----------+--------+
| id | name     | age | address   | salary |
+----+----------+-----+-----------+--------+
| 1  | Ramesh   | 32  | Ahmedabad | 20000  |
| 2  | Khilan   | 25  | Delhi     | 15000  |
| 3  | kaushik  | 23  | Kota      | 30000  |
| 4  | Chaitali | 25  | Mumbai    | 35000  |
+----+----------+-----+-----------+--------+
Fetched 4 row(s) in 0.62s
In the same way, you can get four records from the customers table starting from the row having offset 5 as shown below.
[quickstart.cloudera:21000] > select * from customers order by id limit 4 offset 5;
Query: select * from customers order by id limit 4 offset 5
+----+--------+-----+----------+--------+
| id | name   | age | address  | salary |
+----+--------+-----+----------+--------+
| 6  | Komal  | 22  | MP       | 32000  |
| 7  | ram    | 25  | chennai  | 23000  |
| 8  | ram    | 22  | vizag    | 31000  |
| 9  | robert | 23  | banglore | 28000  |
+----+--------+-----+----------+--------+
Fetched 4 row(s) in 0.52s
Impala - Union Clause
You can combine the results of two queries using the Union clause of Impala.
Syntax
Following is the syntax of the Union clause in Impala.
query1 union query2;
Example
Assume we have a table named customers in the database my_db and its contents are as follows −
[quickstart.cloudera:21000] > select * from customers;
Query: select * from customers
+----+----------+-----+-----------+--------+
| id | name     | age | address   | salary |
+----+----------+-----+-----------+--------+
| 1  | Ramesh   | 32  | Ahmedabad | 20000  |
| 9  | robert   | 23  | banglore  | 28000  |
| 2  | Khilan   | 25  | Delhi     | 15000  |
| 4  | Chaitali | 25  | Mumbai    | 35000  |
| 7  | ram      | 25  | chennai   | 23000  |
| 6  | Komal    | 22  | MP        | 32000  |
| 8  | ram      | 22  | vizag     | 31000  |
| 5  | Hardik   | 27  | Bhopal    | 40000  |
| 3  | kaushik  | 23  | Kota      | 30000  |
+----+----------+-----+-----------+--------+
Fetched 9 row(s) in 0.59s
In the same way, suppose we have another table named employee and its contents are as follows −
[quickstart.cloudera:21000] > select * from employee;
Query: select * from employee
+----+---------+-----+---------+--------+
| id | name    | age | address | salary |
+----+---------+-----+---------+--------+
| 3  | mahesh  | 54  | Chennai | 55000  |
| 2  | ramesh  | 44  | Chennai | 50000  |
| 4  | Rupesh  | 64  | Delhi   | 60000  |
| 1  | subhash | 34  | Delhi   | 40000  |
+----+---------+-----+---------+--------+
Fetched 4 row(s) in 0.59s
Following is an example of the union clause in Impala. In this example, we arrange the records in both tables in the order of their ids and limit their number by 3 using two separate queries and joining these queries using the UNION clause.
[quickstart.cloudera:21000] > select * from customers order by id limit 3
 union select * from employee order by id limit 3;
On executing, the above query gives the following output.
Query: select * from customers order by id limit 3 union select
   * from employee order by id limit 3
+----+---------+-----+-----------+--------+
| id | name    | age | address   | salary |
+----+---------+-----+-----------+--------+
| 2  | Khilan  | 25  | Delhi     | 15000  |
| 3  | mahesh  | 54  | Chennai   | 55000  |
| 1  | subhash | 34  | Delhi     | 40000  |
| 2  | ramesh  | 44  | Chennai   | 50000  |
| 3  | kaushik | 23  | Kota      | 30000  |
| 1  | Ramesh  | 32  | Ahmedabad | 20000  |
+----+---------+-----+-----------+--------+
Fetched 6 row(s) in 3.11s
Impala - With Clause
In case a query is way too complex, we can define aliases to complex parts and include them in the query using the with clause of Impala.
Syntax
Following is the syntax of the with clause in Impala.
with x as (select 1), y as (select 2) (select * from x union y);
Example
Assume we have a table named customers in the database my_db and its contents are as follows −
[quickstart.cloudera:21000] > select * from customers;
Query: select * from customers
+----+----------+-----+-----------+--------+
| id | name     | age | address   | salary |
+----+----------+-----+-----------+--------+
| 1  | Ramesh   | 32  | Ahmedabad | 20000  |
| 9  | robert   | 23  | banglore  | 28000  |
| 2  | Khilan   | 25  | Delhi     | 15000  |
| 4  | Chaitali | 25  | Mumbai    | 35000  |
| 7  | ram      | 25  | chennai   | 23000  |
| 6  | Komal    | 22  | MP        | 32000  |
| 8  | ram      | 22  | vizag     | 31000  |
| 5  | Hardik   | 27  | Bhopal    | 40000  |
| 3  | kaushik  | 23  | Kota      | 30000  |
+----+----------+-----+-----------+--------+
Fetched 9 row(s) in 0.59s
In the same way, suppose we have another table named employee and its contents are as follows −
[quickstart.cloudera:21000] > select * from employee;
Query: select * from employee
+----+---------+-----+---------+--------+
| id | name    | age | address | salary |
+----+---------+-----+---------+--------+
| 3  | mahesh  | 54  | Chennai | 55000  |
| 2  | ramesh  | 44  | Chennai | 50000  |
| 4  | Rupesh  | 64  | Delhi   | 60000  |
| 1  | subhash | 34  | Delhi   | 40000  |
+----+---------+-----+---------+--------+
Fetched 4 row(s) in 0.59s
Following is an example of the with clause in Impala. In this example, we are displaying the records from both employee and customers whose age is greater than 25 using with clause.
[quickstart.cloudera:21000] >
   with t1 as (select * from customers where age>25),
   t2 as (select * from employee where age>25)
   (select * from t1 union select * from t2);
On executing, the above query gives the following output.
Query: with t1 as (select * from customers where age>25), t2 as (select * from employee where age>25)
   (select * from t1 union select * from t2)
+----+---------+-----+-----------+--------+
| id | name    | age | address   | salary |
+----+---------+-----+-----------+--------+
| 3  | mahesh  | 54  | Chennai   | 55000  |
| 1  | subhash | 34  | Delhi     | 40000  |
| 2  | ramesh  | 44  | Chennai   | 50000  |
| 5  | Hardik  | 27  | Bhopal    | 40000  |
| 4  | Rupesh  | 64  | Delhi     | 60000  |
| 1  | Ramesh  | 32  | Ahmedabad | 20000  |
+----+---------+-----+-----------+--------+
Fetched 6 row(s) in 1.73s
Impala - Distinct Operator
The distinct operator in Impala is used to get the unique values by removing duplicates.
Syntax
Following is the syntax of the distinct operator.
select distinct columns from table_name;
Example
Assume that we have a table named customers in Impala and its contents are as follows −
[quickstart.cloudera:21000] > select distinct id, name, age, salary from customers;
Query: select distinct id, name, age, salary from customers
Here you can observe the salary of the customers Ramesh and Chaitali entered twice and using the distinct operator, we can select the unique values as shown below.
[quickstart.cloudera:21000] > select distinct name, age, address from customers;
On executing, the above query gives the following output.
Query: select distinct id, name from customers
+----------+-----+-----------+
| name     | age | address   |
+----------+-----+-----------+
| Ramesh   | 32  | Ahmedabad |
| Khilan   | 25  | Delhi     |
| kaushik  | 23  | Kota      |
| Chaitali | 25  | Mumbai    |
| Hardik   | 27  | Bhopal    |
| Komal    | 22  | MP        |
+----------+-----+-----------+
Fetched 9 row(s) in 1.46s
