- Basic Image Operations
- Python Pillow - Working with Images
- Python Pillow - Resizing an Image
- Python Pillow - Flip and Rotate Images
- Python Pillow - Cropping an Image
- Python Pillow - Adding Borders to Images
- Python Pillow - Identifying Image Files
- Python Pillow - Merging Images
- Python Pillow - Cutting and Pasting Images
- Python Pillow - Rolling an Image
- Python Pillow - Writing text on image
- Python Pillow - ImageDraw Module
- Python Pillow - Concatenating two Images
- Python Pillow - Creating Thumbnails
- Python Pillow - Creating a Watermark
- Python Pillow - Image Sequences
- Python Pillow Color Conversions
- Python Pillow - Colors on an Image
- Python Pillow - Creating Images With Colors
- Python Pillow - Converting Color String to RGB Color Values
- Python Pillow - Converting Color String to Grayscale Values
- Python Pillow - Change the Color by Changing the Pixel Values
- Image Manipulation
- Python Pillow - Reducing Noise
- Python Pillow - Changing Image Modes
- Python Pillow - Compositing Images
- Python Pillow - Working with Alpha Channels
- Python Pillow - Applying Perspective Transforms
- Image Filtering
- Python Pillow - Adding Filters to an Image
- Python Pillow - Convolution Filters
- Python Pillow - Blur an Image
- Python Pillow - Edge Detection
- Python Pillow - Embossing Images
- Python Pillow - Enhancing Edges
- Python Pillow - Unsharp Mask Filter
- Image Enhancement and Correction
- Python Pillow - Enhancing Contrast
- Python Pillow - Enhancing Sharpness
- Python Pillow - Enhancing Color
- Python Pillow - Correcting Color Balance
- Python Pillow - Removing Noise
- Advanced Topics
- Python Pillow - Creating Animated GIFs
- Python Pillow - Batch Processing Images
- Python Pillow - Converting Image File Formats
- Python Pillow - Adding Padding to an Image
- Python Pillow - Color Inversion
- Python Pillow - M L with Numpy
- Python Pillow with Tkinter BitmapImage and PhotoImage objects
- Image Module
- Python Pillow - Image Blending
- Python Pillow Useful Resources
- Python Pillow - Quick Guide
- Python Pillow - Function Reference
- Python Pillow - Useful Resources
- Python Pillow - Discussion
Python Pillow - Batch Processing of Images
Batch processing images in Python Pillow allows you to efficiently apply the same edits or operations to multiple images simultaneously. This approach is valuable for tasks like resizing, cropping, renaming, watermarking, or formatting images, as it enhances workflow efficiency and optimizes output.
This is particularly useful when working with a large number of images, as it can significantly impact the speed and efficiency of your computer. It allows you to apply the same operation to each image, saving time and effort.
Steps for Batch Processing Images
The steps involved in batch processing images with Python Pillow are as follows −
Create a List of Image Files: Generate a list of file paths to the images you want to process.
Iterate Through the List of Images: Use loops to traverse the list of image files. You can use 'for' or 'while' loops to handle each image one at a time.
Perform Image Processing Operations: Within the loop, apply the desired image processing operations to each image. This may include resizing, cropping, applying filters, adding text or watermarks, or any other operation necessary.
Save Processed Images: After performing the processing operations on each image, save the processed image to the desired location.
Example - Resizing Images using Batch Processing
Resizing images using Python Pillow batch processing is one of the common tasks in image processing. It involves adjusting the dimensions of multiple images to a specific size or aspect ratio.
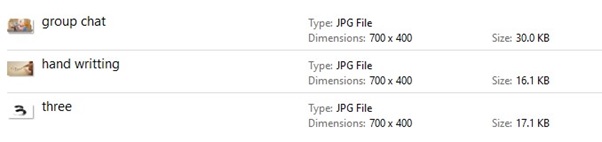
Here is an example that demonstrates the resizing multiple images at once using the Python Pillow batch processing. In this example, a collection of JPG images in a specified folder is resized to a specific size (e.g., 700x400).
main.py
from PIL import Image
import glob
import os

# Get a list of image files in the 'Images' directory
input_directory = "Images"
output_directory = "Output_Images"

image_files = [f for f in glob.glob(os.path.join(input_directory, "*.jpg"))]

for file in image_files:
   image = Image.open(file)

   # Resize the image to a specific size (e.g., 700x400)
   image = image.resize((700, 400))

   # Save the resized image to the 'Output directory for Batch Operation' directory
   output_path = os.path.join(output_directory, os.path.basename(file))
   image.save(output_path)
Output
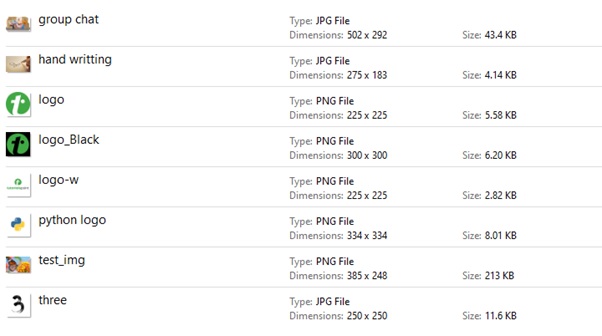
Following image represents the list of image files available in the input directory −

If we navigate to the directory where the output image was saved (i.e, "Output directory for Batch Operation"), we will be able to observe resized images as shown below −
Example - Renaming Images using the Batch Processing
Renaming images is another frequently performed task in batch processing. It involves changing the filenames of multiple images according to a specified pattern.
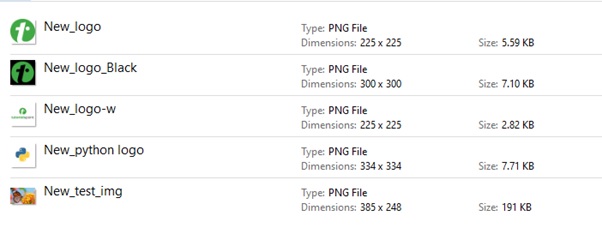
The following example adds the prefix "New_" to the names of a batch of PNG images located in the specified input_directory. It renames these images and saves them in the output_directory with the new names.
main.py
from PIL import Image
import glob
import os

# Get a list of image files in the 'Images' directory
input_directory = "Images"
output_directory = "Output_Images"

image_files = [f for f in glob.glob(os.path.join(input_directory, "*.png"))]

for file in image_files:
   image = Image.open(file)

   # Save the image with the new name to the 'Output directory for Batch Operation' directory
   output_path = os.path.join(output_directory, 'New_'+os.path.basename(file))
   image.save(output_path)
Output
Following image represents the list of image files available in the input directory −
If we navigate to the directory where the output image was saved (i.e, "Output directory for Batch Operation"), we will be able to observe renamed images as shown below −