 Data Structure
 Networking
 RDBMS
RDBMS Operating System
 Java
Java MS Excel
 iOS
iOS HTML
HTML CSS
CSS Android
 Python
 C Programming
 C++
C++ C#
C# MongoDB
 MySQL
MySQL Javascript
 PHP
PHP
- Selected Reading
- UPSC IAS Exams Notes
- Developer's Best Practices
- Questions and Answers
- Effective Resume Writing
- HR Interview Questions
- Computer Glossary
- Who is Who
How to setup hostname in centos 7 x or rhel 7 x linux versions
In this article, we will learn how to change the host name on CentOS 7.x / RHEL 7.0, by default after installation on CentOS 7 or RHEL the default hostname will be localhost.localdomain. This hostname will be used for various services, unlike the older versions we will try to change the host name by changing /etc/sysconfig/networks or using the host name command to change the hostname and after multiple reboot of server the hostname remains as localhost.localdomain. The procedure for changing the host name in CentOS 7 or RHEL is totally different from the previous versions. we have 3 tools on CentOS 7/ RHEL Linux 7.
‘hostnamectl’ – The command, control the system hostname.
‘nmtui’- This command used to control the system hostname using a text user interface (TUI).
‘nmcli’ -This command used to control the system hostname using CLI part of Network Manager settings.
Type of Host Names
Static Hostname: Generally, this is assigned by the users or the system administrator manually (Ex. ‘server’, ‘mailserver’, ‘mailserver.domain.com’)
Dynamic Hostname: This is assigned by DHCP or mDNS servers at the run time level.
Pretty Hostname − This is assigned by end-users and it is a free-form UTF8 host name (ex: my-home-pc, myhoem, mypc)
‘hostnamectl’ Command
We will see now how to change the host name using ‘hostnamectl’ with below examples
To see the present host name run the below commands
[root@centos-linux-1 ~]# hostnamectl
Static hostname: centos-linux-1.shared
Icon name: computer-vm
Chassis: vm
Machine ID: a49eccb686ea448191e879538ca856fd
Boot ID: 6ab8eeced76641e6985c67ed991351d3
Virtualization:
kvmOperating System: CentOS Linux 7 (Core)
CPE OS Name: cpe:/o:centos:centos:7
Kernel: Linux 3.10.0-327.18.2.el7.x86_64
Architecture: x86-64
Or
[root@centos-linux-1 ~]# hostnamectl status
Static hostname: centos-linux-1.shared
Icon name: computer-vm
Chassis: vm
Machine ID: a49eccb686ea448191e879538ca856fd
Boot ID: 6ab8eeced76641e6985c67ed991351d3
Virtualization: kvm
Operating System: CentOS Linux 7 (Core)
CPE OS Name: cpe:/o:centos:centos:7
Kernel: Linux 3.10.0-327.18.2.el7.x86_64
Architecture: x86-64
Setting up the Hostname
# hostnamectl set-hostname New-Host-Nam
Ex: # hostnamectl set-hostname server1
# hostnamectl set-hostname “New-Host-Name” –pretty
Ex: # hostnamectl set-hostname “server1” --pretty
# hostnamectl set-hostname New-Host-Name --static
Ex: # hostnamectl set-hostname server1.domain.com --static
# hostnamectl set-hostname New-Host-Name –transient
Ex: # hostnamectl set-hostname server1
Verifying the Hostname
# hostnamectl status
Static hostname: server1
Icon name: computer-vm
Chassis: vm
Machine ID: a49eccb686ea448191e879538ca856fd
Boot ID: 6ab8eeced76641e6985c67ed991351d3
Virtualization: kvm
Operating System: CentOS Linux 7 (Core)
CPE OS Name: cpe:/o:centos:centos:7
Kernel: Linux 3.10.0-327.18.2.el7.x86_64
Architecture: x86-64
Deleting the Particular Hostname
# hostnamectl set-hostname “”
# hostnamectl set-hostname “” --static
# hostnamectl set-hostname “” --pretty
Setting the Hostname for the Remote Server
To set the hostname to the remote servers we can use this below command
# ssh root@server-ipaddress hostnamectl set-hostname newhostname
Ex: ssh root@192.168.1.100 hostnamectl set-hostname server1
‘nmtui’ Command
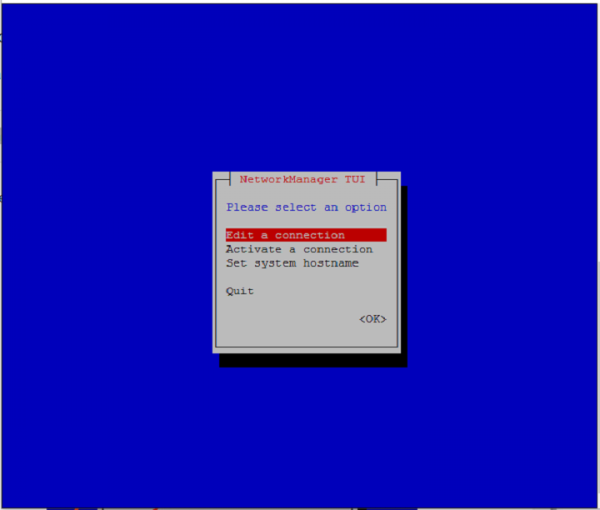
It opens a TUI (Text User Interface) interface. In the menu please select ‘Set system hostname’ and press enter.

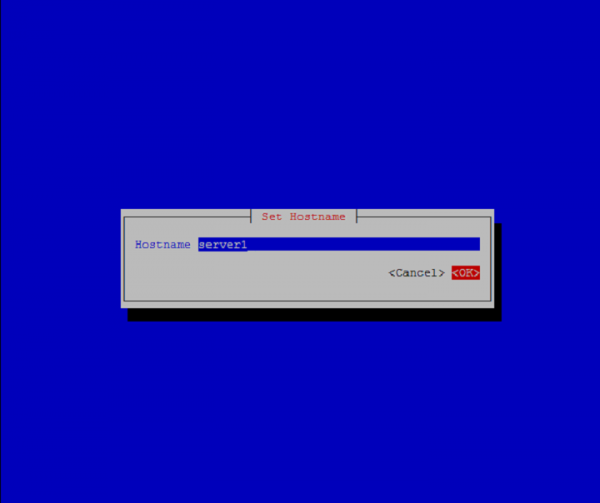
Enter the hostname you desire to change and click on OK

Then click on OK to exit.

After we set the host name on the server or machine we needed to restart the host named services by using the below command to apply the changes.
# systemctl restart system-hostnamed
We can verify the changes by using the bellow command
# hostnamectl status
‘nmcli’ Command
This command line tool is controlling the NetworkManager and reporting the network status on the system.
To see the hostname using the ‘nmcli’ use the below command
# nmcli general hostname
Output will be like this –
Server1
To set the hostname using the ‘nmcli’ command
# nmcli general hostname server1
Or
# nmcli general hostname server1.domain.com
By using the above tutorial or configuration we can control or set the host name by using three types of commands. This is a new feature in the available on CentOS 7 or RHEL 7.x, by using this feature, we are able to change the hostname of the remote server/machines.

