
Article Categories
- All Categories
-
 Data Structure
-
 Networking
-
 RDBMS
RDBMS
-
 Operating System
-
 Java
Java
-
 MS Excel
-
 iOS
iOS
-
 HTML
HTML
-
 CSS
CSS
-
 Android
-
 Python
-
 C Programming
-
 C++
C++
-
 C#
C#
-
 MongoDB
-
 MySQL
MySQL
-
 Javascript
-
 PHP
PHP
-
 Economics & Finance
How To Set-Up Apache to use Password Authentication on Ubuntu 16.04
In this article, we will learn about how to setup and configure the Apache Web server to restrict from visitors without authentication where we can hide some important and critical information to the un-authenticated users.
Prerequisites
- We needed an Ubuntu machine with a non-root user with Sudo privileges.
- An Apache2 web server installed on the machine.
Installing the Apache Utilities
We needed to install an Apache2 utility package called ‘htpasswd’ where this utility is a part of ‘apache2-utils’ packages.
This will help us to create and manage the username and password which is needed to access the restricted part of the website.
Below is the command to install the ‘apache2-utils’ package.
$ sudo apt-get install apache2-utils
Output:
Reading package lists... Done
Building dependency tree
Reading state information... Done
The following package was automatically installed and is no longer required:
apache2-data
The following NEW packages will be installed: apache2-utils
0 upgraded, 1 newly installed, 0 to remove and 92 not upgraded.
Need to get 0 B/81.3 kB of archives.
After this operation, 323 kB of additional disk space will be used.
Selecting previously unselected package apache2-utils.
(Reading database ... 117511 files and directories currently installed.)
Preparing to unpack .../apache2-utils_2.4.18-2ubuntu3.1_amd64.deb ...
Unpacking apache2-utils (2.4.18-2ubuntu3.1) ...
Setting up apache2-utils (2.4.18-2ubuntu3.1) ...
Reading package lists... Done
Need to get 0 B/81.3 kB of archives.
After this operation, 323 kB of additional disk space will be used.
Selecting previously unselected package apache2-utils.
(Reading database ... 117511 files and directories currently installed.)
Preparing to unpack .../apache2-utils_2.4.18-2ubuntu3.1_amd64.deb ...
Unpacking apache2-utils (2.4.18-2ubuntu3.1) ...
Setting up apache2-utils (2.4.18-2ubuntu3.1) ...
Creating the Apache2 Password File
When the apache2-utils is installed, we will have htpasswd command, and we will use this htpasswd to create the password file where the Apache will use for authentication users.
Below is the command to create the htpasswd file with users authentication information.
When we create the file for the first time for the Apache 2, we will use this below command with –c option
$ sudo htpasswd -c /etc/apache2/.htpasswd user1
Output:
New password:
Re-type new password:
Adding password for user user1
‘-c’ option is used to create an initial file if we are creating for the first time.
$ sudo htpasswd /etc/apache2/.htpasswd user2
Output:
New password:
Re-type new password:
Adding password for user user2
If we add the –c option, it will overwrite the old file with the new one and you will lost all the users which are created earlier.
To verify if the user is created, we will check the .htpasswd file which is located at /etc/apache2,
Below is the command to check file contents –
$ cat /etc/apache2/.htpasswd
Output:
user1:$apr1$8mLF0tmz$rvN0z15hv6tnIU9ymXPmH1
user2:$apr1$vGFgrOU4$K0uAbeRlc5sb8ICJJbhxe.
If you can see this file contains the username and encrypted password for the user.
Configuring the Apache to use the password Authentication
In this demo, we will use only authentication using the Virtual host files where we can provide authentication using other methods also. As we have the file with users authenticated in the same format where the Apache2 webserver can read.
We will do this by adding the password protection to the virtual host, the default virtual host configuration file is 000-default.conf, which is located at /etc/apache2/sites-enabled
Below is the command to edit the apache2 configuration file.
$ sudo vi /etc/apache2/sites-enabled/000-default.conf
The original Apache web server configuration file looks like below, we needed to edit this file.
<VirtualHost *:80>
   ServerAdmin admin@webhost.com
   DocumentRoot /var/www/html
   ErrorLog ${APACHE_LOG_DIR}/error.log
   CustomLog ${APACHE_LOG_DIR}/access.log combined
</VirtualHost>
We will add the authentication in the directory block, the authentication is done on the directory basis. Below is the sample configuration with authentication
<VirtualHost *:80>
   ServerAdmin admin@webhost.com
   DocumentRoot /var/www/html
   ErrorLog ${APACHE_LOG_DIR}/error.log
   CustomLog ${APACHE_LOG_DIR}/access.log combined
   <Directory "/var/www/html">
      AuthType Basic
      AuthName "Restricted Content"
      AuthUserFile /etc/apache2/.htpasswd
      Require valid-user
   </Directory>
</VirtualHost>
The block ‘directory’ has some options, now we will see the options we used for password authentication.
AuthType Basic : This will set up a basic authentication for the site.
AuthName “Restricted Contents”: this will display the name of the authentication at the prompt.
AuthUserFile /etc/apache2/.htpasswd : This will show the location of the authentication file.
Require Valid-user: This will be used by any user who has verified their authentication who are allowed to access the website.
Once we edit the configuration file, we will restart the Apache2 web server and check the status
$ sudo systemctl restart apache2
$ sudo systemctl status apache2
Output:
apache2.service - LSB: Apache2 web server
Loaded: loaded (/etc/init.d/apache2; bad; vendor preset: enabled)
Drop-In: /lib/systemd/system/apache2.service.d
??apache2-systemd.conf
Active: active (running) since Mon 2016-09-19 16:33:34 IST; 6s ago
Docs: man:systemd-sysv-generator(8)
Process: 19606 ExecStop=/etc/init.d/apache2 stop (code=exited, status=0/SUCCESS)
Process: 19630 ExecStart=/etc/init.d/apache2 start (code=exited, status=0/SUCCESS)
Tasks: 55 (limit: 512)
Memory: 6.3M
CPU: 54ms
CGroup: /system.slice/apache2.service
??19648 /usr/sbin/apache2 -k start
??19651 /usr/sbin/apache2 -k start
??19652 /usr/sbin/apache2 -k start
Sep 19 16:33:33 ubuntu-16 systemd[1]: Starting LSB: Apache2 web server...
Sep 19 16:33:33 ubuntu-16 apache2[19630]: * Starting Apache httpd web server apache2
Sep 19 16:33:34 ubuntu-16 apache2[19630]: *
Sep 19 16:33:34 ubuntu-16 systemd[1]: Started LSB: Apache2 web server.
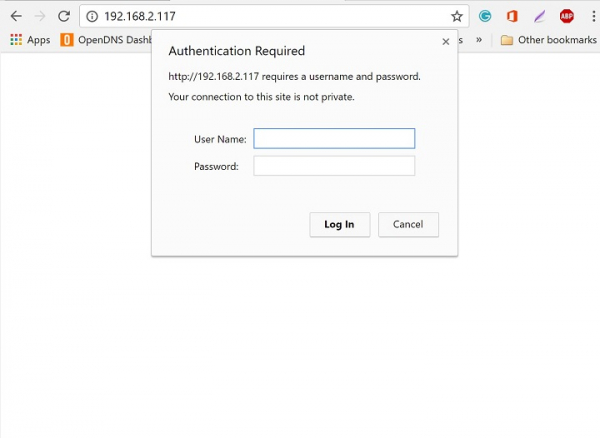
Verifying the Password Authentication
To verify if the password authentication is working or not, we need to access the apache from the web browser. When we access the site apache will use for the authentication, if we provide the correct user with credentials apache will allow the user to access the web page.
You can see the below picture for the password authentication page for the Apache2 web server.
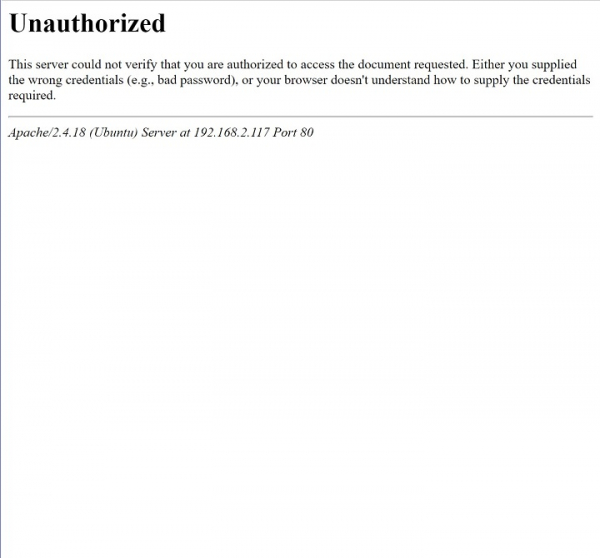
If the user has not provided correct credentials or if we accidentally click cancel, you will be shownthe Unauthorized window as below –
By using the above article and setup, we can secure the website or some part of the webpage where we can restrict the users to access some critical information without authentication, here on this setup we have used only basic authentication for more options and configuration can check the Apache2 original documentation or website.

645 Views
