
Article Categories
- All Categories
-
 Data Structure
-
 Networking
-
 RDBMS
RDBMS
-
 Operating System
-
 Java
Java
-
 MS Excel
-
 iOS
iOS
-
 HTML
HTML
-
 CSS
CSS
-
 Android
-
 Python
-
 C Programming
-
 C++
C++
-
 C#
C#
-
 MongoDB
-
 MySQL
MySQL
-
 Javascript
-
 PHP
PHP
-
 Economics & Finance
How to secure apache with using lets encrypt an open source ssl provider
In this article, we will learn how to setup TLS/SSL certificates using the “Let’s Encrypt” on Ubuntu server with Apache as a web server, we shall also cover how to automate the certificate renewal using corn jobs.
Prerequisites
To complete this demo we needed to have the below requirements
- An Ubuntu server with a user with sudo permissions.
- Apache server installed on it with a proper domain name configured.
- Installing the Dependencies on Server
We needed to update the server using the below command and install the git to get the Let’s Encrypt client from the repository.
$ sudo apt-get update
$ sudo apt-get install git
Download the Let’s Encrupt Client to the Server
Here we will download the “Let’s Encrypt” client from the repository. We needed to keep the files in a separate location. As the Let’s Encrypt client is in the beta only. It is not recommended to use in the production, we can use this SSL certificate for development and testing purposes, so frequently updating might be necessary to correct the bugs and implement the new functionality.
Let’s download the code in /opt directory, run the below command to get the updated code from the github repository
$ sudo git clone https://github.com/letsencrypt/letsencrypt /opt/letsencrypt
Cloning into '/opt/letsencrypt'...
remote: Counting objects: 37273, done.
remote: Compressing objects: 100% (54/54), done.
remote: Total 37273 (delta 29), reused 1 (delta 1), pack-reused 37217
Receiving objects: 100% (37273/37273), 10.16 MiB | 1.35 MiB/s, done.
Resolving deltas: 100% (26562/26562), done.
Checking connectivity... done.
This will get the code from the Let’s Encrypt repository into the local folders
Setting up the SSL Certificates
We needed to generate the SSL certificates for Apache by using the Let’s Encrypt client which is straightforward. The client will automatically obtain and install the new SSL certificate which is valid for the domains which we provided in the parameters.
Below is the procedure for generating and obtain the SSL certificates from the server.
$ cd /opt/letsencrypt
$ sudo ./letsencrypt-auto --apache -d domain.com
Bootstrapping dependencies for Debian-based OSes...
Hit:1 http://in.archive.ubuntu.com/ubuntu xenial InRelease
Hit:2 http://in.archive.ubuntu.com/ubuntu xenial-updates InRelease
Hit:3 http://security.ubuntu.com/ubuntu xenial-security InRelease
Hit:4 http://in.archive.ubuntu.com/ubuntu xenial-backports InRelease
Reading package lists... Done
Reading package lists... Done
Building dependency tree
Reading state information... Done
ca-certificates is already the newest version (20160104ubuntu1).
gcc is already the newest version (4:5.3.1-1ubuntu1).
The following additional packages will be installed:
libexpat1-dev libpython-dev libpython-stdlib libpython2.7-dev python-minimal python-pip-whl
python-pkg-resources python2.7 python2.7-dev python2.7-minimal python3-virtualenv zlib1g-dev
Suggested packages:
augeas-doc augeas-tools python-doc python-tk python-setuptools python2.7-doc binfmt-support
Recommended packages:
libssl-doc
The following NEW packages will be installed:
augeas-lenses dialog libaugeas0 libexpat1-dev libffi-dev libpython-dev libpython-stdlib libpython2.7-dev
libssl-dev python python-dev python-minimal python-pip-whl python-pkg-resources python-virtualenv python2.7
python2.7-dev python2.7-minimal python3-virtualenv virtualenv zlib1g-dev
0 upgraded, 21 newly installed, 0 to remove and 26 not upgraded.
Need to get 33.5 MB of archives.
.
.
.
.
If we want to get and install a certificate for a single valid domain or sub domains, we can use the options.
If we needed to generate the SSL certificates for multiple domains, we can use the below command to get the certificates for the multiple domains.
$sudo ./letsencrypt-auto --apache -d domain.com -d domain1.com
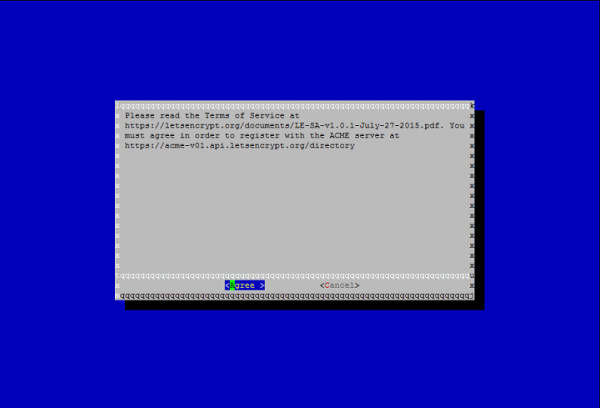
This will install the dependencies and then a GUI based step-by-step guide will be presented to customize the certificate options.
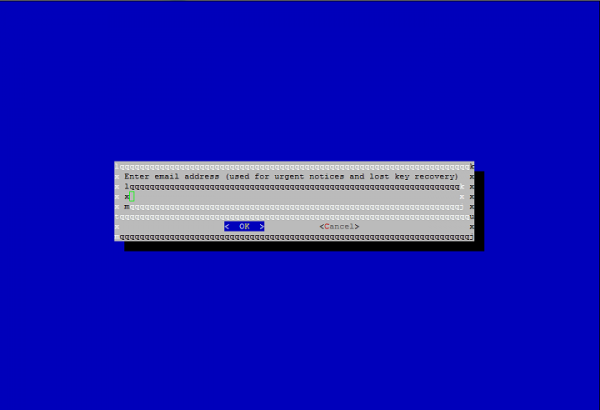
If we lost the key, we can retrieve for that you will be asked to provide a mailing address, and to get any notifications
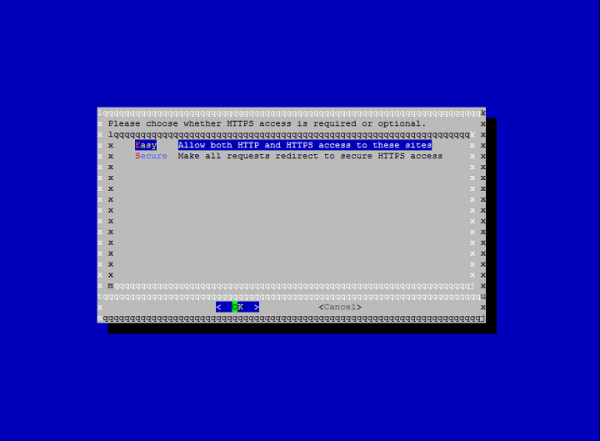
You can able to choose between enabling both http and https access or it can configure that to redirect all the http requests to https.
After the installation is finished, we can find the certificate files in /etc/letsencrypt/live.
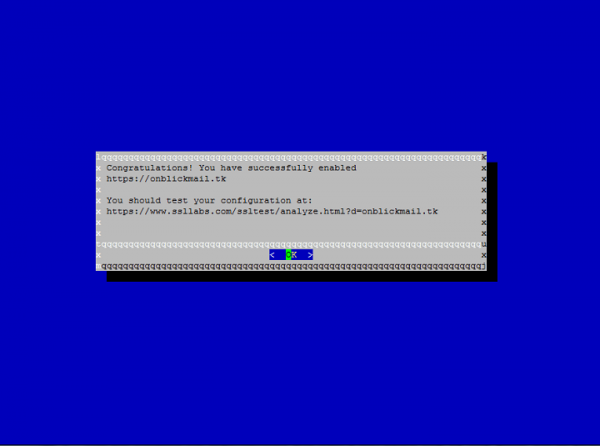
We can verify that SSL certificates with the given below link
https://www.ssllabs.com/ssltest/analyze.html?d=example.com&latest
Configure for the Auto Renewal
In general, Let’s Encrypt certificates are only valid for 90 days, so it is recommended to renew the certificates for every 60 days so that it will allow for renewal without any errors. We can do it by using the renew command. Below is the command to get the certificate renewal –
$ ./letsencrypt-auto renew
It will check for dependencies and check for the renewal and get the certificate.
It will automatically renew all the domains in the machine if we configured for multiple domains in the machine.
We can configure the cron job to do this, which will automatically renew the certificate for a period of time as the server will not allow to renew if the certificate expires below 30 days.
Below is the cron job example where it will check for the renewal daily at 5:00 am
00 5 * * 1 /opt/letsencrypt/letsencrypt-auto renew >> /var/log/le-renew.log
In this article we have learned how to configure and install a free SSL certificate from the “Let’s Encrypt” in order to secure the websites hosted using the Apache web server, as “Let’s Encrypt” is in beta stage. I recommend that you check the Let’s Encrypt blogs for important updates.

271 Views
