
 Data Structure
 Networking
 RDBMS
RDBMS Operating System
 Java
Java MS Excel
 iOS
iOS HTML
HTML CSS
CSS Android
 Python
 C Programming
 C++
C++ C#
C# MongoDB
 MySQL
MySQL Javascript
 PHP
PHP
- Selected Reading
- UPSC IAS Exams Notes
- Developer's Best Practices
- Questions and Answers
- Effective Resume Writing
- HR Interview Questions
- Computer Glossary
- Who is Who
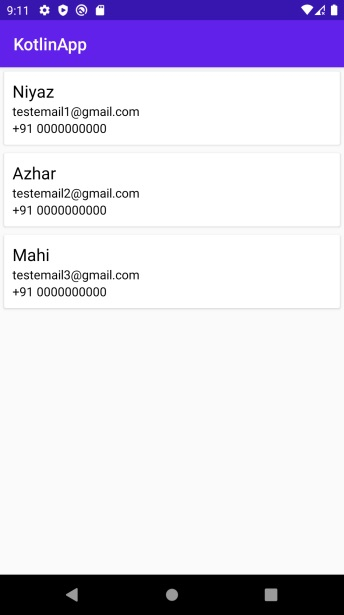
How to parse JSON Objects on Android using Kotlin?
This example demonstrates how to parse JSON Objects on Android using Kotlin.
Step 1 − Create a new project in Android Studio, go to File ⇒ New Project and fill all required details to create a new project.
Step 2 − Add the following code to res/layout/activity_main.xml.
<?xml version="1.0" encoding="utf-8"?>
<RelativeLayout xmlns:android="http://schemas.android.com/apk/res/android"
   xmlns:tools="http://schemas.android.com/tools"
   android:layout_width="match_parent"
   android:layout_height="match_parent"
   tools:context=".MainActivity">
   <androidx.recyclerview.widget.RecyclerView
      android:id="@+id/recyclerView"
      android:layout_width="match_parent"
      android:layout_height="match_parent" />
</RelativeLayout>
Step 3 − Create a new asset folder and create a user_list.json file and the code mentioned below.
{
   "users":[
      {
         "name":"Niyaz",
         "email":"testemail1@gmail.com",
         "contact":{
            "mobile":"+91 0000000000"
         }
      },
      {
         "name":"Azhar",
         "email":"testemail2@gmail.com",
         "contact":{
            "mobile":"+91 0000000000"
         }
      },
      {
         "name":"Mahi",
         "email":"testemail3@gmail.com",
         "contact":{
            "mobile":"+91 0000000000"
         }
      }
   ]
}
Step 4 − Add the following code to src/MainActivity.kt
import android.os.Bundle
import androidx.appcompat.app.AppCompatActivity
import androidx.recyclerview.widget.LinearLayoutManager
import androidx.recyclerview.widget.RecyclerView
import org.json.JSONException
import org.json.JSONObject
import java.io.IOException
import java.nio.charset.Charset
class MainActivity : AppCompatActivity() {
   var personName: ArrayList<String> = ArrayList()
   var emailId: ArrayList<String> = ArrayList()
   var mobileNumbers: ArrayList<String> = ArrayList()
   override fun onCreate(savedInstanceState: Bundle?) {
      super.onCreate(savedInstanceState)
      setContentView(R.layout.activity_main)
      title = "KotlinApp"
      val recyclerView = findViewById<RecyclerView>(R.id.recyclerView)
      val linearLayoutManager = LinearLayoutManager(applicationContext)
      recyclerView.layoutManager = linearLayoutManager
      try {
         val obj = JSONObject(loadJSONFromAsset())
         val userArray = obj.getJSONArray("users")
         for (i in 0 until userArray.length()) {
            val userDetail = userArray.getJSONObject(i)
            personName.add(userDetail.getString("name"))
            emailId.add(userDetail.getString("email"))
            val contact = userDetail.getJSONObject("contact")
            mobileNumbers.add(contact.getString("mobile"))
         }
      }
      catch (e: JSONException) {
         e.printStackTrace()
      }
      val customAdapter = CustomAdapter(this@MainActivity, personName, emailId, mobileNumbers)
      recyclerView.adapter = customAdapter
   }
   private fun loadJSONFromAsset(): String {
      val json: String?
      try {
         val inputStream = assets.open("users_list.json")
         val size = inputStream.available()
         val buffer = ByteArray(size)
         val charset: Charset = Charsets.UTF_8
         inputStream.read(buffer)
         inputStream.close()
         json = String(buffer, charset)
      }
      catch (ex: IOException) {
         ex.printStackTrace()
         return ""
      }
      return json
   }
}
Step 5 − Create a new class CustomAdapter.kt and add the following code −
import android.content.Context
import android.view.LayoutInflater
import android.view.View
import android.view.ViewGroup
import android.widget.TextView
import android.widget.Toast
import androidx.recyclerview.widget.RecyclerView
import androidx.recyclerview.widget.RecyclerView.ViewHolder
import java.util.*
class CustomAdapter(
   private var context: Context,
   private var personNames: ArrayList<String>,
   private var emailIds: ArrayList<String>,
   private var mobileNumbers: ArrayList<String>
) :
RecyclerView.Adapter<CustomAdapter.MyViewHolder>() {
   override fun onCreateViewHolder(parent: ViewGroup, viewType: Int): MyViewHolder {
      val v = LayoutInflater.from(parent.context).inflate(R.layout.rowlayout, parent, false)
      return MyViewHolder(v)
   }
   override fun onBindViewHolder(holder: MyViewHolder, position: Int) {
      // set the data in items
      holder.name.text = personNames[position]
      holder.email.text = emailIds[position]
      holder.mobileNo.text = mobileNumbers[position]
      // implement setOnClickListener event on item view.
      holder.itemView.setOnClickListener { // display a toast with person name on item click
         Toast.makeText(context, personNames[position], Toast.LENGTH_SHORT).show()
      }
   }
   override fun getItemCount(): Int {
      return personNames.size
   }
   inner class MyViewHolder(itemView: View) : ViewHolder(itemView) {
      var name: TextView = itemView.findViewById<View>(R.id.tvName) as TextView
      var email: TextView = itemView.findViewById<View>(R.id.tvEmail) as TextView
      var mobileNo: TextView = itemView.findViewById<View>(R.id.tvMobile) as TextView
   }
}
Step 6 − Create a layout resource file row.xml and add the following code
<?xml version="1.0" encoding="utf-8"?>
<androidx.cardview.widget.CardView xmlns:android="http://schemas.android.com/apk/res/android"
   android:id="@+id/cardView"
   android:layout_width="match_parent"
   android:layout_margin="5dp"
   android:layout_height="wrap_content">
   <LinearLayout
      android:layout_width="match_parent"
      android:layout_height="wrap_content"
      android:orientation="vertical"
      android:padding="10dp">
      <!--items for a single row of RecyclerView-->
      <TextView
         android:id="@+id/tvName"
         android:layout_width="wrap_content"
         android:layout_height="wrap_content"
         android:text="Name"
         android:textColor="#000"
         android:textSize="20sp" />
      <TextView
         android:id="@+id/tvEmail"
         android:layout_width="wrap_content"
         android:layout_height="wrap_content"
         android:text="email@email.com"
         android:textColor="#000"
         android:textSize="15sp" />
      <TextView
         android:id="@+id/tvMobile"
         android:layout_width="wrap_content"
         android:layout_height="wrap_content"
         android:text="e9999999999"
         android:textColor="#000"
         android:textSize="15sp" />
      </LinearLayout>
</androidx.cardview.widget.CardView>
Step 7 − Add the following code to androidManifest.xml
<?xml version="1.0" encoding="utf-8"?>
<manifest xmlns:android="http://schemas.android.com/apk/res/android"
   package="com.example.q11">
   <application
      android:allowBackup="true"
      android:icon="@mipmap/ic_launcher"
      android:label="@string/app_name"
      android:roundIcon="@mipmap/ic_launcher_round"
      android:supportsRtl="true"
      android:theme="@style/AppTheme">
      <activity android:name=".MainActivity">
         <intent-filter>
            <action android:name="android.intent.action.MAIN" />
            <category android:name="android.intent.category.LAUNCHER" />
         </intent-filter>
      </activity>
   </application>
</manifest>
Let's try to run your application. I assume you have connected your actual Android Mobile device with your computer. To run the app from android studio, open one of your project's activity files and click the Run icon ![]() from the toolbar. Select your mobile device as an option and then check your mobile device which will display your default screen.
from the toolbar. Select your mobile device as an option and then check your mobile device which will display your default screen.
Click here to download the project code.

3K+ Views
