
Article Categories
- All Categories
-
 Data Structure
-
 Networking
-
 RDBMS
RDBMS
-
 Operating System
-
 Java
Java
-
 MS Excel
-
 iOS
iOS
-
 HTML
HTML
-
 CSS
CSS
-
 Android
-
 Python
-
 C Programming
-
 C++
C++
-
 C#
C#
-
 MongoDB
-
 MySQL
MySQL
-
 Javascript
-
 PHP
PHP
-
 Economics & Finance
How to parse JSON Objects on Android?
This example demonstrates how to parse JSON Objects on Android .
Step 1 − Create a new project in Android Studio, go to File ⇒ New Project and fill all required details to create a new project.
Step 2 − Add the following dependency to Gradle Scripts ⇒ build.gradle and do sync
apply plugin: 'com.android.application'
android {
   compileSdkVersion 28
   defaultConfig {
      applicationId "com.example.sample"
      minSdkVersion 21
      targetSdkVersion 28
      versionCode 1
      versionName "1.0"
      testInstrumentationRunner "android.support.test.runner.AndroidJUnitRunner"
   }
   buildTypes {
      release {
         minifyEnabled false
         proguardFiles getDefaultProguardFile('proguard-android-optimize.txt'), 'proguard-rules.pro'
      }
   }
}
dependencies {
   implementation fileTree(dir: 'libs', include: ['*.jar'])
   implementation 'com.android.support:appcompat-v7:28.0.0'
   implementation 'com.android.support.constraint:constraint-layout:1.1.3'
   testImplementation 'junit:junit:4.12'
   androidTestImplementation 'com.android.support.test:runner:1.0.2'
   androidTestImplementation 'com.android.support.test.espresso:espresso-core:3.0.2'
   implementation "com.android.support:recyclerview-v7:23.0.1" // dependency file for RecyclerView
   implementation 'com.android.support:cardview-v7:23.0.1' // dependency file for CardView
}
Step 3 − Add the following dependency to res/layout/activity_main.xml
<?xml version="1.0" encoding="utf-8"?>
<RelativeLayout xmlns:android="http://schemas.android.com/apk/res/android"
   xmlns:app="http://schemas.android.com/apk/res-auto"
   xmlns:tools="http://schemas.android.com/tools"
   android:layout_width="match_parent"
   android:layout_height="match_parent"
   tools:context=".MainActivity">
   <android.support.v7.widget.RecyclerView
      android:id="@+id/recyclerView"
      android:layout_width="match_parent"
      android:layout_height="match_parent" />
</RelativeLayout>
Step 4 − Add the following dependency to res/layout/rowlayout _main.xml
<?xml version="1.0" encoding="utf-8"?>
<android.support.v7.widget.CardView xmlns:android="http://schemas.android.com/apk/res/android"
   xmlns:card_view="http://schemas.android.com/apk/res-auto"
   android:id="@+id/cardView"
   android:layout_width="match_parent"
   android:layout_margin="5dp"
   android:layout_height="wrap_content">
   <LinearLayout
      android:layout_width="match_parent"
      android:layout_height="wrap_content"
      android:orientation="vertical"
      android:padding="10dp">
      <!--items for a single row of RecyclerView-->
      <TextView
         android:id="@+id/tvName"
         android:layout_width="wrap_content"
         android:layout_height="wrap_content"
         android:text="Name"
         android:textColor="#000"
         android:textSize="20sp" />
      <TextView
         android:id="@+id/tvEmail"
         android:layout_width="wrap_content"
         android:layout_height="wrap_content"
         android:text="email@email.com"
         android:textColor="#000"
         android:textSize="15sp" />
      <TextView
         android:id="@+id/tvMobile"
         android:layout_width="wrap_content"
         android:layout_height="wrap_content"
         android:text="e9999999999"
         android:textColor="#000"
         android:textSize="15sp" />
      </LinearLayout>
</android.support.v7.widget.CardView>
Step 5 − Add the following dependency to src/MainActivity.java
package com.example.sample;
import android.support.v7.app.AppCompatActivity;
import android.os.Bundle;
import android.support.v7.widget.LinearLayoutManager;
import android.support.v7.widget.RecyclerView;
import android.util.Log;
import org.json.JSONArray;
import org.json.JSONException;
import org.json.JSONObject;
import java.io.IOException;
import java.io.InputStream;
import java.util.ArrayList;
import java.util.Arrays;
public class MainActivity extends AppCompatActivity {
   // ArrayList for person names, email Id's and mobile numbers
   ArrayList<String> personNames=new ArrayList<>();
   ArrayList<String> emailIds=new ArrayList<>();
   ArrayList<String> mobileNumbers=new ArrayList<>();
   @Override
   protected void onCreate(Bundle savedInstanceState) {
      super.onCreate(savedInstanceState);
      setContentView(R.layout.activity_main);
      // get the reference of RecyclerView
      RecyclerView recyclerView=(RecyclerView) findViewById(R.id.recyclerView);
      // set a LinearLayoutManager with default vertical orientation
      LinearLayoutManager linearLayoutManager=new LinearLayoutManager(getApplicationContext());
      recyclerView.setLayoutManager(linearLayoutManager);
      try {
         // get JSONObject from JSON file
         JSONObject obj=new JSONObject(loadJSONFromAsset());
         // fetch JSONArray named users
         JSONArray userArray=obj.getJSONArray("users");
         // implement for loop for getting users list data
         for (int i = 0; i < userArray.length(); i++) {
            // create a JSONObject for fetching single user data
            JSONObject userDetail=userArray.getJSONObject(i);
            // fetch email and name and store it in arraylist
            personNames.add(userDetail.getString("name"));
            emailIds.add(userDetail.getString("email"));
            // create a object for getting contact data from JSONObject
            JSONObject contact=userDetail.getJSONObject("contact");
            // fetch mobile number and store it in arraylist
            mobileNumbers.add(contact.getString("mobile"));
         }
      } catch (JSONException e) {
         e.printStackTrace();
      }
      // call the constructor of CustomAdapter to send the reference and data to Adapter
      CustomAdapter customAdapter=new CustomAdapter(MainActivity.this, personNames, emailIds, mobileNumbers);
      recyclerView.setAdapter(customAdapter); // set the Adapter to RecyclerView
   }
   public String loadJSONFromAsset() {
      String json=null;
      try {
         InputStream is=getAssets().open("users_list.json");
         int size=is.available();
         byte[] buffer=new byte[size];
         is.read(buffer);
         is.close();
         json=new String(buffer, "UTF-8");
      } catch (IOException ex) {
         ex.printStackTrace();
         return null;
      }
      return json;
   }
}
Step 6 − Add the following dependency to src/ CustomAdapter.java
package com.example.sample;
import android.content.Context;
import android.support.v7.widget.RecyclerView;
import android.view.LayoutInflater;
import android.view.View;
import android.view.ViewGroup;
import android.widget.TextView;
import android.widget.Toast;
import java.util.ArrayList;
public class CustomAdapter extends RecyclerView.Adapter<CustomAdapter.MyViewHolder> {
   ArrayList<String> personNames;
   ArrayList<String> emailIds;
   ArrayList<String> mobileNumbers;
   Context context;
   public CustomAdapter(Context context, ArrayList<String> personNames, ArrayList<String> emailIds, ArrayList<String> mobileNumbers) {
      this.context=context;
      this.personNames=personNames;
      this.emailIds=emailIds;
      this.mobileNumbers=mobileNumbers;
   }
   @Override
   public MyViewHolder onCreateViewHolder(ViewGroup parent, int viewType) {
      // infalte the item Layout
      View v=LayoutInflater.from(parent.getContext()).inflate(R.layout.rowlayout, parent, false);
      MyViewHolder vh=new MyViewHolder(v); // pass the view to View Holder
      return vh;
   }
   @Override
   public void onBindViewHolder(MyViewHolder holder, final int position) {
      // set the data in items
      holder.name.setText(personNames.get(position));
      holder.email.setText(emailIds.get(position));
      holder.mobileNo.setText(mobileNumbers.get(position));
      // implement setOnClickListener event on item view.
      holder.itemView.setOnClickListener(new View.OnClickListener() {
         @Override
         public void onClick(View view) {
            // display a toast with person name on item click
            Toast.makeText(context, personNames.get(position), Toast.LENGTH_SHORT).show();
         }
      });
   }
   @Override
   public int getItemCount() {
      return personNames.size();
   }
   public class MyViewHolder extends RecyclerView.ViewHolder {
      TextView name, email, mobileNo; // init the item view's
      public MyViewHolder(View itemView) {
         super(itemView);
         // get the reference of item view's
         name=(TextView) itemView.findViewById(R.id.tvName);
         email=(TextView) itemView.findViewById(R.id.tvEmail);
         mobileNo=(TextView) itemView.findViewById(R.id.tvMobile);
      }
   }
}
Step 7 − Add the following code to app/manifests/AndroidManifest.xml
<?xml version="1.0" encoding="utf-8"?>
<manifest xmlns:android="http://schemas.android.com/apk/res/android"
   package="com.example.sample" >
   <application
      android:allowBackup="true"
      android:icon="@mipmap/ic_launcher"
      android:label="@string/app_name"
      android:roundIcon="@mipmap/ic_launcher_round"
      android:supportsRtl="true"
      android:theme="@style/AppTheme" >
      <activity android:name=".MainActivity" >
         <intent-filter>
            <action android:name="android.intent.action.MAIN" />
            <category android:name="android.intent.category.LAUNCHER" />
         </intent-filter>
      </activity>
   </application>
</manifest>
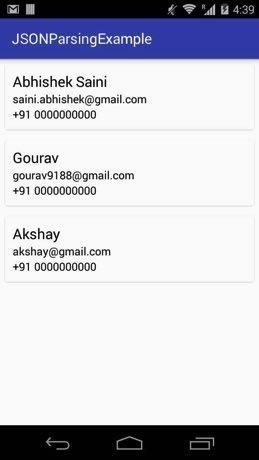
Let's try to run your application. I assume you have connected your actual Android Mobile device with your computer. To run the app from android studio, open one of your project's activity files and click Run ![]() icon from the toolbar. Select your mobile device as an option and then check your mobile device which will display your default screen −
icon from the toolbar. Select your mobile device as an option and then check your mobile device which will display your default screen −
Click here to download the project code.

792 Views
