- Home
- CentOS Overview
- Basic CentOS Linux Commands
- File / Folder Management
- User Management
- Quota Management
- Systemd Services Start and Stop
- Resource Mgmt with systemctl
- Resource Mgmt with crgoups
- Process Management
- Firewall Setup
- Configure PHP in CentOS Linux
- Set Up Python with CentOS Linux
- Configure Ruby on CentOS Linux
- Set Up Perl for CentOS Linux
- Install and Configure Open LDAP
- Create SSL Certificates
- Install Apache Web Server CentOS 7
- MySQL Setup On CentOS 7
- Set Up Postfix MTA and IMAP/POP3
- Install Anonymous FTP
- Remote Management
- Traffic Monitoring in CentOS
- Log Management
- Backup and Recovery
- System Updates
- Shell Scripting
- Package Management
- Volume Management
Linux Admin - Volume Management
Logical Volume Management (LVM) is a method used by Linux to manage storage volumes across different physical hard disks. This is not to be confused with RAID. However, it can be thought of in a similar concept as RAID 0 or J-Bod. With LVM, it is possible to have (for example) three physical disks of 1TB each, then a logical volume of around 3TB such as /dev/sdb. Or even two logical volumes of 1.5TB, 5 volumes of 500GB, or any combination. One single disk can even be used for snapshots of Logical Volumes.
Note − Using Logical Volumes actually increases disk I/O when configured correctly. This works in a similar fashion to RAID 0 striping data across separate disks.
When learning about volume management with LVM, it is easier if we know what each component in LVM is. Please study the following table to get a firm grasp of each component. If you need to, use Google to study. Understanding each piece of a logical volume is important to manage them.
| PV | Physical Volume | sda |
| PP | Physical Partition | sda1 , sda2 |
| VG | Volume Group | Pooled physical resources |
| LV | Logical Volume | Seen as a storage facility to the operating system |
A physical volume will be seen as /dev/sda, /dev/sdb; a physical disk that is detected by Linux.
A physical partition will be a section of the disk partitioned by a disk utility such as fdisk. Keep in mind, physical partition is not recommended in most common LVM setups. Example: disk /dev/sda is partitioned to include two physical partitions: /dev/sda1 and /dev/sda1
If we have two physical disks of 1TB each, we can create a volume group of almost 2TB amongst the two.
From the volume group, we can create three logical volumes each of any-size not exceeding the total volume group size.
Traditional Linux Disk Administration Tools
Before being acquainted with the latest and greatest featured tools for LVM Management in CentOS 7, we should first explore more traditional tools that have been used for Linux disk management. These tools will come handy and still have use with today's advanced LVM tools such as the System Storage Manager: lsblk, parted, and mkfs.xfs.
Now, assuming we have added another disk or two to our system, we need to enumerate disks detected by Linux. I'd always advise enumerating disks every time before performing operations considered as destructive. lsblk is a great tool for getting disk information. Let's see what disks CentOS detects.
[root@localhost rdc]# lsblk
NAME         MAJ:MIN    RM    SIZE    RO    TYPE MOUNTPOINT
sda            8:0       0     20G     0        disk
sda1         8:1       0      1G     0     part /boot
sda2         8:2       0     19G     0        part
  cl-root  253:0       0     17G     0      lvm  /
  cl-swap  253:1       0      2G     0      lvm  [SWAP]
    sdb       8:16       0      6G     0       disk
    sdc       8:32       0      4G     0       disk
    sr0       11:0       1   1024M     0       rom
As you can see, we have three disks on this system: sda, sdb, and sdc.
Disk sda contains our working CentOS installation, so we do not want to toy around with sda. Both sdb and sdc were added to the system for this tutorial. Let's make these disks usable to CentOS.
Create a Disk Label
[root@localhost rdc]# parted /dev/sdb mklabel GPT
Warning: The existing disk label on /dev/sdb will be destroyed and all data on this
   disk will be lost. Do you want to continue?
Yes/No? Yes
[root@localhost rdc]#
We now have one disk labeled. Simply run the parted command in the same manner on sdc.
Create the Partitions on the Disk
We will only create a single partition on each disk. To create partitions, the parted command is used again.
[root@localhost rdc]# parted -a opt /dev/sdb mkpart primary ext4 0% 100%
Warning − You requested a partition from 0.00B to 6442MB (sectors 0..12582911).
The closest location we can manage is 17.4kB to 1048kB (sectors 34..2047).
Is this still acceptable to you?
Yes/No? NO
[root@localhost rdc]# parted -a opt /dev/sdc mkpart primary ext4 0% 100%
Information − You may need to update /etc/fstab.
[root@localhost rdc]# lsblk
NAME        MAJ:MIN   RM    SIZE    RO    TYPE MOUNTPOINT
sda           8:0      0     20G     0        disk
sda1        8:1      0      1G     0      part / boot
sda2        8:2      0     19G     0        part
 cl-root  253:0      0     17G     0       lvm  /
 cl-swap  253:1      0      2G     0       lvm  [SWAP]
sdb          8:16      0      6G     0        disk
sdb1       8:17      0      6G     0        part
 sdc         8:32      0      4G     0        disk
sdc1       8:33      0      4G     0        part
sr0          11:0      1   1024M     0        rom

[root@localhost rdc]#
As you can see from lsblk output, we now have two partitions, each on sdb and sdc.
Make the File System
Finally, before mounting and using any volume we need to add a file system. We will be using the XFS file system.
root@localhost rdc]# mkfs.xfs -f /dev/sdb1
meta-data = /dev/sdb1               isize = 512    agcount = 4, agsize = 393088 blks
            =                      sectsz = 512    attr = 2, projid32bit = 1
            =                         crc = 1      finobt = 0, sparse = 0
data        =                       bsize = 4096   blocks = 1572352, imaxpct = 25
            =                       sunit = 0      swidth = 0 blks
naming      = version 2             bsize = 4096   ascii-ci = 0 ftype = 1
log         = internal log          bsize = 4096   blocks = 2560, version = 2
            =                      sectsz = 512    sunit = 0 blks, lazy-count = 1
realtime    = none                  extsz = 4096   blocks = 0, rtextents = 0
[root@localhost rdc]# mkfs.xfs -f /dev/sdc1
meta-data   = /dev/sdc1             isize = 512    agcount = 4, agsize = 262016 blks
            =                      sectsz = 512    attr = 2, projid32bit = 1
            =                         crc = 1      finobt = 0, sparse = 0
data        =                       bsize = 4096   blocks = 1048064, imaxpct = 25
            =                       sunit = 0      swidth = 0 blks
naming      = version 2             bsize = 4096   ascii-ci = 0 ftype = 1
log         = internal log          bsize = 4096   blocks = 2560, version = 2
            =                      sectsz = 512    sunit = 0 blks, lazy-count = 1
realtime    = none                  extsz = 4096   blocks = 0, rtextents = 0

[root@localhost rdc]#
Let's check to make sure each have a usable file system.
[root@localhost rdc]# lsblk -o NAME,FSTYPE
NAME           FSTYPE
sda
sda1         xfs
sda2         LVM2_member
 cl-root     xfs
 cl-swap     swap
sdb
sdb1         xfs
sdc
sdc1         xfs
sr0

[root@localhost rdc]#
Each is now using the XFS file system. Let's mount them, check the mount, and copy a file to each.
[root@localhost rdc]# mount -o defaults /dev/sdb1 /mnt/sdb
[root@localhost rdc]# mount -o defaults /dev/sdc1 /mnt/sdc

[root@localhost ~]# touch /mnt/sdb/myFile /mnt/sdc/myFile
[root@localhost ~]# ls /mnt/sdb /mnt/sdc
 /mnt/sdb:
  myFile

 /mnt/sdc:
  myFile
We have two usable disks at this point. However, they will only be usable when we mount them manually. To mount each on boot, we must edit the fstab file. Also, permissions must be set for groups needing access to the new disks.
Create Volume Groups and Logical Volumes
One of the greatest addition to CentOS 7 was the inclusion of a utility called System Storage Manager or ssm. System Storage Manager greatly simplifies the process of managing LVM pools and storage volumes on Linux.
We will go through the process of creating a simple volume pool and logical volumes in CentOS. The first step is installing the System Storage Manager.
[root@localhost rdc]# yum install system-storage-manager
Let's look at our disks using the ssm list command.
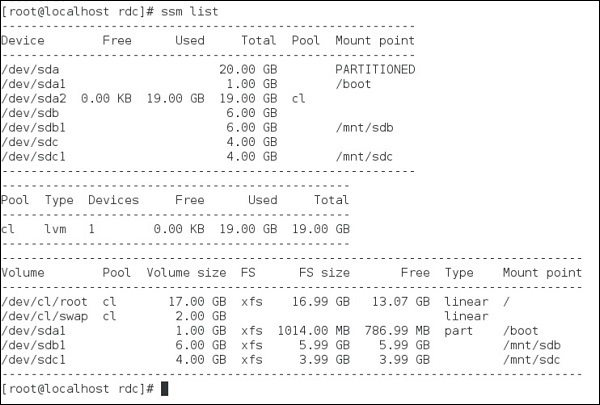
As seen above, a total of three disks are installed on the system.
/sdba1 − Hosts our CentOS installation
/sdb1 − Mounted at /mnt/sdb
/sdc1 − Mounted at /mnt/sdc
What we want to do is make a Volume Group using two disks (sdb and sdc). Then make three 3GB Logical Volumes available to the system.
Let's create our Volume Group.
[root@localhost rdc]# ssm create -p NEW_POOL /dev/sdb1 /dev/sdc1
By default, ssm will create a single logical volume extending the entire 10GB of the pool. We don't want this, so let's remove this.
[root@localhost rdc]# ssm remove /dev/NEW_POOL/lvol001
 Do you really want to remove active logical volume NEW_POOL/lvol001? [y/n]: y
 Logical volume "lvol001" successfully removed
[root@localhost rdc]#
Finally, let's create the three Logical Volumes.
[root@localhost rdc]# ssm create -n disk001 --fs xfs -s 3GB -p NEW_POOL
[root@localhost rdc]# ssm create -n disk002 --fs xfs -s 3GB -p NEW_POOL
[root@localhost rdc]# ssm create -n disk003 --fs xfs -s 3GB -p NEW_POOL
Now, let's check our new volumes.
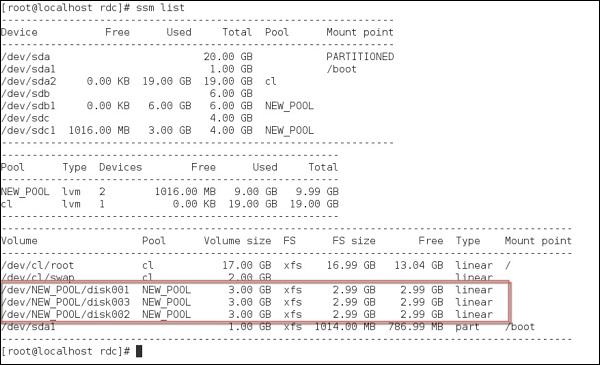
We now have three separate logical volumes spanned across two physical disk partitions.
Logical volumes are a powerful feature now built into CentOS Linux. We have touched the surface on managing these. Mastering pools and logical volumes come with practice and extended learning from Tutorials Point. For now, you have learned the basics of LVM management in CentOS and possess the ability to create basic striped Logical Volumes on a single host.