
Article Categories
- All Categories
-
 Data Structure
-
 Networking
-
 RDBMS
RDBMS
-
 Operating System
-
 Java
Java
-
 MS Excel
-
 iOS
iOS
-
 HTML
HTML
-
 CSS
CSS
-
 Android
-
 Python
-
 C Programming
-
 C++
C++
-
 C#
C#
-
 MongoDB
-
 MySQL
MySQL
-
 Javascript
-
 PHP
PHP
-
 Economics & Finance
How to change the font of UIButton with Swift?
In Swift, this is very easy to change the font of a button. You can use the titleLabel property of the button which is of type UILabel class. This property provides another property called font to apply the desired font. Let?s see some examples of changing the font.
We will follow the below steps to change the font of a button ?
Step 1 ? Initially, we will do the basic setup with button creation and customization.
Step 2 ? In this step, we will change the system font with size and weight.
Step 3 ? In this step, we will apply a custom font to the button.
Basic Setup
In the below example, we first create a button. After that, we customize the button to look better. In the last step, will add some required constraints to the button.
<div class="code-mirror  language-javascript" contenteditable="plaintext-only" spellcheck="false" style="outline: none; overflow-wrap: break-word; overflow-y: auto; white-space: pre-wrap;"><span class="token keyword">import</span> UIKit
<span class="token keyword">class</span> <span class="token class-name">TestController</span><span class="token operator">:</span> UIViewController <span class="token punctuation">{</span>
   <span class="token keyword">private</span> <span class="token keyword">let</span> loginButton <span class="token operator">=</span> <span class="token function">UIButton</span><span class="token punctuation">(</span><span class="token punctuation">)</span>
   override func <span class="token function">viewDidLoad</span><span class="token punctuation">(</span><span class="token punctuation">)</span> <span class="token punctuation">{</span>
      <span class="token keyword">super</span><span class="token punctuation">.</span><span class="token function">viewDidLoad</span><span class="token punctuation">(</span><span class="token punctuation">)</span>
      <span class="token function">initialSetup</span><span class="token punctuation">(</span><span class="token punctuation">)</span>
   <span class="token punctuation">}</span>
   <span class="token keyword">private</span> func <span class="token function">initialSetup</span><span class="token punctuation">(</span><span class="token punctuation">)</span> <span class="token punctuation">{</span>
      <span class="token comment">// basic setup</span>
      view<span class="token punctuation">.</span>backgroundColor <span class="token operator">=</span> <span class="token punctuation">.</span>white
      navigationItem<span class="token punctuation">.</span>title <span class="token operator">=</span> <span class="token string">"UIButton"</span>

      <span class="token comment">// button customization</span>
      loginButton<span class="token punctuation">.</span>backgroundColor <span class="token operator">=</span> UIColor<span class="token punctuation">.</span>gray
      loginButton<span class="token punctuation">.</span><span class="token function">setTitle</span><span class="token punctuation">(</span><span class="token string">"Login"</span><span class="token punctuation">,</span> <span class="token keyword">for</span><span class="token operator">:</span> <span class="token punctuation">.</span>normal<span class="token punctuation">)</span>
      loginButton<span class="token punctuation">.</span><span class="token function">setTitleColor</span><span class="token punctuation">(</span><span class="token punctuation">.</span>white<span class="token punctuation">,</span> <span class="token keyword">for</span><span class="token operator">:</span> <span class="token punctuation">.</span>normal<span class="token punctuation">)</span>
      loginButton<span class="token punctuation">.</span>layer<span class="token punctuation">.</span>cornerRadius <span class="token operator">=</span> <span class="token number">8</span>
      loginButton<span class="token punctuation">.</span>clipsToBounds <span class="token operator">=</span> <span class="token boolean">true</span>


      <span class="token comment">// adding the constraints to button</span>
      view<span class="token punctuation">.</span><span class="token function">addSubview</span><span class="token punctuation">(</span>loginButton<span class="token punctuation">)</span>
      loginButton<span class="token punctuation">.</span>translatesAutoresizingMaskIntoConstraints <span class="token operator">=</span> <span class="token boolean">false</span>
      loginButton<span class="token punctuation">.</span>centerYAnchor<span class="token punctuation">.</span><span class="token function">constraint</span><span class="token punctuation">(</span>equalTo<span class="token operator">:</span> view<span class="token punctuation">.</span>centerYAnchor<span class="token punctuation">)</span><span class="token punctuation">.</span>isActive <span class="token operator">=</span> <span class="token boolean">true</span>
      loginButton<span class="token punctuation">.</span>centerXAnchor<span class="token punctuation">.</span><span class="token function">constraint</span><span class="token punctuation">(</span>equalTo<span class="token operator">:</span> view<span class="token punctuation">.</span>centerXAnchor<span class="token punctuation">)</span><span class="token punctuation">.</span>isActive <span class="token operator">=</span> <span class="token boolean">true</span>
      loginButton<span class="token punctuation">.</span>heightAnchor<span class="token punctuation">.</span><span class="token function">constraint</span><span class="token punctuation">(</span>equalToConstant<span class="token operator">:</span> <span class="token number">50</span><span class="token punctuation">)</span><span class="token punctuation">.</span>isActive <span class="token operator">=</span> <span class="token boolean">true</span>
      loginButton<span class="token punctuation">.</span>widthAnchor<span class="token punctuation">.</span><span class="token function">constraint</span><span class="token punctuation">(</span>equalToConstant<span class="token operator">:</span> <span class="token number">280</span><span class="token punctuation">)</span><span class="token punctuation">.</span>isActive <span class="token operator">=</span> <span class="token boolean">true</span>
   <span class="token punctuation">}</span>
<span class="token punctuation">}</span>
</div>
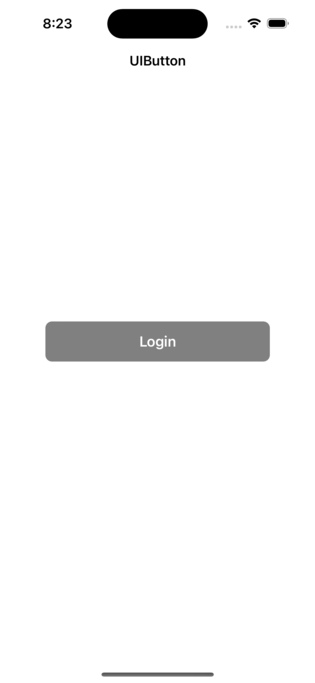
Output

You can see the default look of the button without changing the font size or style in the above output.
In real iOS applications, you may need to change the font size and style. Let see how to implement that in the next step
Change the system font of the button
We will change the font size along with the font weight in the above example by adding the following code to it.
loginButton.titleLabel?.font = UIFont.systemFont(ofSize: 18, weight: .semibold)
Output
Apply the custom font to the button
loginButton.titleLabel?.font = UIFont.init(name: "AmericanTypewriter", size: 18)
Output

You should note that here that it is required to have the font file in your project before using that font in the code. Also after adding the font file, it is required to add the "Info.plist" file.
Conclusion
In conclusion, we can apply the system font with different weights to the button. Also, if you want to apply the custom font, you can pass the font?s name with size. Generally, we used the titleLabel property of the button to change the font.

11K+ Views
