
Article Categories
- All Categories
-
 Data Structure
-
 Networking
-
 RDBMS
RDBMS
-
 Operating System
-
 Java
Java
-
 MS Excel
-
 iOS
iOS
-
 HTML
HTML
-
 CSS
CSS
-
 Android
-
 Python
-
 C Programming
-
 C++
C++
-
 C#
C#
-
 MongoDB
-
 MySQL
MySQL
-
 Javascript
-
 PHP
PHP
-
 Economics & Finance
How to Add Disk Storage to Oracle Virtual Box on Linux
This article is for those who are looking to install software on your Virtual Box but running low disk space issue. At the same time, you might also feel the need to add disk storage to Oracle VirtualBox by creating a new and larger drive to build the existing drive. Below are the steps to allocate more space by adding a virtual drive to a Virtual Box, The Guest VirtualBox is running the Red Hat Linux 6.7.
Adding the Virtual Drive
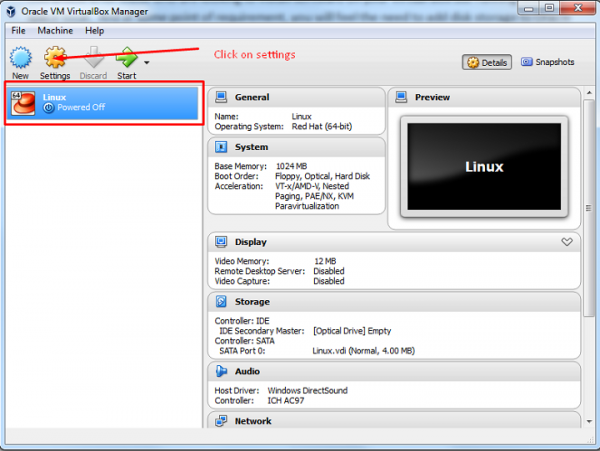
Open Oracle VM Virtual Box Manager, select the Virtual Box for which you want to add the new disk and click on Settings.
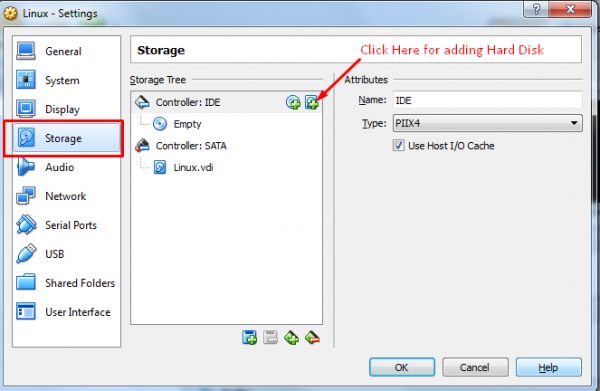
Click on Storage, select hard drive and click on Add a hard disk.
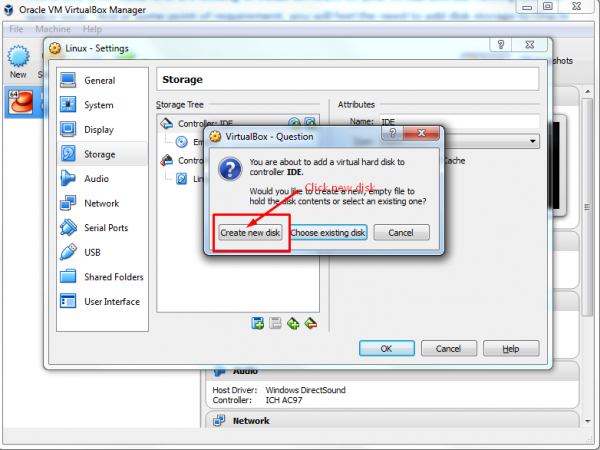
Click on Create New Disk.
Follow the on-screen instructions to create a new hard disk drive. You can also follow the wizard which will ask you the name of new hard disk and the location where you want to create the disk file. Provide the directory on windows where you want the drive created.
Click OK when the wizard completes to close the settings.
Partitioning of the New Drive
Typically, the disk drives in a system are assigned device names beginning hd or sd followed by a letter to indicate the device number. For example, the first device might be /dev/sda, the second /dev/sdb and so on.
Run the below command to list the available hard disk drives
# ls /dev/sd*
/dev/sda /dev/sda1 /dev/sda2 /dev/sdb
As we can see from the above output, the new hard drive has been assigned to the device file /dev/sdb. Currently the drive has no partitions shown (because we have yet to create any)
Creating Linux Partitions
The next step is to create one or more Linux partitions on the new disk drive. This is achieved using the fdisk utility which takes as a command-line argument the device to be partitioned:
# fdisk /dev/sdb
Device contains neither a valid DOS partition table, nor Sun, SGI or OSF disklabel
Building a new DOS disklabel with disk identifier 0xd1082b01.
Changes will remain in memory only, until you decide to write them.
After that, of course, the previous content won't be recoverable.
Warning: invalid flag 0x0000 of partition table 4 will be corrected by w(rite)

WARNING: DOS-compatible mode is deprecated. It's strongly recommended to
   switch off the mode (command 'c') and change display units to
   sectors (command 'u').
Command (m for help):
As instructed, switch off DOS compatible mode and change the units to sectors by entering the c and u commands:
Command (m for help): c
DOS Compatibility flag is not set
Command (m for help): u
Changing display/entry units to sectors
In order to view the current partitions on the disk enter the p command:
Command (m for help): p

Disk /dev/sdb: 34.4 GB, 34359738368 bytes
255 heads, 63 sectors/track, 4177 cylinders
Units = cylinders of 16065 * 512 = 8225280 bytes
Sector size (logical/physical): 512 bytes / 512 bytes
I/O size (minimum/optimal): 512 bytes / 512 bytes
Disk identifier: 0xd1082b01
Device Boot    Start    End    Blocks    Id    System
As we can see from the above fdisk output the disk currently has no partitions because it is a previously unused disk. The next step is to create a new partition on the disk, a task which is performed by entering n (for new partition) and p (for primary partition):
Command (m for help): n
Command action
   e    extended
   p    primary partition (1-4)
   p
Partition number (1-4):
We can create only one partition which will can be named partition 1. Next we need to specify where the partition will begin and end. Since this is the first partition we can start at the first available sector and since we want to use the entire disk we can specify the last sector as the end. Note that, if you wish to create multiple partitions – you can even specify the size of each partition by sectors, bytes, kilobytes or megabytes.
Partition number (1-4): 1
First sector (2048-67108863, default 2048):
Using default value 2048
Last sector, +sectors or +size{K,M,G} (2048-67108863, default 67108863):
Using default value 67108863
Now that we have specified the partition we need to write it to the disk using the w command:
Command (m for help): w
The partition table has been altered!
Calling ioctl() to re-read partition table.
Syncing disks.
If we now look at the devices again we will see that the new partition is visible as /dev/sdb1:
# ls /dev/sd*
/dev/sda /dev/sda1 /dev/sda2 /dev/sdb /dev/sdb1
The next step is to create a filesystem on our new partition.
Creating a File System on an RHEL 6.7 Disk Partition
We now have a new disk installed, it is visible to RHEL 6.7/ CentOS and we have configured a Linux partition on the disk. The next step is to create a Linux file system on the partition so that the operating system can use it to store files and data. The easiest way to create a file system on a partition is to use the mkfs.ext4 utility which takes as arguments the label and the partition device:
# /sbin/mkfs.ext4 -L /backup /dev/sdb1
mke2fs 1.41.12 (17-May-2010)
Filesystem label=/backup
OS type: Linux
Block size=4096 (log=2)
Fragment size=4096 (log=2)
Stride=0 blocks, Stripe width=0 blocks
2097152 inodes, 8388352 blocks
419417 blocks (5.00%) reserved for the super user
First data block=0
Maximum filesystem blocks=4294967296
256 block groups
32768 blocks per group, 32768 fragments per group
8192 inodes per group
Superblock backups stored on blocks:
   32768, 98304, 163840, 229376, 294912, 819200, 884736, 1605632, 2654208,
   4096000, 7962624
Writing inode tables: done
Creating journal (32768 blocks): done
Writing superblocks and filesystem accounting information: done
This filesystem checks automatically after 36 mounts or 180 days, whichever comes first.
Use tune2fs -c or -i to override.
Mounting a Filesystem
Now that we have created a new filesystem on the Linux partition of our new disk drive, we need to mount it so that it is accessible. In order to do this we need to create a mount point. A mount point is simply a directory or folder into which the filesystem will be mounted.
For the purposes of this example, we will create a /backup directory to match our filesystem label (although it is not necessary that these values match):
# mkdir /backup
The file system may then be manually mounted using the mount command
# mount /dev/sdb1 /backup
Running the mount command with no arguments shows us all currently mounted filesystems (including our new filesystem):
# mount
/dev/mapper/vg_rhel6-lv_root on / type ext4 (rw)
proc on /proc type proc (rw)
sysfs on /sys type sysfs (rw)
devpts on /dev/pts type devpts (rw,gid=5,mode=620)
tmpfs on /dev/shm type tmpfs (rw,rootcontext="system_u:object_r:tmpfs_t:s0")
/dev/sda1 on /boot type ext4 (rw)
none on /proc/sys/fs/binfmt_misc type binfmt_misc (rw)
sunrpc on /var/lib/nfs/rpc_pipefs type rpc_pipefs (rw)
/dev/sr0 on /media/RHEL_6.0 x86_64 Disc 1 type iso9660 (ro,nosuid,nodev,uhelper=udisks,uid=500,gid=500,iocharset=utf8,mode=0400,dmode=0500)
/dev/sdb1 on /backup type ext4 (rw)
Configuring RHEL 6.7 to Automatically Mount a Filesystem
In order to configure the system so that the new disk is automatically mounted at the time boot we need an entry to be added to the /etc/fstab file.
The below is the sample configuration file which shows an fstab file configured to auto mount our /backup partition
# Vi /etc/fstab
/dev/mapper/vg_rhel6-lv_root /                   ext4       defaults       1 1
UUID=4a9886f5-9545-406a-a694-04a60b24df84 /boot                ext4       defaults 1 2
/dev/mapper/vg_rhel6-lv_swap swap                swap       defaults          0 0
tmpfs                   /dev/shm             tmpfs    defaults          0 0
devpts                  /dev/pts             devpts   gid=5,mode=620    0 0
sysfs                   /sys                 sysfs    defaults          0 0
proc                    /proc                proc     defaults          0 0
LABEL=/backup           /backup              ext4     defaults          1 2
Conclusion
After the successful configuration and set-up, now you have more space, on your VirtualBox. We can add any number of hard disks to increase the space for storing different types of storages to the Linux machine by using the above procedure.

18K+ Views
