 Data Structure
 Networking
 RDBMS
RDBMS Operating System
 Java
Java MS Excel
 iOS
iOS HTML
HTML CSS
CSS Android
 Python
 C Programming
 C++
C++ C#
C# MongoDB
 MySQL
MySQL Javascript
 PHP
PHP
- Selected Reading
- UPSC IAS Exams Notes
- Developer's Best Practices
- Questions and Answers
- Effective Resume Writing
- HR Interview Questions
- Computer Glossary
- Who is Who
How to activate Tkinter menu and toolbar with keyboard shortcut or binding?
When it comes to enhancing user experience, providing keyboard shortcuts or bindings for menu and toolbar items can greatly improve accessibility and efficiency and Tkinter stands as a popular choice for developing interactive applications in Python.
In this article, we will explore the process of activating Tkinter menus and toolbars using keyboard shortcuts or bindings, empowering developers to create more intuitive and streamlined applications.
How to activate Tkinter menu and toolbar with keyboard shortcut or binding?
To enable keyboard shortcuts or bindings for activating the Tkinter menu and toolbar, you have the option to utilize the accelerator parameter when creating menu items. This allows you to assign keyboard shortcuts. Moreover, by employing the bind method of the root window, you can associate specific functions with keyboard events. Consequently, pressing the corresponding keyboard shortcuts or keys will trigger the menu items and toolbar buttons.
Follow the steps given below to activate Tkinter menu and toolbar with a keyboard shortcut or binding ?
We import the tkinter module, which is the standard Python interface to the Tk GUI toolkit.
After that, we define the create_menu() function, which creates the main menu and its submenus and adds keyboard shortcuts or bindings to them. In this function, we create the Menu widget, which represents the main menu, and add it to the top-level window using the config() method. Then, we create two submenus, "File" and "Help", using the Menu widget again. We add them to the main menu using the add_cascade() method. Finally, we create menu items for each submenu, using the add_command() method, and add keyboard shortcuts or bindings to them using the bind() method.
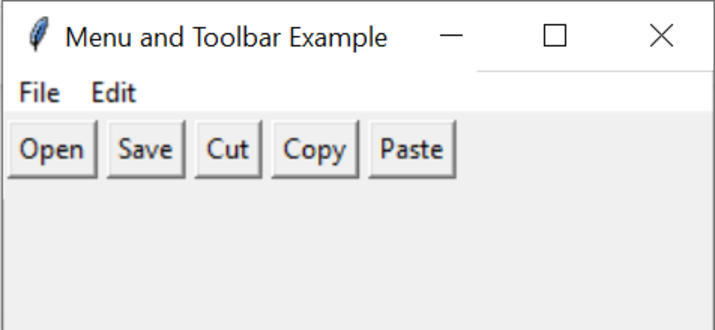
Following that, we define the function create_toolbar(), which is responsible for constructing a toolbar containing buttons and assigning bindings to them. Within this function, we generate the Frame widget, serving as a container for the buttons, and include it in the top-level window using the config() method. We then create two Button widgets, "Open" and "Save," and add them to the toolbar utilizing the pack() method. Lastly, bindings are assigned to each button through the bind() method.
Next, we create the top-level window using the Tk class, and set its title using the title() method.
We call or invoke the create_menu() and create_toolbar() functions to generate the main menu and toolbar, respectively.
Lastly, we start the main event loop using the mainloop() method, which waits for events (such as user input) and responds to them.
Example
import tkinter as tk

def open_file():
   print("Opening file...")

def save_file():
   print("Saving file...")

def cut_text():
   print("Cutting text...")

def copy_text():
   print("Copying text...")

def paste_text():
   print("Pasting text...")

def create_menu(root):
   menu = tk.Menu(root)

   # Create the "File" menu
   file_menu = tk.Menu(menu, tearoff=False)
   file_menu.add_command(label="Open", command=open_file, accelerator="Ctrl+O")
   file_menu.add_command(label="Save", command=save_file, accelerator="Ctrl+S")
   file_menu.add_separator()
   file_menu.add_command(label="Exit", command=root.quit, accelerator="Ctrl+Q")
   menu.add_cascade(label="File", menu=file_menu)

   # Create the "Edit" menu
   edit_menu = tk.Menu(menu, tearoff=False)
   edit_menu.add_command(label="Cut", command=cut_text, accelerator="Ctrl+X")
   edit_menu.add_command(label="Copy", command=copy_text, accelerator="Ctrl+C")
   edit_menu.add_command(label="Paste", command=paste_text, accelerator="Ctrl+V")
   menu.add_cascade(label="Edit", menu=edit_menu)

   # Add the menu to the root window
   root.config(menu=menu)

def create_toolbar(root):
   toolbar = tk.Frame(root)

   # Create toolbar buttons
   open_button = tk.Button(toolbar, text="Open", command=open_file)
   open_button.pack(side=tk.LEFT, padx=2, pady=2)

   save_button = tk.Button(toolbar, text="Save", command=save_file)
   save_button.pack(side=tk.LEFT, padx=2, pady=2)

   cut_button = tk.Button(toolbar, text="Cut", command=cut_text)
   cut_button.pack(side=tk.LEFT, padx=2, pady=2)

   copy_button = tk.Button(toolbar, text="Copy", command=copy_text)
   copy_button.pack(side=tk.LEFT, padx=2, pady=2)

   paste_button = tk.Button(toolbar, text="Paste", command=paste_text)
   paste_button.pack(side=tk.LEFT, padx=2, pady=2)

   # Add the toolbar to the root window
   toolbar.pack(side=tk.TOP, fill=tk.X)

def main():
   root = tk.Tk()
   root.title("Menu and Toolbar Example")
   create_menu(root)
   create_toolbar(root)

   # Configure keyboard shortcuts or bindings
   root.bind("<Control-o>", lambda e: open_file())
   root.bind("<Control-s>", lambda e: save_file())
   root.bind("<Control-x>", lambda e: cut_text())
   root.bind("<Control-c>", lambda e: copy_text())
   root.bind("<Control-v>", lambda e: paste_text())
   root.bind("<Control-q>", lambda e: root.quit())

   root.mainloop()

if __name__ == "__main__":
   main()
Output
Opening file...
Opening file...
Saving file...
Cutting text...
Copying text...
Pasting text...

Conclusion
In conclusion, activating Tkinter menu and toolbar with keyboard shortcuts or bindings can greatly enhance the usability and efficiency of your application. By assigning keyboard shortcuts using the accelerator parameter and binding keyboard events to specific functions using the bind method, users can quickly access menu items and toolbar buttons.
This allows for a seamless user experience, enabling users to perform actions with ease and convenience. Incorporating keyboard shortcuts and bindings is a powerful way to streamline user interactions and improve the overall functionality of your Tkinter-based application.

