
 Data Structure
 Networking
 RDBMS
RDBMS Operating System
 Java
Java MS Excel
 iOS
iOS HTML
HTML CSS
CSS Android
 Python
 C Programming
 C++
C++ C#
C# MongoDB
 MySQL
MySQL Javascript
 PHP
PHP
- Selected Reading
- UPSC IAS Exams Notes
- Developer's Best Practices
- Questions and Answers
- Effective Resume Writing
- HR Interview Questions
- Computer Glossary
- Who is Who
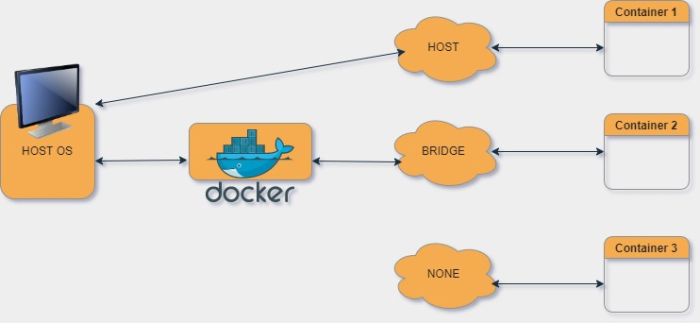
How does the Docker network work?
The best feature of Docker is "Containerization and Networking." Using containerization, we could create an independent and isolated environment for various use cases like web applications ("Apache"), database servers ("MongoDB"), and operating systems ("Ubuntu").
But the Docker network allows us to connect these containerized applications to communicate with each other or to the host operating system.
Types of Docker Network present on Docker Daemon
There are two types of networks on Docker ?
Default Docker bridge network
User?defined network
Default Docker bridge network
This network is created on the host operating machine as soon as the Docker is installed on it. To check the available network on the machine use any of the below commands.
Example 1
$ip address show
$ifconfig
Output
docker0: flags=4163<UP,BROADCAST,RUNNING,MULTICAST>  mtu 1500
   inet 172.17.0.1  netmask 255.255.0.0  broadcast 172.17.255.255
   inet6 fe80::42:49ff:fe42:9791  prefixlen 64  scopeid 0x20<link>
   ether 02:42:49:42:97:91  txqueuelen 0  (Ethernet)
   RX packets 0  bytes 0 (0.0 B)
   RX errors 0  dropped 0  overruns 0  frame 0
   TX packets 27  bytes 4038 (4.0 KB)
   TX errors 0  dropped 0 overruns 0  carrier 0  collisions 0
One of the networks shown is docker0, which is the default bridge network. Now let us create a Docker container and check if it gets connected to the docker0 network.
Example 2
Pull the latest image of busybox from the Docker hub and run the container.
$docker pull busybox:latest
Output
Using default tag: latest
latest: Pulling from library/busybox
405fecb6a2fa: Pull complete
Digest: sha256:fcd85228d7a25feb59f101ac3a955d27c80df4ad824d65f5757a954831450185
Status: Downloaded newer image for busybox:latest
docker.io/library/busybox:latest
Now run the container for this image.
Example 2
$docker run -itd --name mycontainer busybox
Output
337c0846a65ea2cf1b500b391aa64e98b8b7c54de0f10d13ddeab53fb9ff8eeb
Now let us see if the newly created container is connected to docker0.
Example 4
$ip address show
Output
veth617ac3f@if7: <BROADCAST,MULTICAST,UP,LOWER_UP> mtu 1500 qdisc noqueue master docker0 state UP group default
   link/ether 3e:b7:dc:87:5f:3f brd ff:ff:ff:ff:ff:ff link-netnsid 0
   inet6 fe80::3cb7:dcff:fe87:5f3f/64 scope link
      valid_lft forever preferred_lft forever
This shows that a new virtual Ethernet is connected to the docker0 bridge network.
User-define network
Docker doesn't want the DevOps engineer to use the default network as it is not isolated and secure as other networks. If you don't want to connect to this network, you can create your own network and connect containers to it.
To create the network you have three Docker network types listed below. These networks are also called drivers.
Bridge
Host
None
Create Bridge Network
Docker network provide various functionalities like connecting a container to a specific network, creating a network with a specific driver (bridge, host, null), and many more. Let us create a new network of the type bridge and connect the container mycontainer to it.
Example 1
$docker network create --driver bridge mynetwork
Output
dd1341a489b9b55d31521ea9665d935a9dff732f3b2552e88404aac90a6c5531
Below command to check if a new network is created or not.
Example 2
$docker network ls
Output
NETWORK ID    NAME      DRIVER   SCOPE
1381008c7449   bridge     bridge   local
db9d7d7d4e55   host      host     local
dd1341a489b9   mynetwork   bridge   local
574f05aae08a   none      null     local
Now connect this network to the container.
Example 3
$docker network connect mynetwork mycontainer
To check if the container is connected to the network or not, execute the below command on the terminal.
Example 4
$docker network inspect mynetwork
Output
[
   {
      "Name": "mynetwork",
      "Id": "dd1341a489b9b55d31521ea9665d935a9dff732f3b2552e88404aac90a6c5531",
      "Created": "2022-11-27T14:59:49.852692374+05:30",
      "Scope": "local",
      "Driver": "bridge",
      "EnableIPv6": false,
      "IPAM": {
         "Driver": "default",
         "Options": {},
         "Config": [
            {
               "Subnet": "172.18.0.0/16",
               "Gateway": "172.18.0.1"
            }
         ]
      },
      "Internal": false,
      "Attachable": false,
      "Ingress": false,
      "ConfigFrom": {
         "Network": ""
      },
      "ConfigOnly": false,
      "Containers": {
         "337c0846a65ea2cf1b500b391aa64e98b8b7c54de0f10d13ddeab53fb9ff8eeb": {
            "Name": "mycontainer",
            "EndpointID": "fe31f87b1b61ccc6e220a7465d0d415596563df50729470be5346ce948c6c692",
            "MacAddress": "02:42:ac:12:00:02",
            "IPv4Address": "172.18.0.2/16",
            "IPv6Address": ""
         }
      },
      "Options": {},
      "Labels": {}
   }
]
The highlighted line suggests that the container mycontainer has been successfully connected to the created network mynetwork.
Create Host Network
The host network is the least secure and least used network in the Docker network. Only one instance of the host network is allowed to run at a time, this instance is already created by the Docker, named as host. We can connect this network to the container during or after the creation of the Docker container.
During creating a container.
Example 1
$docker run -itd --network host --name newcontainer nginx
Output
Unable to find image 'nginx:latest' locally
latest: Pulling from library/nginx
a603fa5e3b41: Pull complete
c39e1cda007e: Pull complete
90cfefba34d7: Pull complete
a38226fb7aba: Pull complete
62583498bae6: Pull complete
9802a2cfdb8d: Pull complete
Digest: sha256:e209ac2f37c70c1e0e9873a5f7231e91dcd83fdf1178d8ed36c2ec09974210ba
Status: Downloaded newer image for nginx:latest
ceb1670b8ce0a02c5ea8f6a2f617cf0530c07fc0f360a9fb11c23d93b5e070ce
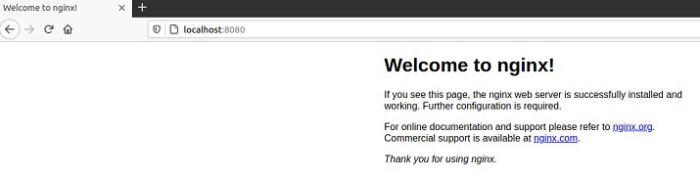
One of the advantages of a host network is that you don't need to expose or publish any kind of ports. Here we can access the nginx server from the host.

You can use the bridge network as well for this container but you have to expose or publish the Docker container port to the host.
Example 2
$docker run -itd --name newwebserver --network bridge -p 8080:80 nginx
Output
fbd0471717985bf7a198da76cc87dd458e1463a605228f5c6068f5d7b57bac72
Let's check if the container is running. Use the below command to see the latest running container.
Example 3
$docker ps -l
Output
CONTAINER ID   IMAGE    COMMAND             CREATED       STATUS       PORTS                           NAMES
fbd047171798   nginx    "/docker-entrypoint.?"   2 minutes ago   Up 2 minutes   0.0.0.0:8080->80/tcp, :::8080->80/tcp   newwebserver
Now browse to localhost:8080 in the host browser.
Create None Network
No one outside this network can ever communicate with the containers and vice versa. The containers will only have the loopback and no network. The driver of the none network is null.
Create a docker container with none network
Example 1
$docker run -itd --name alonecontainer --network none busybox
Output
e8f43661dfae89d4de892c301741ac9e9cf1b2b472e2f2260eecd24ec427192c
Check the network inside the container. Use the below command to first get inside the container shell.
Example 2
$docker exec -it alonecontainer sh
On container shell, use the "ip" command to list the networks that are connected to this container.
Example 3
$ip address show
Output
1: lo: <LOOPBACK,UP,LOWER_UP> mtu 65536 qdisc noqueue qlen 1000
   link/loopback 00:00:00:00:00:00 brd 00:00:00:00:00:00
   inet 127.0.0.1/8 scope host lo
      valid_lft forever preferred_lft forever

434 Views
