- GWT - Home
- GWT - Overview
- GWT - Environment Setup
- GWT - Applications
- GWT - Create Application
- GWT - Deploy Application
- GWT - Style with CSS
- GWT - Basic Widgets
- GWT - Form Widgets
- GWT - Complex widgets
- GWT - Layout Panels
- GWT - Event Handling
- GWT - Custom Widgets
- GWT - UIBinder
- GWT - RPC Communication
- GWT - JUnit Integration
- GWT - Debugging Application
- GWT - Internationalization
- GWT - History Class
- GWT - Bookmark Support
- GWT - Logging Framework
GWT - Style with CSS
GWT widgets rely on cascading style sheets (CSS) for visual styling. By default, the class name for each component is gwt-<classname>.
For example, the Button widget has a default style of gwt-Button and similar way TextBox widgest has a default style of gwt-TextBox.
In order to give all buttons and text boxes a larger font, you could put the following rule in your application's CSS file
.gwt-Button  { font-size: 150%; }

.gwt-TextBox { font-size: 150%; }
By default, neither the browser nor GWT creates default id attributes for widgets. You must explicitly create a unique id for the elements which you can use in CSS. In order to give a particular button with id my-button-id a larger font, you could put the following rule in your application's CSS file −
#my-button-id { font-size: 150%; }
To set the id for a GWT widget, retrieve its DOM Element and then set the id attribute as follows −
Button b = new Button();
DOM.setElementAttribute(b.getElement(), "id", "my-button-id")
CSS Styling APIs
There are many APIs available to hangle CSS setting for any GWT widget. Following are few important APIs which will help you in your day to day web programming using GWT −
| Sr.No. | API & Description |
|---|---|
| 1 |
public void setStyleName(java.lang.String style) This method will clear any existing styles and set the widget style to the new CSS class provided using style. |
| 2 |
public void addStyleName(java.lang.String style) This method will add a secondary or dependent style name to the widget. A secondary style name is an additional style name that is,so if there were any previous style names applied they are kept. |
| 3 |
public void removeStyleName(java.lang.String style) This method will remove given style from the widget and leaves any others associated with the widget. |
| 4 |
public java.lang.String getStyleName() This method gets all of the object's style names, as a space-separated list. |
| 5 |
public void setStylePrimaryName(java.lang.String style) This method sets the object's primary style name and updates all dependent style names. |
For example, let's define two new styles which we will apply to a text −
.gwt-Big-Text {
   font-size:150%;
}

.gwt-Small-Text {
   font-size:75%;
}

.gwt-Red-Text {
   color:red;
}
Now you can use setStyleName(Style) to change the default setting to new setting. After applying the below rule, a text's font will become large
txtWidget.setStyleName("gwt-Big-Text");
We can apply a secondary CSS rule on the same widget to change its color as follows −
txtWidget.addStyleName("gwt-Red-Text");
Using above method you can add as many styles as you like to apply on a widget. If you remove first style from the button widget then second style will still remain with the text.
txtWidget.removeStyleName("gwt-Big-Text");
Primary & Secondary Styles
By default, the primary style name of a widget will be the default style name for its widget class for example gwt-Button for Button widgets. When we add and remove style names using AddStyleName() method, those styles are called secondary styles.
The final appearance of a widget is determined by the sum of all the secondary styles added to it, plus its primary style. You set the primary style of a widget with the setStylePrimaryName(String) method. To illustrate, let's say we have a Label widget. In our CSS file, we have the following rules defined −
.MyText {
   color: blue;
}

.BigText {
   font-size: large;
}

.LoudText {
   font-weight:  bold;
}
Let's suppose we want a particular label widget to always display blue text, and in some cases, use a larger, bold font for added emphasis.
We could do something like this −
// set up our primary style
Label someText = new Label();
someText.setStylePrimaryName("MyText");
...

// later on, to really grab the user's attention
someText.addStyleName("BigText");
someText.addStyleName("LoudText");
...

// after the crisis is over
someText.removeStyleName("BigText");
someText.removeStyleName("LoudText");
Associating CSS Files
There are multiple approaches for associating CSS files with your module. Modern GWT applications typically use a combination of CssResource and UiBinder. We are using only first approach in our examples.
Using a <link> tag in the host HTML page.
Using the <stylesheet> element in the module XML file.
Using a CssResource contained within a ClientBundle.
Using an inline <ui:style> element in a UiBinder template.
GWT CSS Example
This example will take you through simple steps to apply different CSS rules on your GWT widgest. Let us have working Eclipse IDE along with GWT plug in place and follow the following steps to create a GWT application −
| Step | Description |
|---|---|
| 1 | Create a project with a name HelloWorld under a package com.tutorialspoint as explained in the GWT - Create Application chapter. |
| 2 | Modify HelloWorld.gwt.xml, HelloWorld.css, HelloWorld.html and HelloWorld.java as explained below. Keep rest of the files unchanged. |
| 3 | Compile and run the application to verify the result of the implemented logic. |
Following is the content of the modified module descriptor src/com.tutorialspoint/HelloWorld.gwt.xml.
<?xml version = "1.0" encoding = "UTF-8"?>
<module rename-to = 'helloworld'>
   <!-- Inherit the core Web Toolkit stuff.                        -->
   <inherits name = 'com.google.gwt.user.User'/>

   <!-- Inherit the default GWT style sheet.                       -->
   <inherits name = 'com.google.gwt.user.theme.clean.Clean'/>

   <!-- Specify the app entry point class.                         -->
   <entry-point class = 'com.tutorialspoint.client.HelloWorld'/>

   <!-- Specify the paths for translatable code                    -->
   <source path = 'client'/>
   <source path = 'shared'/>

</module>
Following is the content of the modified Style Sheet file war/HelloWorld.css.
body {
   text-align: center;
   font-family: verdana, sans-serif;
}

h1 {
   font-size: 2em;
   font-weight: bold;
   color: #777777;
   margin: 40px 0px 70px;
   text-align: center;
}

.gwt-Button {
   font-size: 150%;
   font-weight: bold;
   width:100px;
   height:100px;
}

.gwt-Big-Text {
   font-size:150%;
}

.gwt-Small-Text {
   font-size:75%;
}
Following is the content of the modified HTML host file war/HelloWorld.html to accomodate two buttons.
<html>
   <head>
      <title>Hello World</title>
      <link rel = "stylesheet" href = "HelloWorld.css"/>
      <script language = "javascript" src = "helloworld/helloworld.nocache.js">
      </script>
   </head>

   <body>
      <div id = "mytext"><h1>Hello, World!</h1></div>
      <div id = "gwtGreenButton"></div>
      <div id = "gwtRedButton"></div>
   </body>
</html>
Let us have following content of Java file src/com.tutorialspoint/HelloWorld.java which will take care of adding two buttons in HTML and will apply custom CSS style.
package com.tutorialspoint.client;

import com.google.gwt.core.client.EntryPoint;
import com.google.gwt.event.dom.client.ClickEvent;
import com.google.gwt.event.dom.client.ClickHandler;
import com.google.gwt.user.client.ui.Button;
import com.google.gwt.user.client.ui.HTML;
import com.google.gwt.user.client.ui.RootPanel;

public class HelloWorld implements EntryPoint {
   public void onModuleLoad() {

   // add button to change font to big when clicked.
   Button Btn1 = new Button("Big Text");
   Btn1.addClickHandler(new ClickHandler() {
      public void onClick(ClickEvent event) {
         RootPanel.get("mytext").setStyleName("gwt-Big-Text");
      }
   });

   // add button to change font to small when clicked.
   Button Btn2 = new Button("Small Text");
   Btn2.addClickHandler(new ClickHandler() {
      public void onClick(ClickEvent event) {
         RootPanel.get("mytext").setStyleName("gwt-Small-Text");
      }
   });

   RootPanel.get("gwtGreenButton").add(Btn1);
   RootPanel.get("gwtRedButton").add(Btn2);
   }
}
Once you are ready with all the changes done, let us compile and run the application in development mode as we did in GWT - Create Application chapter. If everything is fine with your application, this will produce following result −
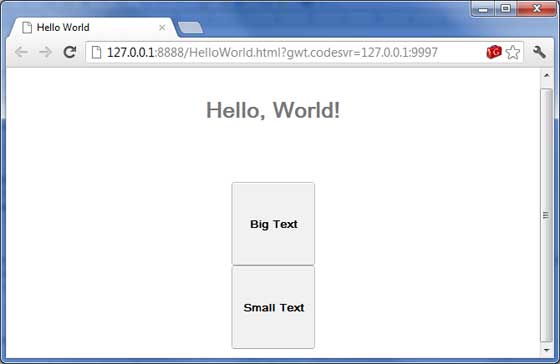
Now try clicking on the two buttons displayed and observe "Hello, World!" text which keeps changing its font upon clicking on the two buttons.
