- Basic Image Operations
- Python Pillow - Working with Images
- Python Pillow - Resizing an Image
- Python Pillow - Flip and Rotate Images
- Python Pillow - Cropping an Image
- Python Pillow - Adding Borders to Images
- Python Pillow - Identifying Image Files
- Python Pillow - Merging Images
- Python Pillow - Cutting and Pasting Images
- Python Pillow - Rolling an Image
- Python Pillow - Writing text on image
- Python Pillow - ImageDraw Module
- Python Pillow - Concatenating two Images
- Python Pillow - Creating Thumbnails
- Python Pillow - Creating a Watermark
- Python Pillow - Image Sequences
- Python Pillow Color Conversions
- Python Pillow - Colors on an Image
- Python Pillow - Creating Images With Colors
- Python Pillow - Converting Color String to RGB Color Values
- Python Pillow - Converting Color String to Grayscale Values
- Python Pillow - Change the Color by Changing the Pixel Values
- Image Manipulation
- Python Pillow - Reducing Noise
- Python Pillow - Changing Image Modes
- Python Pillow - Compositing Images
- Python Pillow - Working with Alpha Channels
- Python Pillow - Applying Perspective Transforms
- Image Filtering
- Python Pillow - Adding Filters to an Image
- Python Pillow - Convolution Filters
- Python Pillow - Blur an Image
- Python Pillow - Edge Detection
- Python Pillow - Embossing Images
- Python Pillow - Enhancing Edges
- Python Pillow - Unsharp Mask Filter
- Image Enhancement and Correction
- Python Pillow - Enhancing Contrast
- Python Pillow - Enhancing Sharpness
- Python Pillow - Enhancing Color
- Python Pillow - Correcting Color Balance
- Python Pillow - Removing Noise
- Advanced Topics
- Python Pillow - Creating Animated GIFs
- Python Pillow - Batch Processing Images
- Python Pillow - Converting Image File Formats
- Python Pillow - Adding Padding to an Image
- Python Pillow - Color Inversion
- Python Pillow - M L with Numpy
- Python Pillow with Tkinter BitmapImage and PhotoImage objects
- Image Module
- Python Pillow - Image Blending
- Python Pillow Useful Resources
- Python Pillow - Quick Guide
- Python Pillow - Function Reference
- Python Pillow - Useful Resources
- Python Pillow - Discussion
Python Pillow - Creating Thumbnail of an Image
Thumbnails are typically used for displaying image previews or smaller representations of the original image. They are useful for optimizing web pages and improving the loading speed of image-heavy applications. Pillow provides a convenient way to generate thumbnails from images. Here are some key points about thumbnails in Pillow.
Preservation of Aspect Ratio − When creating a thumbnail Pillow maintains the aspect ratio of the original image. This means that the width and height of the thumbnail are adjusted in proportion to the original image so the image does not appear distorted.
Reduced File Size − Thumbnails are smaller in size compared to the original image. This reduction in size is useful for optimizing web pages or displaying images in constrained spaces such as in galleries or lists.
Convenience − It simplifies the process of creating thumbnails. It resizes the image while preserving the aspect ratio and it provides an easy way to save the resized image to a file.
Quality Control − We can control the quality of the thumbnail using various parameters such as the size, filter type for resizing and compression settings if we are saving the thumbnail in a compressed format like JPEG.
In pillow we have the method namely thumbnail() which allows us to specify the dimensions and shape for the thumbnail image. We can create the thumbnails in two different shapes one is square and the other is circle.
Creating square Thumbnails
In this chapter we are going to see how to create a square thumbnail by using the thumbnail() method of the pillow library.
The syntax and parameters for thumbnail() method is as follows.
image.thumbnail(size, resample=Image.BOX)
Where,
size (required) − This parameter specifies the dimensions i.e. width and height for the thumbnail as a tuple (width, height). We can also specify just one dimension and the other dimension will be automatically calculated to maintain the aspect ratio.
resample (optional) − This parameter defines the resampling filter to use when resizing the image. It can be one of the following constants −
Image.NEAREST (default) − Nearest-neighbor sampling.
Image.BOX − Box sampling, which is similar to the nearest-neighbor but generally gives slightly smoother results.
Image.BILINEAR − Bilinear interpolation.
Image.HAMMING − Hamming-windowed sinc interpolation.
Image.BICUBIC − Bicubic interpolation.
Image.LANCZOS − Lanczos-windowed sinc interpolation.
Example - Creating a Square Thumbnail
In this example we are creating the square thumbnail by using the thumbnail() method by specifying the width and height parameters of the thumbnail to the resize parameter.
main.py
from PIL import Image

#Open the image
image = Image.open("Images/tutorialspoint.jpg")

#Define the thumbnail size as a tuple (width, height)
thumbnail_size = (200, 200)

#Create a thumbnail
image.thumbnail(thumbnail_size, resample = Image.BOX )
image.save("Output_Images/square_thumbnail_image.jpg")
image.show()
Output

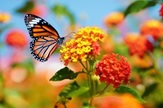
Example - Creating a Smaller Thumbnail
Here is another example of creating a square thumbnail with width 100 and height as 100 by using the thumbnail() module.
main.py
from PIL import Image

#Open the image
image = Image.open("Images/butterfly.jpg")

#Define the thumbnail size as a tuple (width, height)
thumbnail_size = (100, 100)

#Create a thumbnail
image.thumbnail(thumbnail_size, resample = Image.Resampling.BILINEAR)
image.save("Output_Images/square_thumbnail_image.png")
image.show()
Output

Creating circle Thumbnails
In the above section, we have gone through what is thumbnail and how to create the square thumbnail using the pillow thumbnail() method. Now, we are going to see the circle thumbnail creation. Circle thumbnails means the thumbnail will be in the circle shape.
The syntax and parameters of the thumbnail() method for creating the circle thumbnail are same as the square thumbnail.
Here are the steps to be followed to create the circular thumbnail.
Import the necessary modules Image and ImageDraw from the Pillow library.
Use the Image.open() method to load the original image.
Determine the dimensions of the original image using the size attribute.
Create a new object from the mask image using the ImageDraw.Draw() method.
Draw an ellipse on the mask image using the draw.ellipse() method. Centering the image to the center of the ellipse.
Create a new image with the same dimensions as the original image with a transparent background using the Image.new() method.
Use the save() method to save the circle thumbnail image.
Use the show() method to display the created circle thumbnail image.
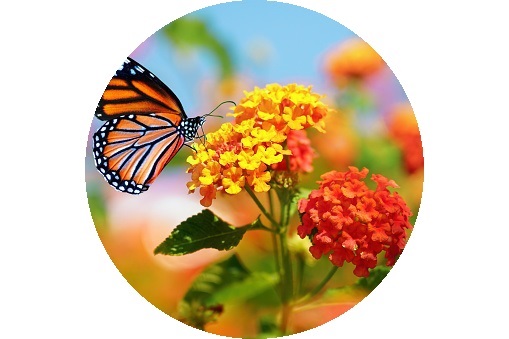
Example - Creating Circular Thumbnail
In this example we are creating the circular thumbnail by using the thumbnail() method of the pillow library.
main.py
#importing the required libraries
from PIL import Image, ImageDraw

#open image file
img = Image.open('Images/butterfly.jpg')

#resize image
img.thumbnail((2000, 2000))

#create circular mask
mask = Image.new('L', img.size, 0)
draw = ImageDraw.Draw(mask)
center = [50, 50]
radius = 10
draw.ellipse((center[0] - radius, center[1] - radius, center[0] + radius, center[1] + radius), fill = 255)

#apply mask to image
result = Image.new('RGBA', img.size, (255, 255, 255, 0))
result.paste(img, (0, 0), mask)

#save circular thumbnail image
result.save('Output_Images/circular_thumbnail1.png')

#showing the image using show() function
result.show()
Image to be used
Output