- Espresso Testing - Home
- Introduction
- Setup Instructions
- Running Tests In Android Studio
- Overview of JUnit
- Architecture
- View Matchers
- Custom View Matchers
- View Assertions
- View Actions
- Testing AdapterView
- Testing WebView
- Testing Asynchronous Operations
- Testing Intents
- Testing UI for Multiple Application
- Test Recorder
- Testing UI Performance
- Testing Accessibility
- Espresso Testing Resources
- Espresso Testing - Quick Guide
- Espresso Testing - Useful Resources
- Espresso Testing - Discussion
Espresso Testing Framework - Setup Instructions
In this chapter, let us understand how to install espresso framework, configure it to write espresso tests and execute it in our android application.
Prerequisites
Espresso is a user interface-testing framework for testing android application developed in Java / Kotlin language using Android SDK. Therefore, espressos only requirement is to develop the application using Android SDK in either Java or Kotlin and it is advised to have the latest Android Studio.
The list of items to be configured properly before we start working in espresso framework is as follows −
Install latest Java JDK and configure JAVA_HOME environment variable.
Install latest Android Studio (version 3.2. or higher).
Install latest Android SDK using SDK Manager and configure ANDROID_HOME environment variable.
Install latest Gradle Build Tool and configure GRADLE_HOME environment variable.
Configure EspressoTesting Framework
Initially, espresso testing framework is provided as part of the Android Support library. Later, the Android team provides a new Android library, AndroidX and moves the latest espresso testing framework development into the library. Latest development (Android 9.0, API level 28 or higher) of espresso testing framework will be done in AndroidX library.
Including espresso testing framework in a project is as simple as setting the espresso testing framework as a dependency in the application gradle file, app/build.gradle. The complete configuration is as follow,
Using Android support library,
android {
   defaultConfig {
      testInstrumentationRunner "android.support.test.runner.AndroidJUnitRunner"
   }
}
dependencies {
   testImplementation 'junit:junit:4.12'
   androidTestImplementation 'com.android.support.test:runner:1.0.2'
   androidTestImplementation 'com.android.support.test.espresso:espressocore:3.0.2'
}
Using AndroidX library,
android {
   defaultConfig {
      testInstrumentationRunner "androidx.test.runner.AndroidJUnitRunner"
   }
}
dependencies {
   testImplementation 'junit:junit:4.12'
   androidTestImplementation 'com.androidx.test:runner:1.0.2'
   androidTestImplementation 'com.androidx.espresso:espresso-core:3.0.2'
}
testInstrumentationRunner in the android/defaultConfig sets AndroidJUnitRunner class to run the instrumentation tests. The first line in the dependencies includes the JUnit testing framework, the second line in the dependencies includes the test runner library to run the test cases and finally the third line in the dependencies includes the espresso testing framework.
By default, Android studio sets the espresso testing framework (Android support library) as a dependency while creating the android project and gradle will download the necessary library from the Maven repository. Let us create a simple Hello world android application and check whether the espresso testing framework is configured properly.
The steps to create a new Android application are described below −
Start Android Studio.
Select File → New → New Project.
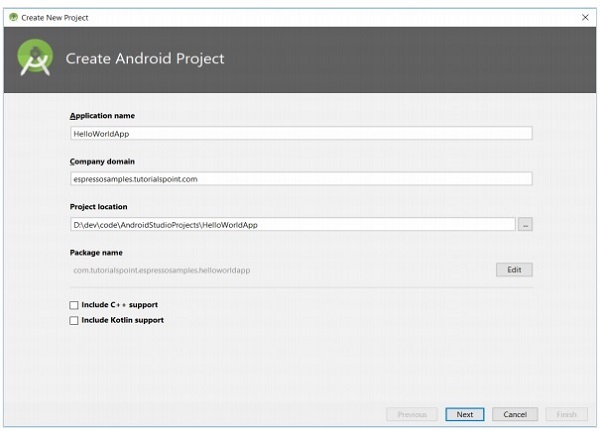
Enter Application Name (HelloWorldApp) and Company domain (espressosamples.tutorialspoint.com) and then click Next.
To create Android Project,
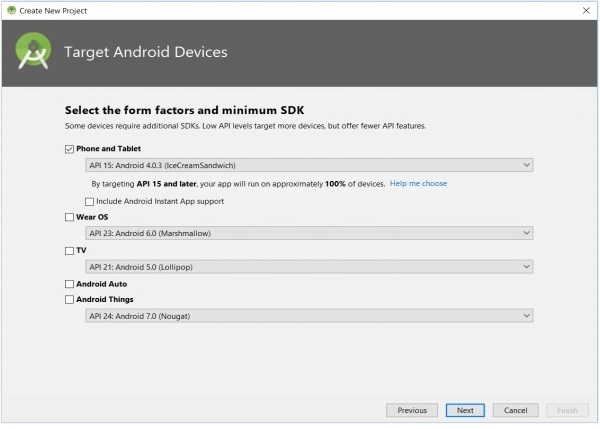
Select minimum API as API 15: Android 4.0.3 (IceCreamSandwich) and then click Next.
To target Android Devices,
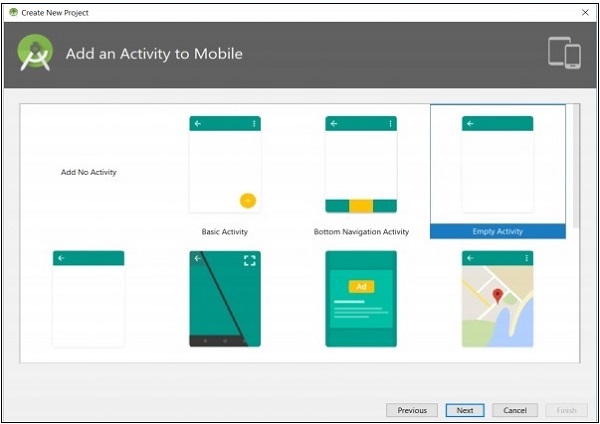
Select Empty Activity and then click Next.
To add an activity to Mobile,
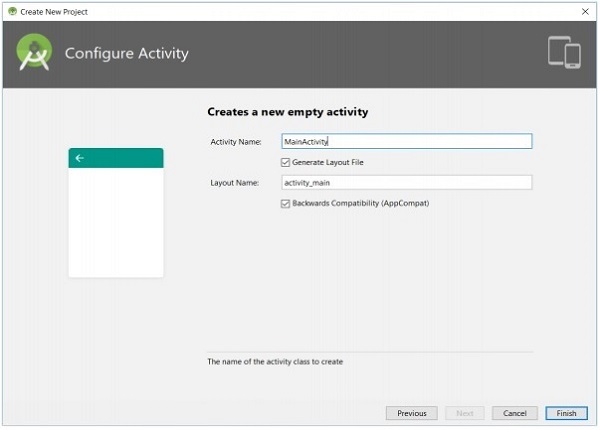
Enter name for main activity and then click Finish.
To configure Activity,
Once, a new project is created, open the app/build.gradle file and check its content. The content of the file is specified below,
apply plugin: 'com.android.application'
android {
   compileSdkVersion 28
   defaultConfig {
      applicationId "com.tutorialspoint.espressosamples.helloworldapp"
      minSdkVersion 15
      targetSdkVersion 28
      versionCode 1
      versionName "1.0"
      testInstrumentationRunner "android.support.test.runner.AndroidJUnitRunner"
   }
   buildTypes {
      release {
         minifyEnabled false
         proguardFiles getDefaultProguardFile('proguard-android.txt'),    'proguard-rules.pro'
      }
   }
}
dependencies {
   implementation fileTree(dir: 'libs', include: ['*.jar'])
   implementation 'com.android.support:appcompat-v7:28.0.0'
   implementation 'com.android.support.constraint:constraint-layout:1.1.3'
   testImplementation 'junit:junit:4.12'
   androidTestImplementation 'com.android.support.test:runner:1.0.2'
   androidTestImplementation 'com.android.support.test.espresso:espressocore:3.0.2'
}
The last line specifies the espresso testing framework dependency. By default, Android support library is configured. We can reconfigure the application to use AndroidX library by clicking Refactor → Migrate to AndroidX in the menu.
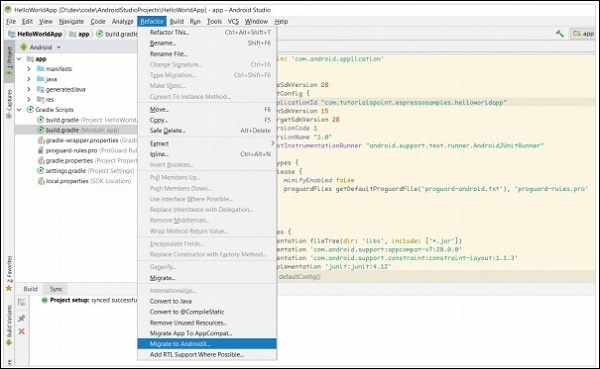
To migrate to Androidx,
Now, the app/build.gradle changes as specified below,
apply plugin: 'com.android.application'
android {
   compileSdkVersion 28
   defaultConfig {
      applicationId "com.tutorialspoint.espressosamples.helloworldapp"
      minSdkVersion 15
      targetSdkVersion 28
      versionCode 1
      versionName "1.0"
      testInstrumentationRunner "androidx.test.runner.AndroidJUnitRunner"
   }
   buildTypes {
      release {
         minifyEnabled false
         proguardFiles getDefaultProguardFile('proguard-android.txt'), 'proguard-rules.pro'
      }
   }
}
dependencies {
   implementation fileTree(dir: 'libs', include: ['*.jar'])
   implementation 'androidx.appcompat:appcompat:1.1.0-alpha01'
   implementation 'androidx.constraintlayout:constraintlayout:2.0.0-alpha3'
   testImplementation 'junit:junit:4.12'
   androidTestImplementation 'androidx.test:runner:1.1.1'
   androidTestImplementation 'androidx.test.espresso:espresso-core:3.1.1'
}
Now, the last line includes espresso testing framework from AndroidX library.
Device Settings
During testing, it is recommended to turn off the animation on the Android device, which is used for testing. This will reduce the confusions while checking ideling resources.
Let us see how to disable animation on Android devices (Settings → Developer options),
Window animation scale
Transition animation scale
Animator duration scale
If Developer options menu is not available in the Settings screen, then click Build Number available inside the About Phone option several times. This enables the Developer Option menu.
