- Espresso Testing - Home
- Introduction
- Setup Instructions
- Running Tests In Android Studio
- Overview of JUnit
- Architecture
- View Matchers
- Custom View Matchers
- View Assertions
- View Actions
- Testing AdapterView
- Testing WebView
- Testing Asynchronous Operations
- Testing Intents
- Testing UI for Multiple Application
- Test Recorder
- Testing UI Performance
- Testing Accessibility
- Espresso Testing Resources
- Espresso Testing - Quick Guide
- Espresso Testing - Useful Resources
- Espresso Testing - Discussion
Espresso Testing Framework - Architecture
In this chapter, let us learn the terms of espresso testing framework, how to write a simple espresso test case and the complete workflow or architecture of the espresso testing framework.
Overview
Espresso provides a large number of classes to test user interface and the user interaction of an android application. They can be grouped into five categories as specified below −
JUnit runner
Android testing framework provides a runner, AndroidJUnitRunner to run the espresso test cases written in JUnit3 and JUnit4 style test cases. It is specific to android application and it transparently handles loading the espresso test cases and the application under test both in actual device or emulator, execute the test cases and report the result of the test cases. To use AndroidJUnitRunner in the test case, we need to annotate the test class using @RunWith annotation and then pass the AndroidJUnitRunner argument as specified below −
@RunWith(AndroidJUnit4.class)
   public class ExampleInstrumentedTest {
}
JUnit rules
Android testing framework provides a rule, ActivityTestRule to launch an android activity before executing the test cases. It launches the activity before each method annotated with @Test` and @Before. It will terminate the activity after method annotated with @After. A sample code is as follows,
@Rule
public ActivityTestRule<MainActivity> mActivityTestRule = new ActivityTestRule<>(MainActivity.class);
Here, MainActivity is the activity to be launched before running a test case and destroyed after the particular test case is run.
ViewMatchers
Espresso provides large number of view matcher classes (in androidx.test.espresso.matcher.ViewMatchers package) to match and find UI elements / views in an android activity screens view hierarchy. Espressos method onView takes a single argument of type Matcher (View matchers), finds the corresponding UI view and returns corresponding ViewInteraction object. ViewInteraction object returned by onView method can be further used to invoke actions like click on the matched view or can be used to assert the matched view. A sample code to find the view with text, Hello World! is as follows,
ViewInteraction viewInteraction = Espresso.onView(withText("Hello World!"));
Here, withText is a matcher, which can be used to match UI view having text Hello World!
ViewActions
Espresso provides large number of view action classes (in androidx.test.espresso.action.ViewActions) to invoke the different action on the selected / matched view. Once onView matches and returns ViewInteraction object, any action can be invoked by calling perform method of ViewInteraction object and pass it with proper view actions. A sample code to click the matched view is as follows,
ViewInteraction viewInteraction = Espresso.onView(withText("Hello World!"));
viewInteraction.perform(click());
Here, the click action of the matched view will be invoked.
ViewAssertions
Similar to view matchers and view actions, Espresso provides a large number of view assertion (in androidx.test.espresso.assertion.ViewAssertions package) to assert the matched view is what we expected. Once onView matches and returns the ViewInteraction object, any assert can be checked using check method of ViewInteraction by passing it with proper view assertion. A sample code to assert that the matched view is as follows,
ViewInteraction viewInteraction = Espresso.onView(withText("Hello World!"));
viewInteraction.check(matches(withId(R.id.text_view)));
Here, matches accept the view matcher and return view assertion, which can be checked by check method of ViewInteraction.
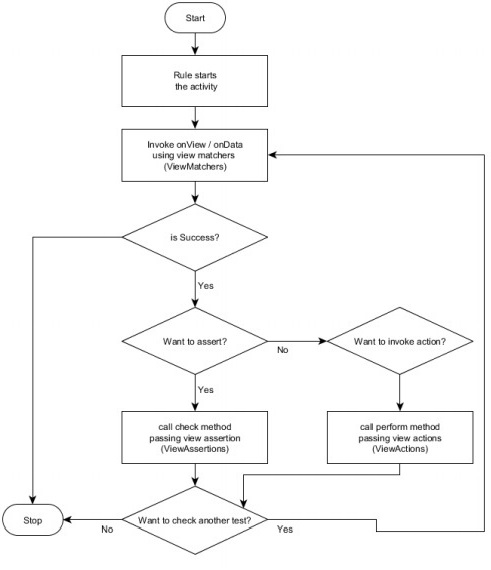
Workflow of Espresso Testing Framework
Let us understand how the espresso testing framework works and how it provides options to do any kind of user interaction in a simple and flexible way. Workflow of an espresso test case is as described below,
As we learned earlier, Android JUnit runner, AndroidJUnit4 will run the android test cases. The espresso test cases need to be marked with @RunWith(AndroidJUnut.class). First, AndroidJUnit4 will prepare the environment to run the test cases. It starts either the connected android device or emulator, installs the application and makes sure the application to be tested is in ready state. It will run the test cases and report the results.
Espresso needs at least a single JUnit rule of type ActivityTestRule to specify the activity. Android JUnit runner will start the activity to be launched using ActivityTestRule.
Every test case needs a minimum of single onView or onDate (used to find data based views like AdapterView) method invocation to match and find the desired view. onView or onData returns ViewInteraction object.
Once ViewInteraction object is returned, we can either invoke an action of the selected view or check the view for our expected view using assertion.
Action can be invoked using perform method of ViewInteraction object by passing any one of the available view actions.
Assertion can be invoked using check method of ViewInteraction object by passing any one of the available view assertions.
The diagram representation of the Workflow is as follows,
Exampleview assertion
Let us write a simple test case to find the text view having Hello World! text in our HelloWorldApp application and then assert it using view assertion. The complete code is as follows,
package com.tutorialspoint.espressosamples.helloworldapp;

import android.content.Context;
import androidx.test.InstrumentationRegistry;
import androidx.test.rule.ActivityTestRule;
import androidx.test.runner.AndroidJUnit4;
import org.junit.Rule;
import org.junit.Test;
import org.junit.runner.RunWith;
import static androidx.test.espresso.Espresso.onView;
import static androidx.test.espresso.matcher.ViewMatchers.withText;;
import static androidx.test.espresso.assertion.ViewAssertions.matches;
import static org.junit.Assert.*;
/**
   * Instrumented test, which will execute on an Android device.
   *
   * @see <a href="http://d.android.com/tools/testing">Testing documentation</a>
*/
@RunWith(AndroidJUnit4.class)
public class ExampleInstrumentedTest {
   @Rule
   public ActivityTestRule<MainActivity> mActivityTestRule = new ActivityTestRule<>(MainActivity.class);
   @Test
   public void view_isCorrect() {
      onView(withText("Hello World!")).check(matches(isDisplayed()));
   }
   @Test
   public void useAppContext() {
      // Context of the app under test.
      Context appContext = InstrumentationRegistry.getTargetContext();
      assertEquals("com.tutorialspoint.espressosamples.helloworldapp", appContext.getPackageName());
   }
}
Here, we have used withText view matchers to find the text view having Hello World! text and matches view assertion to assert that the text view is properly displayed. Once the test case is invoked in Android Studio, it will run the test case and report the success message as below.
view_isCorrect test case

