
 Data Structure
 Networking
 RDBMS
RDBMS Operating System
 Java
Java MS Excel
 iOS
iOS HTML
HTML CSS
CSS Android
 Python
 C Programming
 C++
C++ C#
C# MongoDB
 MySQL
MySQL Javascript
 PHP
PHP
- Selected Reading
- UPSC IAS Exams Notes
- Developer's Best Practices
- Questions and Answers
- Effective Resume Writing
- HR Interview Questions
- Computer Glossary
- Who is Who
Concept of Padding in Android
What is Padding in Android?
Padding is a space which is present between the content which we have to display and the border of that content. Padding is used to create the extra space within the content.
We can add padding for a widget from any of the specific sides. We can add padding either from left,right,top or bottom depending upon the requirement.
In this article we will take a look on How to use padding attributes for different widgets within our android application.
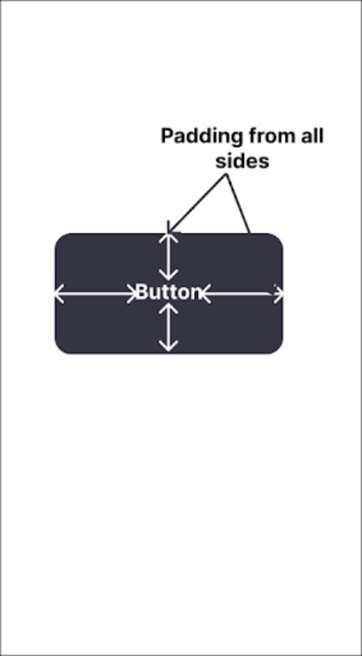
Syntax
android:padding="Size in dp"
Explanation ? Above syntax for padding is used to specify padding from all sides of a view.
android:paddingStart="Size in dp"

android:paddingLeft="Size in dp"
Explanation ? Above syntax for padding is used to specify padding from the left side. We can use either paddingStart or paddingLeft to add padding for a view from the left side.
android:paddingEnd="Size in dp"

android:paddingRight="Size in dp"
Explanation ? Above syntax for padding is used to specify padding from the right side. We can use either paddingEnd or paddingRight to add padding for a view from the right side.
android:paddingTop="Size in dp"
Explanation ? Above syntax for padding is used to specify padding from top of a view.
android:paddingBottom="Size in dp"
Explanation ? Above syntax for padding is used to specify padding from bottom of a view.
Example
We will be creating a simple application in which we will be simply displaying a button and adding padding from all sides to it one by one and test it.
Step 1 : Creating a new Project in Android Studio
Navigate to Android studio as shown in below screen. In the below screen click on New Project to create a new Android Studio Project.
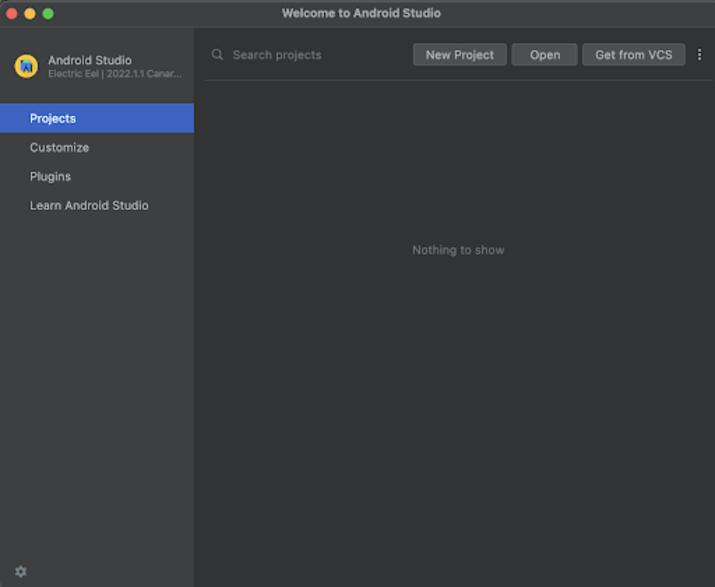
After clicking on New Project you will get to see the below screen.
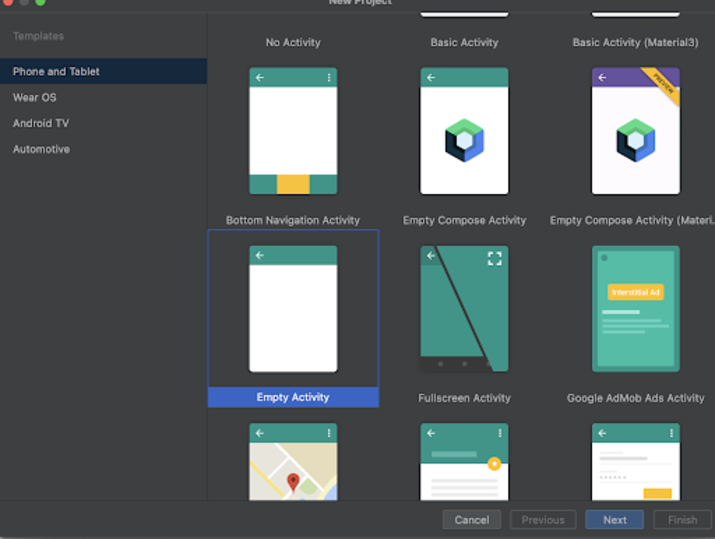
Inside this screen we have to simply select Empty Activity and click on Next. After clicking on next you will get to see the screen below.
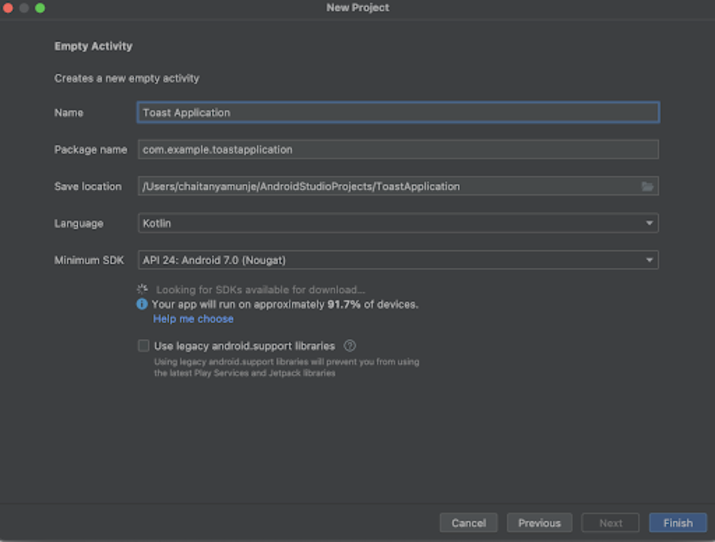
Inside this screen we have to simply specify the project name. Then the package name will be generated automatically.
Note ? Make sure to select the Language as Kotlin.
After specifying all the details click on Finish to create a new Android studio project.
Once our project has been created we will get to see 2 files which are open i.e activity_main.xml and MainActivity.kt file.
Step 2 : Working with activity_main.xml
Example 1 : Padding from all sides
Concept of Padding in Android
 <?xml version="1.0" encoding="utf-8"?>
<RelativeLayout xmlns:android="http://schemas.android.com/apk/res/android"
   xmlns:app="http://schemas.android.com/apk/res-auto"
   xmlns:tools="http://schemas.android.com/tools"
   android:layout_width="match_parent"
   android:layout_height="match_parent"
   tools:context=".MainActivity">

   <!-- creating a simple text view -->
   <TextView
      android:id="@+id/idBtn"
      android:layout_width="wrap_content"
      android:layout_height="wrap_content"
      android:layout_centerInParent="true"
      android:layout_margin="20dp"
      android:background="#FF000000"
      android:padding="30dp"
      android:text="Hello World"
      android:textColor="#FFFFFFFF"
      android:textSize="25sp"
      android:textStyle="bold" />

</RelativeLayout>
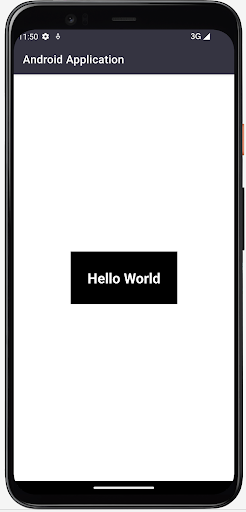
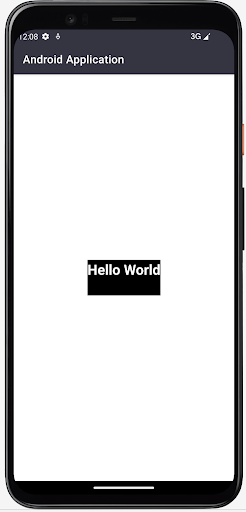
Explanation ? In the above code the root element is a Relative layout in android. This layout is a view group which is used to align all the elements within it relative to each other. We can relatively align all elements within Relative Layout with the help of ids or positions.
Inside this relative layout we are creating a Textview. For this text view we are specifying background color and then we are adding padding for this text from all sides.
Example 2 : Padding from left side
Working with activity_main.xml file.
 <?xml version="1.0" encoding="utf-8"?>
<RelativeLayout xmlns:android="http://schemas.android.com/apk/res/android"
   xmlns:app="http://schemas.android.com/apk/res-auto"
   xmlns:tools="http://schemas.android.com/tools"
   android:layout_width="match_parent"
   android:layout_height="match_parent"
   tools:context=".MainActivity">

   <!-- creating a simple text view -->
   <TextView
      android:id="@+id/idBtn"
      android:layout_width="wrap_content"
      android:layout_height="wrap_content"
      android:layout_centerInParent="true"
      android:layout_margin="20dp"
      android:background="#FF000000"
      android:paddingLeft="30dp"
      android:text="Hello World"
      android:textColor="#FFFFFFFF"
      android:textSize="25sp"
      android:textStyle="bold" />

</RelativeLayout>
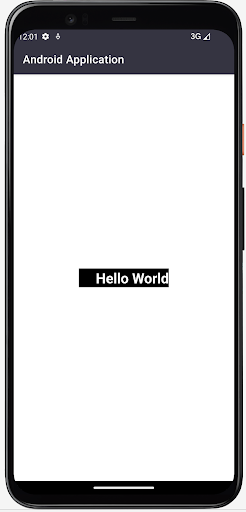
Explanation ? In the above code the root element is a Relative layout in android. This layout is a view group which is used to align all the elements within it relative to each other. We can relatively align all elements within Relative Layout with the help of ids or positions.
Inside this relative layout we are creating a Textview. For this text view we are specifying background color and then we are adding padding for this text from the left side.
Example 3 : Padding from the Right side
Working with activity_main.xml file.
Syntax
 <?xml version="1.0" encoding="utf-8"?>
<RelativeLayout xmlns:android="http://schemas.android.com/apk/res/android"
   xmlns:app="http://schemas.android.com/apk/res-auto"
   xmlns:tools="http://schemas.android.com/tools"
   android:layout_width="match_parent"
   android:layout_height="match_parent"
   tools:context=".MainActivity">

   <!-- creating a simple text view -->
   <TextView
      android:id="@+id/idBtn"
      android:layout_width="wrap_content"
      android:layout_height="wrap_content"
      android:layout_centerInParent="true"
      android:layout_margin="20dp"
      android:background="#FF000000"
      android:paddingRight="30dp"
      android:text="Hello World"
      android:textColor="#FFFFFFFF"
      android:textSize="25sp"
      android:textStyle="bold" />

</RelativeLayout>
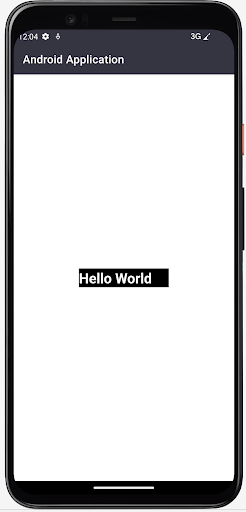
Explanation ? In the above code the root element is a Relative layout in android. This layout is a view group which is used to align all the elements within it relative to each other. We can relatively align all elements within Relative Layout with the help of ids or positions.
Inside this relative layout we are creating a Textview. For this text view we are specifying background color and then we are adding padding for this text from the right side.
Example 4 : Padding from the top side
Working with activity_main.xml file.
Syntax
 <?xml version="1.0" encoding="utf-8"?>
<RelativeLayout xmlns:android="http://schemas.android.com/apk/res/android"
   xmlns:app="http://schemas.android.com/apk/res-auto"
   xmlns:tools="http://schemas.android.com/tools"
   android:layout_width="match_parent"
   android:layout_height="match_parent"
   tools:context=".MainActivity">

   <!-- creating a simple text vixew -->
   <TextView
      android:id="@+id/idBtn"
      android:layout_width="wrap_content"
      android:layout_height="wrap_content"
      android:layout_centerInParent="true"
      android:layout_margin="20dp"
      android:background="#FF000000"
      android:paddingTop="30dp"
      android:text="Hello World"
      android:textColor="#FFFFFFFF"
      android:textSize="25sp"
      android:textStyle="bold" />

</RelativeLayout>
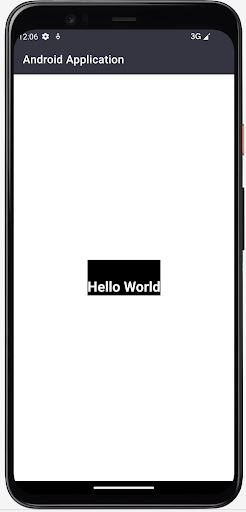
Explanation ? In the above code the root element is a Relative layout in android. This layout is a view group which is used to align all the elements within it relative to each other. We can relatively align all elements within Relative Layout with the help of ids or positions.
Inside this relative layout we are creating a Textview. For this text view we are specifying background color and then we are adding padding for this text from the top side.
Example 5 : Padding from the bottom side
Working with activity_main.xml file.
Syntax
 <?xml version="1.0" encoding="utf-8"?>
<RelativeLayout xmlns:android="http://schemas.android.com/apk/res/android"
   xmlns:app="http://schemas.android.com/apk/res-auto"
   xmlns:tools="http://schemas.android.com/tools"
   android:layout_width="match_parent"
   android:layout_height="match_parent"
   tools:context=".MainActivity">

   <!-- creating a simple text vixew -->
   <TextView
      android:id="@+id/idBtn"
      android:layout_width="wrap_content"
      android:layout_height="wrap_content"
      android:layout_centerInParent="true"
      android:layout_margin="20dp"
      android:background="#FF000000"
      android:paddingBottom="30dp"
      android:text="Hello World"
      android:textColor="#FFFFFFFF"
      android:textSize="25sp"
      android:textStyle="bold" />

</RelativeLayout>
Explanation ? In the above code the root element is a Relative layout in android. This layout is a view group which is used to align all the elements within it relative to each other. We can relatively align all elements within Relative Layout with the help of ids or positions.
Inside this relative layout we are creating a Textview. For this text view we are specifying background color and then we are adding padding for this text from the bottom side.
Conclusion
In the above tutorial we learn What is padding in android and How we can use it inside our application to add spacing between the content of the widget and the border of the widget.

