
Article Categories
- All Categories
-
 Data Structure
-
 Networking
-
 RDBMS
RDBMS
-
 Operating System
-
 Java
Java
-
 MS Excel
-
 iOS
iOS
-
 HTML
HTML
-
 CSS
CSS
-
 Android
-
 Python
-
 C Programming
-
 C++
C++
-
 C#
C#
-
 MongoDB
-
 MySQL
MySQL
-
 Javascript
-
 PHP
PHP
-
 Economics & Finance
Difference between a View\'s margin and padding in Android
Introduction
Padding and margin are two of the most important attributes used to manage the positioning of the views to be displayed within the android application. Both of this attributes are used to change the position of a view but there are some differences between them. In this article we will take a look at What is the difference between a View?s margin and a padding in Android ?
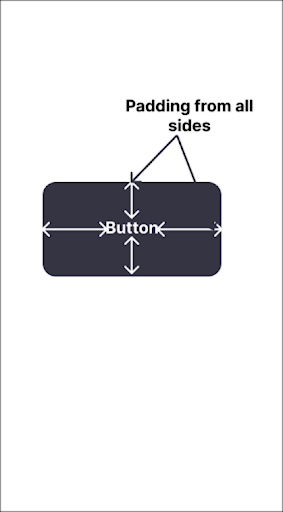
What is padding in android ?
Padding is a space which is present between the content which we have to display and the border of that content. Padding is used to create the extra space within the content.
We can add padding for a widget from any of the specific sides. We can add padding either from left,right,top or bottom depending upon the requirement.
Syntax
android:padding="Size in dp"
Explanation : Above syntax for padding is used to specify padding from all sides of a view.
android:paddingStart="Size in dp"
android:paddingLeft="Size in dp"
Explanation : Above syntax for padding is used to specify padding from the left side. We can use either paddingStart or paddingLeft to add padding for a view from the left side.
android:paddingEnd="Size in dp"
android:paddingRight="Size in dp"
Explanation : Above syntax for padding is used to specify padding from the right side. We can use either paddingEnd or paddingRight to add padding for a view from the right side.
android:paddingTop="Size in dp"
Explanation : Above syntax for padding is used to specify padding from top of a view.
android:paddingBottom="Size in dp"
Explanation : Above syntax for padding is used to specify padding from bottom of a view.
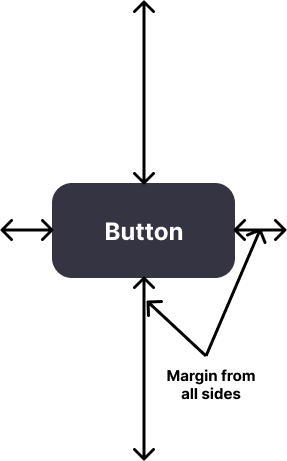
What is the margin in android?
Margin is the distance between the view and its immediate sibling or a parent view. Margin is used to create a visual separation between two different views.
We can add a margin for a widget from any specific sides. We can add margin either from left, right, top or bottom depending upon the requirement.
Syntax
android:layout_margin="size in dp"
Explanation : Above syntax for margin is used to specify padding from all sides of a view.
android:layout_marginStart="size in dp"
android:layout_marginLeft="size in dp"
Explanation : Above syntax for margin is used to specify margin from the left side. We can use either marginStart or marginLeft to add margin for a view from the left side.
android:marginEnd="Size in dp"
android:marginRight="Size in dp"
Explanation : Above syntax for margin is used to specify margin from the right side. We can use either marginEnd or marginRight to add padding for a view from the right side.
android:marginTop="Size in dp"
Explanation : Above syntax for margin is used to specify margin from top of a view.
android:marginBottom="Size in dp"
Explanation : Above syntax for margin is used to specify margin from bottom of a view.
Difference between Margin and Padding in Android
Margin |
Padding |
|---|---|
Margin defines the extra space outside the border of a view. |
Padding defines the extra space inside the border of a view. |
Margin is used to create extra space between two views. |
Padding is used to create extra space around the content of a view. |
Margin affects layout outside the border of a view. |
Padding affects the layout inside the border of a view. |
Margin is not affected by the background color of a view. |
Padding is affected by the background color of a view. |
Example
We will be creating a simple application in which we will be simply displaying a button and adding padding from all sides to it one by one and test it.
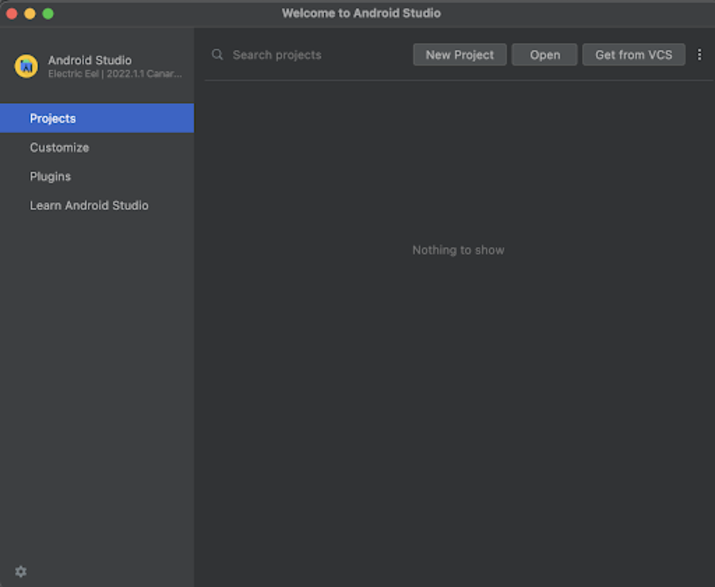
Step 1 : Creating a new project in Android Studio
Navigate to Android studio as shown in below screen. In the below screen click on New Project to create a new Android Studio Project.
After clicking on New Project you will get to see the below screen.
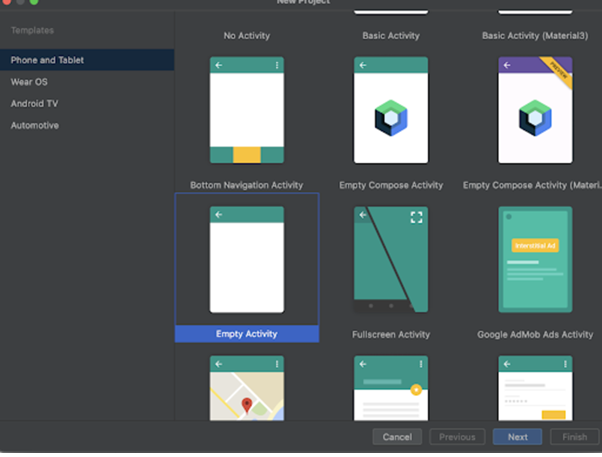
Inside this screen we have to simply select Empty Activity and click on Next. After clicking on next you will get to see the screen below.
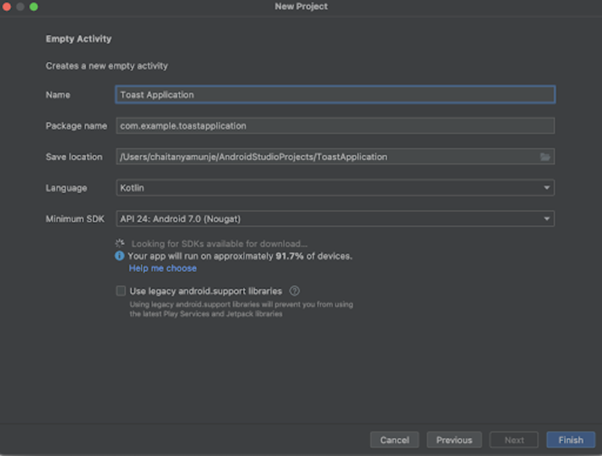
Inside this screen we have to simply specify the project name. Then the package name will be generated automatically.
Note : Make sure to select the Language as Kotlin.
After specifying all the details click on Finish to create a new Android studio project.
Once our project has been created we will get to see 2 files which are open i.e activity_main.xml and MainActivity.kt file.
Step 2 : Working with activity_main.xml
Example 1 : Padding from all sides
Working with activity_main.xml file.
Syntax
<?xml version="1.0" encoding="utf-8"?>
<RelativeLayout xmlns:android="http://schemas.android.com/apk/res/android"
   xmlns:tools="http://schemas.android.com/tools"
   android:layout_width="match_parent"
   android:layout_height="match_parent"
   android:orientation="vertical"
   tools:context=".MainActivity">
   <!-- on below line creating a text view for displaying heading -->
   <TextView
       android:id="@+id/idTVHeading"
       android:layout_width="match_parent"
       android:layout_height="wrap_content"
       android:layout_marginTop="30dp"
       android:text="Margin VS Padding"
       android:textAlignment="center"
       android:textAllCaps="false"
       android:textColor="@color/black"
       android:textSize="20sp"
       android:textStyle="bold" />
   <!-- on below line creating a text view for displaying the margin text view -->
   <TextView
       android:layout_width="match_parent"
       android:layout_height="wrap_content"
       android:layout_below="@id/idTVHeading"
       android:layout_centerHorizontal="true"
       android:layout_margin="20dp"
       android:text="Margin text view"
       android:id="@+id/idTVMargin"
       android:textAlignment="center"
       android:textColor="@color/black"
       android:textSize="18sp" />
   <!-- on below line creating a text view for displaying the padding text view -->
   <TextView
       android:layout_width="match_parent"
       android:layout_height="wrap_content"
       android:layout_below="@id/idTVMargin"
       android:id="@+id/idTVPadding"
       android:layout_centerHorizontal="true"
       android:padding="20dp"
       android:text="Padding text view"
       android:textAlignment="center"
       android:textColor="@color/black"
       android:textSize="18sp" />
</RelativeLayout>
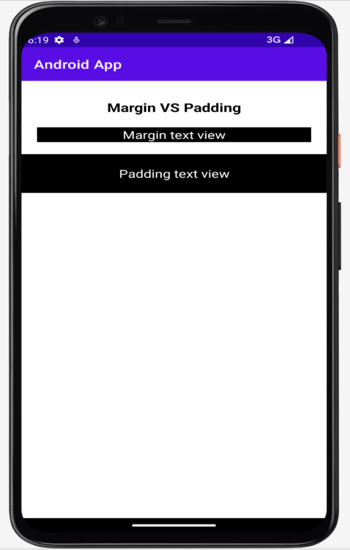
Explanation : In the above code the root element is a Relative layout in android. This layout is a view group which is used to align all the elements within it relative to each other. We can relatively align all elements within Relative Layout with the help of ids or positions.
Inside this relative layout we are creating a Textview which is used to display the heading of our application. After that we are creating one more text view for which we are adding a margin to this text view and after that we are creating one more text view in which we are adding padding to it from all sides. For both of this text view we are specifying background color and then we are adding padding and margin for each of them from all sides.
Output
Conclusion
In the above tutorial, we learn What is the difference between margin and padding in android and How we can use it inside our application to move the views with respect to other views within the application.

4K+ Views
