- CodeIgniter - Home
- CodeIgniter - Overview
- CodeIgniter - Installing CodeIgniter
- CodeIgniter - Application Architecture
- CodeIgniter - MVC Framework
- CodeIgniter - Basic Concepts
- CodeIgniter - Configuration
- CodeIgniter - Working with Database
- CodeIgniter - Libraries
- CodeIgniter - Error Handling
- CodeIgniter - File Uploading
- CodeIgniter - Sending Email
- CodeIgniter - Form Validation
- CodeIgniter - Session Management
- CodeIgniter - Flashdata
- CodeIgniter - Tempdata
- CodeIgniter - Cookie Management
- CodeIgniter - Common Functions
- CodeIgniter - Page Caching
- CodeIgniter - Page Redirection
- CodeIgniter - Application Profiling
- CodeIgniter - Benchmarking
- CodeIgniter - Adding JS and CSS
- CodeIgniter - Internationalization
- CodeIgniter - Security
CodeIgniter - Basic Concepts
Controllers
A controller is a simple class file. As the name suggests, it controls the whole application by URI.
Creating a Controller
First, go to application/controllers folder. You will find two files there, index.html and Welcome.php. These files come with the CodeIgniter.
Keep these files as they are. Create a new file under the same path named Test.php. Write the following code in that file −
<?php
   class Test extends CI_Controller {

      public function index() {
         echo "Hello World!";
      }
   }
?>
The Test class extends an in-built class called CI_Controller. This class must be extended whenever you want to make your own Controller class.
Calling a Controller
The above controller can be called by URI as follows −
http://www.your-domain.com/index.php/test
Notice the word test in the above URI after index.php. This indicates the class name of controller. As we have given the name of the controller Test, we are writing test after the index.php. The class name must start with uppercase letter but we need to write lowercase letter when we call that controller by URI. The general syntax for calling the controller is as follows −
http://www.your-domain.com/index.php/controller/method-name
Creating & Calling Constructor Method
Let us modify the above class and create another method named hello.
<?php
   class Test extends CI_Controller {

      public function index() {
         echo "This is default function.";
      }

      public function hello() {
         echo "This is hello function.";
      }
   }
?>
We can execute the above controller in the following three ways −
- http://www.your-domain.com/index.php/test
- http://www.your-domain.com/index.php/test/index
- http://www.your-domain.com/index.php/test/hello
After visiting the first URI in the browser, we get the output as shown in the picture given below. As you can see, we got the output of the method index, even though we did not pass the name of the method the URI. We have used only controller name in the URI. In such situations, the CodeIgniter calls the default method index.
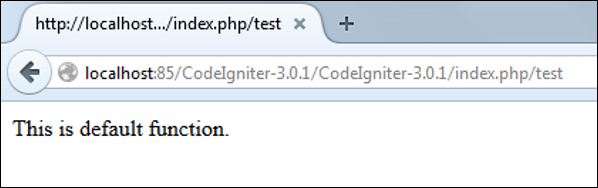
Visiting the second URI in the browser, we get the same output as shown in the above picture. Here, we have passed methods name after controllers name in the URI. As the name of the method is index, we are getting the same output.
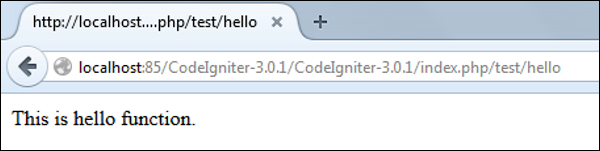
Visiting the third URI in the browser, we get the output as shown in picture given below. As you can see, we are getting the output of the method hello because we have passed hello as the method name, after the name of the controller test in the URI.
Points to Remember
The name of the controller class must start with an uppercase letter.
The controller must be called with lowercase letter.
Do not use the same name of the method as your parent class, as it will override parent classs functionality.
Views
This can be a simple or complex webpage, which can be called by the controller. The webpage may contain header, footer, sidebar etc. View cannot be called directly. Let us create a simple view. Create a new file under application/views with name test.php and copy the below given code in that file.
<!DOCTYPE html>
<html lang = "en">

   <head>
      <meta charset = "utf-8">
      <title>CodeIgniter View Example</title>
   </head>

   <body>
      CodeIgniter View Example
   </body>

</html>
Change the code of application/controllers/test.php file as shown in the below.
Loading the View
The view can be loaded by the following syntax −
$this->load->view('name');
Where name is the view file, which is being rendered. If you have planned to store the view file in some directory then you can use the following syntax −
$this->load->view('directory-name/name');
It is not necessary to specify the extension as php, unless something other than .php is used.
The index() method is calling the view method and passing the test as argument to view() method because we have stored the html coding in test.php file under application/views/test.php.
<?php
   class Test extends CI_Controller {

      public function index() {
         $this->load->view('test');
      }
   }
?>
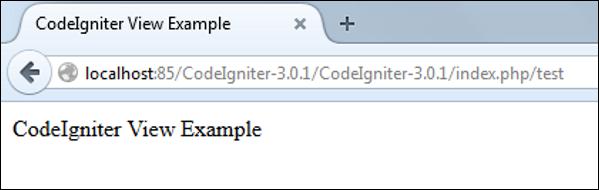
Here is the output of the above code −
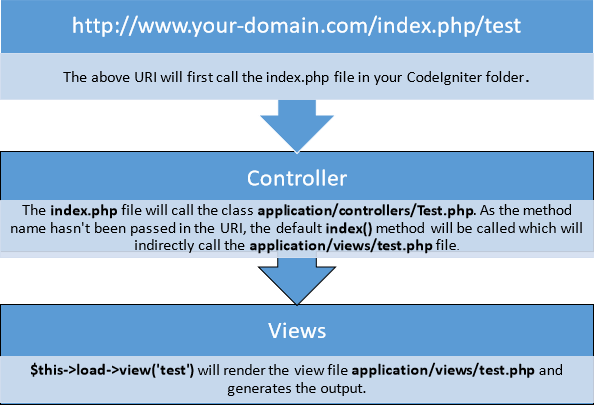
The following flowchart illustrates of how everything works −
Models
Models classes are designed to work with information in the database. As an example, if you are using CodeIgniter to manage users in your application then you must have model class, which contains functions to insert, delete, update and retrieve your users data.
Creating Model Class
Model classes are stored in application/models directory. Following code shows how to create model class in CodeIgniter.
<?php
   Class Model_name extends CI_Model {

      Public function __construct() {
         parent::__construct();
      }
   }
?>
Where Model_name is the name of the model class that you want to give. Each model class must inherit the CodeIgniters CI_Model class. The first letter of the model class must be in capital letter. Following is the code for users model class.
<?php
   Class User_model extends CI_Model {

      Public function __construct() {
         parent::__construct();
      }

   }
?>
The above model class must be saved as User_model.php. The class name and file name must be same.
Loading Model
Model can be called in controller. Following code can be used to load any model.
$this->load->model('model_name');
Where model_name is the name of the model to be loaded. After loading the model you can simply call its method as shown below.
$this->model_name->method();
Auto-loading Models
There may be situations where you want some model class throughout your application. In such situations, it is better if we autoload it.
/*
| ---------------------------------------------------------------
|  Auto-Load Models
| ---------------------------------------------------------------
| Prototype:
|
|   $autoload['model'] = array('first_model', 'second_model');
|
| You can also supply an alternative model name to be assigned
| in the controller:
|
|   $autoload['model'] = array('first_model' => 'first');
*/
$autoload['model'] = array();
As shown in the above figure, pass the name of the model in the array that you want to autoload and it will be autoloaded, while system is in initialization state and is accessible throughout the application.
Helpers
As the name suggests, it will help you build your system. It is divided into small functions to serve different functionality. A number of helpers are available in CodeIgniter, which are listed in the table below. We can build our own helpers too.
Helpers are typically stored in your system/helpers, or application/helpers directory. Custom helpers are stored in application/helpers directory and systems helpers are stored in system/helpers directory. CodeIgniter will look first in your application/helpers directory. If the directory does not exist or the specified helper is not located, CodeIgniter will instead, look in your global system/helpers/ directory. Each helper, whether it is custom or system helper, must be loaded before using it.
| S.N. | Helper Name & Description |
|---|---|
| 1 | Array Helper The Array Helper file contains functions that assist in working with arrays. |
| 2 | CAPTCHA Helper The CAPTCHA Helper file contains functions that assist in creating CAPTCHA images. |
| 3 | Cookie Helper The Cookie Helper file contains functions that assist in working with cookies. |
| 4 | Date Helper The Date Helper file contains functions that help you work with dates. |
| 5 | Directory Helper The Directory Helper file contains functions that assist in working with directories. |
| 6 | Download Helper The Download Helper lets you download data to your desktop. |
| 7 | Email Helper The Email Helper provides some assistive functions for working with Email. For a more robust email solution, see CodeIgniters Email Class. |
| 8 | File Helper The File Helper file contains functions that assist in working with files. |
| 9 | Form Helper The Form Helper file contains functions that assist in working with forms. |
| 10 | HTML Helper The HTML Helper file contains functions that assist in working with HTML. |
| 11 | Inflector Helper The Inflector Helper file contains functions that permits you to change words to plural, singular, camel case, etc. |
| 12 | Language Helper The Language Helper file contains functions that assist in working with language files. |
| 13 | Number Helper The Number Helper file contains functions that help you work with numeric data. |
| 14 | Path Helper The Path Helper file contains functions that permits you to work with file paths on the server. |
| 15 | Security Helper The Security Helper file contains security related functions. |
| 16 | Smiley Helper The Smiley Helper file contains functions that let you manage smileys (emoticons). |
| 17 | String Helper The String Helper file contains functions that assist in working with strings. |
| 18 | Text Helper The Text Helper file contains functions that assist in working with text. |
| 19 | Typography Helper The Typography Helper file contains functions that help your format text in semantically relevant ways. |
| 20 | URL Helper The URL Helper file contains functions that assist in working with URLs. |
| 21 | XML Helper The XML Helper file contains functions that assist in working with XML data. |
Loading a Helper
A helper can be loaded as shown below −
$this->load->helper('name');
Where name is the name of the helper. For example, if you want to load the URL Helper, then it can be loaded as −
$this->load->helper('url');
Routing
CodeIgniter has user-friendly URI routing system, so that you can easily re-route URL. Typically, there is a one-to-one relationship between a URL string and its corresponding controller class/method. The segments in a URI normally follow this pattern −
your-domain.com/class/method/id/
The first segment represents the controller class that should be invoked.
The second segment represents the class function, or method, that should be called.
The third, and any additional segments, represent the ID and any variables that will be passed to the controller.
In some situations, you may want to change this default routing mechanism. CodeIgniter provides facility through which you can set your own routing rules.
Customize Routing Rules
There is a particular file where you can handle all these. The file is located at application/config/routes.php. You will find an array called $route in which you can customize your routing rules. The key in the $route array will decide what to route and the value will decide where to route. There are three reserved routes in CodeIgniter.
| S.N. | Reserved Routes & Description |
|---|---|
| 1 | $route['default_controller'] This route indicates which controller class should be loaded, if the URI contains no data, which will be the case when people load your root URL. You are encouraged to have a default route otherwise a 404 page will appear, by default. We can set home page of website here so it will be loaded by default. |
| 2 | $route['404_override'] This route indicates which controller class should be loaded if the requested controller is not found. It will override the default 404 error page. It wont affect to the show_404() function, which will continue loading the default error_404.php file in application/views/errors/error_404.php. |
| 3 | $route['translate_uri_dashes'] As evident by the Boolean value, this is not exactly a route. This option enables you to automatically replace dashes (-) with underscores in the controller and method URI segments, thus saving you additional route entries if you need to do that. This is required because the dash is not a valid class or method-name character and will cause a fatal error, if you try to use it. |
Routes can be customized by wildcards or by using regular expressions but keep in mind that these customized rules for routing must come after the reserved rules.
Wildcards
We can use two wildcard characters as explained below −
(:num) − It will match a segment containing only numbers.
(:any) − It will match a segment containing any character.
Example
$route['product/:num']='catalog/product_lookup';
In the above example, if the literal word product is found in the first segment of the URL, and a number is found in the second segment, the catalog class and the product_lookup method are used instead.
Regular Expressions
Like wildcards, we can also use regular expressions in $route array key part. If any URI matches with regular expression, then it will be routed to the value part set into $route array.
Example
$route['products/([a-z]+)/(\d+)']='$1/id_$2';
In the above example, a URI similar to products/shoes/123 would instead call the shoes controller class and the id_123 method.
