
Article Categories
- All Categories
-
 Data Structure
-
 Networking
-
 RDBMS
RDBMS
-
 Operating System
-
 Java
Java
-
 MS Excel
-
 iOS
iOS
-
 HTML
HTML
-
 CSS
CSS
-
 Android
-
 Python
-
 C Programming
-
 C++
C++
-
 C#
C#
-
 MongoDB
-
 MySQL
MySQL
-
 Javascript
-
 PHP
PHP
-
 Economics & Finance
How to Create a Time Picker in ReactJS ?
ReactJS is a popular JavaScript library for building user interfaces. It provides developers with a flexible and efficient way to create interactive web applications. Time pickers are commonly used in applications where users need to select a specific time slot for booking appointments, scheduling events, or reserving resources. A time picker allows users to easily select the desired time and ensures accurate time allocation. In this article, we will create a time picker in steps using ReactJS.
Setting Up the React App
First, let's set up a new React application using Create React App. Open your terminal and run the following command:
npx create-react-app time-picker
cd time-picker
npm start
The above commands will create a new folder named "time-picker" with all the necessary files and dependencies, navigate into it, and start the development server.
Method 1: Using react-time-picker Library
The react-time-picker library provides a simple and customizable time picker component. It offers various configuration options to adjust the appearance and behavior of the time picker.
Installation
First, let's install the react-time-picker library using npm:
npm install react-time-picker
Example
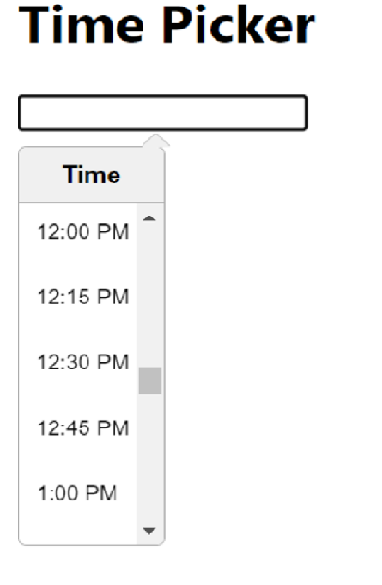
In the example below, we import the necessary dependencies, including React and the TimePicker component from the react-time-picker library. Inside the TimePickerComponent function component, we define a state variable time using the useState hook, initialized with the current time. We define a handleTimeChange function that updates the time state whenever the selected time changes.
import React, { useState } from 'react';
import TimePicker from 'react-time-picker';

function TimePickerComponent() {
  const [time, setTime] = useState('10:00');

  const handleTimeChange = (newTime) => {
    setTime(newTime);
  };

  return (
    <div>
      <h1>React Time Picker Example</h1>
      <TimePicker
        onChange={handleTimeChange}
        value={time}
      />
      <p>Selected time: {time}</p>
    </div>
  );
}

export default TimePickerComponent;
Output
Method 2: Using the react-datetime Library
The react-datetime library provides a highly customizable date and time picker component. It offers various formatting and configuration options to tailor the time picker to specific needs.
Installation
To use the react-datetime library, we need to install it using npm:
npm install react-datetime
Example
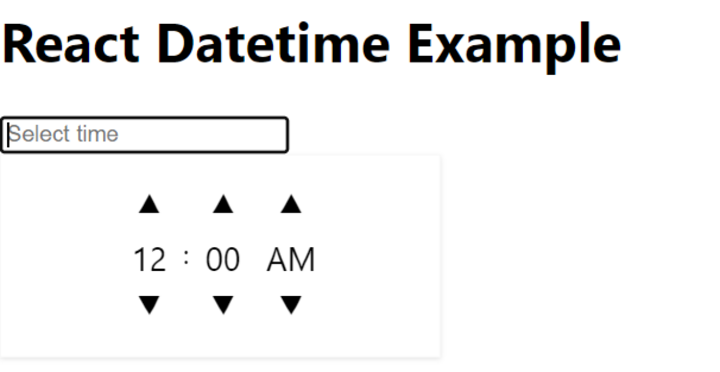
After installing the react-datetime library, we import the required dependencies, including React, Datetime component, and the corresponding CSS file. Inside the TimePickerComponent, we define a state variable time using the useState hook. We define a handleTimeChange function that receives a moment object and updates the time state by formatting it to the desired time format.
import React, { useState } from 'react';
import Datetime from 'react-datetime';
import 'react-datetime/css/react-datetime.css';

function TimePickerComponent() {
  const [time, setTime] = useState('');

  const handleTimeChange = (momentObj) => {
    if (momentObj && momentObj.format) {
      setTime(momentObj.format('HH:mm'));
    }
  };

  return (
    <div>
      <h1>React Datetime Example</h1>
      <Datetime
        onChange={handleTimeChange}
        value={time}
        dateFormat={false}
        inputProps={{ placeholder: 'Select time' }}
        timeFormat="HH:mm"
      />
      <p>Selected time: {time}</p>
    </div>
  );
}

export default TimePickerComponent;
Output
Method 3: Using the react-time-range-picker Library
The react-time-range-picker library provides a comprehensive solution for selecting time ranges. It allows users to choose both start and end times and provides visual feedback for the selected range.
Installation
To use the react-time-range-picker library, we need to install it using npm:
npm install react-time-range-picker
Example
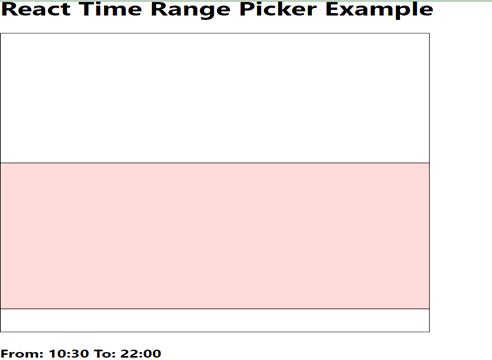
After installing the react-time-range-picker library, we import the necessary dependencies, including React, TimeRangePicker component, and the corresponding CSS file. Inside the TimePickerComponent, we define a state variable timeRange using the useState hook, initialized with default start and end times.
import React, { useState } from 'react';
import TimeRangePicker from 'react-time-range-picker';
import 'react-time-range-picker/dist/styles.css';

function TimePickerComponent() {
  const [timeRange, setTimeRange] = useState({
    start: '09:00',
    end: '17:00',
  });

  const handleTimeChange = (time) => {
    setTimeRange(time);
  };

  return (
    <div>
      <h1>React Time Range Picker Example</h1>
      <TimeRangePicker
        onChange={handleTimeChange}
        value={timeRange}
      />
      <p>Selected range: {timeRange.start} - {timeRange.end}</p>
    </div>
  );
}

export default TimePickerComponent;
Output
Comparison of Time Picker Libraries
| Library | Features | Best For | Bundle Size |
|---|---|---|---|
| react-time-picker | Simple time selection | Basic time picking needs | Small |
| react-datetime | Date and time, highly customizable | Complex date/time requirements | Medium |
| react-time-range-picker | Time range selection | Booking systems, scheduling | Medium |
Conclusion
In this article, we explored three different approaches to create time pickers in ReactJS. Each library offers unique features: react-time-picker for simple time selection, react-datetime for comprehensive date/time functionality, and react-time-range-picker for time range selection. Choose the library that best fits your application's requirements and user experience goals.

2K+ Views
