- Amazon VPC - Home
- What is Amazon VPC?
- Amazon VPC - Components
- Creating Your First VPC
- Public vs Private Subnets
- Amazon VPC - Security Groups
- Network Access Control Lists
- Amazon VPC - Flow Logs
- Amazon VPC - Endpoints
- Amazon VPC - Peering
- Amazon VPC Useful Resources
- Amazon VPC - Quick Guide
- Amazon VPC - Resources
- Amazon VPC - Discussion
Amazon VPC - Security Groups
In Amazon Virtual Private Cloud (VPC), security is the most important factor to protect your resources from unauthorized access.
AWS provides the following two main layers of security for your VPC network −
Security Groups (SGs)
Network Access Control Lists (NACLs)
Both these components work together to control the traffic that enters and exits your VPC. They ensure a strict security configuration for your cloud infrastructure. You can also customize the security settings as per your needs.
In this chapter, we will focus on Security Groups and in the next chapter, we will discuss how you can configure your Network Access Control Lists.
What are Security Groups?
Security Groups act as a virtual firewall for your instances in VPC. It controls both inbound and outbound traffic.
Configuring Security Groups
In this section, we will provide a step-by-step guide to configuring Security Groups for your VPC −
Step 1: Access the Amazon VPC Console
First, click on the link https://aws.amazon.com/console/ to go to the AWS Console. Next, login using your credentials to log in to your AWS account and go to VPC dashboard.
Then, under Security, click Security Groups.

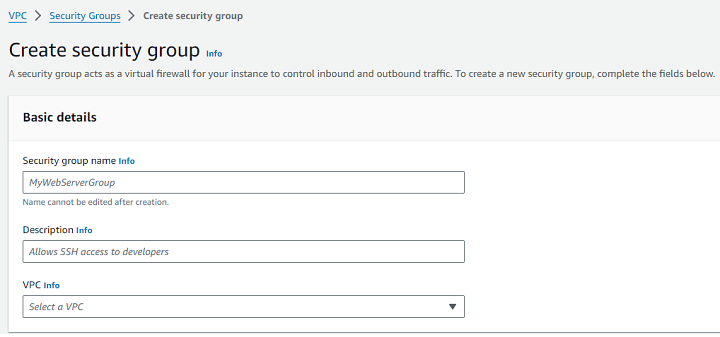
Step 2: Create a New Security Group
For creating a new Security Group, click the Create Security Group button. Next, enter a name and description for your Security Group.
Now, you need to select the VPC where you want to apply this Security Group.
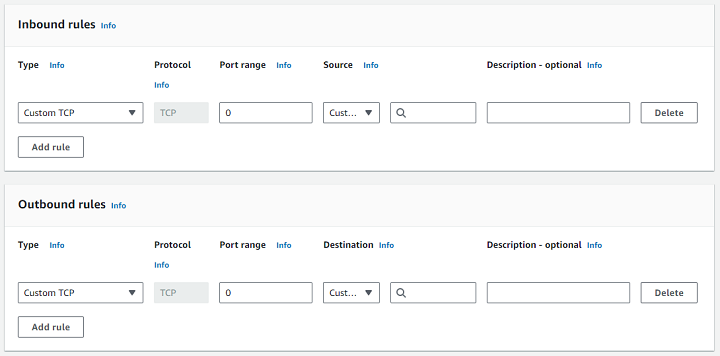
Step 3: Configure Inbound Rules
Inbound rules specify the types of traffic allowed into your instance. To add an inbound rule, follow the steps −
First, under Inbound Rules, click Add Rule. Select the type of traffic (e.g., HTTP, SSH, MySQL) from the dropdown menu.
Next, you need to specify the source IP range or address for the traffic. You can also add multiple inbound rules as needed for different types of traffic.
Step 4: Configure Outbound Rules
Outbound rules control the traffic that leaves your instance. By default, Security Groups allow all outbound traffic. But you can also specify outbound rules if you want to restrict outgoing connections. Follow the steps given below −
First, under Outbound Rules, click Add Rule. Next, select the type of traffic and destination for outbound connections.
Step 5: Review and Create the Security Group
First, review your inbound and outbound rules to ensure they meet your security requirements. To save your settings, click Create Security Group.
Step 6: Assign the Security Group to EC2 Instances
Once your Security Group is created, you must attach it to your EC2 instances −
First, go to the EC2 Dashboard. Select the instance to which you want to assign the Security Group. Under Actions, click Networking > Change Security Groups.
Finally, select the Security Group you just created and click Assign Security Groups.
