- Amazon VPC - Home
- What is Amazon VPC?
- Amazon VPC - Components
- Creating Your First VPC
- Public vs Private Subnets
- Amazon VPC - Security Groups
- Network Access Control Lists
- Amazon VPC - Flow Logs
- Amazon VPC - Endpoints
- Amazon VPC - Peering
- Amazon VPC Useful Resources
- Amazon VPC - Quick Guide
- Amazon VPC - Resources
- Amazon VPC - Discussion
Amazon VPC - Peering
What is VPC Peering?
Amazon VPC Peering connection is a networking connection that allows you to establish communication between two Virtual Private Clouds (VPCs) in the AWS network.
VPC Peering connection uses private IPv4 or IPv6 addresses. This connection allows instances in different VPCs to communicate with each other as if they are in the same network. AWS allows us to create a VPC peering connection between your own VPCs or between different AWS accounts.
The following diagram shows a VPC peering connection between two Virtual Private Clouds −
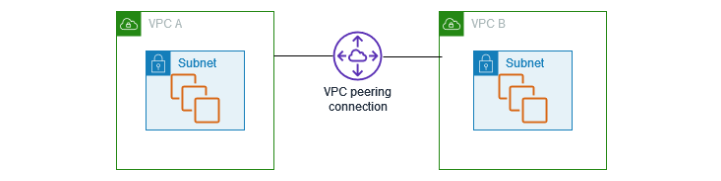
VPC Peering is highly secure because the traffic between the VPCs stays within the AWS network. They do not need to traverse the public internet.
Setup VPC Peering for inter-VPC Communication
Follow the steps below to set up a VPC Peering connection −
Step 1: Create a VPC Peering Connection
First, sign in to AWS Management Console and then navigate to the VPC Dashboard. On the left-hand side, select Peering Connections under the Peering section.
Click on the Create Peering Connection button. In the form, select the Requester VPC. You also need to specify the Accepter VPC. You can choose a VPC within your AWS account or enter the VPC ID from another AWS account.
Once done, click the Create Peering Connection button.
Step 2: Accept the VPC Peering Request
Once the peering connection is created, go to the Peering Connections section in the VPC dashboard. Now, find the newly created peering connection.
Nest, select the peering connection and click Actions > Accept Request. After the request is accepted, the status will change to Active.
If the accepter VPC is in another account, the owner of the accepter VPC will need to log in to their account to accept the request.
Step 3: Modify Route Tables
Once the peering connection is established, we need to update the route tables in both VPCs to allow traffic to flow between them. Follow the steps below to modify the route tables:
To modify the route table, first go to the Route Tables section. From there, choose the route table associated with the subnets that need to communicate with the other VPC.
Click Edit Routes, then click Add Route. In the Destination field, enter the CIDR block of the peer VPC. In the Target field, select Peering Connection and choose the relevant peering connection. Finally, to apply the changes, click Save Routes.
Repeat the above steps in the other VPC, updating its route tables to allow traffic to flow back to the original VPC.
Step 4: Update Security Groups
After modifying the Route Tables, we need to update the Security groups in both VPCs. Follow the steps given below to modify security groups −
In the VPC dashboard, go to Security Groups.
Select the security group associated with the resources that will communicate with the peer VPC. Click Edit Inbound Rules and add a rule to allow traffic from the CIDR block of the peer VPC. Similarly, edit the outbound rules to allow traffic to the peer VPC.
Step 5: Test the VPC Peering Connection
To test the VPC Peering connection, try pinging an instance in the peer VPC or establish a connection.
