- Amazon VPC - Home
- What is Amazon VPC?
- Amazon VPC - Components
- Creating Your First VPC
- Public vs Private Subnets
- Amazon VPC - Security Groups
- Network Access Control Lists
- Amazon VPC - Flow Logs
- Amazon VPC - Endpoints
- Amazon VPC - Peering
- Amazon VPC Useful Resources
- Amazon VPC - Quick Guide
- Amazon VPC - Resources
- Amazon VPC - Discussion
Amazon VPC - Quick Guide
What is Amazon VPC?
Amazon Virtual Private Cloud (VPC) is a key feature of Amazon Web Services (AWS) that allows you to set up your own isolated network within the AWS cloud.
- Amazon VPC gives you full control over your networking environment. You can customize your own IP address ranges, create subnets, and configure route tables and gateways.
- With the help of Amazon VPC, you can securely connect your AWS resources like EC2 instances, RDS databases, and Lambda functions. You can also maintain strong security measures like network access controls and data encryption.
- With Amazon VPC, you can select how your resources communicate with each other and with the Internet. It ensures that your infrastructure is modified according to your business needs.
In simple words, Amazon VPC acts like a personal data center in the cloud that allows you to build your applications and services in a secure and controlled environment.
Features of Amazon VPC
Amazon VPC has various features that enable businesses to securely and efficiently manage their cloud infrastructure.
Listed below are some of the key features of Amazon VPC −
1. VPC Flow Logs
Flow logs is a feature that allows you to capture and monitor network traffic within your VPC. It enables you to monitor both incoming and outgoing traffic which helps you understand the flow of information in your network and detect any suspicious activity.
2. IP Address Manager (IPAM)
IPAM is a feature that allows you to plan, manage, and monitor IP addresses across your AWS environment. With the help of IPAM, you can automate IP address assignment.
IPAM prevents IP conflicts and ensures that your resources have the right IP address available when needed.
3. IPv4 and IPv6 Support
Amazon VPC supports both IPv4 and IPv6 addressing. Thats how it enables your applications to communicate using the latest internet protocol. It gives you the option to use Amazon provided public IPv4 addresses, Elastic IPv4 addresses, or an IP address from the Amazon provided IPv6 subnet CIDR. You can also use your own IPv4 or IPv6 addresses within the Amazon VPC.
4. Ingress Routing
This feature allows you to control how all incoming and outgoing traffic to your Amazon VPC is routed. It enables you to direct the traffic to specific endpoints like firewalls, before it reaches your business workloads.
Ingress Routing enhances network security, enable traffic filtering, monitoring, and load balancing.
5. AWS Direct Connect
AWS direct connect feature, as name implies, provides a dedicated and private connection between your on-premises data center and AWS. It bypasses the public internet hence gives more consistent network performance and enhance security for sensitive data.
6. Reachability Analyzer
Amazon VPC reachability analyzer is a network diagnostic tool with the help of which you can analyze and troubleshoot network connectivity issues within your VPC. Its main role is to examine network paths between two endpoints such as EC2 instances, and check whether they are accessible or not.
If there is an issue with connectivity, then the Reachability Analyzer identifies the blocking component like security groups, network access control lists (ACLs), or route tables.
7. Network Access Control List (ACLs)
It is an optional layer of security for your VPC. It actually acts as a firewall that controls traffic of one or more subnets. You can set ACLs with the same rule you use to set your security groups in VPC.
8. Security Groups
This feature allows you to control in and out traffic at the instance level such as Amazon EC2 instances. It also acts as a firewall. It is recommended to associate your Amazon instance with one or more security groups. If you do not specify a group, your instance will automatically associate with the VPCs default group.
Amazon VPC - Components
Amazon Virtual Private Cloud (VPC) allows you to set up your own isolated network within the AWS cloud. It is just like a traditional on-premises network setup.
With the help of Amazon VPC, you can securely connect your AWS resources like EC2 instances in a logically isolated section of the AWS cloud. It is important to understand the key components of Amazon VPC to set up and manage your cloud infrastructure efficiently.
The key components of Amazon VPC include Subnets, Route Tables, Internet Gateways, and NAT Gateways. In this chapter, lets understand these important components in detail −
What are Subnets?
Subnets are basically subdivisions within a VPC that allow you to organize and manage your resources. In other words, a subnet is a range of IP addresses in your VPC.
You launch your AWS resources in your subnet. Every subnet must be in just one Availability Zone (AZ), and they cannot cross over to other AZs. Keeping your resources in different AZs protects your application from failure of a single AZ.
Types of Subnets
Subnets can be categorized in the following four categories based on how you configure routing for your subnets −
- Public Subnet − These subnets are directly connected to the internet via an internet Gateway. Resources like web services in a public subnet can access the public internet.
- Private Subnet − Opposite to public subnets, private subnets are not directly connected to the internet. To access the internet, resources in these subnets require a NAT device.
- VPN-only Subnet − As name implies, VPN-only subnet has a route to a Site-to-Site VPN connection via a virtual private gateway. They do not have a route to an internet gateway.
- Isolated Subnet − As name implies, isolated subnet has no route to any destination outside its VPC. Resources in an isolated subnet can only be accessed by other resources in the same VPC.
See the following diagram to better understand the working and placement of these key components in Amazon VPC.
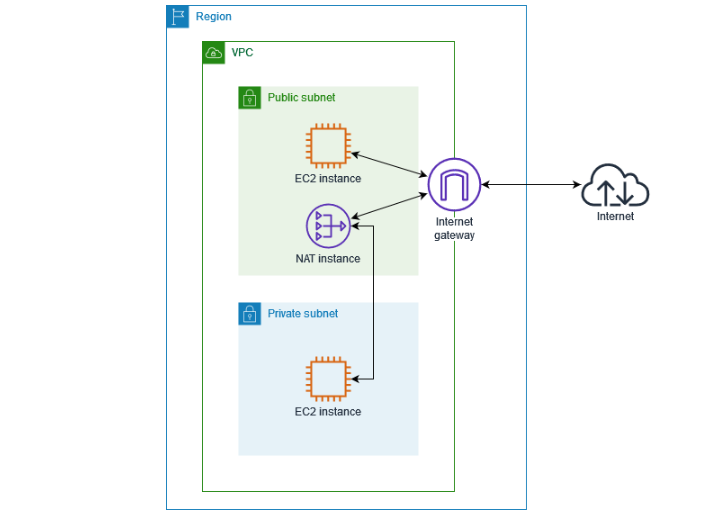
Route Tables
Another key component of VPC is Route Tables. The main aim of route tables is to determine the route of the traffic within a VPC. Route Tables contains a set of rules or routes that specify the path for network traffic.
When an instance such as Amazon EC2 in a subnet receives traffic, the route table, based on the destination IP address, will decide where that traffic should go.
A VPC may have the following Route Tables −
- Main Route Table − Main route table is the default route table that comes with every VPC and by default all subnets in your VPC are associated with it.
- Custom Route Tables − As the name implies, custom route tables are the tables that users create for their VPC.
Internet Gateways
An Internet Gateway allows communication between the resources in your VPC and the internet. As the name implies, it acts as a gateway to route the traffic from public subnets to the internet and from the internet to your instances in public subnets.
Two major concerns with Internet Gateways in VPC are −
- Enabling Internet Access − Internet Gateway enables internet access to the resources in a public subnet.
- Security − Resources connected through an Internet Gateway can be secured by configuring security groups and network access control lists (ACLs).
NAT Gateways
A NAT gateway is a Network Address Translation (NAT) service that provides access to resources within a private subnet.
NAT allows instances like Amazon EC2 instance, in a private subnet to send outbound traffic to the internet for downloading software updates or connecting to external APIs. At that time, they block the inbound internet traffic from initiating a connection to those resources.
Creating Your First VPC
In this chapter, let's understand the steps that you can follow to create your own custom Amazon Virtual Private Cloud (VPC) using AWS Management Console.
Creating and Configuring Your Own Custom VPC
A custom VPC allows users to have full control over their networking environment, including subnets, route tables, and gateways.
Step 1: Sign In to the AWS Management Console
First, click on the link https://aws.amazon.com/console/ to go to the AWS Console. Next, login using your credentials to log in to your AWS account.
At the front page of your AWS console, type "VPC" in the search bar at the top and select the "VPC" service from the dropdown.
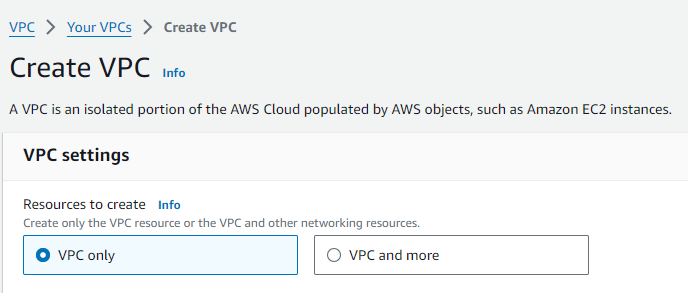
Step 2: Create a Custom VPC
At the VPC Dashboard, click on the "Create VPC" button to start the process of creating your own VPC.
In the "Create VPC" wizard, choose the "VPC Only" option. This allows you to configure your VPCs CIDR block and other settings manually.
Step 3: Configure Your VPC
You first need to give your VPC a descriptive name (e.g., "MyCustomVPC"). Next, select the IPv4 CIDR block for your VPC. For example, you can use 10.0.0.0/16 to create a large range of IP addresses for your VPC.
It is optional but if you want to use IPv6, you can enable it, and Amazon will automatically assign an IPv6 CIDR block.
Now you have an option to choose between "Default" or "Dedicated" tenancy. Default tenancy allows shared tenancy across instances. Dedicated tenancy assigns instances to hardware reserved for your account.
Once you have configured all these settings, you can click on the "Create VPC" button at the bottom of the page.
Step 4: Configure Subnets
Subnets allow you to divide your VPC into smaller networks. Go to the "Subnets" section of the VPC Dashboard and click "Create Subnet".
Next, you need to choose a name for the subnet and select an Availability Zone (e.g., us west 1a) for it to reside in. Each subnet must be in one Availability Zone.
Then, define a CIDR Block for the Subnet. Try to choose a smaller range from the main VPC CIDR block (e.g., 10.0.1.0/24) for the subnet.
You can repeat the above steps if you need multiple subnets.
Step 5: Configure an Internet Gateway
First, we will create an Internet Gateway. On VPC dashboard, go to the "Internet Gateways" section and click "Create Internet Gateway". Once created, now attach the Internet Gateway to your VPC by selecting the gateway and choosing "Attach to VPC".
Step 6: Set Up Route Tables
Once you set up Subnets and Internet Gateways, you need to set up route tables. Go to the "Route Tables" section and click "Create Route Table". Next, you need to assign the route table to the subnet you created in the above step.
Finally, add a route to direct traffic through the Internet Gateway. For example, add a route for 0.0.0.0/0 and point it to your Internet Gateway.
Step 7: Configure Security Groups
Now, you need to create Security Groups. For this, first go to the "Security Groups" section and then create a group that defines what type of traffic is allowed to and from resources in your VPC.
After creating Security Groups, you need to specify rules to control access, like allowing HTTP and HTTPS traffic on specific ports.
Step 8: Launch Resources in Your VPC
Now your VPC is set up, you can start launching AWS resources like EC2 instances within your VPC.
First, launch EC2 Instances by clicking on the EC2 section and selecting "Launch Instance". Next, choose one of the subnets you created in your VPC.
Step 9: Test Connectivity
After launching the EC2 instance, it is time to test the connectivity to ensure that everything is working as expected. If your Internet Gateway and route table correctly set up, your instances should have internet access.
Public vs Private Subnets
Subnets are subdivisions within a VPC that allow you to organize and manage your resources. In simple words, Subnets allow you to divide your VPC into smaller networks. While creating your custom VPC, it is one of the important steps to configure subnets.
In a broader sense, we can divide subnets into two categories, namely, Private Subnets and Public Subnets. To use Amazon VPC, you must have a clear understanding of these subnets.
Difference Between Public and Private Subnets
The following table highlights the differences between Public and Private Subnets −
| Feature | Public Subnet | Private Subnet |
|---|---|---|
| Internet Access | It is directly connected to the Internet using an Internet Gateway. | There is no direct Internet access to the resources of private subnets. Only private connections (e.g., VPN, NAT Gateway) are allowed. |
| Network Access | The instances, like Amazon EC2, in a public subnet can be accessed from the Internet. | The instances in a private subnet cannot be accessed directly from the Internet. |
| Security | The instances in public subnets are more exposed to external traffic. Thats why it requires some strict security measures like firewalls and security groups. | It is more secure than public subnets because it is not directly exposed to the Internet. The traffic is controlled through private connections like VPN, NAT Gateway, etc. |
| Use of Internet Gateway | The instance in the public subnets requires an Internet Gateway to allow communication with the Internet. | It does not use an Internet Gateway. It uses a NAT Gateway or VPN for outbound Internet access. |
| Outbound Traffic | It provides direct Internet access for outgoing traffic. For example, for software updates or communication with APIs. | The outbound traffic in a private subnet is routed through a NAT Gateway or VPN for accessing the Internet. |
| Inbound Traffic | Public subnet can receive inbound traffic from the Internet. | Private subnet does not allow any inbound traffic from the Internet. It is only accessible through a private connection. |
Use Cases of Public Subnets
Public Subnets are ideal for −
- Hosting web servers
- Public-facing applications
- Any other resources that need direct Internet access
Use Cases of Private Subnets
Private Subnets are ideal for −
- Hosting databases
- Backend servers
- Sensitive data or applications that do not need direct Internet access
Amazon VPC - Security Groups
In Amazon Virtual Private Cloud (VPC), security is the most important factor to protect your resources from unauthorized access.
AWS provides the following two main layers of security for your VPC network −
- Security Groups (SGs)
- Network Access Control Lists (NACLs)
Both these components work together to control the traffic that enters and exits your VPC. They ensure a strict security configuration for your cloud infrastructure. You can also customize the security settings as per your needs.
In this chapter, we will focus on Security Groups and in the next chapter, we will discuss how you can configure your Network Access Control Lists.
What are Security Groups?
Security Groups act as a virtual firewall for your instances in VPC. It controls both inbound and outbound traffic.
Configuring Security Groups
In this section, we will provide a step-by-step guide to configuring Security Groups for your VPC −
Step 1: Access the Amazon VPC Console
First, click on the link https://aws.amazon.com/console/ to go to the AWS Console. Next, login using your credentials to log in to your AWS account and go to VPC dashboard.
Then, under Security, click Security Groups.

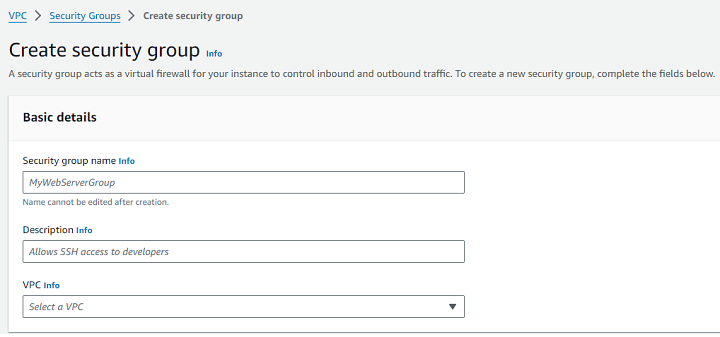
Step 2: Create a New Security Group
For creating a new Security Group, click the Create Security Group button. Next, enter a name and description for your Security Group.
Now, you need to select the VPC where you want to apply this Security Group.
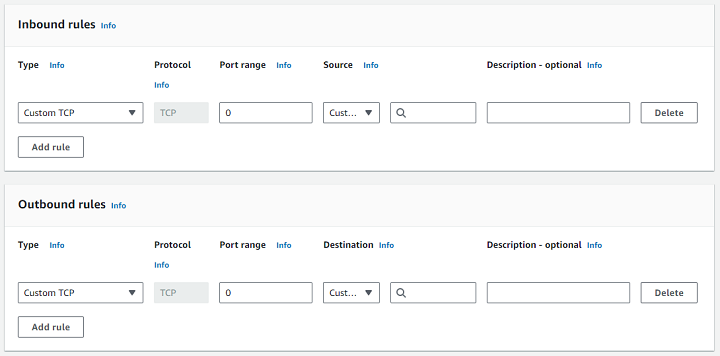
Step 3: Configure Inbound Rules
Inbound rules specify the types of traffic allowed into your instance. To add an inbound rule, follow the steps −
First, under Inbound Rules, click Add Rule. Select the type of traffic (e.g., HTTP, SSH, MySQL) from the dropdown menu.
Next, you need to specify the source IP range or address for the traffic. You can also add multiple inbound rules as needed for different types of traffic.
Step 4: Configure Outbound Rules
Outbound rules control the traffic that leaves your instance. By default, Security Groups allow all outbound traffic. But you can also specify outbound rules if you want to restrict outgoing connections. Follow the steps given below −
First, under Outbound Rules, click Add Rule. Next, select the type of traffic and destination for outbound connections.
Step 5: Review and Create the Security Group
First, review your inbound and outbound rules to ensure they meet your security requirements. To save your settings, click Create Security Group.
Step 6: Assign the Security Group to EC2 Instances
Once your Security Group is created, you must attach it to your EC2 instances −
First, go to the EC2 Dashboard. Select the instance to which you want to assign the Security Group. Under Actions, click Networking > Change Security Groups.
Finally, select the Security Group you just created and click Assign Security Groups.
Network Access Control Lists
Network Access Control Lists (NACLs) provide another layer of security but at the subnet level. Unlike Security Groups, NACLs are stateless, meaning that each request and response must be explicitly allowed by separate rules.
How to Configure Network Access Control Lists?
Given below is a step-by-step guide to configuring NACLs for your VPC −
Step 1: Access the Amazon VPC Console
First, click on the link https://aws.amazon.com/console/ to go to the AWS Console. Login using your credentials to log in to your AWS account and go to VPC dashboard. Under Security, click on Network ACLs.
Step 2: Create a New NACL
Click the Create Network ACL button. First, you need to provide a name for your NACL. Now, choose the VPC where the NACL will be applied. Finally, click Create.
Step 3: Associate NACL with a Subnet
Once your NACL is created, you need to associate it with one or more subnets.
First, select the NACL you just created. Next, click on the Subnet Associations tab, then click Edit Subnet Associations. Finally, select the subnets where you want to apply the NACL and click Save.
Step 4: Configure Inbound Rules
Inbound rules control the traffic that is allowed into the subnet. You need to define the rules for each type of traffic you want to allow or deny.
First, under Inbound Rules, click Edit Inbound Rules. Next, click Add Rule and define the following for each rule:
- Rule Number − It is a numerical identifier for the rule.
- Type − You need to choose the type of traffic (e.g., HTTP, HTTPS, SSH).
- Protocol − Select the protocol (e.g., TCP, UDP, ICMP). You can also select ALL Traffic.
- Port Range − It is used to define the specific port range (e.g., 80 for HTTP, 443 for HTTPS, 22 for SSH).
- Source − This field is used to specify the allowed source IP range (e.g., 0.0.0.0/0 for all IPs or a specific IP range).
- Allow/Deny − You can choose whether to allow or deny the traffic.
Step 5: Configure Outbound Rules
Outbound rules control the traffic that is allowed to leave the subnet.
Under Outbound Rules, click Edit Outbound Rules. Click Add Rule and define the rule parameters −
- Rule Number − A unique identifier.
- Type − The type of traffic (e.g., HTTP, HTTPS).
- Protocol − Select the protocol (TCP, UDP, ICMP).
- Port Range − Define the port range.
- Destination − Specify the allowed destination IP range.
- Allow/Deny − Choose to allow or deny the traffic.
Step 6: Save and Review Rules
Once you have configured your inbound and outbound rules, click the Save button to apply the changes.
Amazon VPC - Flow Logs
Flow logs is a feature that allows you to capture and monitor network traffic within your VPC. It enables you to monitor both incoming and outgoing traffic which helps you understand the flow of information in your network and detect any suspicious activity.
VPC Flow Logs mainly record the following details −
- Source and destination IP addresses
- Ports
- Protocols
- Traffic direction (inbound or outbound)
- Allow / deny decisions based on Security Group and Network Access control List (NACL) rules
Enabling VPC Flow Logs to Monitor Network Traffic
Follow the steps given below to enable VPC Flow Logs for monitoring network traffic in your VPC −
Step 1: Access the VPC Management Console
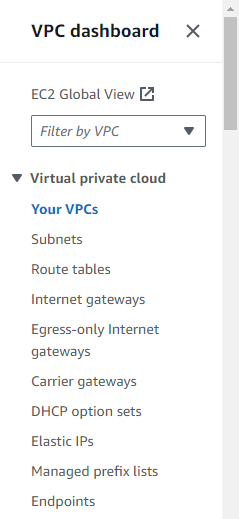
First you need to sign in to AWS Management Console. Next, in the search bar, type VPC, and select VPC Dashboard from the dropdown list.
Step 2: Create a VPC Flow Log
From the left-hand navigation pane choose Your VPCs. You need to select the VPC for which you want to enable Flow Logs.
Click the Actions button and from the dropdown menu, select Create Flow Log.
Step 3: Configure Flow Log Settings
From the Create Flow Log we need to configure several settings to control what data the Flow Logs will capture.
Lets see what to and how to configure −
-
Filter − It provides various options to choose the type of traffic you want to log.
- All − Capture all traffic.
- Reject − Capture only rejected traffic.
- Accept − Capture only accepted traffic.
-
Destination − It provides options for where to send the Flow Log data.
- Amazon CloudWatch Logs − Useful for real-time monitoring and analysis.
- Amazon S3 − Suitable for long-term storage and large-scale log analysis.
- IAM Role − Select or create an IAM role that allows the VPC Flow Logs service to publish logs to CloudWatch or S3.
- Log Format (Optional) − It is optional, but you can customize the log format if needed, to capture specific fields such as instance ID, protocol, traffic direction, and more.
- Tag (Optional) − It is also optional. You can add tags to your Flow Log for easy identification.
Once you have configured everything, click Create Flow Log.
Step 4: View VPC Flow Logs
For CloudWatch, follow the steps given below −
- If you sent the logs to CloudWatch Logs, go to the CloudWatch Dashboard.
- Select Logs, and choose the log group where the VPC Flow Logs are being stored.
- Here, you can view, filter, and analyze the log data.
For Amazon S3, follow the steps given below −
- If you chose Amazon S3 as the destination, navigate to the S3 bucket you specified.
- Inside that bucket, you will see log files that you can download and analyze offline.
Amazon VPC - Endpoints
Amazon VPC Endpoint allows the users to connect their VPC in private to the supported AWS services and to the VPC endpoint services that are powered by AES PrivateLink, without requiring an Internet Gateway, NAT device, VPN connection, or AWS Direct Connect.
VPC endpoints provide a more secure and efficient way to interact with AWS services because all traffic between your VPC and the services remains within the AWS network.
Types of VPC Endpoints
There are two types of VPC Endpoints −
1. Interface Endpoints
These VPC endpoints create an elastic network interface in your subnet that connects to services via AWS PrivateLink. Examples of supported services include Amazon S3, DynamoDB, and many others.
2. Gateway Endpoints
These VPC endpoints are for specific AWS services such as Amazon S3 and DynamoDB. They are more like route table entries that direct traffic from your VPC to the specified AWS service.
How to Set Up and Use VPC Endpoints?
The process of setting up and using VPC Endpoints in your VPC is very simple. Follow the steps given below −
Step 1: Open the VPC Management Console
First, you need to sign in to the AWS Management Console. In the search bar, type VPC, and select VPC Dashboard.
Step 2: Choose VPC Endpoints
Now, check the left-hand navigation pane. Click on Endpoints under Virtual Private Cloud. To create VPC endpoints, click the Create Endpoint button.
Step 3: Select the AWS Service
Now, in the Service Name section you need to select the AWS service you want to connect to. For example, Amazon S3 or DynamoDB.
- For Amazon S3 and DynamoDB, you will need to create a Gateway Endpoint.
- For other services, such as EC2 or SQS, you will use an Interface Endpoint.
Step 4: Choose the VPC
Now, go to the VPC section and select the VPC in which you want to create the endpoint.
First, choose the subnets in which you want the interface for the endpoint to be created. It is only for Interface Endpoints.
For Gateway Endpoints, you need to choose route tables instead of subnets, which will add the endpoint as a route in your route table.
Step 5: Create the Endpoint
Once you have set the configurations, click the Create Endpoint button. Amazon AWS will create the VPC Endpoint, and youll see it in the Endpoints list.
Step 6: Modify Route Tables (For Gateway Endpoints Only)
This step is required if you are creating a Gateway Endpoint.
First, go to Route Tables in the VPC Dashboard. Find the route table associated with the subnets that need access to the service. Finally, add a route for the selected AWS service pointing to the VPC Gateway Endpoint.
Amazon VPC - Peering
What is VPC Peering?
Amazon VPC Peering connection is a networking connection that allows you to establish communication between two Virtual Private Clouds (VPCs) in the AWS network.
VPC Peering connection uses private IPv4 or IPv6 addresses. This connection allows instances in different VPCs to communicate with each other as if they are in the same network. AWS allows us to create a VPC peering connection between your own VPCs or between different AWS accounts.
The following diagram shows a VPC peering connection between two Virtual Private Clouds −
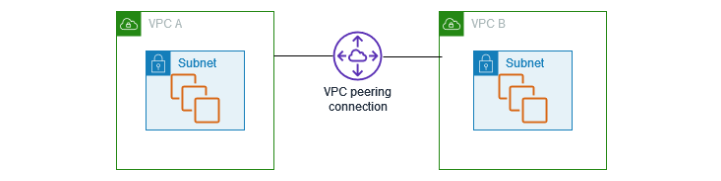
VPC Peering is highly secure because the traffic between the VPCs stays within the AWS network. They do not need to traverse the public internet.
Setup VPC Peering for inter-VPC Communication
Follow the steps below to set up a VPC Peering connection −
Step 1: Create a VPC Peering Connection
First, sign in to AWS Management Console and then navigate to the VPC Dashboard. On the left-hand side, select Peering Connections under the Peering section.
Click on the Create Peering Connection button. In the form, select the Requester VPC. You also need to specify the Accepter VPC. You can choose a VPC within your AWS account or enter the VPC ID from another AWS account.
Once done, click the Create Peering Connection button.
Step 2: Accept the VPC Peering Request
Once the peering connection is created, go to the Peering Connections section in the VPC dashboard. Now, find the newly created peering connection.
Nest, select the peering connection and click Actions > Accept Request. After the request is accepted, the status will change to Active.
If the accepter VPC is in another account, the owner of the accepter VPC will need to log in to their account to accept the request.
Step 3: Modify Route Tables
Once the peering connection is established, we need to update the route tables in both VPCs to allow traffic to flow between them. Follow the steps below to modify the route tables:
To modify the route table, first go to the Route Tables section. From there, choose the route table associated with the subnets that need to communicate with the other VPC.
Click Edit Routes, then click Add Route. In the Destination field, enter the CIDR block of the peer VPC. In the Target field, select Peering Connection and choose the relevant peering connection. Finally, to apply the changes, click Save Routes.
Repeat the above steps in the other VPC, updating its route tables to allow traffic to flow back to the original VPC.
Step 4: Update Security Groups
After modifying the Route Tables, we need to update the Security groups in both VPCs. Follow the steps given below to modify security groups −
In the VPC dashboard, go to Security Groups.
Select the security group associated with the resources that will communicate with the peer VPC. Click Edit Inbound Rules and add a rule to allow traffic from the CIDR block of the peer VPC. Similarly, edit the outbound rules to allow traffic to the peer VPC.
Step 5: Test the VPC Peering Connection
To test the VPC Peering connection, try pinging an instance in the peer VPC or establish a connection.
