- Zend Framework - Home
- Zend Framework - Introduction
- Zend Framework - Installation
- Skeleton Application
- Zend Framework - MVC Architecture
- Zend Framework - Concepts
- Zend Framework - Service Manager
- Zend Framework - Event Manager
- Zend Framework - Module System
- Application Structure
- Zend Framework - Creating Module
- Zend Framework - Controllers
- Zend Framework - Routing
- Zend Framework - View Layer
- Zend Framework - Layout
- Models & Database
- Different Databases
- Forms & Validation
- Zend Framework - File Uploading
- Zend Framework - Ajax
- Cookie Management
- Session Management
- Zend Framework - Authentication
- Email Management
- Zend Framework - Unit Testing
- Zend Framework - Error Handling
- Zend Framework - Working Example
Zend Framework - Layout
A Layout represents the common parts of multiple views i.e. for example, page header and footer. By default, layouts should be stored in the view/layout folder.
A Layout configuration is defined under the view_manager section in the module.config.php.
The default configuration of the skeleton application is as follows −
'view_manager' => array(
   'display_not_found_reason' => true,
   'display_exceptions' => true,
   'doctype' => 'HTML5',
   'not_found_template' => 'error/404',
   'exception_template' => 'error/index',
   'template_map' => array(
      'layout/layout' => __DIR__ . '/../view/layout/layout.phtml',
      'application/index/index' => __DIR__ . '/../view/application/index/index.phtml',
      'error/404' => __DIR__ . '/../view/error/404.phtml',
      'error/index' => __DIR__ . '/../view/error/index.phtml',
   ),
   'template_path_stack' => array(
   __DIR__ . '/../view',
),
Here, the template_map is used to specify the layout. If layout is not found, then it will return an error. Let us have a look at the main layout of the skeleton application.
Layout.phtml
<?= $this->doctype() ?>
<html lang = "en">
   <head>
      <meta charset = "utf-8">
      <?= $this->headTitle('ZF Skeleton Application')->setSeparator(' - ')>
         setAutoEscape(false) ?>
      <?= $this->headMeta()
         ->appendName('viewport', 'width = device-width, initial-scale = 1.0')
         ->appendHttpEquiv('X-UA-Compatible', 'IE = edge')
      ?>

      <!-- Le styles -->
      <?= $this->headLink(['rel' => 'shortcut icon', 'type' =>
         'image/vnd.microsoft.icon',
         'href' => $this->basePath() . '/img/favicon.ico'])
         ->prependStylesheet($this->basePath('css/style.css'))
         ->prependStylesheet($this->basePath('css/bootstraptheme.min.css'))
         ->prependStylesheet($this->basePath('css/bootstrap.min.css'))
      ?>

      <!-- Scripts -->
      <?= $this->headScript()
         ->prependFile($this->basePath('js/bootstrap.min.js'))
         ->prependFile($this->basePath('js/jquery-3.1.0.min.js'))
      ?>
   </head>

   <body>
      <nav class = "navbar navbar-inverse navbar-fixed-top" role = "navigation">
         <div class = "container">
            <div class = "navbar-header">
               <button type = "button" class = "navbar-toggle" data-
                  toggle = "collapse" data-target = ".navbar-collapse">
                  <span class = "icon-bar"></span>
                  <span class = "icon-bar"></span>
                  <span class = "icon-bar"></span>
               </button>

               <a class = "navbar-brand" href = "<?= $this->url('home') ?>">
                  <img src = "<?= $this->basePath('img/zf-logo-mark.svg') ?>
                     " height = "28" alt = "Zend Framework <?= \Application\Module::
                     VERSION ?>"/> Skeleton Application
               </a>
            </div>

            <div class = "collapse navbar-collapse">
               <ul class = "nav navbar-nav">
                  <li class = "active"><a href = "<?=
                     $this->url('home') ?>">Home</a></li>
               </ul>
            </div>
         </div>
      </nav>

      <div class = "container">
         <?= $this->content ?>
         <hr>
         <footer>
            <p>© 2005 - <?= date('Y') ?> by Zend Technologies Ltd.
               All rights reserved.</p>
         </footer>
      </div>
      <?= $this->inlineScript() ?>
   </body>
</html>
As you analyze the layout, it mostly uses the view helpers, which we discussed in the previous chapter. As we look closer, the layout uses a special variable, $this->content. This variable is important as it will be replaced by the view script (template) of the actual requested page.
Creating a new layout
Let us create a new layout for our Tutorial module.
To begin with, let us create a tutorial.css file under the public/css directory.
 body {
   background-color: lightblue;
}
h1 {
   color: white;
   text-align: center;
}
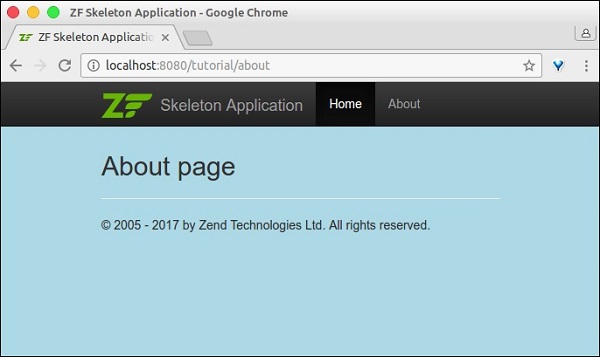
Create a new layout file newlayout.phtml at the /myapp/module/Tutorial/view/layout/ and copy the content from existing layout. Then, Add the tutorial.css stylesheet using the HeadLink helper class inside the layout head section.
<?php echo $this->headLink()->appendStylesheet('/css/tutorial.css');?>
Add a new about link in the navigation section using the URL helper.
<li><a href = "<?= $this->url('tutorial', ['action' => 'about']) ?>">About</a></li>
This layout page is common for the tutorial module application. Update the view_manager section of the tutorial module configuration file.
'view_manager' => array(
   'template_map' => array(
      'layout/layout' => __DIR__ . '/../view/layout/newlayout.phtml'),
   'template_path_stack' => array('tutorial' => __DIR__ . '/../view',),
)
Add the aboutAction function in the TutorialController.
 public function aboutAction() {
}
Add the about.phtml at myapp/module/Tutorial/view/tutorial/tutorial/ with the following content.
<h2>About page</h2>
Now, you are ready to finally run the application − http://localhost:8080/tutorial/about.