- TestNG - Home
- TestNG - Overview
- TestNG - Environment
- TestNG - Writing Tests
- TestNG - Basic Annotations
- TestNG - Execution Procedure
- TestNG - Executing Tests
- TestNG - Suite Test
- TestNG - Ignore a Test
- TestNG - Group Test
- TestNG - Exception Test
- TestNG - Dependency Test
- TestNG - Parameterized Test
- TestNG - Run JUnit Tests
- TestNG - Test Results
- TestNG - Annotation Transformers
- TestNG - Asserts
- TestNG - Parallel Execution
- TestNG - Plug with ANT
- TestNG - Plug with Eclipse
- TestNG - TestNG - vs JUnit
TestNG - Junit Reports
JUnit is one of those unit frameworks which were initially used by many Java applications as a Unit test framework. By default, JUnit tests generate simple report XML files for its test execution. These XML files can then be used to generate any custom reports as per the testing requirement. We can also generate HTML reports using the XML files. Ant has such a utility task, which takes these JUnit XML files as input and generates an HTML report.
TestNG, by default, generates JUnit XML reports for any test execution (in the test-output folder). We can use these XML report files as input for generating a JUnit HTML report. Let us take an example.
Create Test Case Class
Create a java class, say, SampleTest.java in /work/testng/src.
import org.testng.Assert;
import org.testng.annotations.Test;

public class SampleTest {
   @Test
   public void testMethodOne() {
      Assert.assertTrue(true);
   }

   @Test
   public void testMethodTwo() {
      Assert.assertTrue(false);
   }

   @Test(dependsOnMethods = {"testMethodTwo"})
   public void testMethodThree() {
      Assert.assertTrue(true);
   }
}
The preceding test class contains three test methods out of which testMethodOne and testMethodThree will pass when executed, whereas testMethodTwo is made to fail by passing a false Boolean value to the Assert.assertTrue method, which is used for truth conditions in the tests.
Create testng.xml
Create testng.xml in /work/testng/src to execute test case(s).
<?xml version = "1.0" encoding = "UTF-8"?>
<suite name = "Simple Suite">

   <test name = "Simple test">
      <classes>
         <class name = "SampleTest" />
      </classes>
   </test>
</suite>
Compile the SampleTest class using javac.
/work/testng/src$ javac SampleTest.java
Now, run testng.xml.
/work/testng/src$ java org.testng.TestNG testng.xml
Verify the output.
===============================================
   Simple Suite
   Total tests run: 3, Failures: 1, Skips: 1
===============================================
Now that we have JUnit XML reports available from the above execution, let's create a simple Ant build configuration XML file to generate an HTML report for the test execution.
Create a new file named build.xml under /work/testng/src folder.
<project name = "TestNG_WORKSPACE" default = "junit-report" basedir = ".">
   <!-- Sets the property variables to point to respective directories -->
   <property name = "junit-xml-dir" value="${basedir}/test-output/junitreports"/>
   <property name = "report-dir" value="${basedir}/html-report" />

   <!-- Ant target to generate html report -->
   <target name = "junit-report">
      <!-- Delete and recreate the html report directories -->
      <delete dir = "${report-dir}" failonerror="false"/>
      <mkdir dir = "${report-dir}" />
      <mkdir dir = "${report-dir}/Junit" />
      <!-- Ant task to generate the html report.
      todir - Directory to generate the output reports

      fileset - Directory to look for the junit xml reports.

      report - defines the type of format to be generated.
      Here we are using "noframes" which generates a single html report.
      -->
      <junitreport todir = "${report-dir}/Junit">
         <fileset dir = "${junit-xml-dir}">
            <include name = "**/*.xml" />
         </fileset>
         <report format = "noframes" todir = "${report-dir}/Junit" />
      </junitreport>
   </target>
</project>
The preceding XML defines a simple Ant build.xml file having a specific Ant target named junit-report that generates a JUnit report when executed. The target looks for the JUnit report XML files under the directory test-output/junitreports. For the Ant configuration file, the default target to execute is configured as junit-report.
Open the command prompt window and go to the /work/testng/src directory in the command prompt and run the command:
/work/testng/src$ ant
Once executed, a JUnit HTML report will be generated in the configured directory /html-report/Junit. Open the file named junit-noframes.html on your default web browser. You will see the following HTML report −
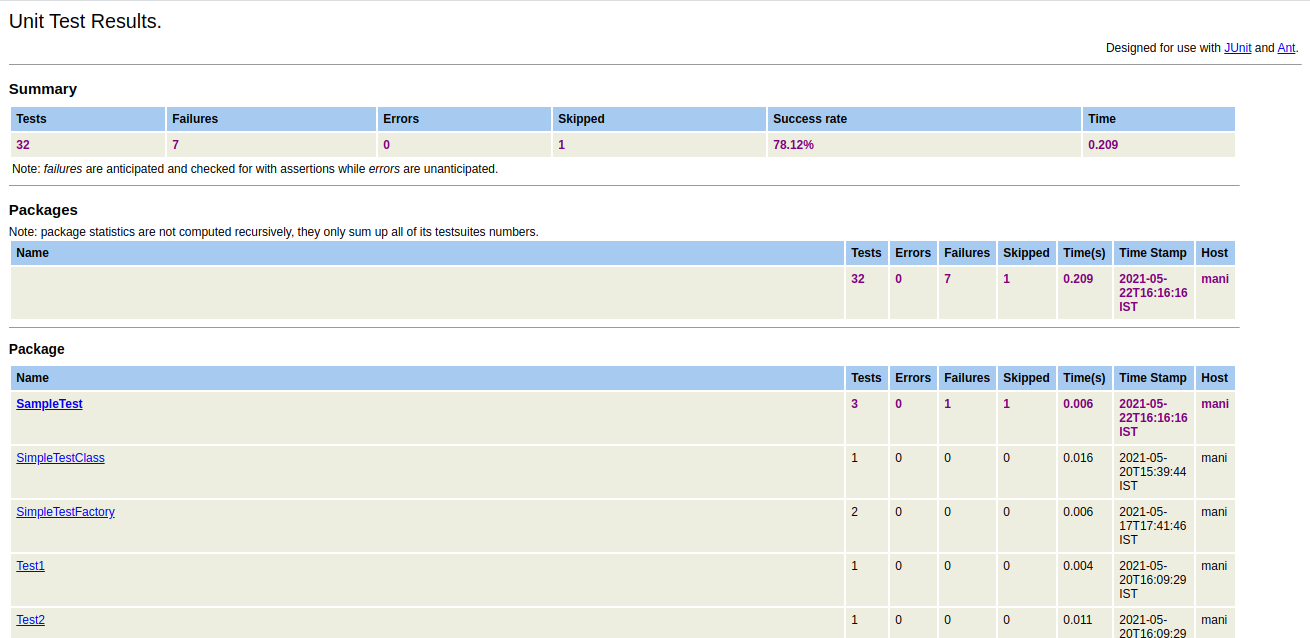
Here, we have seen how to use the JUnit XML report generated by TestNG and generate HTML report using Ant. There are two kinds of reports that can be generated using this method: frames and no-frames.
If the report generation is configured with frames, there will be multiple files generated for each class and the main report will connect to them through links. A no-frames report consists of a single file with all the results of the test execution. This can be configured by providing the respective value to the format attribute of the report task in Ant.
