- Teradata - Introduction
- Teradata - Installation
- Teradata - Architecture
- Teradata - Relational Concepts
- Teradata - Data Types
- Teradata - Tables
- Teradata - Data Manipulation
- Teradata - SELECT Statement
- Logical & Conditional Operators
- Teradata - SET Operators
- Teradata - String Manipulation
- Teradata - Date/Time Functions
- Teradata - Built-in Functions
- Teradata - Aggregate Functions
- Teradata - CASE & COALESCE
- Teradata - Primary Index
- Teradata - Joins
- Teradata - SubQueries
- Teradata Advanced
- Teradata - Table Types
- Teradata - Space Concepts
- Teradata - Secondary Index
- Teradata - Statistics
- Teradata - Compression
- Teradata - Explain
- Teradata - Hashing Algorithm
- Teradata - Join Index
- Teradata - Views
- Teradata - Macros
- Teradata - Stored Procedure
- Teradata - JOIN Strategies
- Teradata - Partitioned Primary Index
- Teradata - OLAP Functions
- Teradata - Data Protection
- Teradata - User Management
- Teradata - Performance Tuning
- Teradata - FastLoad
- Teradata - MultiLoad
- Teradata - FastExport
- Teradata - BTEQ
- Teradata Useful Resources
- Teradata - Questions & Answers
- Teradata - Quick Guide
- Teradata - Useful Resources
- Teradata - Discussion
Teradata - Quick Guide
Teradata - Introduction
What is Teradata?
Teradata is one of the popular Relational Database Management System. It is mainly suitable for building large scale data warehousing applications. Teradata achieves this by the concept of parallelism. It is developed by the company called Teradata.
History of Teradata
Following is a quick summary of the history of Teradata, listing major milestones.
1979 − Teradata was incorporated.
1984 − Release of first database computer DBC/1012.
1986 − Fortune magazine names Teradata as Product of the Year.
1999 − Largest database in the world using Teradata with 130 Terabytes.
2002 − Teradata V2R5 released with Partition Primary Index and compression.
2006 − Launch of Teradata Master Data Management solution.
2008 − Teradata 13.0 released with Active Data Warehousing.
2011 − Acquires Teradata Aster and enters into Advanced Analytics Space.
2012 − Teradata 14.0 introduced.
2014 − Teradata 15.0 introduced.
Features of Teradata
Following are some of the features of Teradata −
Unlimited Parallelism − Teradata database system is based on Massively Parallel Processing (MPP) Architecture. MPP architecture divides the workload evenly across the entire system. Teradata system splits the task among its processes and runs them in parallel to ensure that the task is completed quickly.
Shared Nothing Architecture − Teradatas architecture is called as Shared Nothing Architecture. Teradata Nodes, its Access Module Processors (AMPs) and the disks associated with AMPs work independently. They are not shared with others.
Linear Scalability − Teradata systems are highly scalable. They can scale up to 2048 Nodes. For example, you can double the capacity of the system by doubling the number of AMPs.
Connectivity − Teradata can connect to Channel-attached systems such as Mainframe or Network-attached systems.
Mature Optimizer − Teradata optimizer is one of the matured optimizer in the market. It has been designed to be parallel since its beginning. It has been refined for each release.
SQL − Teradata supports industry standard SQL to interact with the data stored in tables. In addition to this, it provides its own extension.
Robust Utilities − Teradata provides robust utilities to import/export data from/to Teradata system such as FastLoad, MultiLoad, FastExport and TPT.
Automatic Distribution − Teradata automatically distributes the data evenly to the disks without any manual intervention.
Teradata - Installation
Teradata provides Teradata express for VMWARE which is a fully operational Teradata virtual machine. It provides up to 1 terabyte of storage. Teradata provides both 40GB and 1TB version of VMware.
Prerequisites
Since the VM is 64 bit, your CPU must support 64-bit.
Installation Steps for Windows
Step 1 − Download the required VM version from the link, https://downloads.teradata.com/download/database/teradata-express/vmware
Step 2 − Extract the file and specify the target folder.
Step 3 − Download the VMWare Workstation player from the link, https://www.vmware.com/products/desktop-hypervisor/workstation-and-fusion. It is available for both Windows and Linux. Download the VMWARE workstation player for Windows.
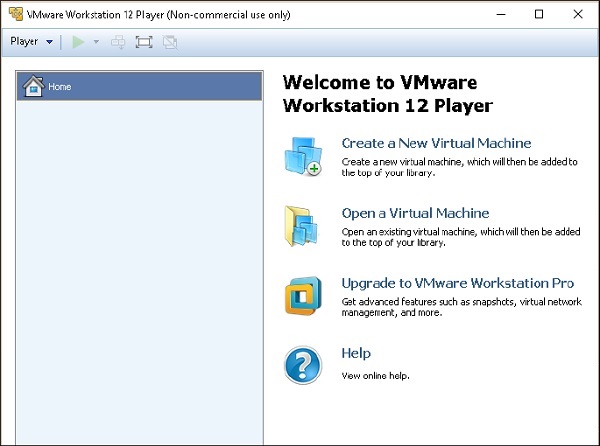
Step 4 − Once the download is complete, install the software.
Step 5 − After the installation is complete, run the VMWARE client.
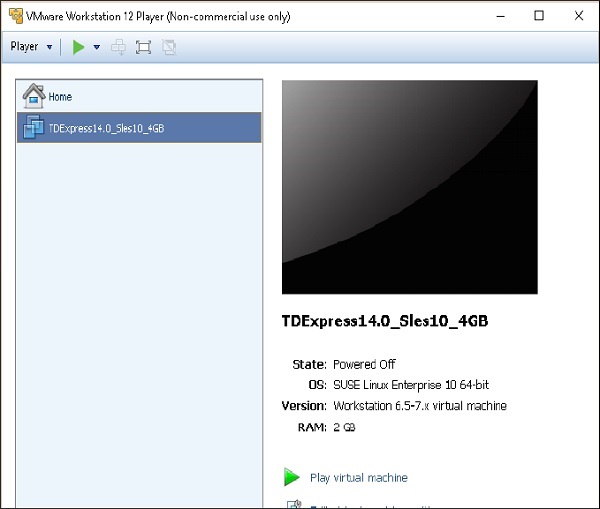
Step 6 − Select 'Open a Virtual Machine'. Navigate through the extracted Teradata VMWare folder and select the file with extension .vmdk.
Step 7 − Teradata VMWare is added to the VMWare client. Select the added Teradata VMware and click Play Virtual Machine.
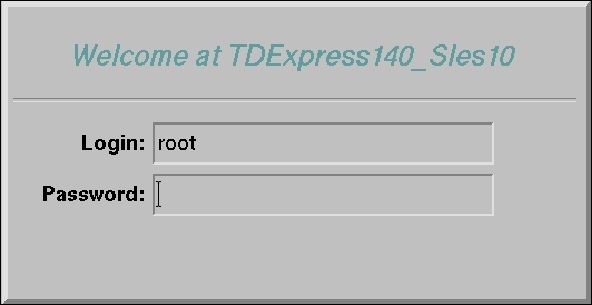
Step 8 − If you get a popup on software updates, you can select Remind Me Later.
Step 9 − Enter the user name as root, press tab and enter password as root and again press Enter.
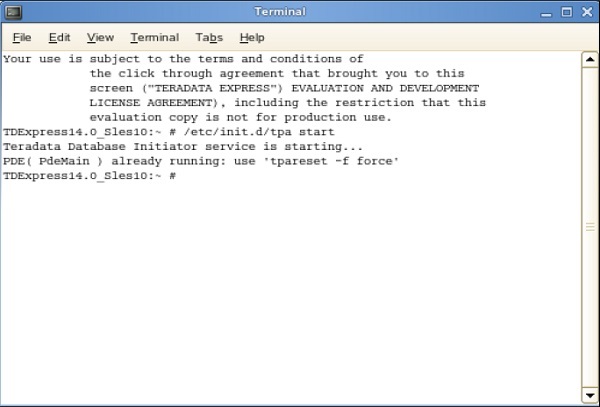
Step 10 − Once the following screen appears on the desktop, double-click on roots home. Then double-click on Genomes Terminal. This will open the Shell.

Step 11 − From the following shell, enter the command /etc/init.d/tpa start. This will start the Teradata server.
Starting BTEQ
BTEQ utility is used to submit SQL queries interactively. Following are the steps to start BTEQ utility.
Step 1 − Enter the command /sbin/ifconfig and note down the IP address of the VMWare.
Step 2 − Run the command bteq. At the logon prompt, enter the command.
Logon <ipaddress>/dbc,dbc; and enter At the password prompt, enter password as dbc;
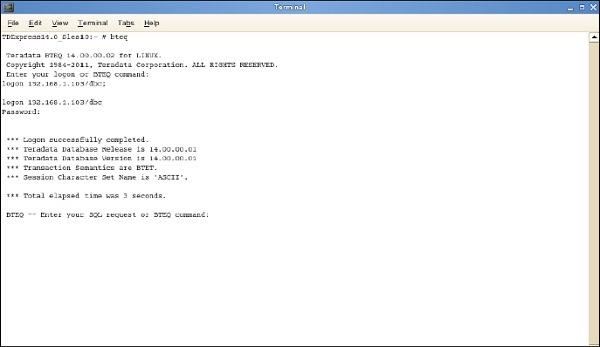
You can log into Teradata system using BTEQ and run any SQL queries.
Teradata - Architecture
Teradata architecture is based on Massively Parallel Processing (MPP) architecture. The major components of Teradata are Parsing Engine, BYNET and Access Module Processors (AMPs). The following diagram shows the high level architecture of a Teradata Node.
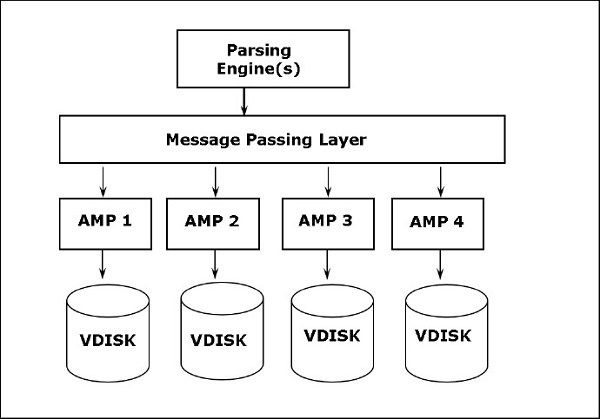
Components of Teradata
The key components of Teradata are as follows −
Node − It is the basic unit in Teradata System. Each individual server in a Teradata system is referred as a Node. A node consists of its own operating system, CPU, memory, own copy of Teradata RDBMS software and disk space. A cabinet consists of one or more Nodes.
Parsing Engine − Parsing Engine is responsible for receiving queries from the client and preparing an efficient execution plan. The responsibilities of parsing engine are −
Receive the SQL query from the client
Parse the SQL query check for syntax errors
Check if the user has required privilege against the objects used in the SQL query
Check if the objects used in the SQL actually exists
Prepare the execution plan to execute the SQL query and pass it to BYNET
Receives the results from the AMPs and send to the client
Message Passing Layer − Message Passing Layer called as BYNET, is the networking layer in Teradata system. It allows the communication between PE and AMP and also between the nodes. It receives the execution plan from Parsing Engine and sends to AMP. Similarly, it receives the results from the AMPs and sends to Parsing Engine.
Access Module Processor (AMP) − AMPs, called as Virtual Processors (vprocs) are the one that actually stores and retrieves the data. AMPs receive the data and execution plan from Parsing Engine, performs any data type conversion, aggregation, filter, sorting and stores the data in the disks associated with them. Records from the tables are evenly distributed among the AMPs in the system. Each AMP is associated with a set of disks on which data is stored. Only that AMP can read/write data from the disks.
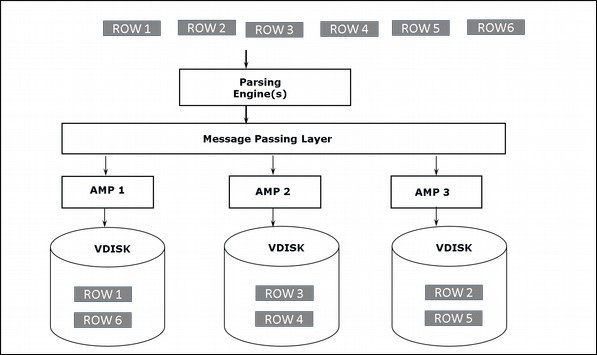
Storage Architecture
When the client runs queries to insert records, Parsing engine sends the records to BYNET. BYNET retrieves the records and sends the row to the target AMP. AMP stores these records on its disks. Following diagram shows the storage architecture of Teradata.
Retrieval Architecture
When the client runs queries to retrieve records, the Parsing engine sends a request to BYNET. BYNET sends the retrieval request to appropriate AMPs. Then AMPs search their disks in parallel and identify the required records and sends to BYNET. BYNET then sends the records to Parsing Engine which in turn will send to the client. Following is the retrieval architecture of Teradata.

Teradata - Relational Concepts
Relational Database Management System (RDBMS) is a DBMS software that helps to interact with databases. They use Structured Query Language (SQL) to interact with the data stored in tables.
Database
Database is a collection of logically related data. They are accessed by many users for different purposes. For example, a sales database contains entire information about sales which is stored in many tables.
Tables
Tables is the basic unit in RDBMS where the data is stored. A table is a collection of rows and columns. Following is an example of employee table.
| EmployeeNo | FirstName | LastName | BirthDate |
|---|---|---|---|
| 101 | Mike | James | 1/5/1980 |
| 104 | Alex | Stuart | 11/6/1984 |
| 102 | Robert | Williams | 3/5/1983 |
| 105 | Robert | James | 12/1/1984 |
| 103 | Peter | Paul | 4/1/1983 |
Columns
A column contains similar data. For example, the column BirthDate in Employee table contains birth_date information for all employees.
| BirthDate |
|---|
| 1/5/1980 |
| 11/6/1984 |
| 3/5/1983 |
| 12/1/1984 |
| 4/1/1983 |
Row
Row is one instance of all the columns. For example, in employee table one row contains information about single employee.
| EmployeeNo | FirstName | LastName | BirthDate |
|---|---|---|---|
| 101 | Mike | James | 1/5/1980 |
Primary Key
Primary key is used to uniquely identify a row in a table. No duplicate values are allowed in a primary key column and they cannot accept NULL values. It is a mandatory field in a table.
Foreign Key
Foreign keys are used to build a relationship between the tables. A foreign key in a child table is defined as the primary key in the parent table. A table can have more than one foreign key. It can accept duplicate values and also null values. Foreign keys are optional in a table.
Teradata - Data Types
Each column in a table is associated with a data type. Data types specify what kind of values will be stored in the column. Teradata supports several data types. Following are some of the frequently used data types.
| Data Types | Length (Bytes) | Range of values |
|---|---|---|
| BYTEINT | 1 | -128 to +127 |
| SMALLINT | 2 | -32768 to +32767 |
| INTEGER | 4 | -2,147,483,648 to +2147,483,647 |
| BIGINT | 8 | -9,233,372,036,854,775,80 8 to +9,233,372,036,854,775,8 07 |
| DECIMAL | 1-16 | |
| NUMERIC | 1-16 | |
| FLOAT | 8 | IEEE format |
| CHAR | Fixed Format | 1-64,000 |
| VARCHAR | Variable | 1-64,000 |
| DATE | 4 | YYYYYMMDD |
| TIME | 6 or 8 | HHMMSS.nnnnnn or HHMMSS.nnnnnn+HHMM |
| TIMESTAMP | 10 or 12 | YYMMDDHHMMSS.nnnnnn or YYMMDDHHMMSS.nnnnnn +HHMM |
Teradata - Tables
Tables in Relational model are defined as collection of data. They are represented as rows and columns.
Table Types
Types Teradata supports different types of tables.
Permanent Table − This is the default table and it contains data inserted by the user and stores the data permanently.
Volatile Table − The data inserted into a volatile table is retained only during the user session. The table and data is dropped at the end of the session. These tables are mainly used to hold the intermediate data during data transformation.
Global Temporary Table − The definition of Global Temporary table are persistent but the data in the table is deleted at the end of user session.
Derived Table − Derived table holds the intermediate results in a query. Their lifetime is within the query in which they are created, used and dropped.
Set Versus Multiset
Teradata classifies the tables as SET or MULTISET tables based on how the duplicate records are handled. A table defined as SET table doesnt store the duplicate records, whereas the MULTISET table can store duplicate records.
| Sr.No | Table Commands & Description |
|---|---|
| 1 | Create Table
CREATE TABLE command is used to create tables in Teradata. |
| 2 | Alter Table
ALTER TABLE command is used to add or drop columns from an existing table. |
| 3 | Drop Table
DROP TABLE command is used to drop a table. |
Teradata - Data Manipulation
This chapter introduces the SQL commands used to manipulate the data stored in Teradata tables.
Insert Records
INSERT INTO statement is used to insert records into the table.
Syntax
Following is the generic syntax for INSERT INTO.
INSERT INTO <tablename>
(column1, column2, column3,)
VALUES
(value1, value2, value3 );
Example
The following example inserts records into the employee table.
INSERT INTO Employee (
   EmployeeNo,
   FirstName,
   LastName,
   BirthDate,
   JoinedDate,
   DepartmentNo
)
VALUES (
   101,
   'Mike',
   'James',
   '1980-01-05',
   '2005-03-27',
   01
);
Once the above query is inserted, you can use the SELECT statement to view the records from the table.
| EmployeeNo | FirstName | LastName | JoinedDate | DepartmentNo | BirthDate |
|---|---|---|---|---|---|
| 101 | Mike | James | 3/27/2005 | 1 | 1/5/1980 |
Insert from Another Table
INSERT SELECT statement is used to insert records from another table.
Syntax
Following is the generic syntax for INSERT INTO.
INSERT INTO <tablename>
(column1, column2, column3,)
SELECT
column1, column2, column3
FROM
<source table>;
Example
The following example inserts records into the employee table. Create a table called Employee_Bkup with the same column definition as employee table before running the following insert query.
INSERT INTO Employee_Bkup (
   EmployeeNo,
   FirstName,
   LastName,
   BirthDate,
   JoinedDate,
   DepartmentNo
)
SELECT
   EmployeeNo,
   FirstName,
   LastName,
   BirthDate,
   JoinedDate,
   DepartmentNo
FROM
   Employee;
When the above query is executed, it will insert all records from the employee table into employee_bkup table.
Rules
The number of columns specified in the VALUES list should match with the columns specified in the INSERT INTO clause.
Values are mandatory for NOT NULL columns.
If no values are specified, then NULL is inserted for nullable fields.
The data types of columns specified in the VALUES clause should be compatible with the data types of columns in the INSERT clause.
Update Records
UPDATE statement is used to update records from the table.
Syntax
Following is the generic syntax for UPDATE.
UPDATE <tablename>
SET <columnnamme> = <new value>
[WHERE condition];
Example
The following example updates the employee dept to 03 for employee 101.
UPDATE Employee
SET DepartmentNo = 03
WHERE EmployeeNo = 101;
In the following output, you can see that the DepartmentNo is updated from 1 to 3 for EmployeeNo 101.
SELECT Employeeno, DepartmentNo FROM Employee;
*** Query completed. One row found. 2 columns returned.
*** Total elapsed time was 1 second.
EmployeeNo    DepartmentNo
-----------  -------------
   101             3
Rules
You can update one or more values of the table.
If WHERE condition is not specified then all rows of the table are impacted.
You can update a table with the values from another table.
Delete Records
DELETE FROM statement is used to update records from the table.
Syntax
Following is the generic syntax for DELETE FROM.
DELETE FROM  <tablename>
[WHERE condition];
Example
The following example deletes the employee 101 from the table employee.
DELETE FROM Employee
WHERE EmployeeNo = 101;
In the following output, you can see that employee 101 is deleted from the table.
SELECT EmployeeNo FROM Employee;
*** Query completed. No rows found.
*** Total elapsed time was 1 second.
Rules
You can update one or more records of the table.
If WHERE condition is not specified then all rows of the table are deleted.
You can update a table with the values from another table.
Teradata - SELECT Statement
SELECT statement is used to retrieve records from a table.
Syntax
Following is the basic syntax of SELECT statement.
SELECT
column 1, column 2, .....
FROM
tablename;
Example
Consider the following employee table.
| EmployeeNo | FirstName | LastName | JoinedDate | DepartmentNo | BirthDate |
|---|---|---|---|---|---|
| 101 | Mike | James | 3/27/2005 | 1 | 1/5/1980 |
| 102 | Robert | Williams | 4/25/2007 | 2 | 3/5/1983 |
| 103 | Peter | Paul | 3/21/2007 | 2 | 4/1/1983 |
| 104 | Alex | Stuart | 2/1/2008 | 2 | 11/6/1984 |
| 105 | Robert | James | 1/4/2008 | 3 | 12/1/1984 |
Following is an example of SELECT statement.
SELECT EmployeeNo,FirstName,LastName
FROM Employee;
When this query is executed, it fetches EmployeeNo, FirstName and LastName columns from the employee table.
 EmployeeNo            FirstName                       LastName
-----------  ------------------------------  ---------------------------
   101                   Mike                            James
   104                   Alex                            Stuart
   102                   Robert                          Williams
   105                   Robert                          James
   103                   Peter                           Paul
If you want to fetch all the columns from a table, you can use the following command instead of listing down all columns.
SELECT * FROM Employee;
The above query will fetch all records from the employee table.
WHERE Clause
WHERE clause is used to filter the records returned by the SELECT statement. A condition is associated with WHERE clause. Only, the records that satisfy the condition in the WHERE clause are returned.
Syntax
Following is the syntax of the SELECT statement with WHERE clause.
SELECT * FROM tablename
WHERE[condition];
Example
The following query fetches records where EmployeeNo is 101.
SELECT * FROM Employee
WHERE EmployeeNo = 101;
When this query is executed, it returns the following records.
 EmployeeNo          FirstName                      LastName
----------- ------------------------------ -----------------------------
   101                 Mike                           James
ORDER BY
When the SELECT statement is executed, the returned rows are not in any specific order. ORDER BY clause is used to arrange the records in ascending/descending order on any columns.
Syntax
Following is the syntax of the SELECT statement with ORDER BY clause.
SELECT * FROM tablename
ORDER BY column 1, column 2..;
Example
The following query fetches records from the employee table and orders the results by FirstName.
SELECT * FROM Employee
ORDER BY FirstName;
When the above query is executed, it produces the following output.
 EmployeeNo         FirstName                      LastName
----------- ------------------------------ -----------------------------
    104               Alex                           Stuart
    101               Mike                           James
    103               Peter                          Paul
    102               Robert                         Williams
    105               Robert                         James
GROUP BY
GROUP BY clause is used with SELECT statement and arranges similar records into groups.
Syntax
Following is the syntax of the SELECT statement with GROUP BY clause.
SELECT column 1, column2 . FROM tablename
GROUP BY column 1, column 2..;
Example
The following example groups the records by DepartmentNo column and identifies the total count from each department.
SELECT DepartmentNo,Count(*) FROM
Employee
GROUP BY DepartmentNo;
When the above query is executed, it produces the following output.
 DepartmentNo    Count(*)
------------  -----------
     3             1
     1             1
     2             3
Teradata - Logical and Conditional Operators
Teradata supports the following logical and conditional operators. These operators are used to perform comparison and combine multiple conditions.
| Syntax | Meaning |
|---|---|
| > | Greater than |
| < | Less than |
| >= | Greater than or equal to |
| <= | Less than or equal to |
| = | Equal to |
| BETWEEN | If values within range |
| IN | If values in <expression> |
| NOT IN | If values not in <expression> |
| IS NULL | If value is NULL |
| IS NOT NULL | If value is NOT NULL |
| AND | Combine multiple conditions. Evaluates to true only if all conditions are met |
| OR | Combine multiple conditions. Evaluates to true only if either of the conditions is met. |
| NOT | Reverses the meaning of the condition |
BETWEEN
BETWEEN command is used to check if a value is within a range of values.
Example
Consider the following employee table.
| EmployeeNo | FirstName | LastName | JoinedDate | DepartmentNo | BirthDate |
|---|---|---|---|---|---|
| 101 | Mike | James | 3/27/2005 | 1 | 1/5/1980 |
| 102 | Robert | Williams | 4/25/2007 | 2 | 3/5/1983 |
| 103 | Peter | Paul | 3/21/2007 | 2 | 4/1/1983 |
| 104 | Alex | Stuart | 2/1/2008 | 2 | 11/6/1984 |
| 105 | Robert | James | 1/4/2008 | 3 | 12/1/1984 |
The following example fetches records with employee numbers in the range between 101,102 and 103.
SELECT EmployeeNo, FirstName FROM
Employee
WHERE EmployeeNo BETWEEN 101 AND 103;
When the above query is executed, it returns the employee records with employee no between 101 and 103.
*** Query completed. 3 rows found. 2 columns returned.
*** Total elapsed time was 1 second.
 EmployeeNo            FirstName
-----------  ------------------------------
   101                   Mike
   102                   Robert
   103                   Peter
IN
IN command is used to check the value against a given list of values.
Example
The following example fetches records with employee numbers in 101, 102 and 103.
SELECT EmployeeNo, FirstName FROM
Employee
WHERE EmployeeNo in (101,102,103);
The above query returns the following records.
*** Query completed. 3 rows found. 2 columns returned.
*** Total elapsed time was 1 second.
 EmployeeNo            FirstName
-----------  ------------------------------
   101                   Mike
   102                   Robert
   103                   Peter
NOT IN
NOT IN command reverses the result of IN command. It fetches records with values that dont match with the given list.
Example
The following example fetches records with employee numbers not in 101, 102 and 103.
SELECT * FROM
Employee
WHERE EmployeeNo not in (101,102,103);
The above query returns the following records.
*** Query completed. 2 rows found. 6 columns returned.
*** Total elapsed time was 1 second.
 EmployeeNo          FirstName                      LastName
----------- ------------------------------ -----------------------------
    104                Alex                          Stuart
    105                Robert                        James
Teradata - SET Operators
SET operators combine results from multiple SELECT statement. This may look similar to Joins, but joins combines columns from multiple tables whereas SET operators combines rows from multiple rows.
Rules
The number of columns from each SELECT statement should be same.
The data types from each SELECT must be compatible.
ORDER BY should be included only in the final SELECT statement.
UNION
UNION statement is used to combine results from multiple SELECT statements. It ignores duplicates.
Syntax
Following is the basic syntax of the UNION statement.
SELECT col1, col2, col3
FROM
<table 1>
[WHERE condition]
UNION

SELECT col1, col2, col3
FROM
<table 2>
[WHERE condition];
Example
Consider the following employee table and salary table.
| EmployeeNo | FirstName | LastName | JoinedDate | DepartmentNo | BirthDate |
|---|---|---|---|---|---|
| 101 | Mike | James | 3/27/2005 | 1 | 1/5/1980 |
| 102 | Robert | Williams | 4/25/2007 | 2 | 3/5/1983 |
| 103 | Peter | Paul | 3/21/2007 | 2 | 4/1/1983 |
| 104 | Alex | Stuart | 2/1/2008 | 2 | 11/6/1984 |
| 105 | Robert | James | 1/4/2008 | 3 | 12/1/1984 |
| EmployeeNo | Gross | Deduction | NetPay |
|---|---|---|---|
| 101 | 40,000 | 4,000 | 36,000 |
| 102 | 80,000 | 6,000 | 74,000 |
| 103 | 90,000 | 7,000 | 83,000 |
| 104 | 75,000 | 5,000 | 70,000 |
The following UNION query combines the EmployeeNo value from both Employee and Salary table.
SELECT EmployeeNo
FROM
Employee
UNION

SELECT EmployeeNo
FROM
Salary;
When the query is executed, it produces the following output.
EmployeeNo
-----------
   101
   102
   103
   104
   105
UNION ALL
UNION ALL statement is similar to UNION, it combines results from multiple tables including duplicate rows.
Syntax
Following is the basic syntax of the UNION ALL statement.
SELECT col1, col2, col3
FROM
<table 1>
[WHERE condition]
UNION ALL

SELECT col1, col2, col3
FROM
<table 2>
[WHERE condition];
Example
Following is an example for UNION ALL statement.
SELECT EmployeeNo
FROM
Employee
UNION ALL

SELECT EmployeeNo
FROM
Salary;
When the above query is executed, it produces the following output. You can see that it returns the duplicates also.
 EmployeeNo
-----------
    101
    104
    102
    105
    103
    101
    104
    102
    103
INTERSECT
INTERSECT command is also used to combine results from multiple SELECT statements. It returns the rows from the first SELECT statement that has corresponding match in the second SELECT statements. In other words, it returns the rows that exist in both SELECT statements.
Syntax
Following is the basic syntax of the INTERSECT statement.
SELECT col1, col2, col3
FROM
<table 1>
[WHERE condition]
INTERSECT

SELECT col1, col2, col3
FROM
<table 2>
[WHERE condition];
Example
Following is an example of INTERSECT statement. It returns the EmployeeNo values that exist in both tables.
SELECT EmployeeNo
FROM
Employee
INTERSECT

SELECT EmployeeNo
FROM
Salary;
When the above query is executed, it returns the following records. EmployeeNo 105 is excluded since it doesnt exist in SALARY table.
EmployeeNo
-----------
   101
   104
   102
   103
MINUS/EXCEPT
MINUS/EXCEPT commands combine rows from multiple tables and returns the rows which are in first SELECT but not in second SELECT. They both return the same results.
Syntax
Following is the basic syntax of the MINUS statement.
SELECT col1, col2, col3
FROM
<table 1>
[WHERE condition]
MINUS

SELECT col1, col2, col3
FROM
<table 2>
[WHERE condition];
Example
Following is an example of MINUS statement.
SELECT EmployeeNo
FROM
Employee
MINUS

SELECT EmployeeNo
FROM
Salary;
When this query is executed, it returns the following record.
EmployeeNo
-----------
   105
Teradata - String Manipulation
Teradata provides several functions to manipulate the strings. These functions are compatible with ANSI standard.
| Sr.No | String Function & Description |
|---|---|
| 1 | ||
Concatenates strings together |
| 2 | SUBSTR
Extracts a portion of a string (Teradata extension) |
| 3 | SUBSTRING
Extracts a portion of a string (ANSI standard) |
| 4 | INDEX
Locates the position of a character in a string (Teradata extension) |
| 5 | POSITION
Locates the position of a character in a string (ANSI standard) |
| 6 | TRIM
Trims blanks from a string |
| 7 | UPPER
Converts a string to uppercase |
| 8 | LOWER
Converts a string to lowercase |
Example
Following table lists some of the string functions with the results.
| String Function | Result |
|---|---|
| SELECT SUBSTRING(warehouse FROM 1 FOR 4) | ware |
| SELECT SUBSTR(warehouse,1,4) | ware |
| SELECT data || || warehouse | data warehouse |
| SELECT UPPER(data) | DATA |
| SELECT LOWER(DATA) | data |
Teradata - Date/Time Functions
This chapter discusses the date/time functions available in Teradata.
Date Storage
Dates are stored as integer internally using the following formula.
((YEAR - 1900) * 10000) + (MONTH * 100) + DAY
You can use the following query to check how the dates are stored.
SELECT CAST(CURRENT_DATE AS INTEGER);
Since the dates are stored as integer, you can perform some arithmetic operations on them. Teradata provides functions to perform these operations.
EXTRACT
EXTRACT function extracts portions of day, month and year from a DATE value. This function is also used to extract hour, minute and second from TIME/TIMESTAMP value.
Example
Following examples show how to extract Year, Month, Date, Hour, Minute and second values from Date and Timestamp values.
SELECT EXTRACT(YEAR FROM CURRENT_DATE);
EXTRACT(YEAR FROM Date)
-----------------------
        2016
SELECT EXTRACT(MONTH FROM CURRENT_DATE);
EXTRACT(MONTH FROM Date)
------------------------
          1
SELECT EXTRACT(DAY FROM CURRENT_DATE);
EXTRACT(DAY FROM Date)
------------------------
          1

SELECT EXTRACT(HOUR FROM CURRENT_TIMESTAMP);
EXTRACT(HOUR FROM Current TimeStamp(6))
---------------------------------------
                 4
SELECT EXTRACT(MINUTE FROM CURRENT_TIMESTAMP);
EXTRACT(MINUTE FROM Current TimeStamp(6))
-----------------------------------------
                 54
SELECT EXTRACT(SECOND FROM CURRENT_TIMESTAMP);
EXTRACT(SECOND FROM Current TimeStamp(6))
-----------------------------------------
              27.140000
INTERVAL
Teradata provides INTERVAL function to perform arithmetic operations on DATE and TIME values. There are two types of INTERVAL functions.
Year-Month Interval
- YEAR
- YEAR TO MONTH
- MONTH
Day-Time Interval
- DAY
- DAY TO HOUR
- DAY TO MINUTE
- DAY TO SECOND
- HOUR
- HOUR TO MINUTE
- HOUR TO SECOND
- MINUTE
- MINUTE TO SECOND
- SECOND
Example
The following example adds 3 years to current date.
SELECT CURRENT_DATE, CURRENT_DATE + INTERVAL '03' YEAR;
  Date    (Date+ 3)
--------  ---------
16/01/01   19/01/01
The following example adds 3 years and 01 month to current date.
SELECT CURRENT_DATE, CURRENT_DATE + INTERVAL '03-01' YEAR TO MONTH;
 Date     (Date+ 3-01)
--------  ------------
16/01/01    19/02/01
The following example adds 01 day, 05 hours and 10 minutes to current timestamp.
SELECT CURRENT_TIMESTAMP,CURRENT_TIMESTAMP + INTERVAL '01 05:10' DAY TO MINUTE;
     Current TimeStamp(6)         (Current TimeStamp(6)+ 1 05:10)
--------------------------------  --------------------------------
2016-01-01 04:57:26.360000+00:00  2016-01-02 10:07:26.360000+00:00
Teradata - Built-in Functions
Teradata provides built-in functions which are extensions to SQL. Following are the common built-in functions.
| Function | Result |
|---|---|
| SELECT DATE; | Date -------- 16/01/01 |
| SELECT CURRENT_DATE; | Date -------- 16/01/01 |
| SELECT TIME; | Time -------- 04:50:29 |
| SELECT CURRENT_TIME; | Time -------- 04:50:29 |
| SELECT CURRENT_TIMESTAMP; | Current TimeStamp(6) -------------------------------- 2016-01-01 04:51:06.990000+00:00 |
| SELECT DATABASE; | Database ------------------------------ TDUSER |
Teradata - Aggregate Functions
Teradata supports common aggregate functions. They can be used with the SELECT statement.
COUNT − Counts the rows
SUM − Sums up the values of the specified column(s)
MAX − Returns the large value of the specified column
MIN − Returns the minimum value of the specified column
AVG − Returns the average value of the specified column
Example
Consider the following Salary Table.
| EmployeeNo | Gross | Deduction | NetPay |
|---|---|---|---|
| 101 | 40,000 | 4,000 | 36,000 |
| 104 | 75,000 | 5,000 | 70,000 |
| 102 | 80,000 | 6,000 | 74,000 |
| 105 | 70,000 | 4,000 | 66,000 |
| 103 | 90,000 | 7,000 | 83,000 |
COUNT
The following example counts the number of records in the Salary table.
SELECT count(*) from Salary;

  Count(*)
-----------
    5
MAX
The following example returns maximum employee net salary value.
SELECT max(NetPay) from Salary;
   Maximum(NetPay)
---------------------
       83000
MIN
The following example returns minimum employee net salary value from the Salary table.
SELECT min(NetPay) from Salary;

   Minimum(NetPay)
---------------------
        36000
AVG
The following example returns the average of employees net salary value from the table.
SELECT avg(NetPay) from Salary;

   Average(NetPay)
---------------------
       65800
SUM
The following example calculates the sum of employees net salary from all records of the Salary table.
SELECT sum(NetPay) from Salary;

   Sum(NetPay)
-----------------
     329000
Teradata - CASE and COALESCE
This chapter explains the CASE and COALESCE functions of Teradata.
CASE Expression
CASE expression evaluates each row against a condition or WHEN clause and returns the result of the first match. If there are no matches then the result from ELSE part of returned.
Syntax
Following is the syntax of the CASE expression.
CASE <expression>
WHEN <expression> THEN result-1
WHEN <expression> THEN result-2

ELSE
   Result-n
END
Example
Consider the following Employee table.
| EmployeeNo | FirstName | LastName | JoinedDate | DepartmentNo | BirthDate |
|---|---|---|---|---|---|
| 101 | Mike | James | 3/27/2005 | 1 | 1/5/1980 |
| 102 | Robert | Williams | 4/25/2007 | 2 | 3/5/1983 |
| 103 | Peter | Paul | 3/21/2007 | 2 | 4/1/1983 |
| 104 | Alex | Stuart | 2/1/2008 | 2 | 11/6/1984 |
| 105 | Robert | James | 1/4/2008 | 3 | 12/1/1984 |
The following example evaluates the DepartmentNo column and returns value of 1 if the department number is 1; returns 2 if the department number is 3; otherwise it returns value as invalid department.
SELECT
   EmployeeNo,
CASE DepartmentNo
   WHEN 1 THEN 'Admin'
   WHEN 2 THEN 'IT'
ELSE 'Invalid Dept'
   END AS Department
FROM Employee;
When the above query is executed, it produces the following output.
*** Query completed. 5 rows found. 2 columns returned.
*** Total elapsed time was 1 second.
 EmployeeNo    Department
-----------   ------------
   101         Admin
   104         IT
   102         IT
   105         Invalid Dept
   103         IT
The above CASE expression can also be written in the following form which will produce the same result as above.
SELECT
   EmployeeNo,
CASE
   WHEN DepartmentNo = 1 THEN 'Admin'
   WHEN  DepartmentNo = 2 THEN 'IT'
ELSE 'Invalid Dept'
   END AS Department
FROM Employee;
COALESCE
COALESCE is a statement that returns the first non-null value of the expression. It returns NULL if all the arguments of the expression evaluates to NULL. Following is the syntax.
Syntax
COALESCE(expression 1, expression 2, ....)
Example
SELECT
   EmployeeNo,
   COALESCE(dept_no, 'Department not found')
FROM
   employee;
NULLIF
NULLIF statement returns NULL if the arguments are equal.
Syntax
Following is the syntax of the NULLIF statement.
NULLIF(expression 1, expression 2)
Example
The following example returns NULL if the DepartmentNo is equal to 3. Otherwise, it returns the DepartmentNo value.
SELECT
   EmployeeNo,
   NULLIF(DepartmentNo,3) AS department
FROM Employee;
The above query returns the following records. You can see that employee 105 has department no. as NULL.
*** Query completed. 5 rows found. 2 columns returned.
*** Total elapsed time was 1 second.
 EmployeeNo      department
-----------  ------------------
    101              1
    104              2
    102              2
    105              ?
    103              2
Teradata - Primary Index
Primary index is used to specify where the data resides in Teradata. It is used to specify which AMP gets the data row. Each table in Teradata is required to have a primary index defined. If the primary index is not defined, Teradata automatically assigns the primary index. Primary index provides the fastest way to access the data. A primary may have a maximum of 64 columns.
Primary index is defined while creating a table. There are 2 types of Primary Indexes.
- Unique Primary Index(UPI)
- Non Unique Primary Index(NUPI)
Unique Primary Index (UPI)
If the table is defined to be having UPI, then the column deemed as UPI should not have any duplicate values. If any duplicate values are inserted, they will be rejected.
Create Unique Primary Index
The following example creates the Salary table with column EmployeeNo as Unique Primary Index.
CREATE SET TABLE Salary (
   EmployeeNo INTEGER,
   Gross INTEGER,
   Deduction INTEGER,
   NetPay INTEGER
)
UNIQUE PRIMARY INDEX(EmployeeNo);
Non Unique Primary Index (NUPI)
If the table is defined to be having NUPI, then the column deemed as UPI can accept duplicate values.
Create Non Unique Primary Index
The following example creates the employee accounts table with column EmployeeNo as Non Unique Primary Index. EmployeeNo is defined as Non Unique Primary Index since an employee can have multiple accounts in the table; one for salary account and another one for reimbursement account.
CREATE SET TABLE Employee _Accounts (
   EmployeeNo INTEGER,
   employee_bank_account_type BYTEINT.
   employee_bank_account_number INTEGER,
   employee_bank_name VARCHAR(30),
   employee_bank_city VARCHAR(30)
)
PRIMARY INDEX(EmployeeNo);
Teradata - Joins
Join is used to combine records from more than one table. Tables are joined based on the common columns/values from these tables.
There are different types of Joins available.
- Inner Join
- Left Outer Join
- Right Outer Join
- Full Outer Join
- Self Join
- Cross Join
- Cartesian Production Join
INNER JOIN
Inner Join combines records from multiple tables and returns the values that exist in both the tables.
Syntax
Following is the syntax of the INNER JOIN statement.
SELECT col1, col2, col3.
FROM
Table-1
INNER JOIN
Table-2
ON (col1 = col2)
<WHERE condition>;
Example
Consider the following employee table and salary table.
| EmployeeNo | FirstName | LastName | JoinedDate | DepartmentNo | BirthDate |
|---|---|---|---|---|---|
| 101 | Mike | James | 3/27/2005 | 1 | 1/5/1980 |
| 102 | Robert | Williams | 4/25/2007 | 2 | 3/5/1983 |
| 103 | Peter | Paul | 3/21/2007 | 2 | 4/1/1983 |
| 104 | Alex | Stuart | 2/1/2008 | 2 | 11/6/1984 |
| 105 | Robert | James | 1/4/2008 | 3 | 12/1/1984 |
| EmployeeNo | Gross | Deduction | NetPay |
|---|---|---|---|
| 101 | 40,000 | 4,000 | 36,000 |
| 102 | 80,000 | 6,000 | 74,000 |
| 103 | 90,000 | 7,000 | 83,000 |
| 104 | 75,000 | 5,000 | 70,000 |
The following query joins the Employee table and Salary table on the common column EmployeeNo. Each table is assigned an alias A & B and the columns are referenced with the correct alias.
SELECT A.EmployeeNo, A.DepartmentNo, B.NetPay
FROM
Employee A
INNER JOIN
Salary B
ON (A.EmployeeNo = B. EmployeeNo);
When the above query is executed, it returns the following records. Employee 105 is not included in the result since it doesnt have matching records in the Salary table.
*** Query completed. 4 rows found. 3 columns returned.
*** Total elapsed time was 1 second.
 EmployeeNo   DepartmentNo     NetPay
-----------  ------------   -----------
    101           1            36000
    102           2            74000
    103           2            83000
    104           2            70000
OUTER JOIN
LEFT OUTER JOIN and RIGHT OUTER JOIN also combine the results from multiple table.
LEFT OUTER JOIN returns all the records from the left table and returns only the matching records from the right table.
RIGHT OUTER JOIN returns all the records from the right table and returns only matching rows from the left table.
FULL OUTER JOIN combines the results from both LEFT OUTER and RIGHT OUTER JOINS. It returns both matching and non-matching rows from the joined tables.
Syntax
Following is the syntax of the OUTER JOIN statement. You need to use one of the options from LEFT OUTER JOIN, RIGHT OUTER JOIN or FULL OUTER JOIN.
SELECT col1, col2, col3.
FROM
Table-1
LEFT OUTER JOIN/RIGHT OUTER JOIN/FULL OUTER JOIN
Table-2
ON (col1 = col2)
<WHERE condition>;
Example
Consider the following example of the LEFT OUTER JOIN query. It returns all the records from Employee table and matching records from Salary table.
SELECT A.EmployeeNo, A.DepartmentNo, B.NetPay
FROM
Employee A
LEFT OUTER JOIN
Salary B
ON (A.EmployeeNo = B. EmployeeNo)
ORDER BY A.EmployeeNo;
When the above query is executed, it produces the following output. For employee 105, NetPay value is NULL, since it doesnt have matching records in Salary table.
*** Query completed. 5 rows found. 3 columns returned.
*** Total elapsed time was 1 second.
 EmployeeNo  DepartmentNo     NetPay
-----------  ------------   -----------
    101           1           36000
    102           2           74000
    103           2           83000
    104           2           70000
    105           3             ?
CROSS JOIN
Cross Join joins every row from the left table to every row from the right table.
Syntax
Following is the syntax of the CROSS JOIN statement.
SELECT A.EmployeeNo, A.DepartmentNo, B.EmployeeNo,B.NetPay
FROM
Employee A
CROSS JOIN
Salary B
WHERE A.EmployeeNo = 101
ORDER BY B.EmployeeNo;
When the above query is executed, it produces the following output. Employee No 101 from Employee table is joined with each and every record from Salary Table.
*** Query completed. 4 rows found. 4 columns returned.
*** Total elapsed time was 1 second.
 EmployeeNo  DepartmentNo   EmployeeNo    NetPay
-----------  ------------  -----------  -----------
    101           1            101         36000
    101           1            104         70000
    101           1            102         74000
    101           1            103         83000
Teradata - SubQueries
A subquery returns records from one table based on the values from another table. It is a SELECT query within another query. The SELECT query called as inner query is executed first and the result is used by the outer query. Some of its salient features are −
A query can have multiple subqueries and subqueries may contain another subquery.
Subqueries doesn't return duplicate records.
If subquery returns only one value, you can use = operator to use it with the outer query. If it returns multiple values you can use IN or NOT IN.
Syntax
Following is the generic syntax of subqueries.
SELECT col1, col2, col3,
FROM
Outer Table
WHERE col1 OPERATOR ( Inner SELECT Query);
Example
Consider the following Salary table.
| EmployeeNo | Gross | Deduction | NetPay |
|---|---|---|---|
| 101 | 40,000 | 4,000 | 36,000 |
| 102 | 80,000 | 6,000 | 74,000 |
| 103 | 90,000 | 7,000 | 83,000 |
| 104 | 75,000 | 5,000 | 70,000 |
The following query identifies the employee number with highest salary. The inner SELECT performs the aggregation function to return the maximum NetPay value and the outer SELECT query uses this value to return the employee record with this value.
SELECT EmployeeNo, NetPay
FROM Salary
WHERE NetPay =
(SELECT MAX(NetPay)
FROM Salary);
When this query is executed, it produces the following output.
*** Query completed. One row found. 2 columns returned.
*** Total elapsed time was 1 second.
 EmployeeNo     NetPay
-----------  -----------
    103         83000
Teradata - Table Types
Teradata supports the following table types to hold temporary data.
- Derived Table
- Volatile Table
- Global Temporary Table
Derived Table
Derived tables are created, used and dropped within a query. These are used to store intermediate results within a query.
Example
The following example builds a derived table EmpSal with records of employees with salary greater than 75000.
SELECT
Emp.EmployeeNo,
Emp.FirstName,
Empsal.NetPay
FROM
Employee Emp,
(select EmployeeNo , NetPay
from Salary
where NetPay >= 75000) Empsal
where Emp.EmployeeNo = Empsal.EmployeeNo;
When the above query is executed, it returns the employees with salary greater than 75000.
*** Query completed. One row found. 3 columns returned.
*** Total elapsed time was 1 second.
 EmployeeNo            FirstName               NetPay
-----------  ------------------------------  -----------
    103                  Peter                 83000
Volatile Table
Volatile tables are created, used and dropped within a user session. Their definition is not stored in data dictionary. They hold intermediate data of the query which is frequently used. Following is the syntax.
Syntax
CREATE [SET|MULTISET] VOALTILE TABLE tablename
<table definitions>
<column definitions>
<index definitions>
ON COMMIT [DELETE|PRESERVE] ROWS
Example
CREATE VOLATILE TABLE dept_stat (
   dept_no INTEGER,
   avg_salary INTEGER,
   max_salary INTEGER,
   min_salary INTEGER
)
PRIMARY INDEX(dept_no)
ON COMMIT PRESERVE ROWS;
When the above query is executed, it produces the following output.
*** Table has been created.
*** Total elapsed time was 1 second.
Global Temporary Table
The definition of Global Temporary table is stored in data dictionary and they can be used by many users/sessions. But the data loaded into global temporary table is retained only during the session. You can materialize up to 2000 global temporary tables per session. Following is the syntax.
Syntax
CREATE [SET|MULTISET] GLOBAL TEMPORARY TABLE tablename
<table definitions>
<column definitions>
<index definitions>
Example
CREATE SET GLOBAL TEMPORARY TABLE dept_stat (
   dept_no INTEGER,
   avg_salary INTEGER,
   max_salary INTEGER,
   min_salary INTEGER
)
PRIMARY INDEX(dept_no);
When the above query is executed, it produces the following output.
*** Table has been created.
*** Total elapsed time was 1 second.
Teradata - Space Concepts
There are three types of spaces available in Teradata.
Permanent Space
Permanent space is the maximum amount of space available for the user/database to hold data rows. Permanent tables, journals, fallback tables and secondary index sub-tables use permanent space.
Permanent space is not pre-allocated for the database/user. They are just defined as the maximum amount of space the database/user can use. The amount of permanent space is divided by the number of AMPs. Whenever per AMP limit exceeds, an error message is generated.
Spool Space
Spool space is the unused permanent space which is used by the system to keep the intermediate results of the SQL query. Users without spool space cannot execute any query.
Similar to Permanent space, spool space defines the maximum amount of space the user can use. Spool space is divided by the number of AMPs. Whenever per AMP limit exceeds, the user will get a spool space error.
Temp Space
Temp space is the unused permanent space which is used by Global Temporary tables. Temp space is also divided by the number of AMPs.
Teradata - Secondary Index
A table can contain only one primary index. More often, you will come across scenarios where the table contains other columns, using which the data is frequently accessed. Teradata will perform full table scan for those queries. Secondary indexes resolve this issue.
Secondary indexes are an alternate path to access the data. There are some differences between the primary index and the secondary index.
Secondary index is not involved in data distribution.
Secondary index values are stored in sub tables. These tables are built in all AMPs.
Secondary indexes are optional.
They can be created during table creation or after a table is created.
They occupy additional space since they build sub-table and they also require maintenance since the sub-tables need to be updated for each new row.
There are two types of secondary indexes −
- Unique Secondary Index (USI)
- Non-Unique Secondary Index (NUSI)
Unique Secondary Index (USI)
A Unique Secondary Index allows only unique values for the columns defined as USI. Accessing the row by USI is a two amp operation.
Create Unique Secondary Index
The following example creates USI on EmployeeNo column of employee table.
CREATE UNIQUE INDEX(EmployeeNo) on employee;
Non Unique Secondary Index (NUSI)
A Non-Unique Secondary Index allows duplicate values for the columns defined as NUSI. Accessing the row by NUSI is all-amp operation.
Create Non Unique Secondary Index
The following example creates NUSI on FirstName column of employee table.
CREATE INDEX(FirstName) on Employee;
Teradata - Statistics
Teradata optimizer comes up with an execution strategy for every SQL query. This execution strategy is based on the statistics collected on the tables used within the SQL query. Statistics on the table is collected using COLLECT STATISTICS command. Optimizer requires environment information and data demographics to come up with optimal execution strategy.
Environment Information
- Number of Nodes, AMPs and CPUs
- Amount of memory
Data Demographics
- Number of rows
- Row size
- Range of values in the table
- Number of rows per value
- Number of Nulls
There are three approaches to collect statistics on the table.
- Random AMP Sampling
- Full statistics collection
- Using SAMPLE option
Collecting Statistics
COLLECT STATISTICS command is used to collect statistics on a table.
Syntax
Following is the basic syntax to collect statistics on a table.
COLLECT [SUMMARY] STATISTICS
INDEX (indexname) COLUMN (columnname)
ON <tablename>;
Example
The following example collects statistics on EmployeeNo column of Employee table.
COLLECT STATISTICS COLUMN(EmployeeNo) ON Employee;
When the above query is executed, it produces the following output.
*** Update completed. 2 rows changed.
*** Total elapsed time was 1 second.
Viewing Statistics
You can view the collected statistics using HELP STATISTICS command.
Syntax
Following is the syntax to view the statistics collected.
HELP STATISTICS <tablename>;
Example
Following is an example to view the statistics collected on Employee table.
HELP STATISTICS employee;
When the above query is executed, it produces the following result.
  Date       Time      Unique Values           Column Names
--------   -------- -------------------- -----------------------
16/01/01   08:07:04         5                       *
16/01/01   07:24:16         3                   DepartmentNo
16/01/01   08:07:04         5                   EmployeeNo
Teradata - Compression
Compression is used to reduce the storage used by the tables. In Teradata, compression can compress up to 255 distinct values including NULL. Since the storage is reduced, Teradata can store more records in a block. This results in improved query response time since any I/O operation can process more rows per block. Compression can be added at table creation using CREATE TABLE or after table creation using ALTER TABLE command.
Limitations
- Only 255 values can be compressed per column.
- Primary Index column cannot be compressed.
- Volatile tables cannot be compressed.
Multi-Value Compression (MVC)
The following table compresses the field DepatmentNo for values 1, 2 and 3. When compression is applied on a column, the values for this column is not stored with the row. Instead the values are stored in the Table header in each AMP and only presence bits are added to the row to indicate the value.
CREATE SET TABLE employee (
   EmployeeNo integer,
   FirstName CHAR(30),
   LastName CHAR(30),
   BirthDate DATE FORMAT 'YYYY-MM-DD-',
   JoinedDate DATE FORMAT 'YYYY-MM-DD-',
   employee_gender CHAR(1),
   DepartmentNo CHAR(02) COMPRESS(1,2,3)
)
UNIQUE PRIMARY INDEX(EmployeeNo);
Multi-Value compression can be used when you have a column in a large table with finite values.
Teradata - Explain
EXPLAIN command returns the execution plan of parsing engine in English. It can be used with any SQL statement except on another EXPLAIN command. When a query is preceded with EXPLAIN command, the execution plan of the Parsing Engine is returned to the user instead of AMPs.
Examples of EXPLAIN
Consider the table Employee with the following definition.
CREATE SET TABLE EMPLOYEE,FALLBACK (
   EmployeeNo INTEGER,
   FirstName VARCHAR(30),
   LastName VARCHAR(30),
   DOB DATE FORMAT 'YYYY-MM-DD',
   JoinedDate DATE FORMAT 'YYYY-MM-DD',
   DepartmentNo BYTEINT
)
UNIQUE PRIMARY INDEX ( EmployeeNo );
Some examples of EXPLAIN plan are given below.
Full Table Scan (FTS)
When no conditions are specified in the SELECT statement, then the optimizer may choose to use Full Table Scan where each and every row of the table is accessed.
Example
Following is a sample query where the optimizer may choose FTS.
EXPLAIN SELECT * FROM employee;
When the above query is executed, it produces the following output. As can be seen the optimizer chooses to access all AMPs and all rows within the AMP.
1) First, we lock a distinct TDUSER."pseudo table" for read on a
   RowHash to prevent global deadlock for TDUSER.employee.
2) Next, we lock TDUSER.employee for read.
3) We do an all-AMPs RETRIEVE step from TDUSER.employee by way of an
   all-rows scan with no residual conditions into Spool 1
   (group_amps), which is built locally on the AMPs.  The size of
   Spool 1 is estimated with low confidence to be 2 rows (116 bytes).
   The estimated time for this step is 0.03 seconds.
4) Finally, we send out an END TRANSACTION step to all AMPs involved
   in processing the request.
→ The contents of Spool 1 are sent back to the user as the result of
   statement 1.  The total estimated time is 0.03 seconds.
Unique Primary Index
When the rows are accessed using Unique Primary Index, then it is one AMP operation.
EXPLAIN SELECT * FROM employee WHERE EmployeeNo = 101;
When the above query is executed, it produces the following output. As can be seen it is a single-AMP retrieval and the optimizer is using the unique primary index to access the row.
1) First, we do a single-AMP RETRIEVE step from TDUSER.employee by
   way of the unique primary index "TDUSER.employee.EmployeeNo = 101"
   with no residual conditions. The estimated time for this step is
   0.01 seconds.
→ The row is sent directly back to the user as the result of
   statement 1.  The total estimated time is 0.01 seconds.
Unique Secondary Index
When the rows are accessed using Unique Secondary Index, its a two amp operation.
Example
Consider the table Salary with the following definition.
CREATE SET TABLE SALARY,FALLBACK (
   EmployeeNo INTEGER,
   Gross INTEGER,
   Deduction INTEGER,
   NetPay INTEGER
)
PRIMARY INDEX ( EmployeeNo )
UNIQUE INDEX (EmployeeNo);
Consider the following SELECT statement.
EXPLAIN SELECT * FROM Salary WHERE EmployeeNo = 101;
When the above query is executed, it produces the following output. As can be seen the optimizer retrieves the row in two amp operation using unique secondary index.
1) First, we do a two-AMP RETRIEVE step from TDUSER.Salary
   by way of unique index # 4 "TDUSER.Salary.EmployeeNo =
   101" with no residual conditions.  The estimated time for this
   step is 0.01 seconds.
→ The row is sent directly back to the user as the result of
   statement 1.  The total estimated time is 0.01 seconds.
Additional Terms
Following is the list of terms commonly seen in EXPLAIN plan.
... (Last Use)
A spool file is no longer needed and will be released when this step completes.
... with no residual conditions
All applicable conditions have been applied to the rows.
... END TRANSACTION
Transaction locks are released, and changes are committed.
... eliminating duplicate rows ...
Duplicate rows only exist in spool files, not set tables. Doing a DISTINCT operation.
... by way of a traversal of index #n extracting row ids only
A spool file is built containing the Row IDs found in a secondary index (index #n)
... we do a SMS (set manipulation step)
Combining rows using a UNION, MINUS, or INTERSECT operator.
... which is redistributed by hash code to all AMPs.
Redistributing data in preparation for a join.
... which is duplicated on all AMPs.
Duplicating data from the smaller table (in terms of SPOOL) in preparation for a join.
... (one_AMP) or (group_AMPs)
Indicates one AMP or subset of AMPs will be used instead of all AMPs.
Teradata - Hashing Algorithm
A row is assigned to a particular AMP based on the primary index value. Teradata uses hashing algorithm to determine which AMP gets the row.
Following is a high level diagram on hashing algorithm.

Following are the steps to insert the data.
The client submits a query.
The parser receives the query and passes the PI value of the record to the hashing algorithm.
The hashing algorithm hashes the primary index value and returns a 32 bit number, called Row Hash.
The higher order bits of the row hash (first 16 bits) is used to identify the hash map entry. The hash map contains one AMP #. Hash map is an array of buckets which contains specific AMP #.
BYNET sends the data to the identified AMP.
AMP uses the 32 bit Row hash to locate the row within its disk.
If there is any record with same row hash, then it increments the uniqueness ID which is a 32 bit number. For new row hash, uniqueness ID is assigned as 1 and incremented whenever a record with same row hash is inserted.
The combination of Row hash and Uniqueness ID is called as Row ID.
Row ID prefixes each record in the disk.
Each table row in the AMP is logically sorted by their Row IDs.
How Tables are Stored
Tables are sorted by their Row ID (Row hash + uniqueness id) and then stored within the AMPs. Row ID is stored with each data row.
| Row Hash | Uniqueness ID | EmployeeNo | FirstName | LastName |
|---|---|---|---|---|
| 2A01 2611 | 0000 0001 | 101 | Mike | James |
| 2A01 2612 | 0000 0001 | 104 | Alex | Stuart |
| 2A01 2613 | 0000 0001 | 102 | Robert | Williams |
| 2A01 2614 | 0000 0001 | 105 | Robert | James |
| 2A01 2615 | 0000 0001 | 103 | Peter | Paul |
Teradata - JOIN Index
JOIN INDEX is a materialized view. Its definition is permanently stored and the data is updated whenever the base tables referred in the join index is updated. JOIN INDEX may contain one or more tables and also contain pre-aggregated data. Join indexes are mainly used for improving the performance.
There are different types of join indexes available.
- Single Table Join Index (STJI)
- Multi Table Join Index (MTJI)
- Aggregated Join Index (AJI)
Single Table Join Index
Single Table Join index allows to partition a large table based on the different primary index columns than the one from the base table.
Syntax
Following is the syntax of a JOIN INDEX.
CREATE JOIN INDEX <index name>
AS
<SELECT Query>
<Index Definition>;
Example
Consider the following Employee and Salary tables.
CREATE SET TABLE EMPLOYEE,FALLBACK (
   EmployeeNo INTEGER,
   FirstName VARCHAR(30) ,
   LastName VARCHAR(30) ,
   DOB DATE FORMAT 'YYYY-MM-DD',
   JoinedDate DATE FORMAT 'YYYY-MM-DD',
   DepartmentNo BYTEINT
)
UNIQUE PRIMARY INDEX ( EmployeeNo );

CREATE SET TABLE SALARY,FALLBACK (
   EmployeeNo INTEGER,
   Gross INTEGER,
   Deduction INTEGER,
   NetPay INTEGER
)
PRIMARY INDEX ( EmployeeNo )
UNIQUE INDEX (EmployeeNo);
Following is an example that creates a Join index named Employee_JI on Employee table.
CREATE JOIN INDEX Employee_JI
AS
SELECT EmployeeNo,FirstName,LastName,
BirthDate,JoinedDate,DepartmentNo
FROM Employee
PRIMARY INDEX(FirstName);
If the user submits a query with a WHERE clause on EmployeeNo, then the system will query the Employee table using the unique primary index. If the user queries the employee table using employee_name, then the system may access the join index Employee_JI using employee_name. The rows of the join index are hashed on employee_name column. If the join index is not defined and the employee_name is not defined as secondary index, then the system will perform full table scan to access the rows which is time consuming.
You can run the following EXPLAIN plan and verify the optimizer plan. In the following example you can see that the optimizer is using the Join Index instead of base Employee table when the table queries using the Employee_Name column.
EXPLAIN SELECT * FROM EMPLOYEE WHERE FirstName='Mike';
*** Help information returned. 8 rows.
*** Total elapsed time was 1 second.
Explanation
------------------------------------------------------------------------
   1) First, we do a single-AMP RETRIEVE step from EMPLOYEE_JI by
      way of the primary index "EMPLOYEE_JI.FirstName = 'Mike'"
      with no residual conditions into Spool 1 (one-amp), which is built
      locally on that AMP.  The size of Spool 1 is estimated with low
      confidence to be 2 rows (232 bytes).  The estimated time for this
      step is 0.02 seconds.
   → The contents of Spool 1 are sent back to the user as the result of
      statement 1.  The total estimated time is 0.02 seconds.
Multi Table Join Index
A multi-table join index is created by joining more than one table. Multi-table join index can be used to store the result set of frequently joined tables to improve the performance.
Example
The following example creates a JOIN INDEX named Employee_Salary_JI by joining Employee and Salary tables.
CREATE JOIN INDEX Employee_Salary_JI
AS
SELECT a.EmployeeNo,a.FirstName,a.LastName,
a.BirthDate,a.JoinedDate,a.DepartmentNo,b.Gross,b.Deduction,b.NetPay
FROM Employee a
INNER JOIN Salary b
ON(a.EmployeeNo = b.EmployeeNo)
PRIMARY INDEX(FirstName);
Whenever the base tables Employee or Salary are updated, then the Join index Employee_Salary_JI is also automatically updated. If you are running a query joining Employee and Salary tables, then the optimizer may choose to access the data from Employee_Salary_JI directly instead of joining the tables. EXPLAIN plan on the query can be used to verify if the optimizer will choose the base table or Join index.
Aggregate Join Index
If a table is consistently aggregated on certain columns, then aggregate join index can be defined on the table to improve the performance. One limitation of aggregate join index is that it supports only SUM and COUNT functions.
Example
In the following example Employee and Salary is joined to identify the total salary per Department.
CREATE JOIN INDEX Employee_Salary_JI
AS
SELECT a.DepartmentNo,SUM(b.NetPay) AS TotalPay
FROM Employee a
INNER JOIN Salary b
ON(a.EmployeeNo = b.EmployeeNo)
GROUP BY a.DepartmentNo
Primary Index(DepartmentNo);
Teradata - Views
Views are database objects that are built by the query. Views can be built using a single table or multiple tables by way of join. Their definition is stored permanently in data dictionary but they don't store copy of the data. Data for the view is built dynamically.
A view may contain a subset of rows of the table or a subset of columns of the table.
Create a View
Views are created using CREATE VIEW statement.
Syntax
Following is the syntax for creating a view.
CREATE/REPLACE VIEW <viewname>
AS
<select query>;
Example
Consider the following Employee table.
| EmployeeNo | FirstName | LastName | BirthDate |
|---|---|---|---|
| 101 | Mike | James | 1/5/1980 |
| 104 | Alex | Stuart | 11/6/1984 |
| 102 | Robert | Williams | 3/5/1983 |
| 105 | Robert | James | 12/1/1984 |
| 103 | Peter | Paul | 4/1/1983 |
The following example creates a view on Employee table.
CREATE VIEW Employee_View
AS
SELECT
EmployeeNo,
FirstName,
LastName,
FROM
Employee;
Using Views
You can use regular SELECT statement to retrieve data from Views.
Example
The following example retrieves the records from Employee_View;
SELECT EmployeeNo, FirstName, LastName FROM Employee_View;
When the above query is executed, it produces the following output.
*** Query completed. 5 rows found. 3 columns returned.
*** Total elapsed time was 1 second.
 EmployeeNo            FirstName                       LastName
-----------  ------------------------------  ---------------------------
    101                  Mike                           James
    104                  Alex                           Stuart
    102                  Robert                         Williams
    105                  Robert                         James
    103                  Peter                          Paul
Modifying Views
An existing view can be modified using REPLACE VIEW statement.
Following is the syntax to modify a view.
REPLACE VIEW <viewname>
AS
<select query>;
Example
The following example modifies the view Employee_View for adding additional columns.
REPLACE VIEW Employee_View
AS
SELECT
EmployeeNo,
FirstName,
BirthDate,
JoinedDate
DepartmentNo
FROM
Employee;
Drop View
An existing view can be dropped using DROP VIEW statement.
Syntax
Following is the syntax of DROP VIEW.
DROP VIEW <viewname>;
Example
Following is an example to drop the view Employee_View.
DROP VIEW Employee_View;
Advantages of Views
Views provide additional level of security by restricting the rows or columns of a table.
Users can be given access only to views instead of base tables.
Simplifies the use of multiple tables by pre-joining them using Views.
Teradata - Macros
Macro is a set of SQL statements which are stored and executed by calling the Macro name. The definition of Macros is stored in Data Dictionary. Users only need EXEC privilege to execute the Macro. Users don't need separate privileges on the database objects used inside the Macro. Macro statements are executed as a single transaction. If one of the SQL statements in Macro fails, then all the statements are rolled back. Macros can accept parameters. Macros can contain DDL statements, but that should be the last statement in Macro.
Create Macros
Macros are created using CREATE MACRO statement.
Syntax
Following is the generic syntax of CREATE MACRO command.
CREATE MACRO <macroname> [(parameter1, parameter2,...)] (
   <sql statements>
);
Example
Consider the following Employee table.
| EmployeeNo | FirstName | LastName | BirthDate |
|---|---|---|---|
| 101 | Mike | James | 1/5/1980 |
| 104 | Alex | Stuart | 11/6/1984 |
| 102 | Robert | Williams | 3/5/1983 |
| 105 | Robert | James | 12/1/1984 |
| 103 | Peter | Paul | 4/1/1983 |
The following example creates a Macro called Get_Emp. It contains a select statement to retrieve records from employee table.
CREATE MACRO Get_Emp AS (
   SELECT
   EmployeeNo,
   FirstName,
   LastName
   FROM
   employee
   ORDER BY EmployeeNo;
);
Executing Macros
Macros are executed using EXEC command.
Syntax
Following is the syntax of EXECUTE MACRO command.
EXEC <macroname>;
Example
The following example executes the Macro names Get_Emp; When the following command is executed, it retrieves all records from employee table.
EXEC Get_Emp;
*** Query completed. 5 rows found. 3 columns returned.
*** Total elapsed time was 1 second.
EmployeeNo             FirstName                      LastName
-----------  ------------------------------  ---------------------------
   101                  Mike                          James
   102                  Robert                        Williams
   103                  Peter                         Paul
   104                  Alex                          Stuart
   105                  Robert                        James
Parameterized Macros
Teradata Macros can accept parameters. Within a Macro, these parameters are referenced with ; (semicolon).
Following is an example of a Macro that accepts parameters.
CREATE MACRO Get_Emp_Salary(EmployeeNo INTEGER) AS (
   SELECT
   EmployeeNo,
   NetPay
   FROM
   Salary
   WHERE EmployeeNo = :EmployeeNo;
);
Executing Parameterized Macros
Macros are executed using EXEC command. You need EXEC privilege to execute the Macros.
Syntax
Following is the syntax of EXECUTE MACRO statement.
EXEC <macroname>(value);
Example
The following example executes the Macro names Get_Emp; It accepts employee no as parameter and extracts records from employee table for that employee.
EXEC Get_Emp_Salary(101);
*** Query completed. One row found. 2 columns returned.
*** Total elapsed time was 1 second.

EmployeeNo      NetPay
-----------  ------------
   101           36000
Teradata - Stored Procedure
A stored procedure contains a set of SQL statements and procedural statements. They may contain only procedural statements. The definition of stored procedure is stored in database and the parameters are stored in data dictionary tables.
Advantages
Stored procedures reduce the network load between the client and the server.
Provides better security since the data is accessed through stored procedures instead of accessing them directly.
Gives better maintenance since the business logic is tested and stored in the server.
Creating Procedure
Stored Procedures are created using CREATE PROCEDURE statement.
Syntax
Following is the generic syntax of the CREATE PROCEDURE statement.
CREATE PROCEDURE <procedurename> ( [parameter 1 data type, parameter 2 data type..] )
BEGIN
   <SQL or SPL statements>;
END;
Example
Consider the following Salary Table.
| EmployeeNo | Gross | Deduction | NetPay |
|---|---|---|---|
| 101 | 40,000 | 4,000 | 36,000 |
| 102 | 80,000 | 6,000 | 74,000 |
| 103 | 90,000 | 7,000 | 83,000 |
| 104 | 75,000 | 5,000 | 70,000 |
The following example creates a stored procedure named InsertSalary to accept the values and insert into Salary Table.
CREATE PROCEDURE InsertSalary (
   IN in_EmployeeNo INTEGER, IN in_Gross INTEGER,
   IN in_Deduction INTEGER, IN in_NetPay INTEGER
)
BEGIN
   INSERT INTO Salary (
      EmployeeNo,
      Gross,
      Deduction,
      NetPay
   )
   VALUES (
      :in_EmployeeNo,
      :in_Gross,
      :in_Deduction,
      :in_NetPay
   );
END;
Executing Procedures
Stored Procedures are executed using CALL statement.
Syntax
Following is the generic syntax of the CALL statement.
CALL <procedure name> [(parameter values)];
Example
The following example calls the stored procedure InsertSalary and inserts records to Salary Table.
CALL InsertSalary(105,20000,2000,18000);
Once the above query is executed, it produces the following output and you can see the inserted row in Salary table.
| EmployeeNo | Gross | Deduction | NetPay |
|---|---|---|---|
| 101 | 40,000 | 4,000 | 36,000 |
| 102 | 80,000 | 6,000 | 74,000 |
| 103 | 90,000 | 7,000 | 83,000 |
| 104 | 75,000 | 5,000 | 70,000 |
| 105 | 20,000 | 2,000 | 18,000 |
Teradata - JOIN strategies
This chapter discusses the various JOIN strategies available in Teradata.
Join Methods
Teradata uses different join methods to perform join operations. Some of the commonly used Join methods are −
- Merge Join
- Nested Join
- Product Join
Merge Join
Merge Join method takes place when the join is based on the equality condition. Merge Join requires the joining rows to be on the same AMP. Rows are joined based on their row hash. Merge Join uses different join strategies to bring the rows to the same AMP.
Strategy #1
If the join columns are the primary indexes of the corresponding tables, then the joining rows are already on the same AMP. In this case, no distribution is required.
Consider the following Employee and Salary Tables.
CREATE SET TABLE EMPLOYEE,FALLBACK (
   EmployeeNo INTEGER,
   FirstName VARCHAR(30) ,
   LastName VARCHAR(30) ,
   DOB DATE FORMAT 'YYYY-MM-DD',
   JoinedDate DATE FORMAT 'YYYY-MM-DD',
   DepartmentNo BYTEINT
)
UNIQUE PRIMARY INDEX ( EmployeeNo );
CREATE SET TABLE Salary (
   EmployeeNo INTEGER,
   Gross INTEGER,
   Deduction INTEGER,
   NetPay INTEGER
)
UNIQUE PRIMARY INDEX(EmployeeNo);
When these two tables are joined on EmployeeNo column, then no redistribution takes place since EmployeeNo is the primary index of both the tables which are being joined.
Strategy #2
Consider the following Employee and Department tables.
CREATE SET TABLE EMPLOYEE,FALLBACK (
   EmployeeNo INTEGER,
   FirstName VARCHAR(30) ,
   LastName VARCHAR(30) ,
   DOB DATE FORMAT 'YYYY-MM-DD',
   JoinedDate DATE FORMAT 'YYYY-MM-DD',
   DepartmentNo BYTEINT
)
UNIQUE PRIMARY INDEX ( EmployeeNo );
CREATE SET TABLE DEPARTMENT,FALLBACK (
   DepartmentNo BYTEINT,
   DepartmentName CHAR(15)
)
UNIQUE PRIMARY INDEX ( DepartmentNo );
If these two tables are joined on DeparmentNo column, then the rows need to be redistributed since DepartmentNo is a primary index in one table and non-primary index in another table. In this scenario, joining rows may not be on the same AMP. In such case, Teradata may redistribute employee table on DepartmentNo column.
Strategy #3
For the above Employee and Department tables, Teradata may duplicate the Department table on all AMPs, if the size of Department table is small.
Nested Join
Nested Join doesnt use all AMPs. For the Nested Join to take place, one of the condition should be equality on the unique primary index of one table and then joining this column to any index on the other table.
In this scenario, the system will fetch the one row using Unique Primary index of one table and use that row hash to fetch the matching records from other table. Nested join is the most efficient of all Join methods.
Product Join
Product Join compares each qualifying row from one table with each qualifying row from other table. Product join may take place due to some of the following factors −
- Where condition is missing.
- Join condition is not based on equality condition.
- Table aliases is not correct.
- Multiple join conditions.
Teradata - Partitioned Primary Index
Partitioned Primary Index (PPI) is an indexing mechanism that is useful in improving the performance of certain queries. When rows are inserted into a table, they are stored in an AMP and arranged by their row hash order. When a table is defined with PPI, the rows are sorted by their partition number. Within each partition, they are arranged by their row hash. Rows are assigned to a partition based on the partition expression defined.
Advantages
Avoid full table scan for certain queries.
Avoid using secondary index that requires additional physical structure and additional I/O maintenance.
Access a subset of a large table quickly.
Drop the old data quickly and add new data.
Example
Consider the following Orders table with Primary Index on OrderNo.
| StoreNo | OrderNo | OrderDate | OrderTotal |
|---|---|---|---|
| 101 | 7501 | 2015-10-01 | 900 |
| 101 | 7502 | 2015-10-02 | 1,200 |
| 102 | 7503 | 2015-10-02 | 3,000 |
| 102 | 7504 | 2015-10-03 | 2,454 |
| 101 | 7505 | 2015-10-03 | 1201 |
| 103 | 7506 | 2015-10-04 | 2,454 |
| 101 | 7507 | 2015-10-05 | 1201 |
| 101 | 7508 | 2015-10-05 | 1201 |
Assume that the records are distributed between AMPs as shown in the following tables. Recorded are stored in AMPs, sorted based on their row hash.
| RowHash | OrderNo | OrderDate |
|---|---|---|
| 1 | 7505 | 2015-10-03 |
| 2 | 7504 | 2015-10-03 |
| 3 | 7501 | 2015-10-01 |
| 4 | 7508 | 2015-10-05 |
| RowHash | OrderNo | OrderDate |
|---|---|---|
| 1 | 7507 | 2015-10-05 |
| 2 | 7502 | 2015-10-02 |
| 3 | 7506 | 2015-10-04 |
| 4 | 7503 | 2015-10-02 |
If you run a query to extract the orders for a particular date, then the optimizer may choose to use Full Table Scan, then all the records within the AMP may be accessed. To avoid this, you can define the order date as Partitioned Primary Index. When rows are inserted into orders table, they are partitioned by the order date. Within each partition they will be ordered by their row hash.
The following data shows how the records will be stored in AMPs, if they are partitioned by Order Date. If a query is run to access the records by Order Date, then only the partition that contains the records for that particular order will be accessed.
| Partition | RowHash | OrderNo | OrderDate |
|---|---|---|---|
| 0 | 3 | 7501 | 2015-10-01 |
| 1 | 1 | 7505 | 2015-10-03 |
| 1 | 2 | 7504 | 2015-10-03 |
| 2 | 4 | 7508 | 2015-10-05 |
| Partition | RowHash | OrderNo | OrderDate |
|---|---|---|---|
| 0 | 2 | 7502 | 2015-10-02 |
| 0 | 4 | 7503 | 2015-10-02 |
| 1 | 3 | 7506 | 2015-10-04 |
| 2 | 1 | 7507 | 2015-10-05 |
Following is an example to create a table with partition primary Index. PARTITION BY clause is used to define the partition.
CREATE SET TABLE Orders (
   StoreNo SMALLINT,
   OrderNo INTEGER,
   OrderDate DATE FORMAT 'YYYY-MM-DD',
   OrderTotal INTEGER
)
PRIMARY INDEX(OrderNo)
PARTITION BY RANGE_N  (
   OrderDate BETWEEN DATE '2010-01-01' AND '2016-12-31' EACH INTERVAL '1' DAY
);
In the above example, the table is partitioned by OrderDate column. There will be one separate partition for each day.
Teradata - OLAP Functions
OLAP functions are similar to aggregate functions except that the aggregate functions will return only one value whereas the OLAP function will provide the individual rows in addition to the aggregates.
Syntax
Following is the general syntax of the OLAP function.
<aggregate function> OVER
([PARTITION BY] [ORDER BY columnname][ROWS BETWEEN
UNBOUDED PRECEDING AND UNBOUNDED FOLLOWING)
Aggregation functions can be SUM, COUNT, MAX,MIN, AVG.
Example
Consider the following Salary table.
| EmployeeNo | Gross | Deduction | NetPay |
|---|---|---|---|
| 101 | 40,000 | 4,000 | 36,000 |
| 102 | 80,000 | 6,000 | 74,000 |
| 103 | 90,000 | 7,000 | 83,000 |
| 104 | 75,000 | 5,000 | 70,000 |
Following is an example to find the cumulative sum or running total of NetPay on Salary table. Records are sorted by EmployeeNo and cumulative sum is calculated on NetPay column.
SELECT
EmployeeNo, NetPay,
SUM(Netpay) OVER(ORDER BY EmployeeNo ROWS
UNBOUNDED PRECEDING) as TotalSalary
FROM Salary;
When the above query is executed, it produces the following output.
EmployeeNo     NetPay     TotalSalary
-----------  -----------  -----------
   101         36000        36000
   102         74000        110000
   103         83000        193000
   104         70000        263000
   105         18000        281000
RANK
RANK function orders the records based on the column provided. RANK function can also filter the number of records returned based on the rank.
Syntax
Following is the generic syntax to use the RANK function.
RANK() OVER
([PARTITION BY columnnlist] [ORDER BY columnlist][DESC|ASC])
Example
Consider the following Employee table.
| EmployeeNo | FirstName | LastName | JoinedDate | DepartmentID | BirthDate |
|---|---|---|---|---|---|
| 101 | Mike | James | 3/27/2005 | 1 | 1/5/1980 |
| 102 | Robert | Williams | 4/25/2007 | 2 | 3/5/1983 |
| 103 | Peter | Paul | 3/21/2007 | 2 | 4/1/1983 |
| 104 | Alex | Stuart | 2/1/2008 | 2 | 11/6/1984 |
| 105 | Robert | James | 1/4/2008 | 3 | 12/1/1984 |
Following query orders the records of the employee table by Joined Date and assigns the ranking on Joined Date.
SELECT EmployeeNo, JoinedDate,RANK()
OVER(ORDER BY JoinedDate) as Seniority
FROM Employee;
When the above query is executed, it produces the following output.
EmployeeNo   JoinedDate   Seniority
-----------  ----------  -----------
   101       2005-03-27       1
   103       2007-03-21       2
   102       2007-04-25       3
   105       2008-01-04       4
   104       2008-02-01       5
PARTITION BY clause groups the data by the columns defined in the PARTITION BY clause and performs the OLAP function within each group. Following is an example of the query that uses PARTITION BY clause.
SELECT EmployeeNo, JoinedDate,RANK()
OVER(PARTITION BY DeparmentNo ORDER BY JoinedDate) as Seniority
FROM Employee;
When the above query is executed, it produces the following output. You can see that the Rank is reset for each Department.
EmployeeNo  DepartmentNo  JoinedDate   Seniority
-----------  ------------  ----------  -----------

    101           1        2005-03-27       1
    103           2        2007-03-21       1
    102           2        2007-04-25       2
    104           2        2008-02-01       3
    105           3        2008-01-04       1
Teradata - Data Protection
This chapter discusses the features available for data protection in Teradata.
Transient Journal
Teradata uses Transient Journal to protect data from transaction failures. Whenever any transactions are run, Transient journal keeps a copy of the before images of the affected rows until the transaction is successful or rolled back successfully. Then, the before images are discarded. Transient journal is kept in each AMPs. It is an automatic process and cannot be disabled.
Fallback
Fallback protects the table data by storing the second copy of rows of a table on another AMP called as Fallback AMP. If one AMP fails, then the fallback rows are accessed. With this, even if one AMP fails, data is still available through fallback AMP. Fallback option can be used at table creation or after table creation. Fallback ensures that the second copy of the rows of the table is always stored in another AMP to protect the data from AMP failure. However, fallback occupies twice the storage and I/O for Insert/Delete/Update.
Following diagram shows how fallback copy of the rows are stored in another AMP.
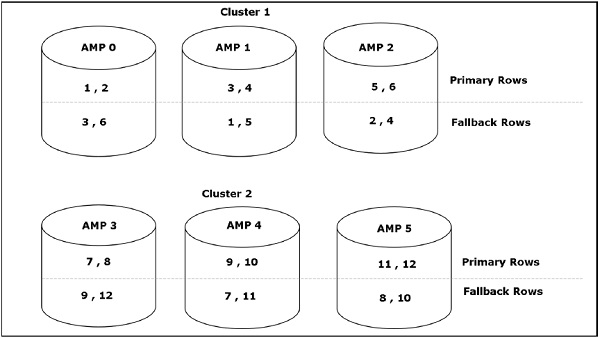
Down AMP Recovery Journal
The Down AMP recovery journal is activated when the AMP fails and the table is fallback protected. This journal keeps track of all the changes to the data of the failed AMP. The journal is activated on the remaining AMPs in the cluster. It is an automatic process and cannot be disabled. Once the failed AMP is live then the data from the Down AMP recovery journal is synchronized with the AMP. Once this is done, the journal is discarded.

Cliques
Clique is a mechanism used by Teradata to protect data from Node failures. A clique is nothing but a set of Teradata nodes that share a common set of Disk Arrays. When a node fails, then the vprocs from the failed node will migrate to other nodes in the clique and continue to access their disk arrays.
Hot Standby Node
Hot Standby Node is a node that does not participate in the production environment. If a node fails then the vprocs from the failed nodes will migrate to the hot standby node. Once the failed node is recovered it becomes the hot standby node. Hot Standby nodes are used to maintain the performance in case of node failures.
RAID
Redundant Array of Independent Disks (RAID) is a mechanism used to protect data from Disk Failures. Disk Array consists of a set of disks which are grouped as a logical unit. This unit may look like a single unit to the user but they may be spread across several disks.
RAID 1 is commonly used in Teradata. In RAID 1, each disk is associated with a mirror disk. Any changes to the data in primary disk is reflected in mirror copy also. If the primary disk fails, then the data from mirror disk can be accessed.
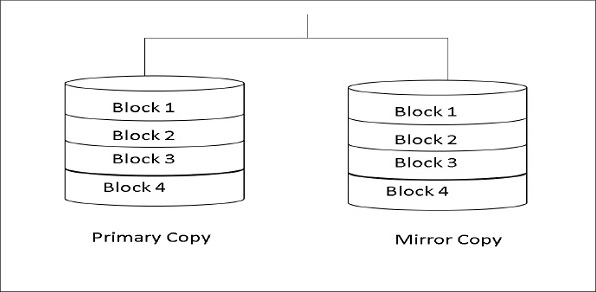
Teradata - User Management
This chapter discussed the various strategies of user management in Teradata.
Users
A user is created using CREATE USER command. In Teradata, a user is also similar to a database. They both can be assigned space and contain database objects except that the user is assigned a password.
Syntax
Following is the syntax for CREATE USER.
CREATE USER username
AS
[PERMANENT|PERM] = n BYTES
PASSWORD = password
TEMPORARY = n BYTES
SPOOL = n BYTES;
While creating a user, the values for user name, Permanent space and Password is mandatory. Other fields are optional.
Example
Following is an example to create the user TD01.
CREATE USER TD01
AS
PERMANENT = 1000000 BYTES
PASSWORD = ABC$124
TEMPORARY = 1000000 BYTES
SPOOL = 1000000 BYTES;
Accounts
While creating a new user, the user may be assigned to an account. ACCOUNT option in CREATE USER is used to assign the account. A user may be assigned to multiple accounts.
Syntax
Following is the syntax for CREATE USER with account option.
CREATE USER username
PERM = n BYTES
PASSWORD = password
ACCOUNT = accountid
Example
The following example creates the user TD02 and assigns the account as IT and Admin.
CREATE USER TD02
AS
PERMANENT = 1000000 BYTES
PASSWORD = abc$123
TEMPORARY = 1000000 BYTES
SPOOL = 1000000 BYTES
ACCOUNT = (IT,Admin);
The user can specify the account id while logging into Teradata system or after being logged into the system using SET SESSION command.
.LOGON username, passowrd,accountid
OR
SET SESSION ACCOUNT = accountid
Grant Privileges
GRANT command is used to assign one or more privileges on the database objects to the user or database.
Syntax
Following is the syntax of the GRANT command.
GRANT privileges ON objectname TO username;
Privileges can be INSERT, SELECT, UPDATE, REFERENCES.
Example
Following is an example of GRANT statement.
GRANT SELECT,INSERT,UPDATE ON Employee TO TD01;
Revoke Privileges
REVOKE command removes the privileges from the users or databases. The REVOKE command can only remove explicit privileges.
Syntax
Following is the basic syntax for REVOKE command.
REVOKE [ALL|privileges] ON objectname FROM username;
Example
Following is an example of REVOKE command.
REVOKE INSERT,SELECT ON Employee FROM TD01;
Teradata - Performance Tuning
This chapter discusses the procedure of performance tuning in Teradata.
Explain
The first step in performance tuning is the use of EXPLAIN on your query. EXPLAIN plan gives the details of how optimizer will execute your query. In the Explain plan, check for the keywords like confidence level, join strategy used, spool file size, redistribution, etc.
Collect Statistics
Optimizer uses Data demographics to come up with effective execution strategy. COLLECT STATISTICS command is used to collect data demographics of the table. Make sure that the statistics collected on the columns are up to date.
Collect statistics on the columns that are used in WHERE clause and on the columns used in the joining condition.
Collect statistics on the Unique Primary Index columns.
Collect statistics on Non Unique Secondary Index columns. Optimizer will decide if it can use NUSI or Full Table Scan.
Collect statistics on the Join Index though the statistics on base table is collected.
Collect statistics on the partitioning columns.
Data Types
Make sure that proper data types are used. This will avoid the use of excessive storage than required.
Conversion
Make sure that the data types of the columns used in join condition are compatible to avoid explicit data conversions.
Sort
Remove unnecessary ORDER BY clauses unless required.
Spool Space Issue
Spool space error is generated if the query exceeds per AMP spool space limit for that user. Verify the explain plan and identify the step that consumes more spool space. These intermediate queries can be split and put as separately to build temporary tables.
Primary Index
Make sure that the Primary Index is correctly defined for the table. The primary index column should evenly distribute the data and should be frequently used to access the data.
SET Table
If you define a SET table, then the optimizer will check if the record is duplicate for each and every record inserted. To remove the duplicate check condition, you can define Unique Secondary Index for the table.
UPDATE on Large Table
Updating the large table will be time consuming. Instead of updating the table, you can delete the records and insert the records with modified rows.
Dropping Temporary Tables
Drop the temporary tables (staging tables) and volatiles if they are no longer needed. This will free up permanent space and spool space.
MULTISET Table
If you are sure that the input records will not have duplicate records, then you can define the target table as MULTISET table to avoid the duplicate row check used by SET table.
Teradata - FastLoad
FastLoad utility is used to load data into empty tables. Since it does not use transient journals, data can be loaded quickly. It doesn't load duplicate rows even if the target table is a MULTISET table.
Limitation
Target table should not have secondary index, join index and foreign key reference.
How FastLoad Works
FastLoad is executed in two phases.
Phase 1
The Parsing engines read the records from the input file and sends a block to each AMP.
Each AMP stores the blocks of records.
Then AMPs hash each record and redistribute them to the correct AMP.
At the end of Phase 1, each AMP has its rows but they are not in row hash sequence.
Phase 2
Phase 2 starts when FastLoad receives the END LOADING statement.
Each AMP sorts the records on row hash and writes them to the disk.
Locks on the target table is released and the error tables are dropped.
Example
Create a text file with the following records and name the file as employee.txt.
101,Mike,James,1980-01-05,2010-03-01,1
102,Robert,Williams,1983-03-05,2010-09-01,1
103,Peter,Paul,1983-04-01,2009-02-12,2
104,Alex,Stuart,1984-11-06,2014-01-01,2
105,Robert,James,1984-12-01,2015-03-09,3
Following is a sample FastLoad script to load the above file into Employee_Stg table.
LOGON 192.168.1.102/dbc,dbc;
   DATABASE tduser;
   BEGIN LOADING tduser.Employee_Stg
      ERRORFILES Employee_ET, Employee_UV
      CHECKPOINT 10;
      SET RECORD VARTEXT ",";
      DEFINE in_EmployeeNo (VARCHAR(10)),
         in_FirstName (VARCHAR(30)),
         in_LastName (VARCHAR(30)),
         in_BirthDate (VARCHAR(10)),
         in_JoinedDate (VARCHAR(10)),
         in_DepartmentNo (VARCHAR(02)),
         FILE = employee.txt;
      INSERT INTO Employee_Stg (
         EmployeeNo,
         FirstName,
         LastName,
         BirthDate,
         JoinedDate,
         DepartmentNo
      )
      VALUES (
         :in_EmployeeNo,
         :in_FirstName,
         :in_LastName,
         :in_BirthDate (FORMAT 'YYYY-MM-DD'),
         :in_JoinedDate (FORMAT 'YYYY-MM-DD'),
         :in_DepartmentNo
      );
   END LOADING;
LOGOFF;
Executing a FastLoad Script
Once the input file employee.txt is created and the FastLoad script is named as EmployeeLoad.fl, you can run the FastLoad script using the following command in UNIX and Windows.
FastLoad < EmployeeLoad.fl;
Once the above command is executed, the FastLoad script will run and produce the log. In the log, you can see the number of records processed by FastLoad and status code.
**** 03:19:14 END LOADING COMPLETE
   Total Records Read              =  5
   Total Error Table 1             =  0  ---- Table has been dropped
   Total Error Table 2             =  0  ---- Table has been dropped
   Total Inserts Applied           =  5
   Total Duplicate Rows            =  0
   Start:   Fri Jan  8 03:19:13 2016
   End  :   Fri Jan  8 03:19:14 2016
**** 03:19:14 Application Phase statistics:
              Elapsed time: 00:00:01 (in hh:mm:ss)
0008  LOGOFF;
**** 03:19:15 Logging off all sessions
FastLoad Terms
Following is the list of common terms used in FastLoad script.
LOGON − Logs into Teradata and initiates one or more sessions.
DATABASE − Sets the default database.
BEGIN LOADING − Identifies the table to be loaded.
ERRORFILES − Identifies the 2 error tables that needs to be created/updated.
CHECKPOINT − Defines when to take checkpoint.
SET RECORD − Specifies if the input file format is formatted, binary, text or unformatted.
DEFINE − Defines the input file layout.
FILE − Specifies the input file name and path.
INSERT − Inserts the records from the input file into the target table.
END LOADING − Initiates phase 2 of the FastLoad. Distributes the records into the target table.
LOGOFF − Ends all sessions and terminates FastLoad.
Teradata - MultiLoad
MultiLoad can load multiple tables at a time and it can also perform different types of tasks such as INSERT, DELETE, UPDATE and UPSERT. It can load up to 5 tables at a time and perform up to 20 DML operations in a script. The target table is not required for MultiLoad.
MultiLoad supports two modes −
- IMPORT
- DELETE
MultiLoad requires a work table, a log table and two error tables in addition to the target table.
Log Table − Used to maintain the checkpoints taken during load which will be used for restart.
Error Tables − These tables are inserted during load when an error occurs. First error table stores conversion errors whereas second error table stores duplicate records.
Log Table − Maintains the results from each phase of MultiLoad for restart purpose.
Work table − MultiLoad script creates one work table per target table. Work table is used to keep DML tasks and the input data.
Limitation
MultiLoad has some limitations.
- Unique Secondary Index not supported on target table.
- Referential integrity not supported.
- Triggers not supported.
How MultiLoad Works
MultiLoad import has five phases −
Phase 1 − Preliminary Phase Performs basic setup activities.
Phase 2 − DML Transaction Phase Verifies the syntax of DML statements and brings them to Teradata system.
Phase 3 − Acquisition Phase Brings the input data into work tables and locks the table.
Phase 4 − Application Phase Applies all DML operations.
Phase 5 − Cleanup Phase Releases the table lock.
The steps involved in a MultiLoad script are −
Step 1 − Set up the log table.
Step 2 − Log on to Teradata.
Step 3 − Specify the Target, Work and Error tables.
Step 4 − Define INPUT file layout.
Step 5 − Define the DML queries.
Step 6 − Name the IMPORT file.
Step 7 − Specify the LAYOUT to be used.
Step 8 − Initiate the Load.
Step 9 − Finish the load and terminate the sessions.
Example
Create a text file with the following records and name the file as employee.txt.
101,Mike,James,1980-01-05,2010-03-01,1
102,Robert,Williams,1983-03-05,2010-09-01,1
103,Peter,Paul,1983-04-01,2009-02-12,2
104,Alex,Stuart,1984-11-06,2014-01-01,2
105,Robert,James,1984-12-01,2015-03-09,3
The following example is a MultiLoad script that reads records from employee table and loads into Employee_Stg table.
.LOGTABLE tduser.Employee_log;
.LOGON 192.168.1.102/dbc,dbc;
   .BEGIN MLOAD TABLES Employee_Stg;
      .LAYOUT Employee;
      .FIELD in_EmployeeNo * VARCHAR(10);
      .FIELD in_FirstName * VARCHAR(30);
      .FIELD in_LastName * VARCHAR(30);
      .FIELD in_BirthDate * VARCHAR(10);
      .FIELD in_JoinedDate * VARCHAR(10);
      .FIELD in_DepartmentNo * VARCHAR(02);

      .DML LABEL EmpLabel;
      INSERT INTO Employee_Stg (
         EmployeeNo,
         FirstName,
         LastName,
         BirthDate,
         JoinedDate,
         DepartmentNo
      )
      VALUES (
         :in_EmployeeNo,
         :in_FirstName,
         :in_Lastname,
         :in_BirthDate,
         :in_JoinedDate,
         :in_DepartmentNo
      );
      .IMPORT INFILE employee.txt
      FORMAT VARTEXT ','
      LAYOUT Employee
      APPLY EmpLabel;
   .END MLOAD;
LOGOFF;
Executing a MultiLoad Script
Once the input file employee.txt is created and the multiload script is named as EmployeeLoad.ml, then you can run the Multiload script using the following command in UNIX and Windows.
Multiload < EmployeeLoad.ml;
Teradata - FastExport
FastExport utility is used to export data from Teradata tables into flat files. It can also generate the data in report format. Data can be extracted from one or more tables using Join. Since FastExport exports the data in 64K blocks, it is useful for extracting large volume of data.
Example
Consider the following Employee table.
| EmployeeNo | FirstName | LastName | BirthDate |
|---|---|---|---|
| 101 | Mike | James | 1/5/1980 |
| 104 | Alex | Stuart | 11/6/1984 |
| 102 | Robert | Williams | 3/5/1983 |
| 105 | Robert | James | 12/1/1984 |
| 103 | Peter | Paul | 4/1/1983 |
Following is an example of a FastExport script. It exports data from employee table and writes into a file employeedata.txt.
.LOGTABLE tduser.employee_log;
.LOGON 192.168.1.102/dbc,dbc;
   DATABASE tduser;
   .BEGIN EXPORT SESSIONS 2;
      .EXPORT OUTFILE employeedata.txt
      MODE RECORD FORMAT TEXT;
      SELECT CAST(EmployeeNo AS CHAR(10)),
         CAST(FirstName AS CHAR(15)),
         CAST(LastName AS CHAR(15)),
         CAST(BirthDate AS CHAR(10))
      FROM
      Employee;
   .END EXPORT;
.LOGOFF;
Executing a FastExport Script
Once the script is written and named as employee.fx, you can use the following command to execute the script.
fexp < employee.fx
After executing the above command, you will receive the following output in the file employeedata.txt.
103       Peter          Paul           1983-04-01
101       Mike           James          1980-01-05
102       Robert         Williams       1983-03-05
105       Robert         James          1984-12-01
104       Alex           Stuart         1984-11-06
FastExport Terms
Following is the list of terms commonly used in FastExport script.
LOGTABLE − Specifies the log table for restart purpose.
LOGON − Logs into Teradata and initiates one or more sessions.
DATABASE − Sets the default database.
BEGIN EXPORT − Indicates the beginning of the export.
EXPORT − Specifies the target file and the export format.
SELECT − Specifies the select query to export data.
END EXPORT − Specifies the end of FastExport.
LOGOFF − Ends all sessions and terminates FastExport.
Teradata - BTEQ
BTEQ utility is a powerful utility in Teradata that can be used in both batch and interactive mode. It can be used to run any DDL statement, DML statement, create Macros and stored procedures. BTEQ can be used to import data into Teradata tables from flat file and it can also be used to extract data from tables into files or reports.
BTEQ Terms
Following is the list of terms commonly used in BTEQ scripts.
LOGON − Used to log into Teradata system.
ACTIVITYCOUNT − Returns the number of rows affected by the previous query.
ERRORCODE − Returns the status code of the previous query.
DATABASE − Sets the default database.
LABEL − Assigns a label to a set of SQL commands.
RUN FILE − Executes the query contained in a file.
GOTO − Transfers control to a label.
LOGOFF − Logs off from database and terminates all sessions.
IMPORT − Specifies the input file path.
EXPORT − Specifies the output file path and initiates the export.
Example
Following is a sample BTEQ script.
.LOGON 192.168.1.102/dbc,dbc;
   DATABASE tduser;

   CREATE TABLE employee_bkup (
      EmployeeNo INTEGER,
      FirstName CHAR(30),
      LastName CHAR(30),
      DepartmentNo SMALLINT,
      NetPay INTEGER
   )
   Unique Primary Index(EmployeeNo);

   .IF ERRORCODE <> 0 THEN .EXIT ERRORCODE;

   SELECT * FROM
   Employee
   Sample 1;
   .IF ACTIVITYCOUNT <> 0 THEN .GOTO InsertEmployee;

   DROP TABLE employee_bkup;

   .IF ERRORCODE <> 0 THEN .EXIT ERRORCODE;

   .LABEL InsertEmployee
   INSERT INTO employee_bkup
   SELECT a.EmployeeNo,
      a.FirstName,
      a.LastName,
      a.DepartmentNo,
      b.NetPay
   FROM
   Employee a INNER JOIN Salary b
   ON (a.EmployeeNo = b.EmployeeNo);

   .IF ERRORCODE <> 0 THEN .EXIT ERRORCODE;
.LOGOFF;
The above script performs the following tasks.
Logs into Teradata System.
Sets the Default Database.
Creates a table called employee_bkup.
Selects one record from Employee table to check if the table has any records.
Drops employee_bkup table, if the table is empty.
Transfers the control to a Label InsertEmployee which inserts records into employee_bkup table
Checks ERRORCODE to make sure that the statement is successful, following each SQL statement.
ACTIVITYCOUNT returns number of records selected/impacted by the previous SQL query.
