- Arduino - Home
- Arduino - Overview
- Arduino - Board Description
- Arduino - Installation
- Arduino - Program Structure
- Arduino - Data Types
- Arduino - Variables & Constants
- Arduino - Operators
- Arduino - Control Statements
- Arduino - Loops
- Arduino - Functions
- Arduino - Strings
- Arduino - String Object
- Arduino - Time
- Arduino - Arrays
- Arduino Function Libraries
- Arduino - I/O Functions
- Arduino - Advanced I/O Function
- Arduino - Character Functions
- Arduino - Math Library
- Arduino - Trigonometric Functions
- Arduino Advanced
- Arduino - Due & Zero
- Arduino - Pulse Width Modulation
- Arduino - Random Numbers
- Arduino - Interrupts
- Arduino - Communication
- Arduino - Inter Integrated Circuit
- Arduino - Serial Peripheral Interface
- Arduino Projects
- Arduino - Blinking LED
- Arduino - Fading LED
- Arduino - Reading Analog Voltage
- Arduino - LED Bar Graph
- Arduino - Keyboard Logout
- Arduino - Keyboard Message
- Arduino - Mouse Button Control
- Arduino - Keyboard Serial
- Arduino Sensors
- Arduino - Humidity Sensor
- Arduino - Temperature Sensor
- Arduino - Water Detector / Sensor
- Arduino - PIR Sensor
- Arduino - Ultrasonic Sensor
- Arduino - Connecting Switch
- Motor Control
- Arduino - DC Motor
- Arduino - Servo Motor
- Arduino - Stepper Motor
- Arduino And Sound
- Arduino - Tone Library
- Arduino - Wireless Communication
- Arduino - Network Communication
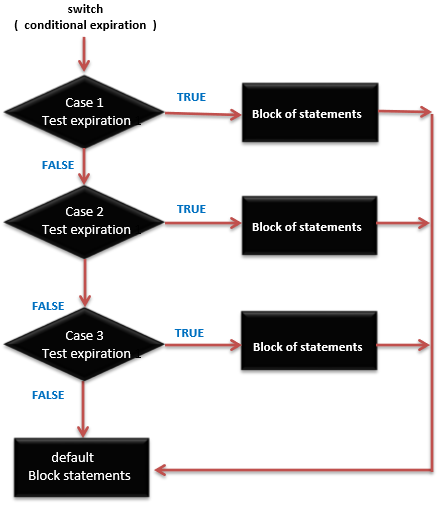
Arduino - switch case statement
Similar to the if statements, switch...case controls the flow of programs by allowing the programmers to specify different codes that should be executed in various conditions. In particular, a switch statement compares the value of a variable to the values specified in the case statements. When a case statement is found whose value matches that of the variable, the code in that case statement is run.
The break keyword makes the switch statement exit, and is typically used at the end of each case. Without a break statement, the switch statement will continue executing the following expressions ("falling-through") until a break, or the end of the switch statement is reached.
Switch Case Statement Syntax
switch (variable) {
   case label:
   // statements
   break;
}

case label: {
   // statements
   break;
}

default: {
   // statements
   break;
}
Switch Case Statement Execution Sequence
Example
Here is a simple example with switch. Suppose we have a variable phase with only 3 different states (0, 1, or 2) and a corresponding function (event) for each of these states. This is how we could switch the code to the appropriate routine −
switch (phase) {
   case 0: Lo(); break;
   case 1: Mid(); break;
   case 2: Hi(); break;
   default: Message("Invalid state!");
}
