- PySimpleGUI - Home
- PySimpleGUI - Introduction
- PySimpleGUI - Environment Setup
- PySimpleGUI - Hello World
- PySimpleGUI - Popup Windows
- PySimpleGUI - Window Class
- PySimpleGUI - Element Class
- PySimpleGUI - Events
- PySimpleGUI - Menubar
- PySimpleGUI - Matplotlib Integration
- PySimpleGUI - Working with PIL
- PySimpleGUI - Debugger
- PySimpleGUI - Settings
- PySimpleGUI Useful Resources
- PySimpleGUI - Quick Guide
- PySimpleGUI - Useful Resources
- PySimpleGUI - Discussion
PySimpleGUI - Window Class
Popups have a predefined configuration of buttons, text labels and text input fields. The Window class allows you to design a GUI of more flexible design. In addition to these elements, other elements like listbox, checkbox, radio buttons, etc., are available. You can also provide a menu system to the GUI. Certain specialized widgets such as spinner, sliders, etc., can also be used to make the design more effective.
A window can be a non-persistent window, similar to the popups. It blocks the program flow till the user closes it by clicking a button on the client area or the close (X) button in the title bar.
A persistent window on the other hand continues to be visible till the event causing it to be closed occurs. The asynchronous window is the one whose contents are periodically updated.
Layout Structure
The placement of elements or widgets in the windows client area is controlled by list of list objects. Each list element corresponds to one row on the window surface, and may contain one or more GUI elements available in PySimpleGUI library.
The first step is to visualize the placement of elements by making a drawing as follows −
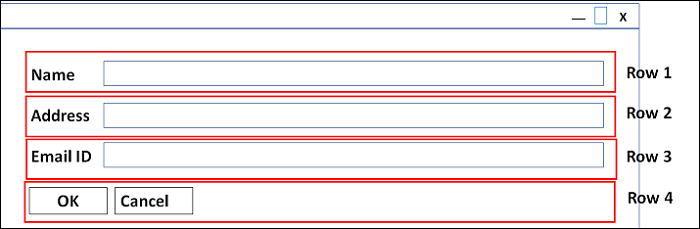
The elements on the window are placed in four rows. First three rows have a Text element (displays a static text) and an InputText element (in which user can enter). Last row has two buttons, Ok and Cancel.
This is represented in the list of lists as below −
import PySimpleGUI as psg
layout = [
   [psg.Text('Name '),psg.Input()],
   [psg.Text('Address '), psg.Input()],
   [psg.Text('Email ID '), psg.Input()],
   [psg.OK(), psg.Cancel()]
]
This list object is used as the value of layout parameter for the constructor of the Window class.
window = psg.Window('Form', layout)
This will display the desired window. The user inputs are stored in a dictionary named as values. The read() method of Window class is called as the user presses the Ok button, and the window closes immediately.
The complete code to render the window is as follows −
import PySimpleGUI as psg
psg.set_options(font=('Arial Bold', 16))
layout = [
[psg.Text('Name ', size=(15,1)),psg.Input(expand_x=True)],
[psg.Text('Address ', size=(15,1)), psg.Input(expand_x=True)],
[psg.Text('Email ID ', size=(15,1)), psg.Input(expand_x=True)],
[psg.OK(), psg.Cancel()]
]
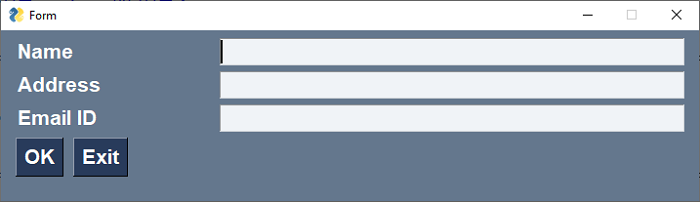
window = psg.Window('Form', layout, size=(715,207))
event, values = window.read()
print (event, values)
window.close()
Here is the output as displayed −
Enter the data as shown and press the "OK" button. The values will be printed as below −
OK {0: 'Kiran Gupta', 1: 'Mumbai', 2: 'kiran@gmail.com'}
If, after filling the data, you press the "Cancel" button, the result printed will be −
Cancel {0: 'Kiran Gupta', 1: 'Mumbai', 2: 'kiran@gmail.com'}
Persistent Window
Note that this window gets closed as soon as any button (or the "X" button in the title bar) is clicked. To keep the window alive till a special type of button called Exit is pressed or if the window is closed by pressing "X", the read() method is placed in an infinite loop with provision to break when WIN_CLOSED event occurs (when Exit button is pressed) or Exit event occurs (when "X" button is pressed).
Let us change the Cancel button in the above code with Exit button.
import PySimpleGUI as psg
layout = [
   [psg.Text('Name '), psg.Input()],
   [psg.Text('Address '), psg.Input()],
   [psg.Text('Email ID '), psg.Input()],
   [psg.OK(), psg.Exit()]
]
window = psg.Window('Form', layout)
while True:
   event, values = window.read()
   if event == psg.WIN_CLOSED or event == 'Exit':
      break
   print (event, values)
window.close()
The appearance of the window will be similar as before, except that instead of Cancel, it has Exit button.

The entered data will be printed in the form of a tuple. First element is the event, i.e., the caption of button, and second is a dictionary whose key is incrementing number and value is the text entered.
OK {0: 'kiran', 1: 'Mumbai', 2: 'kiran@gmail.com'}
OK {0: 'kirti', 1: 'Hyderabad', 2: 'kirti@gmail.com'}
OK {0: 'karim', 1: 'Chennai', 2: 'karim@gmail.com'}
Window Methods
The important method defined in the Window class is the read() method, to collect the values entered in all input elements. The Window class has other methods to customize the appearance and behaviour. They are listed below −
| Sr.No. | Method & Description |
|---|---|
| 1 | AddRow Adds a single row of elements to a window's "self.Rows" variable |
| 2 | AddRows Loops through a list of lists of elements and adds each row, list, to the layout. |
| 3 | close Closes the window so that resources are properly freed up. |
| 4 | disable Disables window from taking any input from the user |
| 5 | disappear Causes a window to "disappear" from the screen, but remain on the taskbar. |
| 6 | enable Re-enables window to take user input |
| 7 | fill Fill in elements that are input fields with data provided as dictionary. |
| 8 | find_element Find element object associated with the provided key. It is equivalent to "element = window[key]" |
| 9 | get_screen_dimensions Get the screen dimensions. |
| 10 | hide Hides the window from the screen and the task bar |
| 11 | load_from_disk Restore values from a Pickle file created by the "SaveToDisk" function |
| 12 | layout Populates the window with a list of widget lists. |
| 13 | read Get all of your data from your Window. Pass in a timeout (in milliseconds) to wait. |
| 14 | reappear Causes a disappeared window to display again. |
| 15 | save_to_disk Saves the values contained in each of the input elements to a pickle file. |
| 16 | set_title Change the title of the window in taskbar |
Update Window with Key
The data entered by the user in different input elements on the window layout is stored in the dictionary format. The dictionary keys are numbered (starting from 0) corresponding to input elements from left to right and top to bottom. We can refer to the input data by dictionary operator. That means, the data in the first element is returned by "values[0]".
values = {0: 'kiran', 1: 'Mumbai', 2: 'kiran@gmail.com'}
data = [values[k] for k in values.keys()]
print (data)
It will print the following on the console −
['kiran', 'Mumbai', 'kiran@gmail.com']
However, if you want to manipulate the value of an element programmatically, the element must be initialized by assigning a unique string value to its key parameter. The key of an element is like the name of the variable or identifier, which makes it convenient to handle reading or assigning a value to it programmatically.
The key parameter should be a string. The convention is that it should be an uppercase string preceded and followed by a "-" character (Example: "- NAME-"). However, any string can be used.
Let us assign keys to the Input elements in the above example as shown below −
layout = [
   [psg.Text('Name '),psg.Input(key='-NM-')],
   [psg.Text('Address '), psg.Input(key='-AD-')],
   [psg.Text('Email ID '), psg.Input(key='-ID-')],
   [psg.OK(), psg.Exit()],
]
As a result, the values dictionary returned after the read() method will contain the key identifiers instead of integers previously.
OK {'-NM-': 'Kiran', '-AD-': 'Mumbai', '-ID-': 'kiran@gmail.com'}
Now, values[-NM-'] will fetch 'Kiran'. The key can be assigned to any element and not just the input element. You can use the same key to call Update on an element. We can use "find_element(key)" of the Window object, or use window['key'] to refer to the element.
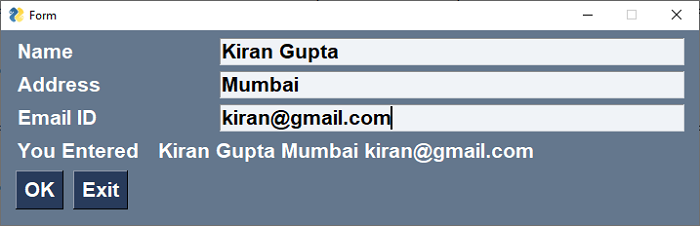
Let us extend our previous example to add a row before the Ok and Cancel buttons and have an empty Text element with "-OUT-" key. On the OK event, this Text label shows the concatenation of data entered in three input elements having keys "-NM-", "-AD-" and "-ID-"
import PySimpleGUI as psg
psg.set_options(font=('Arial Bold', 16))
layout = [
   [psg.Text('Name ', size=(15, 1)),
   psg.Input(key='-NM-', expand_x=True)],
   [psg.Text('Address ', size=(15, 1)),
   psg.Input(key='-AD-', expand_x=True)],
   [psg.Text('Email ID ', size=(15, 1)),
   psg.Input(key='-ID-', expand_x=True)],
   [psg.Text('You Entered '), psg.Text(key='-OUT-')],
   [psg.OK(), psg.Exit()],
]
window = psg.Window('Form', layout, size=(715, 200))
while True:
   event, values = window.read()
   print(event, values)
   out = values['-NM-'] + ' ' + values['-AD-'] + ' ' + values['-ID-']
   window['-OUT-'].update(out)
   if event == psg.WIN_CLOSED or event == 'Exit':
      break
window.close()
Run the above code, enter text in three input elements and press OK. The -OUT- text label will be updated as shown here −
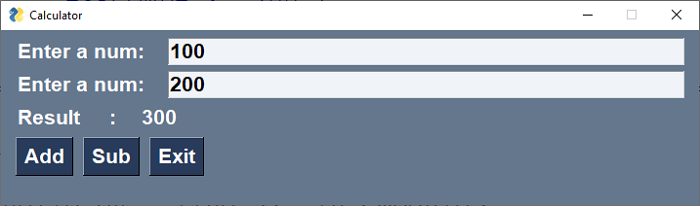
Another example of use of key attribute is given below. To Input elements are assigned key parameters -FIRST- and -SECOND-. There are two buttons captioned Add and Sub. The Text element displays addition or subtraction of two numbers depending on the button pressed.
import PySimpleGUI as psg
import PySimpleGUI as psg
psg.set_options(font=('Arial Bold', 16))
layout = [
   [psg.Text('Enter a num: '), psg.Input(key='-FIRST-')],
   [psg.Text('Enter a num: '), psg.Input(key='-SECOND-')],
   [psg.Text('Result : '), psg.Text(key='-OUT-')],
   [psg.Button("Add"), psg.Button("Sub"), psg.Exit()],
]
window = psg.Window('Calculator', layout, size=(715, 180))
while True:
   event, values = window.read()
   print(event, values)
   if event == "Add":
      result = int(values['-FIRST-']) + int(values['-SECOND-'])
   if event == "Sub":
      result = int(values['-FIRST-']) - int(values['-SECOND-'])
   window['-OUT-'].update(result)
   if event == psg.WIN_CLOSED or event == 'Exit':
      break
window.close()
The following screenshot shows the result when the "Add" button is pressed.
Borderless Window
By default, the application window is created with a title bar above the client area wherein all other elements are placed in the layout. The titlebar consists of a window title on the left, and the control buttons (minimize, restore/maxmimize and close) on the right. However, particularly for a kiosk-like application, there is no need of a title bar. You can get rid of the title bar by setting the "no_titlebar" property of the Window object to "True".

To terminate such an application, the event loop must be terminated on the occurrence of Exit button event.
Window with Disabled Close
If you wish to prevent the user to minimize the application window, the "disable_minimize" property of the Window object should be set to True. Similarly, the True value to "disable_close" property the Close button is displayed but it doesnt create the WINDOW_CLOSED event.

Transparent Window
The "alpha_channel" property of the Window object decides the transparency of the window. Its value is between 0 to 1. By default, it is 0, which means that the window appears as opaque. Set it to 1 to make it completely transparent. Any float value between 0 to 1 makes the transparency proportional.

Multiple Windows
PySimpleGUI allows more than one windows to be displayed simultaneously. The static function in PySimpleGUI module reads all the active windows when called. To make the window active, it must be finalized. The function returns a tuple of (window, event, values) structure.
window, event, values = PySimpleGUI.read_all_windows()
If no window is open, its return value is (None, WIN_CLOSED, None)
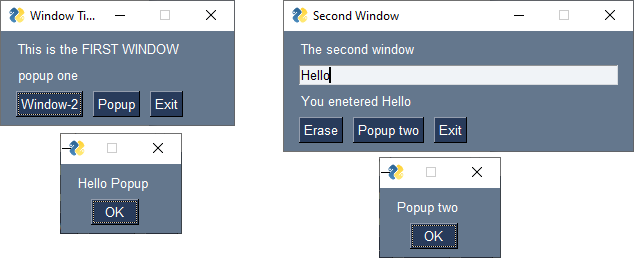
In the following code, two functions "win1()" and "win2()" create a window each when called. Starting with the first window, the button captioned Window-2 opens another window, so that both are active. When CLOSED event on first window takes place, both are closed and the program ends. If the "X" button on second window is pressed, it is marked as closed, leaving the first open.
import PySimpleGUI as psg
def win1():
   layout = [
      [psg.Text('This is the FIRST WINDOW'), psg.Text('', key='-OUTPUT-')],
      [psg.Text('popup one')],
      [psg.Button('Window-2'), psg.Button('Popup'), psg.Button('Exit')]
   ]
   return psg.Window('Window Title', layout, finalize=True)
   def win2():
      layout = [
         [psg.Text('The second window')],
         [psg.Input(key='-IN-', enable_events=True)],
         [psg.Text(size=(25, 1), key='-OUTPUT-')],
         [psg.Button('Erase'), psg.popup('Popup two'), psg.Button('Exit')]]
         return psg.Window('Second Window', layout, finalize=True)
window1 = win1()
window2 = None
while True:
   window, event, values = psg.read_all_windows()
   print(window.Title, event, values)
   if event == psg.WIN_CLOSED or event == 'Exit':
      window.close()
   if window == window2:
      window2 = None
   elif window == window1:
      break
   elif event == 'Popup':
      psg.popup('Hello Popup')
   elif event == 'Window-2' and not window2:
      window2 = win2()
   elif event == '-IN-':
      window['-OUTPUT-'].update('You entered {}'.format(values["-IN-"]))
   elif event == 'Erase':
      window['-OUTPUT-'].update('')
      window['-IN-'].update('')
window.close()
It will produce the following output windows:
Asynchronous Window
The read() method of the Window class has the following additional parameters −
window.read(timeout = t, timeout_key=TIMEOUT_KEY, close=False)
The timeout parameter lets your GUIs to use in a non-blocking read situation. It is the miliseconds your device can wait before returning. It makes a window that runs on a periodic basis.
The longer you're able to add to the timeout value, the less CPU time you'll be taking. During the timeout time, you are "yielding" the processor to do other tasks. your GUI will be more responsive than if you used a nonblocking read.
The timeout_key parameter helps in deciding whether there has been any user action within the stipulated time. The default value of "timeout_key" is "__timeout__".
while True:
   event, value = window.read(timeout=10)
   if event == sg.WIN_CLOSED:
      break
   if event == sg.TIMEOUT_KEY:
      print("Nothing happened")
To make the window movable, set the "grab_anywhere" property of the Window object to true. If the "keep_on_top" property is set to True, the window will remain above the current windows.
