- PySimpleGUI - Home
- PySimpleGUI - Introduction
- PySimpleGUI - Environment Setup
- PySimpleGUI - Hello World
- PySimpleGUI - Popup Windows
- PySimpleGUI - Window Class
- PySimpleGUI - Element Class
- PySimpleGUI - Events
- PySimpleGUI - Menubar
- PySimpleGUI - Matplotlib Integration
- PySimpleGUI - Working with PIL
- PySimpleGUI - Debugger
- PySimpleGUI - Settings
- PySimpleGUI Useful Resources
- PySimpleGUI - Quick Guide
- PySimpleGUI - Useful Resources
- PySimpleGUI - Discussion
PySimpleGUI - Quick Guide
PySimpleGUI - Introduction
Python GUIs for Humans
The PySimpleGui project started as a wrapper around TKinter package, which is bundled with Pythons standard library, with the objective to simplify the GUI building process.
PySimpleGui subsequently added the ability to design desktop GUIs based on PySide library (which itself ports Qt GUI toolkit, originally written in C++, to Python) and WxPython (which ports another popular GUI toolkit called WxWidgets). These libraries are called PySimpleGUIQt and PySimpleGUIWx respectively.
The latest addition to the PySimpleGui family is the PySimpleGUIWeb package which uses the Remi (REMote Interface Library) to construct GUI design that is rendered in a web page.
All the packages in the PySimpleGui group follow the similar API, which means the names of GUI elements, their properties and methods are same in all the four packages. As a result, just by replacing the import statement (and keeping the rest of the code unchanged), one can get the corresponding GUI design rendered. This is in fact the most important feature of PySimpleGui. Thats why, it is known as Python GUIs for Humans.
Comparison with other GUI Frameworks
A Python programmer has a variety of GUI frameworks to choose from, to develop a GUI application. TKinter is the one which is officially included in Pythons standard library. Others, most of them are open source, have to be explicitly installed.
| Sr.No. | Library & Description |
|---|---|
| 1 | TkInter Included in Python standard library |
| 2 | PyQt Python 3 bindings for the Qt application framework. |
| 3 | PySide Qt for Python (formerly known as PySide) offers the official Python bindings for the Qt cross-platform application and UI framework. |
| 4 | PySimpleGUI Wraps tkinter, Qt (pyside2), wxPython and Remi (for browser support) in a non-OOP API |
| 5 | wxPython Supports Windows/Unix/Mac. Supports Python 2.7 and >=3.4. Wraps & extends the wxWidgets toolchain. |
| 6 | PyGObject PyGObject is a Python package which provides bindings for GObject based libraries such as GTK Replacement for PyGtk. |
| 7 | PyForms A Python framework to develop GUI application, which promotes modular software design and code reusability with minimal effort. |
PySimpleGUI - Environment Setup
PySimpleGui supports both Python 3.x versions as well as Python 2.7 version. The main port, PySimpleGui doesnt have any external dependencies, as Tkinter - on which it is based - is a part of Pythons standard library, and hence it neednt be installed separately. Install it in the current Python3 environment by the PIP installer as follows
pip3 install PySimpleGUI
To verify if the library is correctly installed, enter the following statement −
>>> import PySimpleGUI
>>> PySimpleGUI.version
'4.60.1 Released 22-May-2022'
In case, the PIP installation doesnt work, you can download "pysimplegui.py" from the Github repository (https://github.com/PySimpleGUI/PySimpleGUI) and place it in your folder along with the application that is importing it.
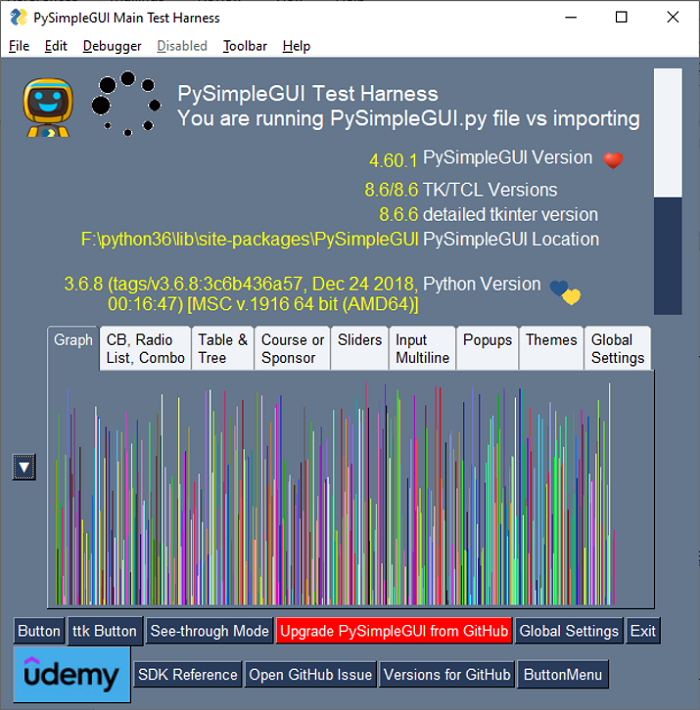
The pysimplegui.py file has the "main()" function. When called from Python prompt, it generates the following window to affirm that the package is correctly installed.
>>> import PySimpleGUI as psg
>>> psg.main()
Starting up PySimpleGUI Diagnostic & Help System
PySimpleGUI long version = 4.60.1 Released 22-May-2022
PySimpleGUI Version 4.60.1
tcl ver = 8.6 tkinter version = 8.6
Python Version 3.6.8 (tags/v3.6.8:3c6b436a57, Dec 24 2018,
00:16:47) [MSC v.1916 64 bit (AMD64)]
tcl detailed version = 8.6.6
PySimpleGUI.py location F:\python36\lib\sitepackages\PySimpleGUI\PySimpleGUI.py
The GUI window appears as below:
If you are using Python3 version earlier than 3.4, you may need to install the "typing" module since it is not shipped in the corresponding standard library
pip3 install typing
For Python 2.7, change the name to PySimpleGUI27.
pip3 install PySimpleGUI27
You may need to also install "future" for version 2.7
pip3 install future
However, it is important to note that Python Software Foundation doesnt officially support Python 2.x branches.
PySimpleGUI - Hello World
First Window using PySimpleGUI
To check whether PySimpleGUI along with its dependencies are properly installed, enter the following code and save it as "hello.py", using any Python-aware editor.
import PySimpleGUI as psg
layout = [[psg.Text(text='Hello World',
   font=('Arial Bold', 20),
   size=20,
   expand_x=True,
   justification='center')],
]
window = psg.Window('HelloWorld', layout, size=(715,250))
while True:
   event, values = window.read()
   print(event, values)
   if event in (None, 'Exit'):
      break
window.close()
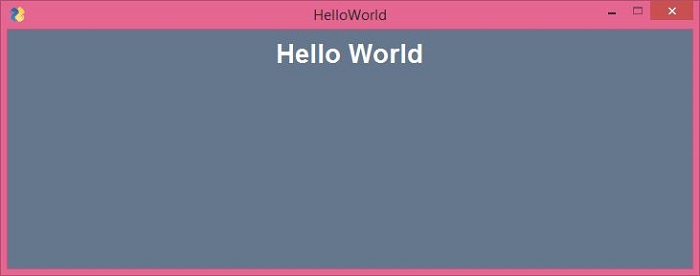
The above code constructs a window with a Text element (equivalent of a Label in TKinter) and displays the "Hello World" message placed centrally across the width of the window.
Run this program from the command terminal as −
Python hello.py
The output generated by the program should be similar to the one displayed below −
Equivalent Tkinter Code
To obtain similar output using pure Tkinter code, we would require the following Python script −
from tkinter import *
window=Tk()
lbl=Label(window, text="Hello World",
   fg='white', bg='#64778D',
   font=("Arial Bold", 20))
lbl.place(x=300, y=15)
window.title('HelloWorld Tk')
window['bg']='#64778D'
window.geometry("715x250+10+10")
window.mainloop()
All other functionalities remain same, except we use the serve() function off waitress module to start the WSGI server. On visiting the '/' route in the browser after running the program, the Hello World message is displayed as before.
Instead of a function, a callable class can also be used as a View. A callable class is the one which overrides the __call__() method.
from pyramid.response import Response
class MyView(object):
   def __init__(self, request):
      self.request = request
   def __call__(self):
      return Response('hello world')
PySimpleGUIQt
The object model of PySimpleGUI API has been made compatible with the widgets as defined in PySide2 package (which is the Python port for Qt graphics toolkit). The Qt version of PySimpleGui is called PySimpleGUIQt. It can be similarly installed with following PIP command −
pip3 install PySimpleGUIQt
Since this package depends on PySide2, the same will also be installed.
>>> import PySide2
>>> PySide2.__version__
'5.15.2.1'
>>> import PySimpleGUIQt
>>> PySimpleGUIQt.version
'0.35.0 Released 6-Jun-2020'
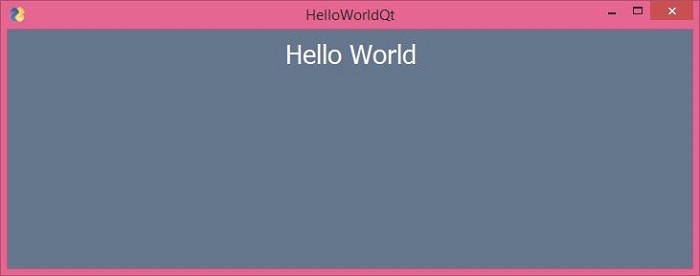
As mentioned earlier, the most important feature of PySimpleGui projects is that the code written for one package is completely compatible with the other. Hence, the hello.py program used earlier can be used as it is for the Qt version. The only change needed is import PySimpleGUIQt instead of PySimpleGui.
import PySimpleGUIQt as psg
layout = [[psg.Text(text='Hello World',
   font=('Arial Bold', 20),
   justification='center')],
]
window = psg.Window('HelloWorldQt', layout, size=(715,250))
while True:
   event, values = window.read()
   print(event, values)
   if event in (None, 'Exit'):
      break
window.close()
The output is fairly similar.
Equivalent PySide2 Code
The pure PySide2 code to achieve the same result is as follows −
import sys
from PySide2.QtCore import *
from PySide2.QtGui import *
from PySide2.QtWidgets import *
def window():
   app = QApplication(sys.argv)
   w = QWidget()
   w.setStyleSheet("background-color: #64778D;")

   b = QLabel(w)
   b.setText("Hello World!")
   b.setFont(QFont('Arial Bold', 20))
   b.setAlignment(Qt.AlignCenter)
   b.setStyleSheet("color: white;")
   b.setGeometry(100, 100, 715, 250)
   b.move(50, 20)

   w.setWindowTitle("HelloWorldQt")
   w.show()
   sys.exit(app.exec_())
   if __name__ == '__main__':
      window()
It will produce the same output window.
PySimpleGUIWx
This module encapsulates the functionality of GUI widgets as defined in WxPython toolkit. WxPython is a Python port for the widely used WxWidgets library originally written in C++. Obviously, PySimpleGUIWx depends on WxPython package, and hence the latter will get automatically installed by the following PIP command −
pip3 install PySimpleGUIWx
To confirm that both PySimpleGUIWx and WxPython are properly installed, enter following statements in Python terminal.
>>> import PySimpleGUIWx
>>> PySimpleGUIWx.version
'0.17.1 Released 7-Jun-2020'
>>> import wx
>>> wx.__version__
'4.0.7'
Not much of change is required in the "hello.py" script. We need to just replace PySimpleGUI with PySimpleGUIWx module in the "import" statement.
import PySimpleGUIWx as psg
layout = [[psg.Text(text='Hello World',
   font=('Arial Bold', 20),
   size=(500, 5),
   justification='center')],
]
window = psg.Window('HelloWorldWx', layout, size=(715, 250))
while True:
   event, values = window.read()
   print(event, values)
   if event in (None, 'Exit'):
      break
window.close()
It will produce the following output:

Note that youll need a little more complex code to obtain the similar output with pure WxPython code as follows −
import wx
app = wx.App()
window = wx.Frame(None, title="WxPython", size=(715, 250))
panel = wx.Panel(window)
panel.SetBackgroundColour((100, 119, 141))
label = wx.StaticText(panel, -1, style=wx.ALIGN_CENTER)
label.SetLabel("Hello World")
label.SetForegroundColour((255, 255, 255))
font = wx.Font()
font.SetFaceName("Arial Bold")
font.SetPointSize(30)
label.SetFont(font)
window.Show(True)
app.MainLoop()
It will display a top level window with a text label having Hello World as the caption.
PySimpleGUIWeb
Remi (REMote Interface) is a GUI library for Python applications that are rendered in a web browser. PySimpleGUIWeb package ports the original PySimpleGui library to Remi so that its apps can be run in a browser. Following PIP command installs both PySimpleGUIWeb and Remi in the current Python environment −
pip3 install PySimpleGUIWeb
Check for their proper installation before writing an app.
>>> import PySimpleGUIWeb
>>> PySimpleGUIWeb.version
'0.39.0 Released 6-Jun-2020'
Following script is the PySimpleGUIWeb version of the original Hello World program.
import PySimpleGUIWeb as psg
layout = [[psg.Text(text='Hello World',
   font=('Arial Bold', 20),
   justification='center')]]
window = psg.Window('HelloWorldWeb', layout)
while True:
   event, values = window.read()
   print(event, values)
   if event in (None, 'Exit'):
      break
window.close()
To obtain similar output using pure Remi librarys functionality is a little complex, as the following code shows:
import remi.gui as gui
from remi import start, App
class HelloWeb(App):
   def __init__(self, *args):
      super(HelloWeb, self).__init__(*args)
   def main(self):
      wid = gui.VBox(style={"background-color": "#64778D"})
      self.lbl = gui.Label('Hello World', width='100%', height='100%',
      style={ "color":"white",
         "text-align": "center",
         "font-family": "Arial Bold",
         "font-size": "20px"}
      )
      wid.append(self.lbl)
      return wid
      if __name__ == "__main__":
         start(HelloWeb, debug=True, address='0.0.0.0', port=0)
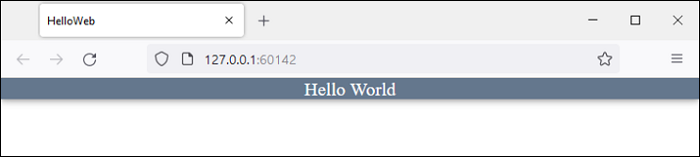
When we run these programs, the Remi server starts, a browser window automatically opens and the Hello World message is displayed.
Here we have seen the Hello World program written in the PySimpleGUI, PySimpleGUIQt, PySimpleGUIWx and PySimpleGUIWeb libraries. We can see that the widget library remains the same. Moreover, the same Hello world program, when written in pure Tkinter, PySide, WxPython and Remi respectively, becomes far more complex and tedious than the PySimpleGUI versions.
PySimpleGUI - Popup Windows
A function in PySimpleGUI module that start with the prefix popup* generates window of a predefined appearance. The name of the popup function indicates is purpose and configuration of buttons present on it. These popups are created with just one line of code. Each popup serves a certain purpose, and then closes immediately.
A most basic popup is created by the popup()function. It can be used like a print() function to display more than one parameters on the window, and an OK button. It acts like a message box, that disappears immediately on pressing the OK button
>>> import PySimpleGUI as psg
>>> psg.popup("Hello World")
It displays a popup window with Hello World text and OK button. Note that more than one strings can be displayed. Following popups with different button configurations are available −
popup_ok − Display Popup with OK button only
popup_ok_cancel − Display popup with OK and Cancel buttons
popup_cancel − Display Popup with "cancelled" button text
popup_yes_no − Display Popup with Yes and No buttons
popup_error − Popup with colored button and 'Error' as button text
These functions return the text of the button pressed by the user. For example, if the user presses OK button of the ok-cancel popup, it returns Ok which can be used in further programming logic.
Following popups accept input from the user in the form of text or let the user select file/folder/date from the selectors.
popup_get_text − Display Popup with text entry field. Returns the text entered or None if closed / cancelled
popup_get_file − Display popup window with text entry field and browse button so that a file can be chosen by user.
popup_get_folder − Display popup with text entry field and browse button so that a folder can be chosen.
popup_get_date − Display a calendar window, get the user's choice, return as a tuple (mon, day, year)
When user has made the selection and Ok button is pressed, the return value of the popup is the text, which can be used further in the program.
Following script shows the use of some of the above popups −
import PySimpleGUI as psg
text = psg.popup_get_text('Enter your name', title="Textbox")
print ("You entered: ", text)
file=psg.popup_get_file('Select a file',  title="File selector")
print ("File selected", file)
folder=psg.popup_get_folder('Get folder', title="Folder selector")
print ("Folder selected",folder)
ch = psg.popup_yes_no("Do you want to Continue?",  title="YesNo")
print ("You clicked", ch)
ch = psg.popup_ok_cancel("Press Ok to proceed", "Press cancel to stop",  title="OkCancel")
if ch=="OK":
   print ("You pressed OK")
if ch=="Cancel":
   print ("You pressed Cancel")
psg.popup_no_buttons('You pressed', ch, non_blocking=True)
psg.popup_auto_close('This window will Autoclose')
Output − The popups generated by the above code are shown below −
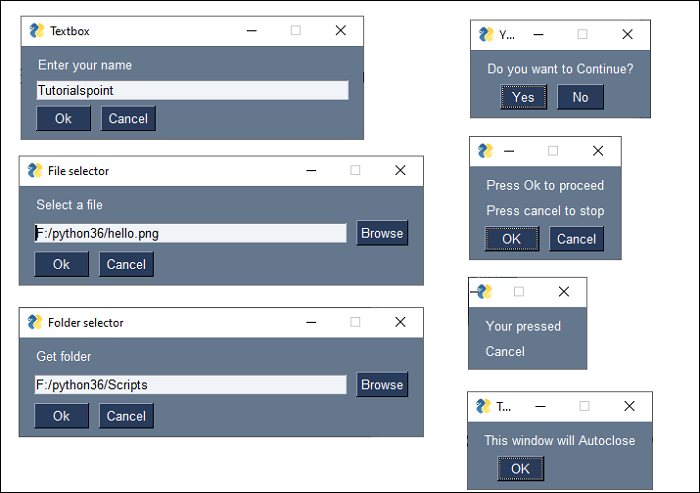
The following output is displayed on the Python console −
You entered: Tutorialspoint
File selected F:/python36/hello.png
Folder selected F:/python36/Scripts
You clicked Yes
You pressed Cancel
All types of popups are objects of respective classes inherited from popup class. All of them have a common set of properties. These properties have a certain default value, and can be used to customize the appearance and behaviour of the popup objects. Following table lists the common parameters −
| Type | Parameter | Description |
|---|---|---|
| Any | *args | Values to be displayed on the popup |
| Str | title | Optional title for the window. |
| (str, str) or None | button_color | Color of the buttons shown (text color, button color) |
| Str | background_color | Window's background color |
| Str | text_color | text color |
| Bool | auto_close | If True the window will automatically close |
| Int | auto_close_duration | time in seconds to keep window open before closing it automatically |
| Bool | non_blocking | If True then will immediately return from the function without waiting for the user's input. |
| Tuple[font_name, size, modifiers] | font | specifies the font family, size, etc. Tuple or Single string format 'name size styles'. |
| Bool | grab_anywhere | If True can grab anywhere to move the window. |
| (int, int) | Location | Location on screen to display the top left corner of window. Defaults to window centered on screen |
| Bool | keep_on_top | If True the window will remain above all current windows |
| Bool | modal | If True, then makes the popup will behave like a Modal window. Default = True |
Scrolled Popup
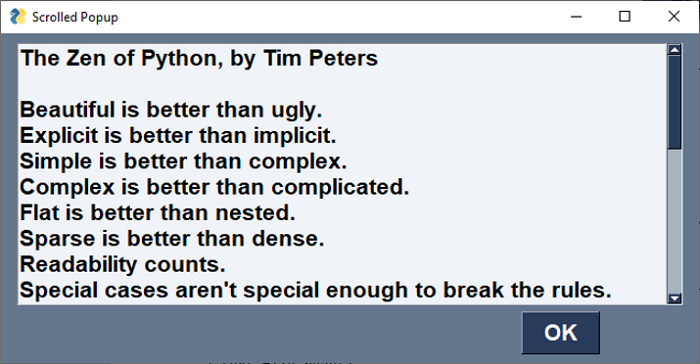
The popup_scrolled() function generates a popup with a scrollable text box in it. Use this to display a large amount of text, consisting of many lines with number of characters more than the width.
The size property is a tuple (w, h) with "w" being the number of characters in one line, and "h" being the lines displayed at a time. The horizontal/vertical scrollbar to the text box will become active if the number of characters/no of lines of text are more than "w" or "h".
In the following example, a big file zen.txt is displayed in a popup with scrollable text box. The file contains the design principles of Python called the "Zen of Python".
import PySimpleGUI as psg
file=open("zen.txt")
text=file.read()
psg.popup_scrolled(text, title="Scrolled Popup", font=("Arial Bold", 16), size=(50,10))
It will produce the following output −
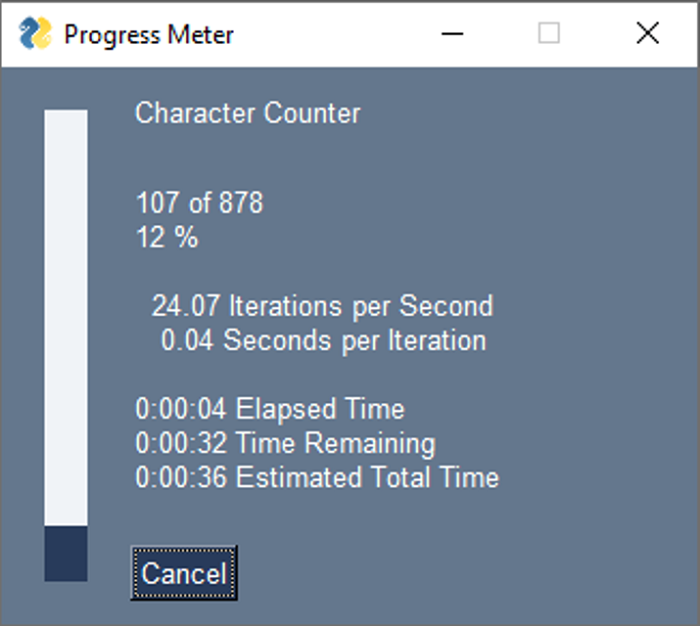
Progress Meter
The "one_line_progress_meter" is a popup that displays the visual representation of an ongoing long process, such as a loop. It shows the instantaneous value of a certain parameter, estimated time to complete the process, and the elapsed time.
In the following example, a text file is read character by character. The Progress meter shows the progress of the process in the form of a progress bar, estimated time required for completion, and the instantaneous value of the count.
import PySimpleGUI as psg
import os
size = os.path.getsize('zen.txt')
file=open("zen.txt")
i=0
while True:
   text=file.read(1)
   i=i+1
   if text=="":
      file.close()
      break
   print (text,end='')
   psg.one_line_progress_meter(
      'Progress Meter', i, size,
      'Character Counter'
   )
It will produce the following output window −
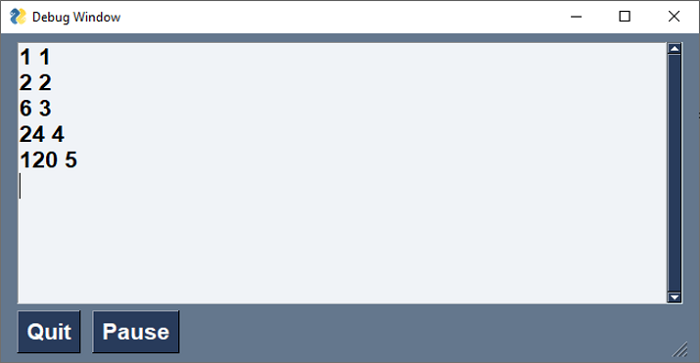
Debug Popup
During the execution of a program, it is usually required to keep track of intermediate values of certain variables, although not required in the following output. This can be achieved by the Print() function in PySimpleGUI library.
Note − Unlike Pythons built-in print() function, this function has "P" in uppercase).
As the program encounters this function for the first time, the debug window appears and all the subsequent Prints are echoed in it. Moreover, we can use EasyPrint or eprint that also have same effect.
The following program computes the factorial value of the number input by the user. Inside the for loop, we want to keep track of the values of f (for factorial) on each iteration. That is done by the Print function and displayed in the debug window.
import PySimpleGUI as psg
f=1
num=int(psg.popup_get_text("enter a number: "))
for x in range(1, num+1):
   f=f*x
   psg.Print (f,x)
print ("factorial of {} = {}".format(x,f))
Assuming that the user inputs 5, the debug window shows the following output−
PySimpleGUI - Window Class
Popups have a predefined configuration of buttons, text labels and text input fields. The Window class allows you to design a GUI of more flexible design. In addition to these elements, other elements like listbox, checkbox, radio buttons, etc., are available. You can also provide a menu system to the GUI. Certain specialized widgets such as spinner, sliders, etc., can also be used to make the design more effective.
A window can be a non-persistent window, similar to the popups. It blocks the program flow till the user closes it by clicking a button on the client area or the close (X) button in the title bar.
A persistent window on the other hand continues to be visible till the event causing it to be closed occurs. The asynchronous window is the one whose contents are periodically updated.
Layout Structure
The placement of elements or widgets in the windows client area is controlled by list of list objects. Each list element corresponds to one row on the window surface, and may contain one or more GUI elements available in PySimpleGUI library.
The first step is to visualize the placement of elements by making a drawing as follows −
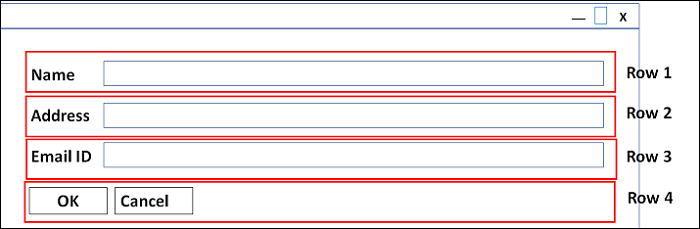
The elements on the window are placed in four rows. First three rows have a Text element (displays a static text) and an InputText element (in which user can enter). Last row has two buttons, Ok and Cancel.
This is represented in the list of lists as below −
import PySimpleGUI as psg
layout = [
   [psg.Text('Name '),psg.Input()],
   [psg.Text('Address '), psg.Input()],
   [psg.Text('Email ID '), psg.Input()],
   [psg.OK(), psg.Cancel()]
]
This list object is used as the value of layout parameter for the constructor of the Window class.
window = psg.Window('Form', layout)
This will display the desired window. The user inputs are stored in a dictionary named as values. The read() method of Window class is called as the user presses the Ok button, and the window closes immediately.
The complete code to render the window is as follows −
import PySimpleGUI as psg
psg.set_options(font=('Arial Bold', 16))
layout = [
   [psg.Text('Name ', size=(15,1)),psg.Input(expand_x=True)],
   [psg.Text('Address ', size=(15,1)), psg.Input(expand_x=True)],
   [psg.Text('Email ID ', size=(15,1)), psg.Input(expand_x=True)],
   [psg.OK(), psg.Cancel()]
]
window = psg.Window('Form', layout, size=(715,207))
event, values = window.read()
print (event, values)
window.close()
Here is the output as displayed −
Enter the data as shown and press the "OK" button. The values will be printed as below −
OK {0: 'Kiran Gupta', 1: 'Mumbai', 2: 'kiran@gmail.com'}
If, after filling the data, you press the "Cancel" button, the result printed will be −
Cancel {0: 'Kiran Gupta', 1: 'Mumbai', 2: 'kiran@gmail.com'}
Persistent Window
Note that this window gets closed as soon as any button (or the "X" button in the title bar) is clicked. To keep the window alive till a special type of button called Exit is pressed or if the window is closed by pressing "X", the read() method is placed in an infinite loop with provision to break when WIN_CLOSED event occurs (when Exit button is pressed) or Exit event occurs (when "X" button is pressed).
Let us change the Cancel button in the above code with Exit button.
import PySimpleGUI as psg
layout = [
   [psg.Text('Name '), psg.Input()],
   [psg.Text('Address '), psg.Input()],
   [psg.Text('Email ID '), psg.Input()],
   [psg.OK(), psg.Exit()]
]
window = psg.Window('Form', layout)
while True:
   event, values = window.read()
   if event == psg.WIN_CLOSED or event == 'Exit':
      break
   print (event, values)
window.close()
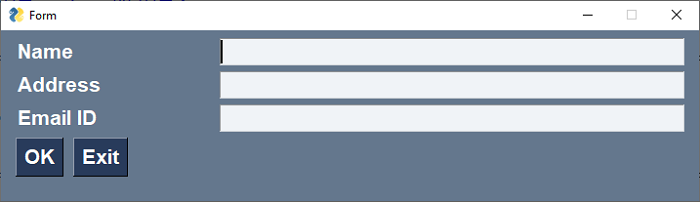
The appearance of the window will be similar as before, except that instead of Cancel, it has Exit button.

The entered data will be printed in the form of a tuple. First element is the event, i.e., the caption of button, and second is a dictionary whose key is incrementing number and value is the text entered.
OK {0: 'kiran', 1: 'Mumbai', 2: 'kiran@gmail.com'}
OK {0: 'kirti', 1: 'Hyderabad', 2: 'kirti@gmail.com'}
OK {0: 'karim', 1: 'Chennai', 2: 'karim@gmail.com'}
Window Methods
The important method defined in the Window class is the read() method, to collect the values entered in all input elements. The Window class has other methods to customize the appearance and behaviour. They are listed below −
| Sr.No. | Method & Description |
|---|---|
| 1 | AddRow Adds a single row of elements to a window's "self.Rows" variable |
| 2 | AddRows Loops through a list of lists of elements and adds each row, list, to the layout. |
| 3 | close Closes the window so that resources are properly freed up. |
| 4 | disable Disables window from taking any input from the user |
| 5 | disappear Causes a window to "disappear" from the screen, but remain on the taskbar. |
| 6 | enable Re-enables window to take user input |
| 7 | fill Fill in elements that are input fields with data provided as dictionary. |
| 8 | find_element Find element object associated with the provided key. It is equivalent to "element = window[key]" |
| 9 | get_screen_dimensions Get the screen dimensions. |
| 10 | hide Hides the window from the screen and the task bar |
| 11 | load_from_disk Restore values from a Pickle file created by the "SaveToDisk" function |
| 12 | layout Populates the window with a list of widget lists. |
| 13 | read Get all of your data from your Window. Pass in a timeout (in milliseconds) to wait. |
| 14 | reappear Causes a disappeared window to display again. |
| 15 | save_to_disk Saves the values contained in each of the input elements to a pickle file. |
| 16 | set_title Change the title of the window in taskbar |
Update Window with Key
The data entered by the user in different input elements on the window layout is stored in the dictionary format. The dictionary keys are numbered (starting from 0) corresponding to input elements from left to right and top to bottom. We can refer to the input data by dictionary operator. That means, the data in the first element is returned by "values[0]".
values = {0: 'kiran', 1: 'Mumbai', 2: 'kiran@gmail.com'}
data = [values[k] for k in values.keys()]
print (data)
It will print the following on the console −
['kiran', 'Mumbai', 'kiran@gmail.com']
However, if you want to manipulate the value of an element programmatically, the element must be initialized by assigning a unique string value to its key parameter. The key of an element is like the name of the variable or identifier, which makes it convenient to handle reading or assigning a value to it programmatically.
The key parameter should be a string. The convention is that it should be an uppercase string preceded and followed by a "-" character (Example: "- NAME-"). However, any string can be used.
Let us assign keys to the Input elements in the above example as shown below −
layout = [
   [psg.Text('Name '),psg.Input(key='-NM-')],
   [psg.Text('Address '), psg.Input(key='-AD-')],
   [psg.Text('Email ID '), psg.Input(key='-ID-')],
   [psg.OK(), psg.Exit()],
]
As a result, the values dictionary returned after the read() method will contain the key identifiers instead of integers previously.
OK {'-NM-': 'Kiran', '-AD-': 'Mumbai', '-ID-': 'kiran@gmail.com'}
Now, values[-NM-'] will fetch 'Kiran'. The key can be assigned to any element and not just the input element. You can use the same key to call Update on an element. We can use "find_element(key)" of the Window object, or use window['key'] to refer to the element.
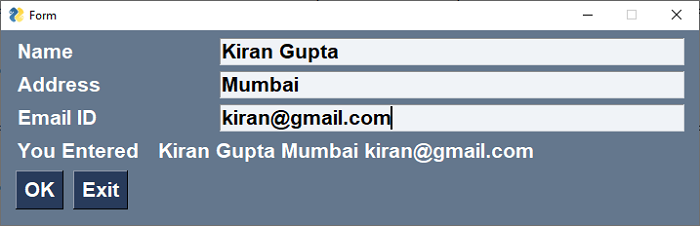
Let us extend our previous example to add a row before the Ok and Cancel buttons and have an empty Text element with "-OUT-" key. On the OK event, this Text label shows the concatenation of data entered in three input elements having keys "-NM-", "-AD-" and "-ID-"
import PySimpleGUI as psg
psg.set_options(font=('Arial Bold', 16))
layout = [
   [psg.Text('Name ', size=(15, 1)),
   psg.Input(key='-NM-', expand_x=True)],
   [psg.Text('Address ', size=(15, 1)),
   psg.Input(key='-AD-', expand_x=True)],
   [psg.Text('Email ID ', size=(15, 1)),
   psg.Input(key='-ID-', expand_x=True)],
   [psg.Text('You Entered '), psg.Text(key='-OUT-')],
   [psg.OK(), psg.Exit()],
]
window = psg.Window('Form', layout, size=(715, 200))
while True:
   event, values = window.read()
   print(event, values)
   out = values['-NM-'] + ' ' + values['-AD-'] + ' ' + values['-ID-']
   window['-OUT-'].update(out)
   if event == psg.WIN_CLOSED or event == 'Exit':
      break
window.close()
Run the above code, enter text in three input elements and press OK. The -OUT- text label will be updated as shown here −
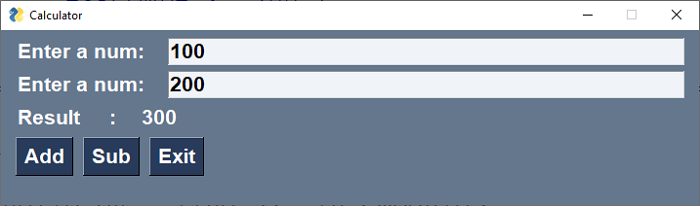
Another example of use of key attribute is given below. To Input elements are assigned key parameters -FIRST- and -SECOND-. There are two buttons captioned Add and Sub. The Text element displays addition or subtraction of two numbers depending on the button pressed.
import PySimpleGUI as psg
import PySimpleGUI as psg
psg.set_options(font=('Arial Bold', 16))
layout = [
   [psg.Text('Enter a num: '), psg.Input(key='-FIRST-')],
   [psg.Text('Enter a num: '), psg.Input(key='-SECOND-')],
   [psg.Text('Result : '), psg.Text(key='-OUT-')],
   [psg.Button("Add"), psg.Button("Sub"), psg.Exit()],
]
window = psg.Window('Calculator', layout, size=(715, 180))
while True:
   event, values = window.read()
   print(event, values)
   if event == "Add":
      result = int(values['-FIRST-']) + int(values['-SECOND-'])
   if event == "Sub":
      result = int(values['-FIRST-']) - int(values['-SECOND-'])
   window['-OUT-'].update(result)
   if event == psg.WIN_CLOSED or event == 'Exit':
      break
window.close()
The following screenshot shows the result when the "Add" button is pressed.
Borderless Window
By default, the application window is created with a title bar above the client area wherein all other elements are placed in the layout. The titlebar consists of a window title on the left, and the control buttons (minimize, restore/maxmimize and close) on the right. However, particularly for a kiosk-like application, there is no need of a title bar. You can get rid of the title bar by setting the "no_titlebar" property of the Window object to "True".

To terminate such an application, the event loop must be terminated on the occurrence of Exit button event.
Window with Disabled Close
If you wish to prevent the user to minimize the application window, the "disable_minimize" property of the Window object should be set to True. Similarly, the True value to "disable_close" property the Close button is displayed but it doesnt create the WINDOW_CLOSED event.

Transparent Window
The "alpha_channel" property of the Window object decides the transparency of the window. Its value is between 0 to 1. By default, it is 0, which means that the window appears as opaque. Set it to 1 to make it completely transparent. Any float value between 0 to 1 makes the transparency proportional.

Multiple Windows
PySimpleGUI allows more than one windows to be displayed simultaneously. The static function in PySimpleGUI module reads all the active windows when called. To make the window active, it must be finalized. The function returns a tuple of (window, event, values) structure.
window, event, values = PySimpleGUI.read_all_windows()
If no window is open, its return value is (None, WIN_CLOSED, None)
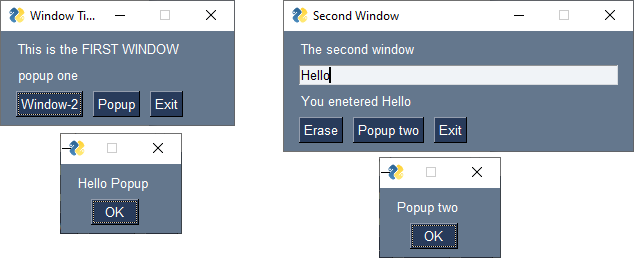
In the following code, two functions "win1()" and "win2()" create a window each when called. Starting with the first window, the button captioned Window-2 opens another window, so that both are active. When CLOSED event on first window takes place, both are closed and the program ends. If the "X" button on second window is pressed, it is marked as closed, leaving the first open.
import PySimpleGUI as psg
def win1():
   layout = [
      [psg.Text('This is the FIRST WINDOW'), psg.Text('', key='-OUTPUT-')],
      [psg.Text('popup one')],
      [psg.Button('Window-2'), psg.Button('Popup'), psg.Button('Exit')]
   ]
   return psg.Window('Window Title', layout, finalize=True)
   def win2():
      layout = [
         [psg.Text('The second window')],
         [psg.Input(key='-IN-', enable_events=True)],
         [psg.Text(size=(25, 1), key='-OUTPUT-')],
         [psg.Button('Erase'), psg.popup('Popup two'), psg.Button('Exit')]]
         return psg.Window('Second Window', layout, finalize=True)
window1 = win1()
window2 = None
while True:
   window, event, values = psg.read_all_windows()
   print(window.Title, event, values)
   if event == psg.WIN_CLOSED or event == 'Exit':
      window.close()
   if window == window2:
      window2 = None
   elif window == window1:
      break
   elif event == 'Popup':
      psg.popup('Hello Popup')
   elif event == 'Window-2' and not window2:
      window2 = win2()
   elif event == '-IN-':
      window['-OUTPUT-'].update('You entered {}'.format(values["-IN-"]))
   elif event == 'Erase':
      window['-OUTPUT-'].update('')
      window['-IN-'].update('')
window.close()
It will produce the following output windows:
Asynchronous Window
The read() method of the Window class has the following additional parameters −
window.read(timeout = t, timeout_key=TIMEOUT_KEY, close=False)
The timeout parameter lets your GUIs to use in a non-blocking read situation. It is the miliseconds your device can wait before returning. It makes a window that runs on a periodic basis.
The longer you're able to add to the timeout value, the less CPU time you'll be taking. During the timeout time, you are "yielding" the processor to do other tasks. your GUI will be more responsive than if you used a nonblocking read.
The timeout_key parameter helps in deciding whether there has been any user action within the stipulated time. The default value of "timeout_key" is "__timeout__".
while True:
   event, value = window.read(timeout=10)
   if event == sg.WIN_CLOSED:
      break
   if event == sg.TIMEOUT_KEY:
      print("Nothing happened")
To make the window movable, set the "grab_anywhere" property of the Window object to true. If the "keep_on_top" property is set to True, the window will remain above the current windows.
PySimpleGUI - Element Class
The PySimpleGUI library consists of a number of GUI widgets that can be placed on top of the Window object. For instance, the buttons or the textboxes that we have used in the above examples. All these widgets are in fact objects of classes defined in this library, in which Element class acts as the base for all other widget classes.
An object of this Element class is never declared explicitly. It defines the common properties like size, color, etc. Here is the list of the available widgets (also called elements)
| Sr.No. | Widget & Description |
|---|---|
| 1 | Text Element Display some text in the window. Usually this means a single line of text. |
| 2 | Input Element Display a single text input field. |
| 3 | Multiline Element Display and/or read multiple lines of text. This is both an input and output element. |
| 4 | Combo Element A combination of a single-line input and a drop-down menu. |
| 5 | OptionMenu Element Similar to Combo. Only on TKinter port |
| 6 | Checkbox Element Displays a checkbox and text next to it. |
| 7 | Radio Element Used in a group of other Radio Elements to provide user with ability to select only one choice in a list of choices. |
| 8 | Spin Element A spinner with up/down buttons and a single line of text. |
| 9 | Button Element Defines all possible buttons. The shortcuts such as Submit, FileBrowse, ... each create a Button |
| 10 | ButtonMenu element Creates a button that when clicked will show a menu similar to right click menu. |
| 11 | Slider Element Horizontal or vertical slider to increment/decrement a value. |
| 12 | Listbox Element Provide a list of values for the user to choose one or more of. Returns a list of selected rows when a window.read() is executed. |
| 13 | Image Element Show an image in the window. Should be a GIF or a PNG only. |
| 14 | Graph Element Creates area to draw graph |
| 15 | Canvas Element An area to draw shapes |
| 16 | ProgressBar Element Displays a colored bar that is shaded as progress of some operation is made. |
| 17 | Table Element Display data in rows and columns |
| 18 | Tree Element Presents data in a tree-like manner, much like a file/folder browser. |
| 19 | Sizer Element This element is used to add more space. |
| 20 | StatusBar Element A StatusBar Element creates the sunken text-filled strip at the bottom. |
| 21 | Frame Element The Frame element is a container object that holds on or more elements of other types. |
| 22 | Column Element It is very useful if you want to design the GUI window elements represented in one or more vertical columns. |
| 23 | Tab Element The use of Tab elements makes the design very convenient, effective and easy for the user to navigate. Tab element is also a container element such as Frame or Column. |
Properties of Element Class
Following are the properties of the Element Class −
| Sr.No. | Property & Description |
|---|---|
| 1 | size (w=characters-wide, h=rows-high) |
| 2 | font specifies the font family, size |
| 3 | background_color color of background |
| 4 | text_color element's text color |
| 5 | key Identifies an Element |
| 6 | visible set visibility state of the element (Default = True) |
Methods of Element Class
Following are the methods of the Element Class −
| Sr.No. | Method & Description | 1 | set_tooltip() Called by application to change the tooltip text for an Element |
|---|---|
| 2 | set_focus() Sets the current focus to be on this element |
3 | set_size() Changes the size of an element to a specific size |
| 4 | get_size() Return the size of an element in Pixels |
5 | expand() Causes the Element to expand to fill available space in the X and Y directions |
| 6 | set_cursor() Sets the cursor for the current Element |
| 7 | set_right_click_menu() Sets right click menu to be invoked when clicked |
PySimpleGUI - Events
Any GUI application is event driven, having the ability to respond to the various possible events occurring on the GUI elements. In PySimpleGUI, the event handling is done inside an infinite loop below the constitution of GUI design, continuously checking whether an event occurs and perform the actions based on the event.
There are two types of events −
Window events, and
Element events.
The window events are enabled by default, and include the button events (occur when any button is clicked) and the event of the "X" button on the titlebar clicked.
The element events are not enabled by default. Element-specific events can be detected only when the "enable_events" parameter is set to True when an element is created.
Window Closed Event
The infinite event loop that makes the PySimpleGUI window persistent, is terminated when the user presses the "X" button, or the close() method of Window class is executed. The standard way of terminating the loop is as follows −
import PySimpleGUI as psg
...
while True:
 ...

   if event == psg.WIN_CLOSED:
      break
 ...
window.close()
The Widow class also emits an "enable_close_attempted_event" if this parameter is set to True. It is a good practice to call yes-no popup when it is detected inside the loop.
window = psg.Window('Calculator', layout, enable_close_attempted_event=True)
while True:
event, values = window.read()
print(event, values)
if event == "Add":
result = int(values['-FIRST-']) + int(values['-SECOND-'])
if event == "Sub":
result = int(values['-FIRST-']) - int(values['-SECOND-'])
window['-OUT-'].update(result)
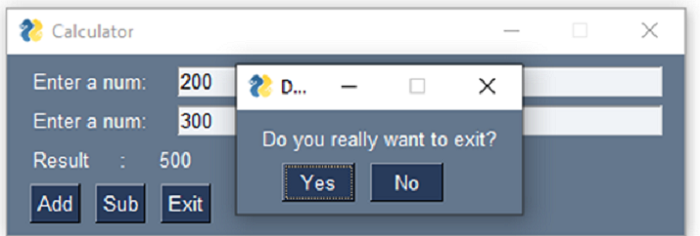
if event == psg.WINDOW_CLOSE_ATTEMPTED_EVENT and psg.popup_yes_no('Do you really want to exit?') == 'Yes':
break
if event == psg.WIN_CLOSED or event == 'Exit':
break
In this case, as the "X" button is pressed, the Popup with Yes/No button appears and the program exits when the "Yes" button is clicked.
It will produce the following output window −
The event value also returns the "-WINDOW CLOSE ATTEMPTED-" value.
-WINDOW CLOSE ATTEMPTED- {'-FIRST-': '200', '-SECOND-': '300'}
Button Events
The button click event is enabled by default. To disable, use "Button.update(disabled=True)". You can also set "enable_events=True" in Buttons constructor, it will enable the Button Modified event. This event is triggered when something 'writes' to a button.
When we read the contents of the window (using "window.read()"), the button value will be either its caption (if key is not set) or key if it is set.
In the above example, since the key parameter is not set on the Add and Sub buttons, their captions are returned when the window is read.
Add {'-FIRST-': '200', '-SECOND-': '300'}
Add key parameters to Add and Sub buttons in the program.
import PySimpleGUI as psg
layout = [
   [psg.Text('Enter a num: '), psg.Input(key='-FIRST-')],
   [psg.Text('Enter a num: '), psg.Input(key='-SECOND-')],
   [psg.Text('Result : '), psg.Text(key='-OUT-')],
   [psg.Button("Add", key='-ADD-'), psg.Button("Sub", key='- SUB-'), psg.Exit()],
]
window = psg.Window('Calculator', layout)
while True:
   event, values = window.read()
   print(event, values)

   if event == "-ADD-":
      result = int(values['-FIRST-']) + int(values['-SECOND-'])

   if event == "-SUB-":
      result = int(values['-FIRST-']) - int(values['-SECOND-'])

   window['-OUT-'].update(result)

   if event == psg.WIN_CLOSED or event == 'Exit':
      break
window.close()
The tuple returned by the read() method will now show the key of button pressed.
-ADD- {'-FIRST-': '200', '-SECOND-': '300'}
Events of Other Elements
Many of the elements emit events when some type of user interaction takes place. For example, when a slider is moved, or an item from the list is selected on or a radio button is clicked on.
Unlike Button or Window, these events are not enabled by default. To enable events for an Element, set the parameter "enable_events=True".
The following table shows the elements and the events generated by them.
| Name | Events |
|---|---|
| InputText | any key pressed |
| Combo | item selected |
| Listbox | selection changed |
| Radio | selection changed |
| Checkbox | selection changed |
| Spinner | new item selected |
| Multiline | any key pressed |
| Text | Clicked |
| Status Bar | Clicked |
| Graph | Clicked |
| Graph | Dragged |
| Graph | drag ended (mouse up) |
| TabGroup | tab clicked |
| Slider | slider moved |
| Table | row selected |
| Tree | node selected |
| ButtonMenu | menu item chosen |
| Right click menu | menu item chosen |
PySimpleGUI - Menubar
Most of the desktop applications have a menu system to trigger different operations based on users choice of options in the menu. In a typical application window, the menu bar is placed just below the title bar and above the client area of the window.
A menubar is a horizontal bar consisting of clickable buttons. When any of these buttons is clicked it generates a pull down list of option buttons. Such an option button triggers a click event which can be processed inside an event loop.
The menu system is designed just as the window layout is specified. It is also a list of lists. Each list has one or more strings. The starting string of the list at the first level is the caption for the button appearing in the horizontal menu bar. It is followed by a list of caption strings for the option buttons in the drop down menu. These option captions are in a list inside the first level list.
You may have a sub-menu under an option button, in which case the captions are put in a third level list. Likewise, the captions can be nested up to any level.
The general format of a menu definition is as follows:
menu_def = [
   ['Memu1', ['btn1', 'btn2', 'btn3', 'btn4',]],
   ['menu2', ['btn5', 'btn6','btn7', 'btn8'],],
]
To attach the menu system to the main layout of PysimpleGUI window, place the Menu object in the first row of the layout.
The Menu constructor is given the menu_def list as the argument. Other rows of the main layout may be given after the row having Menu object.
layout= [[psg.Menu(menu_def),[..], [..]]
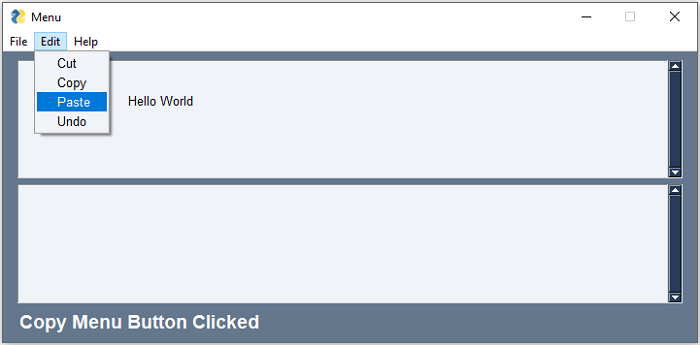
In the code given below, we have a menu bar with File, Edit and Help menus, each having a few menu buttons in respective menu bar.
import PySimpleGUI as psg
menu_def = [['File', ['New', 'Open', 'Save', 'Exit', ]], ['Edit', ['Cut', 'Copy', 'Paste', 'Undo'], ], ['Help', 'About...'], ]
layout = [[psg.Menu(menu_def)],
[psg.Multiline("", key='-IN-',
expand_x=True, expand_y=True)],
[psg.Multiline("", key='-OUT-',
expand_x=True, expand_y=True)],
[psg.Text("", key='-TXT-',
expand_x=True, font=("Arial Bold", 14))]
]
window = psg.Window("Menu", layout, size=(715, 300))
while True:
event, values = window.read()
print(event, values)
if event != psg.WIN_CLOSED:
window['-TXT-'].update(values[0] + "Menu Button Clicked")
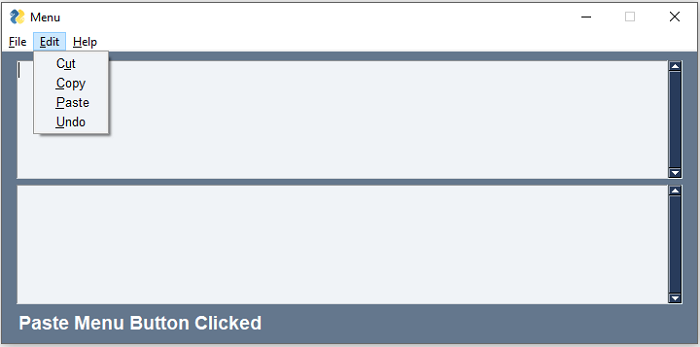
if event == 'Copy':
txt = window['-IN-'].get()
if event == 'Paste':
window['-OUT-'].update(value=txt)
if event == psg.WIN_CLOSED:
break
window.close()
Below the Menubar, two Multiline elements are placed. The last row has a Text element.
When any menu option button is clicked, the event so generated is the caption of the button. This caption is displayed on the Text label in the last row. Refer to the following figure −

When the Copy event occurs, the text in the upper multiline box with -INkey is stored in a txt variable. Afterwards, when Paste button is pressed, the -OUT- box is updated with the value of txt.
Menu button with Hot Key
To map a menu button with a key on the keyboard, put an ampersand & character before the desired character. For example, put & before File so that the string is '&File'. By doing so, the File menu can be accessed by pressing "Alf+F" key. Here "F" key is said to be a hot key.
Add hot keys to the menu buttons in our menu definition.
menu_def = [
   ['&File', ['&New', '&Open', '&Save', 'E&xit',]],
   ['&Edit', ['C&ut', '&Copy','&Paste', '&Undo'],],
   ['&Help', '&About...'],
]
When the code is run, the hot keys in the menu are shown as underlined.
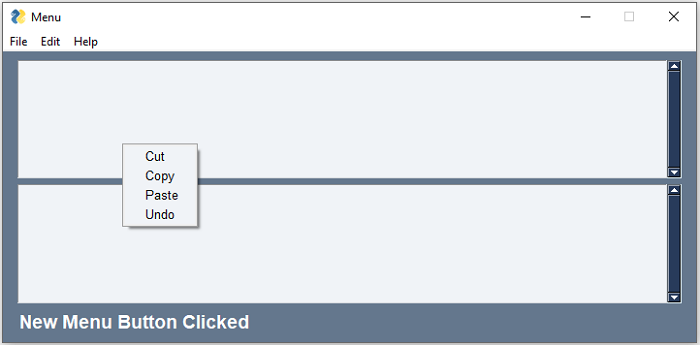
Right-click Menu
This menu is detached from the menubar which is at the top of the application window. Whenever the user presses the right click button of the mouse, this menu pops up at the same position where the click takes place.
In the menubar defined above, each list is a definition of a single menu. Such single menu definition can be attached to any element by the right_click_menu parameter in the constructor. This parameter can also be passed while constructing the main Window object.
Let us use rightclick as a variable for the list corresponding to the Edit menu.
rightclick=['&Edit', ['C&ut', '&Copy','&Paste', '&Undo']]
menu_def = [
   ['&File', ['&New', '&Open', '&Save', 'E&xit',]], rightclick,
   ['&Help', '&About...'],
]
Use it as the value of right_click_menu parameter in the Window constructor. See the following snippet −
window=psg.Window("Menu", layout, size=(715, 300), right_click_menu=rightclick)
Make these changes and run the code. Click anywhere in the window. The menu pops up as shown −
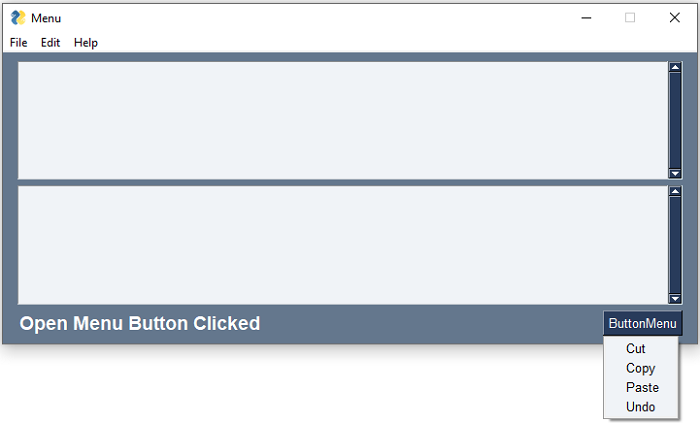
ButtonMenu
This menu is similar to the right click menu, except that it is attached to a button and pops up when the button is clicked.
In the last row of the main layout, we add a ButtonMenu element and use the rightclick list as its layout.
layout= [
   [psg.Menu(menu_def)],
   [psg.Multiline("", key='-IN-', expand_x=True, expand_y=True)],
   [psg.Multiline("", key='-OUT-', expand_x=True, expand_y=True)],
   [psg.Text("", key='-TXT-', expand_x=True, font=("Arial Bold", 14)),
   psg.ButtonMenu('ButtonMenu', rightclick, key='-BMENU-')]
]
When the button at the lower right is clicked, the menu comes up as can be seen in the following figure −
PySimpleGUI - Matplotlib Integration
When Matplotlib is used from Python shell, the plots are displayed in a default window. The backend_tkagg module is useful for embedding plots in Tkinter.
The Canvas element in PySimpleGUI has TKCanvas method that returns original TKinter's Canvas object. It is given to the FigureCanvasTkAgg() function in the backend_tkagg module to draw the figure.
First, we need to create the figure object using the Figure() class and a plot to it. We shall draw a simple plot showing sine wave.
fig = matplotlib.figure.Figure(figsize=(5, 4), dpi=100)
t = np.arange(0, 3, .01)
fig.add_subplot(111).plot(t, 2 * np.sin(2 * np.pi * t))
Define a function to draw the matplotlib figure object on the canvas
def draw_figure(canvas, figure):
   figure_canvas_agg = FigureCanvasTkAgg(figure, canvas)
   figure_canvas_agg.draw()
   figure_canvas_agg.get_tk_widget().pack(side='top', fill='both', expand=1)
   return figure_canvas_agg
Obtain the Canvas from PySimpleGUI.Canvas object by calling its TkCanvas property.
layout = [
   [psg.Text('Plot test')],
   [psg.Canvas(key='-CANVAS-')],
   [psg.Button('Ok')]
]
Draw the figure by calling the above function. Pass the Canvas object and fifure object to it.
fig_canvas_agg = draw_figure(window['-CANVAS-'].TKCanvas, fig)
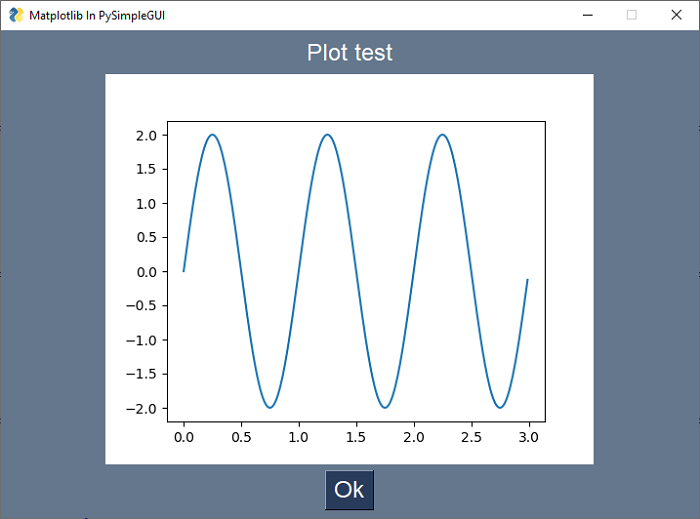
Example: Draw a Sinewave Line graph
The complete code is given below −
import matplotlib.pyplot as plt
import numpy as np
from matplotlib.backends.backend_tkagg import
FigureCanvasTkAgg
import PySimpleGUI as sg
import matplotlib
matplotlib.use('TkAgg')
fig = matplotlib.figure.Figure(figsize=(5, 4), dpi=100)
t = np.arange(0, 3, .01)
fig.add_subplot(111).plot(t, 2 * np.sin(2 * np.pi * t))
def draw_figure(canvas, figure):
   tkcanvas = FigureCanvasTkAgg(figure, canvas)
   tkcanvas.draw()
   tkcanvas.get_tk_widget().pack(side='top', fill='both', expand=1)
   return tkcanvas
layout = [[sg.Text('Plot test')],
   [sg.Canvas(key='-CANVAS-')],
   [sg.Button('Ok')]]
window = sg.Window('Matplotlib In PySimpleGUI', layout, size=(715, 500), finalize=True, element_justification='center', font='Helvetica 18')

# add the plot to the window
tkcanvas = draw_figure(window['-CANVAS-'].TKCanvas, fig)
event, values = window.read()
window.close()
The generated graph is as follows −
PySimpleGUI - Working with PIL
Python Imaging Library is a free, cross-platform and open-source library for the Python programming language that has the functionality for opening, manipulating, and saving many different image file formats.
To install it, use the PIP command as follows −
pip3 install pillow
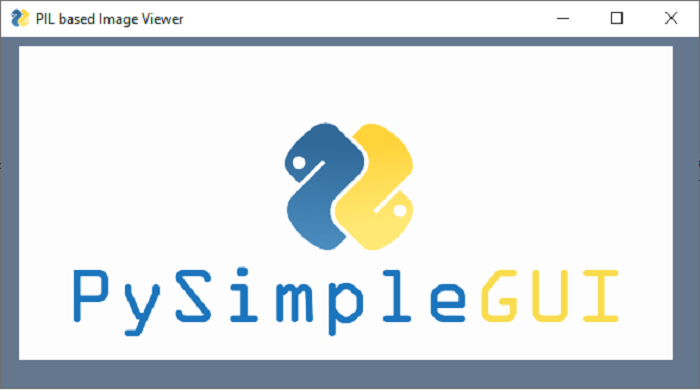
In the following example, we obtain the byte value of the PNG image with PIL function and display the same in Image element on a PySimpleGUI window.
import PySimpleGUI as sg
import PIL.Image
import io
import base64
def convert_to_bytes(file_or_bytes, resize=None):
   img = PIL.Image.open(file_or_bytes)
   with io.BytesIO() as bio:
      img.save(bio, format="PNG")
      del img
      return bio.getvalue()

imgdata = convert_to_bytes("PySimpleGUI_logo.png")
layout = [[sg.Image(key='-IMAGE-', data=imgdata)]]
window = sg.Window('PIL based Image Viewer', layout,resizable=True)
while True:
   event, values = window.read()
   if event == sg.WIN_CLOSED:
      break
window.close()
It will produce the following output window −
PySimpleGUI - Debugger
In addition to the built-in debugger that most IDEs such as PyCharm or VS Code have, PySimpleGUI offers its own debugger. This debugger provides you the ability to "see" and interact with your code, while it is running.
To use the debugger service effectively, the window should be red asynchronously, i.e., you should provide a timeout to the read() function.
The debugger window is invoked by calling show_debugger_window() function anywhere inside the program as shown below −
import PySimpleGUI as sg
sg.show_debugger_window(location=(10,10))
window = sg.Window('Debugger Demo',
   [[sg.Text('Debugger'),
   sg.Input('Input here'),
   sg.Button('Push Me')]]
)
while True:
   event, values = window.read(timeout=500)
   if event == sg.TIMEOUT_KEY:
      continue
   if event == sg.WIN_CLOSED:
      break
   print(event, values)
window.close()
The PySimpleGUI debugger window appears at the specified screen location.
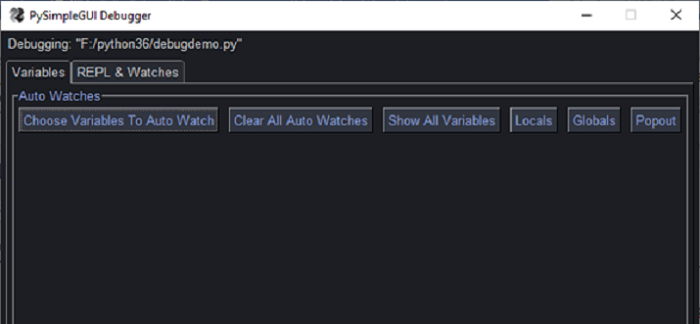
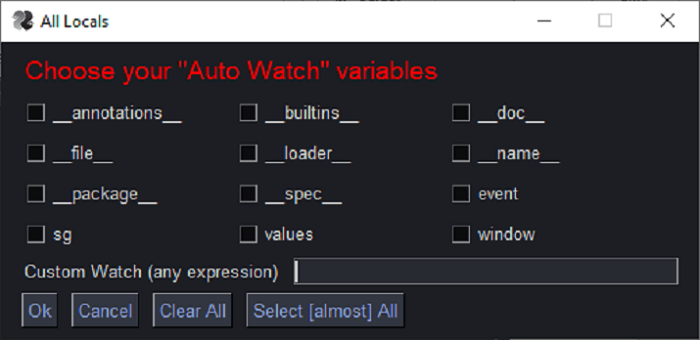
The window shows two tabs Variables and REPL. Click on the Variables tab. A list of variables to auto-watch is shown Check the ones that you want to watch during the execution of the program.
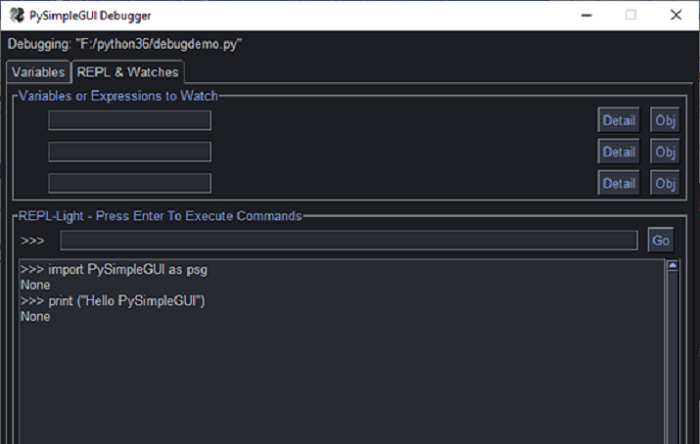
The second tab about REPL gives a Python interactive console to be executed around your programs environment so that you can inspect the values of desired variables in the code.
PySimpleGUI - Settings
Global Settings
Global settings are the application settings available application wide. These settings control the various properties of the Element class to be applied to all the Elements in the application.
These settings work in hierarchical manner. The global settings are overridden if those settings are given different value for a window. In turn the settings defined in Window object are given different value for a specific element.
For example, if the font size is set to 16 globally, the text of all elements is displayed accordingly. However, if a specific Text or Input element with Font property with size other than 16 is defined in the layout, it will change the appearance accordingly.
The function set_options is used to change settings that will apply globally. If it's a setting that applies to Windows, then that setting will apply not only to Windows that you create, but also to popup Windows.
import PySimpleGUI as sg
sg.set_options(font=('Arial Bold', 16))
User Settings
"User settings" is a dictionary that is automatically written to your hard drive. User settings are stored in a Python dictionary which is saved to and loaded from the disk. Individual settings are thus keys into a dictionary.
List of user setting functions −
| Sr.No. | Function & Description |
|---|---|
| 1 | user_settings Returns settings as a dictionary |
| 2 | user_settings_delete_entry Deletes a setting |
| 3 | user_settings_delete_filename Deletes the settings file |
| 4 | user_settings_file_exists Returns True if settings file specified exists |
| 5 | user_settings_filename Returns full path and filename of settings file |
| 6 | user_settings_get_entry Returns value for a setting. If no setting found, then specified default value is returned |
| 7 | user_settings_load Loads dictionary from the settings file. |
| 8 | user_settings_save Saves settings to current or newly specified file. |
| 9 | user_settings_set_entry Sets an entry to a particular value |
| 10 | user_settings_write_new_dictionary Writes a specified dictionary to settings file |
Create the User Settings object.
settings = sg.UserSettings()
Use the dictionary-style [ ] syntax to read a setting. If the item's name is '- item-', then reading the value is achieved by writing
item_value = settings['-item-']
Following sttement is used to Write the setting.
settings['-item-'] = new_value
To delete an item, again the dictionary style syntax is used.
del settings['-item-']
You can also call the delete_entry method to delete the entry.
settings.delete_entry('-item-')
The following simple program demonstrates load/saving of user settings
import PySimpleGUI as sg
import json
sg.set_options(font=('Arial Bold', 16))
layout = [
   [sg.Text('Settings', justification='left')],
   [sg.Text('User name', size=(10, 1), expand_x=True),
   sg.Input(key='-USER-')],
   [sg.Text('email ID', size=(10, 1), expand_x=True),
   sg.Input(key='-ID-')],
   [sg.Text('Role', size=(10, 1), expand_x=True),
   sg.Input(key='-ROLE-')],
   [sg.Button("LOAD"), sg.Button('SAVE'), sg.Button('Exit')]
]
window = sg.Window('User Settings Demo', layout, size=(715, 200))
# Event Loop
while True:
   event, values = window.read()
   if event in (sg.WIN_CLOSED, 'Exit'):
      break
   if event == 'LOAD':
      f = open("settings.txt", 'r')
      settings = json.load(f)
      window['-USER-'].update(value=settings['-USER-'])
      window['-ID-'].update(value=settings['-ID-'])
      window['-ROLE-'].update(value=settings['-ROLE-'])
   if event == 'SAVE':
      settings = {'-USER-': values['-USER-'],
      '-ID-': values['-ID-'],
      '-ROLE-': values['-ROLE-']}
      f = open("settings.txt", 'w')
      json.dump(settings, f)
      f.close()
window.close()
Enter the data in the input boxes and click the "Save" button.
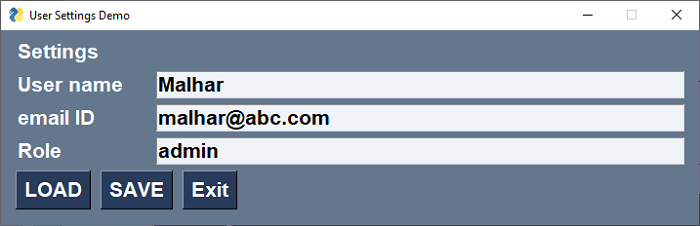
A JSON file will be saved. To load the previously saved settings, click the "Load" button.
