- PhantomJS - Home
- PhantomJS - Overview
- PhantomJS - Environment Setup
- PhantomJS - Object
- PhantomJS - Methods
- PhantomJS - Properties
- PhantomJS - Methods
- PhantomJS - Events/Callbacks
- PhantomJS - Child Process Module
- File System Module
- PhantomJS - Properties
- PhantomJS - Methods
- System Module
- PhantomJS - Properties
- Web Server Module
- PhantomJS - Properties
- PhantomJS - Methods
- Miscellaneous
- Command Line Interface
- PhantomJS - Screen Capture
- PhantomJS - Page Automation
- PhantomJS - Network Monitoring
- PhantomJS - Testing
- PhantomJS - REPL
- PhantomJS - Examples
- PhantomJS Useful Resources
- PhantomJS - Quick Guide
- PhantomJS - Useful Resources
- PhantomJS - Discussion
PhantomJS - Quick Guide
PhantomJS - Overview
PhantomJS is said to be a headless browser because there is no involvement of browser while executing the JavaScript code. The execution will not be seen in the browser display, but on the command line prompt. The functionalities like CSS Handling, DOM Manipulation, JSON, Ajax, Canvas, SVG, etc., will all be taken care at the command prompt. PhantomJS does not have a GUI and hence, all its execution takes place at the command line.
Using PhantomJS, we can write to a file, read the contents of the file or upload a file, take an screen capture, convert the webpage into a pdf and lots more. With headless browsers, you get all the browser behavior i.e. Cookies, Http Request Methods i.e. GET /POST, Clearing Cookies, Deleting Cookies, etc., Reloading of Page, Navigating to a Different Page.
PhantomJS uses WebKit that has a similar browsing environment like the famous browsers Google Chrome, Mozilla Firefox, Safari, etc. It also provides a lot of JavaScript API, which helps in taking screenshots, uploading of file, writing to file, reading a file, interacting with the web pages, etc.
PhantomJS does not support Flash or Video, as it requires plugins and it is difficult to support the same on the command line.
Features of PhantomJS
Let us now understand the features that PhantomJS offers.
Page Automation
PhantomJS allows you to read the page contents with the help of its API. It can help to manipulate the DOM, use external libraries to carry out the task required.
Screen Capture
PhantomJS helps in taking a screen capture of a page specified and save the same as an image in various formats like PNG, JPEG, PDF, and GIF. With the help of the screen capture, it can easily help to make sure the web content is fine.
PhantomJS offers properties and methods with the help of which it allows developers to adjust the size of the screenshots and specify the area they want to capture.
Headless Testing
PhantomJS helps testing of UI at the command line. While, with the help of a screenshot, it can easily help to find errors in the UI. PhantomJS sometimes cannot help with testing alone. However, it can be wrapped along with other testing libraries like Mocha, Yoeman, etc. You can take the help of PhantomJS to upload a file and submit the form.
PhantomJS can be used to test logins across the sites and make sure the security is not compromised. PhantomJS can be used along with other tools like CasperJS, Mocha, Qunit to make the testing more powerful.
Network Monitoring
One of the important features of PhantomJS is its usage to monitor the network connection using the API available. PhantomJS permits the inspection of network traffic; it is suitable to build various analysis on the network behavior and performance.
PhantomJS can be used to collect the data about the performance of the webpage in a live environment. PhantomJS can be used with tools like Yslow to gather performance metrics of any websites.
PhantomJS - Environment Setup
PhantomJS is a free software and is distributed under the BSD License. It is easy to install and it offers multiple features to execute the scripts. PhantomJS can be easily run on multiple platforms such as Windows, Linux, and Mac.
For downloading PhantomJS, you can go to http://phantomjs.org/ and then click on the download option.
For Windows
The download page shows you the options for download for different OS. Download the zip file, unpack it and you will get an executable phantom.exe. Set the PATH environment variable to the path of phantom.exe file. Open a new command prompt and type phantomjs v. It should give you the current version of PhantomJS that is running.
For MAC OS X
Download the PhantomJS zip file meant for MAC OS and extract the content. Once the content is downloaded, move the PhantomJS to /usr/local/bin/. Execute PhantomJS command i.e. phantomjs v at the terminal and it should give you the version description of PhantomJS.
Linux 64 bit
Download the PhantomJS zip file meant for Linux 64 bit and extract the content. Once the content is downloaded, move PhantomJS folder to /usr/local/share/ and create a symlink −
sudo mv $PHANTOM_JS /usr/local/share
sudo ln -sf /usr/local/share/$PHANTOM_JS/bin/phantomjs /usr/local/bin.
Execute phantomjs v at the terminal and it should give the version of PhantomJS.
Linux 32 bit
Download the PhantomJS zip file meant for Linux 32 bit and extract the content. Once the content is downloaded, move the PhantomJS folder to /usr/local/share/ and create a symlink −
sudo mv $PHANTOM_JS /usr/local/share
sudo ln -sf /usr/local/share/$PHANTOM_JS/bin/phantomjs /usr/local/bin.
Execute phantomjs v at the terminal and it should give the version of PhantomJS.
The PhantomJS source code can also be taken from the git repository by clicking on the following link https://github.com/ariya/phantomjs/
To run scripts in PhantomJS, the command is as follows −
phantomjs jsfile arg1 arg2
PhantomJS - Object
In this chapter, we will look at the four important objects PhantomJS. They are as follows −
- CookiesEnabled
- Cookies
- LibraryPath
- Version
Let us now discuss each of these in detail.
cookiesEnabled
It tells whether the cookies are enabled or not. It will return true, if yes; otherwise false.
Syntax
Its syntax is as follows −
phantom.cookiesEnabled
Example
cookieenabled.js
phantom.addCookie ({
   //adding cookie with addcookie property
   name: 'c1',
   value: '1',
   domain: 'localhost'
});

console.log("Cookie Enabled value is : "+phantom.cookiesEnabled);
phantom.exit();
Output
Command − phantomjs cookieenabled.js
Cookie Enabled value is : true
Cookies
It helps to add and set cookies to a domain. It returns an object with all the cookies available for the domain.
Syntax
Its syntax is as follows −
phantom.cookies;
Example
Filename: phantomcookie.js
phantom.addCookie ({
   name: 'c1',
   value: '1',
   domain: 'localhost'
});
phantom.addCookie ({
   name: 'c2',
   value: '2',
   domain: 'localhost'
});
phantom.addCookie ({
   name: 'c3',
   value: '3',
   domain: 'localhost'
});
console.log(JSON.stringify(phantom.cookies));
phantom.exit();
Output
Command − phantomjs phantomcookie.js
[{"domain":".localhost","httponly":false,"name":"c3","path":"/","secure":false, "
value":"3"},{"domain":".localhost","httponly":false,"name":"c2","path":"/","sec u
re":false,"value":"2"},{"domain":".localhost","httponly":false,"name":"c1","pat h
":"/","secure":false,"value":"1"}]
In the above example, we added some cookies to the localhost domain. We then fetched it using phantom.cookies. It returns an object with all the cookies by using the JSON stringify method to convert the JavaScript object into a string. You can also use foreach to access the name/values of the cookies.
LibraryPath
PhantomJS libraryPath stores the script path to be used by the injectJS method.
Syntax
Its syntax is as follows −
phantom.libraryPath
Example
Here is an example to find out the version.
var webPage = require('webpage');
var page = webPage.create();

page.open('http://www.tutorialspoint.com/jquery', function(status) {
   if (status === "success") {
      page.includeJs('http://ajax.googleapis.com/ajax/libs/jquery/1.7.2/jquery.min.js ', function() {
         if (page.injectJs('do.js')) {
            // returnTitle is a function loaded from our do.js file - see below
            return returnTitle();
         });

         console.log(title);
         phantom.exit();
      }
   }
});

window.returnTitle = function() {
   return document.title;
};
The above program generates the following output.
Jquery Tutorial
Version
It gives the version of the PhantomJS that is running and returns the details in an object. For example: {"major":2,"minor":1,"patch":1}
Syntax
Its syntax is as follows −
phantom.version
Example
Here is an example to find out the version.
var a = phantom.version;
console.log(JSON.stringify(a));
console.log(a.major);
console.log(a.minor);
console.log(a.patch);
phantom.exit();
The above program generates the following output.
{"major":2,"minor":1,"patch":1}
2
1
1
In the above example, we have used console.log to print the version. Currently, we are running on version 2. It returns the object with the details shown in the above code block.
PhantomJS - Methods
PhantomJS is a platform to help execute JavaScript without a browser. To do that, the following methods are used, which help in Adding the Cookie, Deleting, Clearing, Exiting the Script, Injecting JS, etc.
We will discuss more on these PhantomJS methods and their syntax in this chapter. Similar methods i.e. addcookie, injectjs exists on the webpage module, which will be discussed in the subsequent chapters.
PhantomJS exposes the following methods that can help us to execute JavaScript without the browser −
- addCookie
- clearCookie
- deleteCookie
- Exit
- InjectJS
Let us now understand these methods in detail with examples.
addCookie
The addcookie method is used to add cookies and store in the data. It is similar to how the browser stores it. It takes a single argument that is an object with all the properties of cookies and the syntax for it looks like shown below −
Syntax
Its syntax is as follows −
phantom.addCookie ({
   "name" : "cookie_name",
   "value" : "cookie_value",
   "domain" : "localhost"
});
The name, value, domain are mandatory properties to be added to the addcookie function. If any of this property is missing in the cookie objects, this method will fail.
name − specifies the name of the cookie.
value − specifies the value of the cookie to be used.
domain − domain to which the cookie will be applied.
Example
Here is an example of the addcookie method.
var page = require('webpage').create(),url = 'http://localhost/tasks/a.html';
page.open(url, function(status) {
   if (status === 'success') {
      phantom.addCookie({   //add name cookie1 with value = 1
         name: 'cookie1',
         value: '1',
         domain: 'localhost'
      });
      phantom.addCookie({   // add cookie2 with value 2
         name: 'cookie2',
         value: '2',
         domain: 'localhost'
      });
      phantom.addCookie({   // add cookie3 with value 3
         name: 'cookie3',
         value: '3',
         domain: 'localhost'
      });
      console.log('Added 3 cookies');
      console.log('Total cookies :'+phantom.cookies.length);

      // will output the total cookies added to the url.
   } else {
      console.error('Cannot open file');
      phantom.exit(1);
   }
});
Example
a.html
<html>
   <head>
      <title>Welcome to phantomjs test page</title>
   </head>

   <body>
      <h1>This is a test page</h1>
      <h1>This is a test page</h1>
      <h1>This is a test page</h1>
      <h1>This is a test page</h1>
      <h1>This is a test page</h1>
      <h1>This is a test page</h1>
      <h1>This is a test page</h1>
      <h1>This is a test page</h1>
      <h1>This is a test page</h1>
   </body>
</html>
The above program generates the following output.
Added 3 cookies
Total cookies :3
The code comments are self-explanatory.
clearCookies
This method allows deleting all the cookies.
Syntax
Its syntax is as follows −
phantom.clearCookies();
This concept works similar to deleting the browser cookies by selecting in the browser menu.
Example
Here is an example of the clearCookies method.
var page = require('webpage').create(),url = 'http://localhost/tasks/a.html';
page.open(url, function(status) {
   if (status === 'success') {
      phantom.addCookie({   //add name cookie1 with value = 1
         name: 'cookie1',
         value: '1',
         domain: 'localhost'
      });
      phantom.addCookie({   // add cookie2 with value 2
         name: 'cookie2',
         value: '2',
         domain: 'localhost'
      });
      phantom.addCookie({   // add cookie3 with value 3
         name: 'cookie3',
         value: '3',
         domain: 'localhost'
      });
      console.log('Added 3 cookies');
      console.log('Total cookies :'+phantom.cookies.length);
      phantom.clearCookies();
      console.log(
         'After clearcookies method total cookies :' +phantom.cookies.length);

      phantom.exit();
   } else {
      console.error('Cannot open file');
      phantom.exit(1);
   }
});
a.html
<html>
   <head>
      <title>Welcome to phantomjs test page</title>
   </head>

   <body>
      <h1>This is a test page</h1>
      <h1>This is a test page</h1>
      <h1>This is a test page</h1>
      <h1>This is a test page</h1>
      <h1>This is a test page</h1>
      <h1>This is a test page</h1>
      <h1>This is a test page</h1>
      <h1>This is a test page</h1>
      <h1>This is a test page</h1>
   </body>
</html>
The above program generates the following output.
Added 3 cookies
Total cookies :3
After clearcookies method total cookies :0
deleteCookie
Delete any cookie in the CookieJar with a name' property matching cookieName. It will return true, if successfully deleted; otherwise false.
Syntax
Its syntax is as follows −
phantom.deleteCookie(cookiename);
Let us understand addcookie, clearcookies and deletecookie with the help of an example.
Example
Here is an example to demonstrate the use of deleteCookie method −
File: cookie.js
var page = require('webpage').create(),url = 'http://localhost/tasks/a.html';
page.open(url, function(status) {
   if (status === 'success') {
      phantom.addCookie({   //add name cookie1 with value = 1
         name: 'cookie1',
         value: '1',
         domain: 'localhost'
      });
      phantom.addCookie({   // add cookie2 with value 2
         name: 'cookie2',
         value: '2',
         domain: 'localhost'
      });
      phantom.addCookie({   // add cookie3 with value 3
         name: 'cookie3',
         value: '3',
         domain: 'localhost'
      });
      console.log('Added 3 cookies');
      console.log('Total cookies :'+phantom.cookies.length);

      //will output the total cookies added to the url.
      console.log("Deleting cookie2");
      phantom.deleteCookie('cookie2');

      console.log('Total cookies :'+phantom.cookies.length);
      phantom.clearCookies();

      console.log(
         'After clearcookies method total cookies :' +phantom.cookies.length);
      phantom.exit();
   } else {
      console.error('Cannot open file');
      phantom.exit(1);
   }
});
The above program generates the following output.
phantomjs cookie.js
Added 3 cookies
Total cookies :3
Deleting cookie2
Total cookies :2
After clearcookies method total cookies :0
Exit
The phantom.exit method will exit the script which it had started. It exits the program with return value mentioned. It gives 0, if there is no value passed.
Syntax
Its syntax is as follows −
phantom.exit(value);
In case you do not add phantom.exit, then the command line assumes that the execution is still on and will not complete.
Example
Let us look at an example to understand the use of the exit method.
console.log('Welcome to phantomJs');  // outputs Welcome to phantomJS
var a = 1;
if (a === 1) {
   console.log('Exit 1'); //outputs Exit 1
   phantom.exit(); // Code exits.
} else {
   console.log('Exit 2');
   phantom.exit(1);
}
The above program generates the following output.
phantomjs exit.js
Welcome to phantomJs
Exit 1
Any piece of code after phantom.exit will not be executed, since phantom.exit is a method to end the script.
injectJs
InjectJs is used to add addtionaljs files in phantom. If the file is not found in the current directory librarypath, then the phantom property (phantom.libraryPath) is used as an additional place to track the path. It returns true if the file addition is successful otherwise false for failure, incase if it is not able to locate the file.
Syntax
Its syntax is as follows −
phantom.injectJs(filename);
Example
Let us look at the following example to understand the use of injectJs.
Filename: inject.js
console.log(Added file);
File name: addfile.js
var addfile =  injectJs(inject.js);
console.log(addfile);
phantom.exit();
Output
Command − C:\phantomjs\bin>phantomjs addfile.js
Added file // coming from inject.js
true
In the above example, addfile.js calls the file inject.js using injectJs. When you execute addfile.js, the console.log present in inject.js is shown in the output. It also shows true for addfile variable since the file inject.js was added successfully.
PhantomJS - Webpage Module Properties
PhantomJS provides quite a lot of properties and methods to help us to interact with the contents inside a webpage.
The require("webpage").create() command creates a webpage object. We will use this object to manipulate the webpage with the help of properties and methods listed below.
var wpage = require("webpage").create();
The following table has the list of all the webpage properties that we are going to discuss.
| S.No | Properties & Description |
|---|---|
| 1 | canGoBack
This property returns true if there is previous page in the navigation history; if not, false. |
| 2 | canGoForward
This property returns true if there is next page in the navigation history; if not, false. |
| 3 | clipRect
clipRect is an object with values top, left, width and height and used to take the image capture of the webpage when used by the render() method. |
| 4 | Content
This property contains the contents of webpage. |
| 5 | cookies
With cookies, you can set /get the cookies available on the URL. It will also give you the cookies available on the URL and the new cookies set on the page. |
| 6 | customHeaders
customHeaders specifies additional HTTP request headers that will be send to server for every request issued by the page. |
| 7 | Event
It gives long list of events i.e. modifier, keys details. |
| 8 | focusedFrameName
Returns the name of the currently focused frame. |
| 9 | frameContent
This property gives the content of the frame which is active. |
| 10 | frameName
Returns the name of the currently focused frame. |
| 11 | framePlainText
This property also gives the contents of the current active frame but only contents without any html tags. |
| 12 | frameTitle
Gives the title of the active frame. |
| 13 | frameUrl
This property will give the url of the currently focused frame. |
| 14 | framesCount
Gives the count of the frames present on the page. |
| 15 | framesName
Gives array of frame names. |
| 16 | libraryPath
This property has the path, which is used by page.inectJs method. |
| 17 | navigationLocked
This property defines whether navigation of the page is allowed or not. If true it will be on current page url and clicking on page to go to next page will not be allowed. |
| 18 | offlineStoragePath
This property gives the path where the data is stored using window.localStorage.The path can be changed using --local-storage-path from command line. |
| 19 | offlineStorageQuota
This property defines the maximum amount of data you can store in window.localStorage.The value is 5242880 bytes which is 5MB.This value can overwritten at command line using the following command --localstorage-quota = size over here. |
| 20 | ownsPages
ownsPages returns true or false if the page opened by the webpage is a child of the webpage. |
| 21 | pagesWindowName
PagesWindowName will give the names of the windows open using window.open |
| 22 | pages
The pages property will you give array of pages opened in a page using window.open. If the page is closed in url you referring the page will not be considered. |
| 23 | paperSize
This property gives the size ie dimensions of the webpage when needs to be used to convert the webpage in a pdf format.paperSize contains the dimensions required in an object. |
| 24 | plaintext
This property also gives the contents of the current active frame but only contents without any html tags. |
| 25 | scrollPosition
This contains object indicating the scroll position. It gives left and top. |
| 26 | settings
This property will give the settings of the webpage when page.open method is used. Once the page is loaded the changes in settings properties will not create any impact. |
| 27 | title
This property will give you the title of the page you are reading. |
| 28 | url
This property will give the page url. |
| 29 | viewportSize
This property allows to change the size of the window display. It contains width and height, which you can read or change it as per the needs. |
| 30 | windowName
Gives the name of the window. |
| 31 | zoomFactor
This property specifies the zoom factor for render and renderBase64 methods. It helps to zoom a page and take a screen capture if required. |
PhantomJS - Webpage Module Methods
The Web Page Module has methods for Cookies, Frames, Page Navigation, Reload, Rendering and Uploading of Files.
Following are the methods available on the web page.
| S.No | Methods & Description |
|---|---|
| 1 | addCookie()
addCookie method adds cookies to the page specified. |
| 2 | childFramesCount()
This method is deprecated as per http://phantomjs.org. |
| 3 | childFramesName()
This method is deprecated as per http://phantomjs.org. |
| 4 | clearCookies()
Will delete all the cookies for the page specified. |
| 5 | close()
This method is used to close the page and release the memory used. Any of the webpage methods or properties will not work once the close is called. |
| 6 | currentFrameName()
This method is deprecated as per http://phantomjs.org. |
| 7 | deleteCookie()
This will delete a cookie with the name matching with the existing list of cookies present for a given page url. |
| 8 | evaluateAsync()
Evaluate given function asynchronously within the page without blocking current execution. This function helps to execute certain scripts asynchronously. |
| 9 | evaluateJavascript()
EvaluateJavaScript helps to execute the function passed to it as a string. Please note the string passed has to be a function only. |
| 10 | evaluate()
Evaluate will execute the function passed to it. If the function contain console messages it is not displayed directly in the terminal. To display any console messages you need to use onConsoleMessage phantom callback. |
| 11 | getPage()
This will give you the child page that matches the windowname passed in getpage. |
| 12 | goBack()
It gives the previous page in navigation history, if only the navigation is not locked. |
| 13 | goForward()
It gives the next page in navigation history, if only the navigation is not locked. |
| 14 | go()
This method allows you to navigate with the pages. |
| 15 | includeJs()
Includejs executes the external JS file on page and executes the callback function on completion. |
| 16 | injectJs()
InjectJs includes external script from a specified file into the page. If the file is not available in the current directory, then it used libraryPath for additional search of the file. It returns true if the file is injected, otherwise false. |
| 17 | openUrl()
OpenUrl opens up a webpage. It is similar to open method of PhantomJS. OpenUrl has some additional parameters, which are httpConf, settings and callback functions. |
| 18 | open()
Open is used to open up a webpage. |
| 19 | release()
Release will release the memory heap usage for the page. Do not use page instance methods after the release is called. This method is similar to the close method and the usage of it is deprecated. Instead use wpage.close(). |
| 20 | reload()
Reload is used to reload the current page used. |
| 21 | renderBase64()
This method takes the screen capture and gives the image as a string in base46. Renderbase64 supports format like PNG, JPEG and JPG. It does not support gif as of now. You can use clipRect property to define the portion for image capture. |
| 22 | renderBuffer()
RenderBuffer takes the capture of the webpage to an image buffer, which can be directly sent to the server. Formats supported are PNG, GIF and JPEG. |
| 23 | render()
Render helps to take the image buffer and save it as per the format specified. |
| 24 | sendEvent()
It is used to send an event to the webpage. They are not dom events. Each of these events are sent to the webpage based on user interaction. |
| 25 | setContent()
setcontent will change the page content of the specified url with the contents specified. |
| 26 | stop()
It helps to stop loading of the page. |
| 27 | switchToChildFrame()
It is deprecated to use switchToFrame(); |
| 28 | switchToFocusedFrame()
It selects the frame, which is in focus. |
| 29 | switchToFrame()
Selects frame with the name specified and which is child of current frame. |
| 30 | switchToMainFrame()
Selects mainframe i.e. the root window. |
| 31 | switchToParentFrame()
It takes the parent frame of the current child frame. |
| 32 | uploadFile()
This method is used to handle the file upload done using form in html. PhantomJS does not have a direct way to do so using forms the same can be achieved using uploadFile method. It takes html tag selector for file location and the destination where it has to be copied. |
Webpage Module Events/Callbacks
The callbacks available with the webpage module are described in the following table.
| S.No | Callbacks & Description |
|---|---|
| 1 | onAlert()
This callback is called when there is an alert on the page; the callback takes a string and does not return anything. |
| 2 | onCallback()
OnCallback is used to pass values from webpage to webpage object and it is done using the window.callPhantom() method, which internally invokes the onCallback function. |
| 3 | onClosing()
This is called when the window is closed either by using the page.close() method or the window.close() method. |
| 4 | onConfirm()
This callback is called when there is a confirmed message called with ok /cancel from the page. |
| 5 | onConsoleMessage()
This callback is used when there are console messages used in the webpage. The onConsoleMessage method takes 3 arguments. |
| 6 | onError()
It is called when there is JavaScript error. The arguments for onError are msg and stack trace, which is an array. |
| 7 | onFilePicker()
This is used for upload file the callback is called when user want to upload a file. |
| 8 | onInitialized()
This callback is invoked when the page is called before loading. |
| 9 | onLoadFinished()
This function is called when the page opened is fully loaded. It has one argument, which tells when loading was a success or a failure. |
| 10 | onLoadStarted()
This callback is invoked when the page starts loading. |
| 11 | onNavigationRequested()
This callback tells when the navigation event is taking place. |
| 12 | onPageCreated()
This callback is invoked when a new child window is opened by the page. |
| 13 | onPrompt()
This callback is called when a prompt is called by the web page. It takes 2 arguments, message and the answer. The return value is a string. |
| 14 | onResourceError()
This callback is called when the webpage is not able to upload the file. |
| 15 | onResourceReceived()
This callback is called when the resource requested by the page is received. |
| 16 | onResourceRequested()
This function is invoked when page requests a resource. |
| 17 | onResourceTimeout()
This callback is called when the requested resource times out, when settings.resourceTimeout is used. |
| 18 | onUrlChanged()
This is called when the URL changes from the current one using navigation. It has one argument to the call back, which is a new URL targetUrl string. |
Webpage Child Process Module
The Phantomjs Child process module helps to interact with the sub-processes and talk to them using stdin /stdout/stderr. The child processes can be used for tasks like printing, sending mail or to invoke programs written in another language. To create a child process module, you need references.
For example −
var process = require("child_process");
Spawn Method
With the spawn child process, you can subscribe to its stdout and stderr streams to get data real-time.
Syntax
Its syntax is as follows −
var spawn = require('child_process').spawn;
Example
Let us look at an example of the spawn method.
var process = require("child_process")
var spawn = process.spawn
var child = spawn("cmd", ['/c', 'dir']);

child.stdout.on("data", function (data) {
   console.log("spawnSTDOUT---VALUE:", JSON.stringify(data))
})
child.stderr.on("data", function (data) {
   console.log("spawnSTDERR:", JSON.stringify(data))
})
child.on("exit", function (code) {
   console.log("spawnEXIT:", code)
})
Output
The above program generates the following output.
spawnSTDOUT---VALUE: " Volume in drive C is OS\r\n"
spawnSTDOUT---VALUE: " Volume Serial Number is 7682-9C1B\r\n\r\n Directory of C:
\\phantomjs\\bin\r\n\r\n"
spawnSTDOUT---VALUE: "20-05-2017  10:01
<DIR>          .\r\n20-05-2017  10:01
<DIR>          ..\r\n13-05-2017  20:48   12 a,txt.txt\r\n07-05-2017  08:51
63 a.js\r\n06-05-2017  16:32           120,232 a.pdf\r\n13-05-2017  20:49
spawnEXIT: 0
PhantomJS - File System Module Properties
The File System Module has many APIs to deal with files and directories. You can create/write and delete a file/directory. To start using the file system module you must require a reference to the fs module.
var fs = require('fs');
There are two properties available for file system module: Separator and Working Directory. Let us understand them in detail.
Separator
It tells you the separator used for the file paths.
- For windows:\
- For Linux: /
Syntax
Its syntax is as follows −
fs.seperator
Example
var fs = require('fs');
console.log(fs.seperator);
phantom.exit();
The above program generates the following output.
undefined
workingDirectory
The working directory is the directory in which PhantomJS executes.
Syntax
Its syntax is as follows −
var fs = require('fs');
fs.workingDirectory;
Example
var fs = require('fs');
console.log(fs.workingDirectory);
phantom.exit();
The above program generates the following output.
C:/phantomjs/bin
PhantomJS - File System Module Methods
The following table has all the methods and their descriptions, which are available on the File System module.
| S.No | Methods & Description |
|---|---|
| 1 | absolute
This method gives the absolute path where PhantomJS runs. |
| 2 | changeWorkingDirectory
This allows you to change the working directory and returns true, if it succeeds otherwise returns false. |
| 3 | copyTree
copyTree will copy a directory from one path to another. The first parameter is a source folder and the second parameter is a destination folder. |
| 4 | copy
This method helps to copy file from one location to another. It takes two parameters. The first parameter is the source file and the second parameter is the file path, where it has to be copied. It will throw an error, if the source or destination file does not exist. |
| 5 | exists
It checks whether the given file path exists in the system. It returns true, if it is present, otherwise false. |
| 6 | isAbsolute
This method will return true, if the file path is absolute and false, if relative. |
| 7 | isDirectory
isDirectory tells if the given file is a directory or not. It returns true, if directory otherwise false. It gives false in case if the given path does not exist. |
| 8 | isExecutable
This method will tell if the given file is executable or not. It returns true, if executable, otherwise false. |
| 9 | isFile
This gives details whether the filepath given is a file or not. It returns true, if it is a file and false, if it is not. |
| 10 | isLink
This will give you true, if the file path is a symlink, otherwise false. |
| 11 | isReadable
It checks if the given file is readable or not. It gives true, if yes and false, if not. |
| 12 | isWritable
It tells whether if a given file is writable. Returns true, if yes, otherwise false. |
| 13 | lastModified
Gives the details of the last modification done to the file. It tells the date and time of when the file was last modified. |
| 14 | list
It gives all the files present in the directory. |
| 15 | makeDirectory
Creates a new directory. |
| 16 | makeTree
makeTree creates all necessary folders to be able to form final directories. This will return true, if the creation was successful, otherwise false. If the directory already exists, it will return true. |
| 17 | move
It will move the file from one path to another. |
| 18 | open
It is used to open up the file. |
| 19 | readLink
This will return the absolute path of a file or a folder pointed by a symlink (or shortcut on Windows). If the path is not a symlink or shortcut, it will return an empty string. |
| 20 | read
This will read the given file. |
| 21 | removeDirectory
This will remove the given directory. |
| 22 | removeTree
It will delete all the files and folders from the given folder and finally delete the folder itself. If there is any error while doing this process, it will throw an error 'Unable to remove directory tree PATH' and hang execution. |
| 23 | remove
It removes the given file. |
| 24 | size
It gives the size of the file. |
| 25 | touch
It creates a given file. |
| 26 | write
Writes to a given file. |
PhantomJS - System Module Properties
In this chapter, we will discuss regarding the various System Module Properties of PhantomJS.
args
The system module of PhantomJS has different properties, which help to pass arguments, get to know the file that is executed, etc.
The args property basically returns the arguments passed at the command line. You can also pass the page-URL that you want to read. If you want to store the screen-capture pdf-file or upload file, the details can be passed to the command line and can be read using the args property.
Let us find the length and the way to fetch each argument passed to the command line.
Syntax
Its syntax is as follows −
var system = require('system');
system.args;
Example
Take a look at the following example to understand how this property works.
var system = require('system');
console.log(system.args.length);

if (system.args.length>0) {
   console.log(JSON.stringify(system.args));
}
phantom.exit();
The above program generates the following output.
Command − phantomsjs args.js http://localhost/tasks/request.html
2
["args.js","http://localhost/tasks/request.html"]
The first value is the name of the file and next value is the URL passed. You can pass more arguments in the command line and fetch the same using system.args.
env
The env property returns the details of the system.
Syntax
Its syntax is as follows −
var system = require('system');
system.env;
Example
var system = require('system');
console.log(JSON.stringify(system.env));
phantom.exit();
The above program generates the following output.
{"=::":"::\\","=C:":"C:\\phantomjs\\bin","=ExitCode":"00000000","ALLUSERSPROFILE":
"C:\\ProgramData","APPDATA":"C:\\Users\\UserName\\AppData\\Roaming","COMPUTERNAME":
"X","ComSpec":"C:\\Windows\\system32\\cmd.exe","CommonProgramFiles":
"C:\\Program Files (x86)\\Common Files","CommonProgramFiles(x86)":
"C:\\Program Files (x86)\\Common Files","CommonProgramW6432":
"C:\\Program Files\\Common Files","FP_NO_HOST_CHECK":"NO","HOMEDRIVE":"C:",
"HOMEPATH":"\\Users\\UserName","LOCALAPPDATA":
"C:\\Users\\UserName\\AppData\\Local","LOGONSERVER":"\\\\MicrosoftAccount",
"NUMBER_OF_PROCESSORS":"2","OS":"Windows_NT","PATHEXT":".COM;.EXE;.BAT;.CMD;.VBS ;
.VBE;.JS;.JSE;.WSF;.WSH;.MSC","PROCESSOR_ARCHITECTURE":"x86","PROCESSOR_ARCHITEW64 32":
"AMD64","PROCESSOR_IDENTIFIER":"Intel64 Family 6 Model 58Stepping9,GenuineIntel",
"PROCESSOR_LEVEL":"6","PROCESSOR_REVISION":"3a09","PROMPT":
"$P$G","PSModulePath":"C:\\Windows\\system32\\WindowsPowerShell\\v1.0\\
Modules\\" ,"PUBLIC":"C:\\Users\\Public","Path":
"C:\\Program Files\\Dell\\DW WLAN Card;
c:\\Program Files (x86)\\Intel\\iCLS Client\\;c:\\Program Files\\Intel\\iCLSClient\\;
C:\\Windows\\system32;C:\\Windows;C:\\Windows\\System32\ \Wbem;
C:\\Windows\\System32\\WindowsPowerShell\\v1.0\\;
C:\\Program Files\\Intel\\Intel(R) Management Engine Components\\DAL;
C:\\Program Files\\Intel\\Intel(R) Management Engine Components\\IPT;
C:\\Program Files (x86)\\Intel\\Intel(R) Management Engine Components\\DAL;
C:\\Program Files (x86)\\Intel\\Intel(R)
ManagementEngineComponents\\IPT;c:\\ProgramFiles\\WIDCOMM\\BluetoothSoftware\\;
c:\\ProgramFiles\\WIDCOMM\\BluetoothSoftware\\syswow64;
C:\\ProgramFiles(x86)\\WindowsLive\\Shared;C:\\ProgramFiles\\nodejs\\;
C:\\ProgramFiles\\Git\\cmd;C:\\ProgramFiles\\ OpenVPN\\bin;
C:\\ProgramFiles(x86)\\Skype\\Phone\\;C:\\Users\\UserName\\AppData\\Roaming
\\npm","ProgramData":
"C:\\ProgramData","ProgramFiles":"C:\\ProgramFiles(x86)",
"ProgramFiles(x86)":"C:\\ProgramFiles(x86)","ProgramW6432":
"C:\\ProgramFiles","SESSIONNAME":"Console","SystemDrive":
"C:","SystemRoot":"C:\\Windows","TEMP":"C:\\Users\ \Username~1\\AppData\\Local\\Temp",
"TMP":"C:\\Users\\Username~1\\AppData\\Local\\Temp",
"USERDOMAIN":"USER","USERDOMAIN_ROAMINGPROFILE":"USER","USERNAME":"X Y","USERPROFILE":
"C:\\Users\\X Y","windir":"C:\\Windows"}
OS
It returns the details of the operating system used. It returns an object with architecture, name of the OS, and version.
Syntax
Its syntax is as follows −
var system = require('system');
system.os;
Example
var system = require('system');
console.log(JSON.stringify(system.os));
phantom.exit();
The above program generates the following output.
{"architecture":"32bit","name":"windows","version":"8.1"}
pid
This property returns the process ID.
Syntax
Its syntax is as follows −
var system = require('system');
system.pid;
Example
Let us look at an example of the pid property.
var system = require('system');
console.log(system.pid);
phantom.exit();
The above program generates the following output.
2160
platform
This property returns the platform we are working on.
Syntax
Its syntax is as follows −
var system = require('system');
system.platform;
Example
var system = require('system');
console.log(system.platform);
phantom.exit();
The above program generates the following output.
Phantomjs
PhantomJS - Web Server Module Properties
PhantomJS uses an embedded web server called mongoose. Right now, PhantomJS cannot connect with any other production webserver. With respect to connection, it can deal with 10 connections at a time and more than 10 requests will be waiting in a queue.
To start a webserver, we need to use the following syntax −
var webserver = require (webserver);
Let us understand the Port property, which is used to listen to the requests that are sent to the webserver.
port
The Port property for a webserver is used to listen to the request that are sent to it.
Syntax
Its syntax is as follows −
var server = require('webserver').create();
var listening = server.listen(port, function (request, response) {});
Example
Let us take an example to understand how the port property works.
var webserver = require('webserver');
var server = webserver.create();
var service = server.listen(8080,function(request,response){
});
if(service) console.log("server started - http://localhost:" + server.port);
The above program generates the following output.
server started - http://localhost:8080
PhantomJS - Web Server Module Methods
In this chapter, we will discuss regarding the various methods of the Web Server Module of PhantomJS.
close
The close method is used to close the webserver.
Syntax
Its syntax is as follows −
var server = require('webserver').create();
server.close();
Example
The following example shows how you can use the close method.
var webserver = require('webserver');
var server = webserver.create();
var service = server.listen(8080,function(request,response){
});

if(service) console.log("server started - http://localhost:" + server.port);
console.log(server.port);
server.close();
console.log(server.port);
The above program generates the following output.
server started - http://localhost:8080
8080
Here, we have consoled server.port after closing the server. Hence, it will not respond, as the webserver is already closed.
listen
The server.listen method takes the port and callback function with two arguments, which are Request Object and Response Object.
The Request Object contains the following properties −
Method − This defines the method GET /POST.
URL − This displays the requested URL.
httpVersion − This displays the actual http version.
Headers − This displays all the headers with key value pairs.
Post − Request body applicable only for the post method.
postRaw − If the Content-Type header is set to 'application/x-www-formurlencoded', the original content of the post will be stored in this extra property (postRaw) and then that post will be automatically updated with a URL-decoded version of the data.
The Response Object contains the following properties −
Headers − Has all the HTTP headers as key-value pairs. It should be set before calling write for the first time.
SetHeader − This sets a specific header.
Header (name) − It returns the value of the given header.
StatusCode − It sets the returned HTTP status code.
SetEncoding (encoding) − This is used to convert data given to write(). By default, data will be converted to UTF-8. Indicate "binary" if data is a binary string. Not required if data is a Buffer (e.g. from page.renderBuffer).
Write (data) − It sends data for the response body. Can be called multiple times.
WriteHead (statusCode, headers) − It sends a response header to the request. The status code is a 3-digit HTTP status code (e.g. 404). The last arguments and headers are the response headers.
Close − It closes the http connection.
CloseGracefully − It is similar to close(), but it makes sure the response headers have been sent first.
Syntax
Its syntax is as follows −
var server = require('webserver').create();
var listening = server.listen(8080, function (request, response) {}
Example
Let us take an example to understand how the listen method works.
var page = require('webpage').create();
var server = require('webserver').create();
var port = 8080;
var listening = server.listen(8080, function (request, response) {
   console.log("GOT HTTP REQUEST");
   console.log(JSON.stringify(request, null, 4));

   // we set the headers here
   response.statusCode = 200;
   response.headers = {"Cache": "no-cache", "Content-Type": "text/html"};

   // the headers above will now be sent implictly
   // now we write the body
   response.write("<html><head><title>Welcone to Phantomjs</title></head>");
   response.write("<body><p>Hello World</p></body></html>");
   response.close();
});

if (!listening) {
   console.log("could not create web server listening on port " + port);
   phantom.exit();
}

var url = "http://localhost:" + port + "/foo/response.php";
console.log("sending request to :" +url);
page.open(url, function (status) {
   if (status !== 'success') {
      console.log('page not opening');
   } else {
      console.log("Getting response from the server:");
      console.log(page.content);
   }

   phantom.exit();
});
The above program generates the following output.
sending request to :http://localhost:8080/foo/response.php
GOT HTTP REQUEST {
   "headers": {
      "Accept": "text/html,application/xhtml+xml,application/xml;q=0.9,*/*;q=0.8",
      "Accept-Encoding": "gzip, deflate",
      "Accept-Language": "en-IN,*",
      "Connection": "Keep-Alive",
      "Host": "localhost:8080",
      "User-Agent": "Mozilla/5.0 (Windows NT 6.2; WOW64) AppleWebKit/538.1
         (KHTML, like Gecko) PhantomJS/2.1.1 Safari/538.1"
   },
   "httpVersion": "1.1",
   "method": "GET",
   "url": "/foo/response.php"
}
Getting response from the server:
<html><head><title>Welcone to Phantomjs</title></head><body><p>Hello World</p></body>
</html>
PhantomJS - Command Line Interface
PhantomJS can be executed using the keyword "phantomjs" and the name of the file. For example, "phantomjs file.js".
You can also pass arguments into "file.js" as follows −
phantomjs [options] file.js arg1 arg2 ...
Let us go through some of the options available at the command line.
| S.No | Option & Description |
|---|---|
| 1 | --help or h Will display all the command line options. Halts immediately and will not run the script passed. |
| 2 | --version or v Prints the version of PhantomJS running. This will halt the execution of script to be run. |
| 3 | --debug[true|false] Prints warnings and debug messages. By default, it is set to false. You can also use [yes|no]. |
| 4 | --cookies-file = /path/to/cookies.txt File name to store persistent cookies. |
| 5 | --diskcache=[true|false] Enables disk cache. It also takes values [yes|no] |
| 6 | --disk-cahe-path Path for disk cache. |
| 7 | --ignore-sslerrors=[true|false] Ignore SSL errors. For example Expired or self-signed certificate errors. Default is false. It also takes values [yes|no]. |
| 8 | --loadimages=[true|false] Loads all inline images. Default value is true. It also takes [yes|no]. |
| 9 | --local-storagepath=/some/path Path to save LocalStorage content and WebSQL content. |
| 10 | --local-storagequota=number Maximum size to allow for data. |
| 11 | --local-url-access Allows use of file:/// URLs (default is true). |
| 12 | --local-to-remote-urlaccess=[true|false] Allows local content to access remote URL. Default is false. It also takes values [yes|no]. |
| 13 | --max-disk-cachesize=size Limits the size of disk cache (in KB) |
| 14 | --offline-storage-path Specifies location for offline storage. |
| 15 | --offline-storage-quota Sets the maximum size of the offline storage in KB. |
| 16 | --outputencoding=encoding Sets the encoding used for terminal output. Default is utf-8. |
| 17 | --proxy=address:port Specifies the proxy server to be used (For example proxy=192.168.1.1:8080) |
| 18 | --proxytype=[http|socks5|none] Specifies the type of proxy server (default is http) |
| 19 | --proxy-auth Authentication information for the proxy. For example --proxy-auth=username:password |
| 20 | --scriptencoding=encoding Sets the encoding used for the script. Default is utf8. |
| 21 | --script-language Sets the script language. |
PhantomJS - Screen Capture
PhantomJS is very helpful in taking a screenshot of a webpage and converting a webpage into a PDF. We have given here a simple example to demonstrate how it works.
Example
var page = require('webpage').create();
page.open('http://phantom.org/',function(status){
   page.render('phantom.png');
   phantom.exit();
});
Execute the above program and the output will be saved as phantom.png.
Convert Webpages into PDFs
PhantomJS also helps to convert webpages into PDFs with header and footer added to it. Take a look at the following example to understand how it works.
var wpage = require('webpage').create();
var url = "https://en.wikipedia.org/wiki/Main_Page";
var output = "test.pdf";

wpage.paperSize = {
   width: screen.width+'px',
   height: '1500px',

   margin: {
      'top':'50px',
      'left':'50px',
      'rigtht':'50px'
   },
   orientation:'portrait',
   header: {
      height: "1cm",
      contents: phantom.callback(function(pageNumber, nPages) {
         return "<h5>Header <b>" + pageNumber + " / " + nPages + "</b></h5>";
      })
   },
   footer: {
      height: "1cm",
      contents: phantom.callback(function(pageNumber, nPages) {
         return "<h5>Footer <b>" + pageNumber + " / " + nPages + "</b></h5>";
      })
   }
}
wpage.open(url, function (status) {
   if (status !== 'success') {
      console.log('Page is not opening');
      phantom.exit();
   } else {
      wpage.render(output);
      phantom.exit();
   }
});
The above program generates the following output.
The above will convert the page into pdf and will be saved in test.pdf
Convert a Canvas to an Image
Phantomjs can easily convert a Canvas to an Image. Take a look at the following example to understand how it works.
var page = require('webpage').create();
page.content = '<html><body><canvas id="surface" width="400" height="400"></canvas></body></html>';

page.evaluate(function() {
   var context,e1;
   el = document.getElementById('surface');

   context = el.getContext('2d');
   context.font = "30px Comic Sans MS";
   context.fillStyle = "red";
   context.textAlign = "center";
   context.fillText("Welcome to PhantomJS ", 200, 200);

   document.body.style.backgroundColor = 'white';
   document.body.style.margin = '0px';
});
page.render('canvas.png');
phantom.exit();
The above program generates the following output.

PhantomJS - Page Automation
PhantomJS, with the help of its webpage module APIs, can manipulate webpages and perform operations such as DOM manipulation, clicking on buttons, etc.
Fetch Images from a Page
The following program shows how you can use PhantomJS to fetch images from a page.
var wpage = require('webpage').create();
wpage.onConsoleMessage = function(str) {
   console.log(str.length);
}
wpage.open("http://phantomjs.org", function(status) {
   console.log(status);
   var element = wpage.evaluate(function() {
      var imgdata =  document.querySelectorAll('img');
      var imgsrc = [];

      if (imgdata) {
         for (var i in imgdata) {
            imgsrc.push(imgdata[0].src);
         }
      }
      return imgsrc;
   });
   console.log(JSON.stringify(element));
});
The above program generates the following output.
Success
["http://phantomjs.org/img/phantomjslogo.png","http://phantomjs.org/img/phantom
js-logo.png","http://phantomjs.org/img/phantomjslogo.png","http://phantomjs.org
/img/phantomjs-logo.png"]
It is possible to include external JavaScript in a page using the injectJS webpage method. There are many properties and methods, which can help page automation and do many other things. You can refer the webpage module where the properties and methods are explained in detail.
PhantomJS - Network Monitoring
With help of PhantomJS, we can monitor the network and validate the behavior and performance of a particular webpage. There are callbacks in PhantomJS, i.e., onResourceRequested and onResourceReceived, which help in monitoring the traffic for a given page.
Example
The following example shows how you can use PhantomJS to monitor traffic for a given page.
function createHAR(address, title, startTime, resources) {

   // this function formats the data which is coming from
      onresourcerequest and onresourcereceived
   var entries = [];

   resources.forEach(function (resource) {
      var request = resource.request, startReply = resource.startReply,
         endReply = resource.endReply;

      if (!request || !startReply || !endReply) {
         return;
      }

      // Exclude Data URI from HAR file because
      // they aren't included in specification
      if (request.url.match(/(^data:image\/.*)/i)) {
         return;
      }
      entries.push ({
         startedDateTime: request.time.toISOString(),
         time: endReply.time - request.time,

         request: {
            method: request.method,
            url: request.url,
            httpVersion: "HTTP/1.1",
            cookies: [], headers: request.headers,
            queryString: [],
            headersSize: -1,
            bodySize: -1
         },
         response: {
            status: endReply.status,
            statusText: endReply.statusText,
            httpVersion: "HTTP/1.1",
            cookies: [],
            headers: endReply.headers,
            redirectURL: "",
            headersSize: -1,
            bodySize: startReply.bodySize,

            content: {
               size: startReply.bodySize,
               mimeType: endReply.contentType
            }
         },
         cache: {},
         timings: {
            blocked: 0,
            dns: -1,
            connect: -1,
            send: 0,
            wait: startReply.time - request.time,
            receive: endReply.time - startReply.time,
            ssl: -1
         },
         pageref: address
      });
   });
   return {
      log: {
         version: '1.2', creator: {
            name: "PhantomJS",
            version: phantom.version.major + '.' + phantom.version.minor +
               '.' + phantom.version.patch
         },
         pages: [{
            startedDateTime: startTime.toISOString(),
            id: address,
            title: title,

            pageTimings: {
               onLoad: page.endTime - page.startTime
            }
         }],
         entries: entries
      }
   };
}
var page = require('webpage').create(), system = require('system');
var fs = require('fs');

if (system.args.length === 1) {
   console.log('Usage: netsniff.js <some URL>');
   phantom.exit(1);
} else {
   page.address = system.args[1];
   page.resources = [];

   page.onLoadStarted = function () {  // called when page is loaded
      page.startTime = new Date();
   };
   page.onResourceRequested = function (req) {
      // called when any files are requested from given page url
      page.resources[req.id] = {
         request: req,
         startReply: null,
         endReply: null
      };
   };
   page.onResourceReceived = function (res) {
      //called when any files are received.
      if (res.stage === 'start') {
         page.resources[res.id].startReply = res;
      }
      if (res.stage === 'end') {
         page.resources[res.id].endReply = res;
      }
   };
   page.open(page.address, function (status) {  // open given page url
      var har;

      if (status !== 'success') {
         console.log('FAIL to load the address');
         phantom.exit(1);
      } else {
         page.endTime = new Date();

         page.title = page.evaluate(function () { // gets the page title
            return document.title;
         });
         har = createHAR(page.address, page.title, page.startTime, page.resources);

         // calls the function createHAR with page url, starttime, and page resources.
         // console.log(JSON.stringify(har, undefined, 4));
         fs.write('log.txt', JSON.stringify(har, undefined, 4), 'w');

         // logs are collected in log.txt file.
         phantom.exit();
      }
   });
}
Example of log.txt given to HAR preview
{
   "log": {
      "version": "1.2",
      "creator": {
         "name": "PhantomJS",
         "version": "2.1.1"
      },
      "pages": [
         {
            "startedDateTime": "2017-05-21T13:41:21.824Z",
            "id": "http://www.sample.com",
            "title": "Free Sample Products  Sample.com ≫ Free Samples,
               Free Product Samples, Product Test Marketing",
            "pageTimings": {
               "onLoad": 11081
            }
         }
      ],
      "entries": [
         {
            "startedDateTime": "2017-05-21T13:41:21.815Z",
            "time": 1999,

            "request": {
               "method": "GET",
               "url": "http://www.sample.com/",
               "httpVersion": "HTTP/1.1",
               "cookies": [],

               "headers": [
                  {
                     "name": "Accept",
                     "value": "text/html,application/xhtml+xml,
                        application/xml;q = 0.9,*/*;q = 0.8"
                  },

                  {
                     "name": "User-Agent",
                     "value": "Mozilla/5.0 (Windows NT 6.2; WOW64) AppleWebKit/538.1
                        (KHTML, like Gecko) PhantomJS/2.1.1 Safari/538.1"
                  }
               ],

               "queryString": [],
               "headersSize": -1,
               "bodySize": -1
            },
            "response": {
               "status": 301,
               "statusText": "Moved Permanently",
               "httpVersion": "HTTP/1.1",
               "cookies": [],

               "headers": [
                  {
                     "name": "Date",
                     "value": "Sun, 21 May 2017 13:41:25 GMT"
                  },

                  {
                     "name": "Server",
                     "value": "Apache/2.2.14 (Ubuntu)"
                  },

                  {
                     "name": "Location",
                     "value": "http://sample.com//"
                  },

                  {
                     "name": "Vary",
                     "value": "Accept-Encoding"
                  },

                  {
                     "name": "Content-Encoding",
                     "value": "gzip"
                  },

                  {
                     "name": "Keep-Alive",
                     "value": "timeout = 15, max = 100"
                  },

                  {
                     "name": "Connection",
                     "value": "Keep-Alive"
                  },

                  {
                     "name": "Content-Type",
                     "value": "text/html; charset = iso-8859-1"
                  }
               ],
               "redirectURL": "",
               "headersSize": -1,
               "bodySize": 307,

               "content": {
                  "size": 307,
                  "mimeType": "text/html; charset = iso-8859-1"
               }
            },

            "cache": {},
            "timings": {
               "blocked": 0,
               "dns": -1,
               "connect": -1,
               "send": 0,
               "wait": 1999,
               "receive": 0,
               "ssl": -1
            },
            "pageref": "http://www.sample.com"
         },
      ]
      {
         "startedDateTime": "2017-05-21T13:41:24.898Z",
         "time": 885,

         "request": {
            "method": "GET",
            "url": "http://sample.com/",
            "httpVersion": "HTTP/1.1",
            "cookies": [],

            "headers": [
               {
                  "name": "Accept",
                  "value": "text/html,application/xhtml+xml,
                     application/xml;q = 0.9,*/*;q = 0.8"
               },

               {
                  "name": "User-Agent",
                  "value": "Mozilla/5.0 (Windows NT 6.2; WOW64) AppleWebKit/538.1
                     (KHTML, like Gecko) PhantomJS/2.1.1 Safari/538.1"
               }
            ],
            "queryString": [],
            "headersSize": -1,
            "bodySize": -1
         },
         "response": {
            "status": 200,
            "statusText": "OK",
            "httpVersion": "HTTP/1.1",
            "cookies": [],

            "headers": [
               {
                  "name": "Date",
                  "value": "Sun, 21 May 2017 13:41:27 GMT"
               },

               {
                  "name": "Server",
                  "value": "Apache/2.2.14 (Ubuntu)"
               },

               {
                  "name": "X-Powered-By",
                  "value": "PHP/5.3.2-1ubuntu4.29"
               },

               {
                  "name": "X-Pingback",
                  "value": "http://sample.com/xmlrpc.php"
               },

               {
                  "name": "Link",
                  "value": "<http://sample.com/wp-json/>;
                     rel = \"https://api.w.org/\", <http://wp.me/P6Jj5H-4>;
                     rel = shortlink"
               },

               {
                  "name": "Vary",
                  "value": "Accept-Encoding"
               },

               {
                  "name": "Content-Encoding",
                  "value": "gzip"
               },

               {
                  "name": "Keep-Alive",
                  "value": "timeout = 15, max = 99"
               },

               {
                  "name": "Connection",
                  "value": "Keep-Alive"
               },

               {
                  "name": "Content-Type",
                  "value": "text/html; charset = UTF-8"
               }
            ],

            "redirectURL": "",
            "headersSize": -1,
            "bodySize": 1969,

            "content": {
               "size": 1969,
               "mimeType": "text/html; charset = UTF-8"
            }
         },

         "cache": {},
         "timings": {
            "blocked": 0,
            "dns": -1,
            "connect": -1,
            "send": 0,
            "wait": 869,
            "receive": 16,
            "ssl": -1
         },

         "pageref": http://www.sample.com
      },

      {
         "startedDateTime": "2017-05-21T13:41:25.767Z",
         "time": 388,

         "request": {
            "method": "GET",
            "url": "http://sample.com/wpcontent/themes/samplecom/style.css",
            "httpVersion": "HTTP/1.1",
            "cookies": [],

            "headers": [
               {
                  "name": "Accept",
                  "value": "text/css,*/*;q = 0.1"
               },

               {
                  "name": "Referer",
                  "value": "http://sample.com/"
               },

               {
                  "name": "User-Agent",
                  "value": "Mozilla/5.0 (Windows NT 6.2; WOW64) AppleWebKit/538.1
                     (KHTML, like Gecko) PhantomJS/2.1.1 Safari/538.1"
               }
            ],

            "queryString": [],
            "headersSize": -1,
            "bodySize": -1
         },

         "response": {
            "status": 200,
            "statusText": "OK",
            "httpVersion": "HTTP/1.1",
            "cookies": [],

            "headers": [
               {
                  "name": "Date",
                  "value": "Sun, 21 May 2017 13:41:27 GMT"
               },

               {
                  "name": "Server",
                  "value": "Apache/2.2.14 (Ubuntu)"
               },

               {
                  "name": "Last-Modified",
                  "value": "Fri, 22 Apr 2011 00:32:22 GMT"
               },

               {
                  "name": "ETag",
                  "value": "\"e1d7-1836-4a176fdbbd180\""
               },

               {
                  "name": "Accept-Ranges",
                  "value": "bytes"
               },

               {
                  "name": "Vary",
                  "value": "Accept-Encoding"
               },

               {
                  "name": "Content-Encoding",
                  "value": "gzip"
               },

               {
                  "name": "Keep-Alive",
                  "value": "timeout = 15, max = 98"
               },

               {
                  "name": "Connection",
                  "value": "Keep-Alive"
               },

               {
                  "name": "Content-Type",
                  "value": "text/css"
               }
            ],

            "redirectURL": "",
            "headersSize": -1,
            "bodySize": 3174,

            "content": {
               "size": 3174,
               "mimeType": "text/css"
            }
         },

         "cache": {},
         "timings": {
            "blocked": 0,
            "dns": -1,
            "connect": -1,
            "send": 0,
            "wait": 388,
            "receive": 0,
            "ssl": -1
         },

         "pageref": "http://www.sample.com"
      }
   }
}
Output
The above program generates the following output.
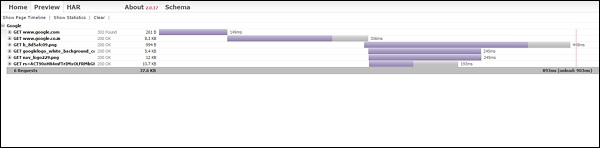
All the logs are collected in a .txt file and later, the same is converted as above using the HAR preview, for example, (http://www.softwareishard.com/har/viewer/)
PhantomJS - Testing
PhantomJS has a lot of API for a webpage, which gives all the details. PhantomJS can be used to for testing like getting the content of a page, taking screen share, converting page into a pdf, etc. There are many popular testing libraries in the market, which can be used along with PhantomJS and can be used for testing.
Some of the popular frameworks that can work with PhantomJS are as follows −
- Mocha
- Jasmine
- Qunit
- Hiro
- Laika
- Buster.JS
- WebDriver
Example PhantomJS with Qunit
(function () {
   var url, timeout,args = require('system').args, page = require('webpage').create();
   url = args[1];
   timeout = parseInt(10, 10);

   page.onConsoleMessage = function (msg) {
      //prints all the console messages
      console.log(msg);
   };
   page.onInitialized = function () {  // called when page is initialized
      page.evaluate(callqunit);
   };
   page.onCallback = function (message) { // called from
      var result, failed;

      if (message) {
         if (message.name === 'QUnit.done') {
            result = message.data;
            failed = !result || !result.total || result.failed;

            if (!result.total) {
               console.error('No tests were executed');
            }
            pageexit(failed ? 1 : 0);
         }
      }
   };
   page.open(url, function (status) { // opening page
      if (status !== 'success') {
         console.error('Unable to access network: ' + status);
         pageexit(1);

      } else {
         var checkqunit = page.evaluate(function () {
            //evaluating page and chcking if qunit object
               is present on the given page url
            return (typeof QUnit === 'undefined' || !QUnit);
         });

         if (checkqunit) {
            console.error('Qunit scripts are not present on the page');
            pageexit(1);
         }

         //timeout of 10seconds is used otherwise message from console will get printed.
         setTimeout(function () {
            console.error('The specified timeout of ' + timeout + ' seconds has expired.
               Aborting...');
            pageexit(1);
         }, timeout * 1000);
      }
   });
   function callqunit() {
qunit.html
<!DOCTYPE html>
<html>

   <head>
      <meta charset = "utf-8">
      <meta name = "viewport" content = "width = device-width">
      <title>QUnit Example</title>
      <link rel = "stylesheet" href = "https://code.jquery.com/qunit/qunit-2.3.2.css">
   </head>

   <body>
      <div id = "qunit"></div>
      <div id = "qunit-fixture"></div>
      <script src = "https://code.jquery.com/qunit/qunit-2.3.2.js"></script>
   </body>

</html>
Output
Command − phantomjs qunit.js http://localhost/tasks/qunit.html
The above program generates the following output.
{"passed":3,"failed":2,"total":5,"runtime":23}
Time taken is 23ms to run 5 tests.
3 passed, 2 failed.
PhantomJS - REPL
REPL stands for Read Eval Print Loop. In PhantomJS, REPL is an interactive mode to test the JavaScript code. You can do the same thing, which is done in Google Chrome Inspector or Firebug to execute some piece of code directly on the console. REPL returns you the same platform to execute the scripts.
The typed command is sent to the interpreter for immediate interpretation (EVAL) and to provide feedback (PRINT). Enter PhantomJS in the command line and it will take you to the interactive mode, where you can execute your code directly.
Syntax
Its syntax is as follows −
Phantomjs
Example
The following example demonstrates how REPL works in PhantomJS.
phantomjs> console.log("Welcome to phantomjs");
Welcome to phantomjs
Undefined

phantomjs> window.navigator {
   "appCodeName": "Mozilla",
   "appName": "Netscape",
   "appVersion": "5.0 (Windows NT 6.2; WOW64) AppleWebKit/538.1 (KHTML, like Gecko)
      PhantomJS/2.1.1 Safari/538.1",
   "cookieEnabled": true,
   "language": "en-IN",

   "mimeTypes": {
      "length": 0
   },
   "onLine": false,
   "platform": "Win32",

   "plugins": {
      "length": 0
   },
   "product": "Gecko
   "productSub": "20030107",
   "userAgent": "Mozilla/5.0 (Windows NT 6.2; WOW64) AppleWebKit/538.1 (KHTML, like Gecko)
      PhantomJS/2.1.1 Safari/538.1",
   "vendor": "Apple Computer, Inc.",
   "vendorSub": ""
}

phantomjs>
To find the version
phantomjs> phantom.version {
   "major": 2,
   "minor": 1,
   "patch": 1
}
phantomjs>
Each command is executed and the result is displayed. Use CTRL+C, CTRL+D or phantom.exit() to come out of the interactive mode.
Use the up/down arrow keys to listen to the previously typed commands.
There is another feature called autocompletion, which helps to remember the command. Just type "phantom" and hit the "Tab" button to get a list of available commands you can execute.
Output
The above program generates the following output.
phantomjs> phantom.→|
phantomjs> phantom.cookies→|
phantomjs> phantom.exit→|
phantomjs> phantom.version→|
PhantomJS - Examples
In this chapter, we are providing a few more practical examples to understand some important features of PhantomJS.
Example 1 - Find the Page Speed
In this example, we will use PhantomJS to find the page speed for any given page URL.
var page = require('webpage').create(),
   system = require('system'),
   t, address;

if (system.args.length === 1) {
   console.log('Usage: loadspeed.js <some URL>');
   phantom.exit(1);
} else {
   t = Date.now();
   address = system.args[1];

   page.open(address, function (status) {
      if (status !== 'success') {
         console.log('FAIL to load the address');
      } else {
         t = Date.now() - t;

         console.log('Page title is ' + page.evaluate(function () {
            return document.title;
         }));
         console.log('Loading time ' + t + ' msec');
      }
      phantom.exit();
   });
}
The above program generates the following output.
Command − phantomjs pagespeed.js http://www.google.com
Page title is Google
Loading time 1396 msec
Example 2 - Send a Click Event to a Page
In the following example, we will use PhantomJS to send a click event to a page.
var page = require('webpage').create();
page.onConsoleMessage = function(str) {
   console.log(str);
}
page.open('http://phantomjs.org/api/phantom/', function(status) {
   page.render('beforeclick.png');
   console.log(page.url);

   var element = page.evaluate(function() {
      return document.querySelector('img[src = "http://phantomjs.org/img/phantomjslogo.png"]');
   });
   page.sendEvent('click', element.offsetLeft, element.offsetTop, 'left');

   window.setTimeout(function () {
      console.log(page.url);
      page.render('afterclick.png');
      phantom.exit();
   }, 5000);
   console.log('element is ' + element);
});
The above program generates the following output.
http://phantomjs.org/api/phantom/
element is [object Object]
http://phantomjs.org/
Our program will create the following two png images in the bin folder. These two images show the difference before and after the execution of the above program.
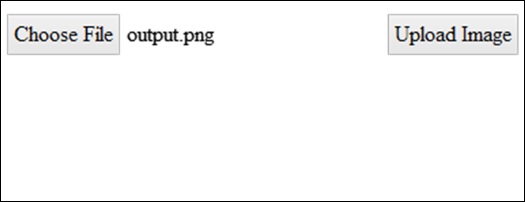
Example 3 - Submit a Form
The following example shows how to submit a form using PhantomJS.
var wpage = require('webpage').create();
wpage.open("http://localhost/tasks/submitform.html", function(status) {
   console.log(status);
   wpage.uploadFile('input[name = fileToUpload]', 'output.png');
   wpage.render("sform.png");

   var element = wpage.evaluate(function() {
      return document.querySelector('input[type = "submit"]');
      // getting details of submit button using queryselector.
   });
   wpage.sendEvent('click', element.offsetLeft, element.offsetTop, 'left');

   // sendevent is used to send click event and also giving the left and top
      position of the submit button.

   window.setTimeout(function () {
      console.log(wpage.url);
      wpage.render("submit.png");  // screenshot is saved in submit.png
      phantom.exit();
   }, 5000);
   console.log('element is ' + element);
});
submitform.html
The following code shows how to use the submitform.html file.
<html>
   <head>
      <title>Window 2</title>
   </head>

   <body>
      <form action = "submitform.php" method = "post" enctype = "multipart/form-data"
         id = "form1">
         <input type = "file" name = "fileToUpload" id = "fileToUpload">
         <input type = "submit" value = "Upload Image" name = "submit">
      </form>
   </body>

</html>
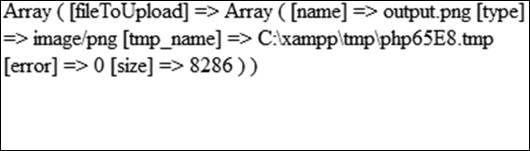
Once the form is submitted, it goes to submitform.php.
submitform.php
submitform.php is just printing the details of the files.
<?php
   print_r($_FILES);
?>
The above program generates the following output.
Success
element is [object Object]
http://localhost/tasks/submitform.php
Images
Following are the images for file upload and form submit.