- Microsoft Azure - Home
- Cloud Computing - Overview
- Microsoft Azure - Windows
- Microsoft Azure - Components
- Microsoft Azure - Compute Module
- Microsoft Azure - Fabric Controller
- Microsoft Azure - Storage
- Microsoft Azure - Blobs
- Microsoft Azure - Queues
- Microsoft Azure - Tables
- Microsoft Azure - CDN
- Microsoft Azure - Applications
- Microsoft Azure - Security
- Microsoft Azure - Datacenters
- Microsoft Azure - Scenarios
- Microsoft Azure - Management Portal
- Azure - Create Virtual Network
- Azure - Deploying Virtual Machines
- Azure - Endpoint Configuration
- Azure - Point-to-Site Connectivity
- Azure - Site-to-Site Connectivity
- Microsoft Azure - Traffic Manager
- Microsoft Azure - PowerShell
- Azure - Monitoring Virtual Machines
- Azure - Setting Up Alert Rules
- Azure - Application Deployment
- Microsoft Azure - Backup & Recovery
- Azure - Self-Service Capabilities
- Azure - Multi-Factor Authentication
- Azure - Forefront Identity Manager
- Azure - Data Import & Export Job
- Microsoft Azure - Websites
- Microsoft Azure - Scalability
- Microsoft Azure - Disk Configuration
- Microsoft Azure - Disk Caching
- Microsoft Azure - Personalize Access
- Azure - Personalize Company Brand
- Azure - Self-Service Password Reset
- Microsoft Azure - Self-Service Group
- Microsoft Azure - Create a Group
- Azure - Security Reports & Alerts
- Azure - Orchestrated Recovery
- Microsoft Azure - Health Monitoring
- Microsoft Azure - Upgrades
- Microsoft Azure Useful Resources
- Microsoft Azure - Quick Guide
- Microsoft Azure - Useful Resources
- Microsoft Azure - Discussion
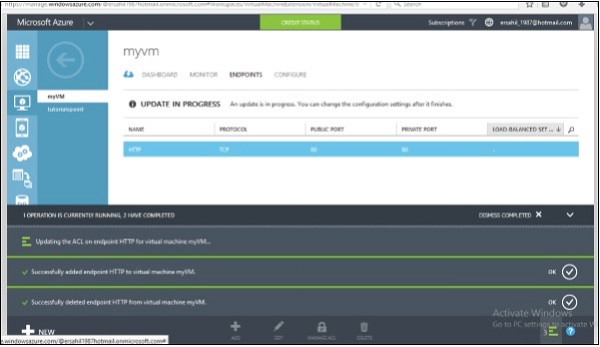
Microsoft Azure - Endpoint Configuration
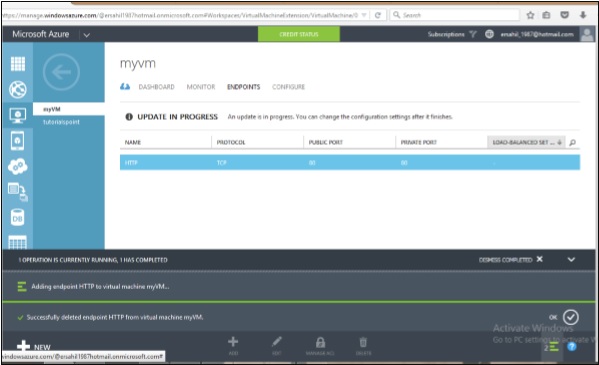
When creating a virtual machine, we come across a part where endpoints can be configured. The two default endpoints enabled while creating a virtual machine are Remote Desktop and PowerShell. What actually is an endpoint? Virtual machine on same cloud can communicate to each other automatically. But in case we need them to communicate with our own computer, we will need an endpoint configured to make it happen. It is basically accessing the virtual machine through a port. An endpoint provides remote access to the services running on virtual machine. It has a public and private port that needs to be specified while creating an endpoint. Additionally, an endpoint can be accessed securely by activating Access Control Lists (ACL).
In the following section, it is demonstrated how a new endpoint can be configured for virtual machine thats already been created. However, it can also be done in the same way as creating a new one on configuration part of wizard.
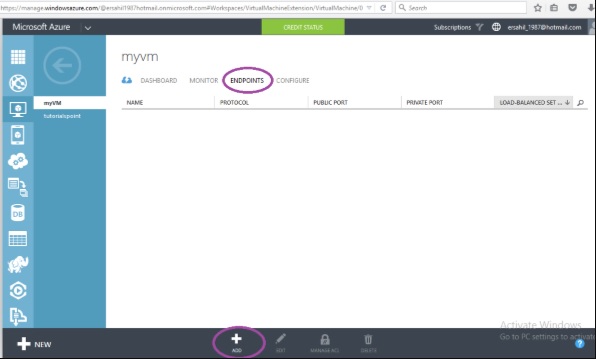
Step 1 − Click on Virtual Machine in your Azure Management portal.
Step 2 − Click on Endpoint and then Click on Add.
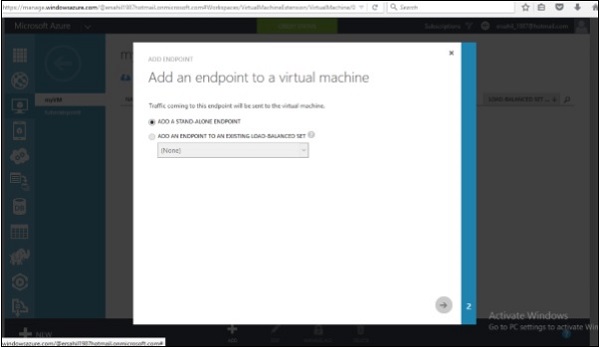
Step 3 − Select Add a Stand-Alone Endpoint as shown in the following image.
Step 4 − Select the name from dropdown. Alternatively, you can enter a custom name. Here lets select Http from options. It will assign unused ports automatically. Or you can enter it manually.
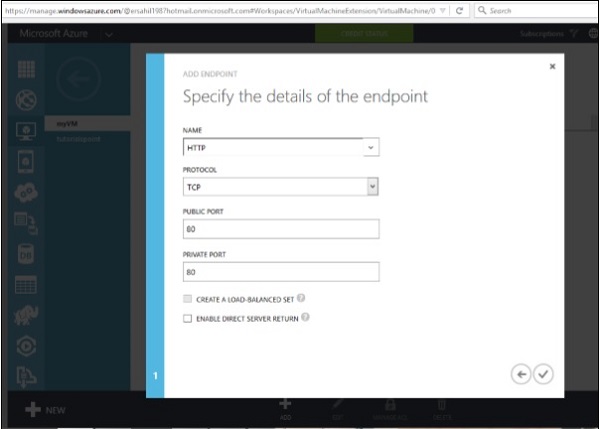
Step 5 − If you tick Create a Load Balanced Set, it will allow distributing the load across virtual machines. Lets leave it unchecked here because it can be configured later, if needed.
Step 6 − The Enable Direct Server Return is checked when SQL servers Always On feature is required, so lets leave it unchecked.
Step 7 − Click on Next arrow.
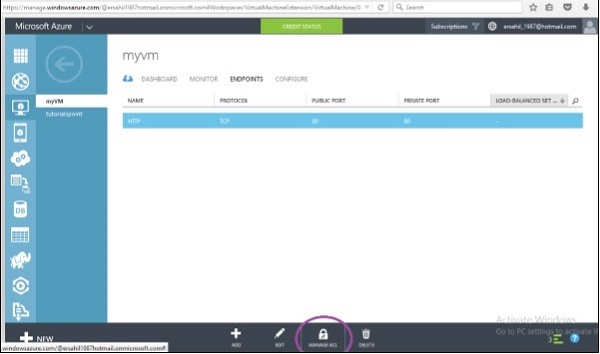
Access Control of Endpoint
We can grant or deny the access of services to an individual host or network. If nothing is specified, the endpoint can be accessed from any host and network.
Step 1 − Select Manage ACL as shown in the following image.
Step 2 − Enter access description.
Step 3 − Enter Subnet Mask.
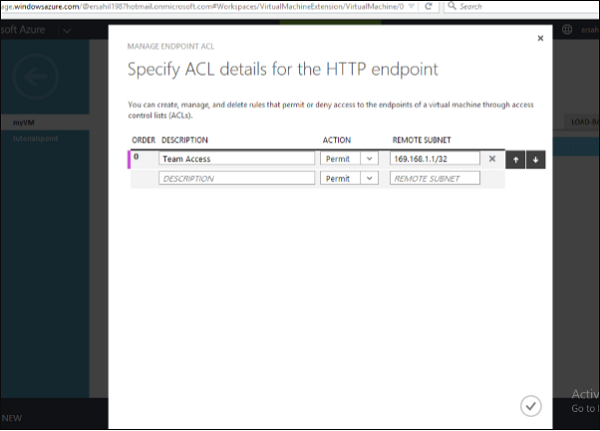
Step 4 − Click on Next and its done.