- MEAN.JS - Home
- MEAN.JS - Overview
- MEAN.JS - Architecture
- Build Node Web App
- MEAN.JS - Mean Project Setup
- Building Static Route Node Express
- MEAN.JS - Build Data Model
- MEAN.JS - REST API
- Front End with Angular
- Angular Components in App
- Building Single Page with Angular
- Building an SPA: The next level
- MEAN.JS Useful Resources
- MEAN.JS - Quick Guide
- MEAN.JS - Useful Resources
- MEAN.JS - Discussion
MEAN.JS - Building Single Page with Angular
In the MEAN stack, Angular is known as second JavaScript framework, which allows creating single page applications in a clean Model View Controller (MVC) way.
AngularJS as a front-end Framework uses following things −
Uses Bower to install files and libraries
Uses controllers and services for Angular application structure
Creates different HTML pages
Uses ngRoute module to handle routing and services for AngularJS application
Uses Bootstrap to make an application attractive
Setting Up Our Angular Application
Let us build a simple application that has a Node.js backend and an AngularJS frontend. For our Angular application, we will want −
Two different pages (Home, Student)
A different angular controller for each
No page refresh when switching pages
Bower and Pulling in Components
We will need certain files for our application like bootstrap and angular. We will tell bower to fetch those components for us.
First, install bower on your machine executing the below command on your command terminal −
npm install -g bower
This will install bower and make it accessible globally on your system. Now place the files .bowerrc and bower.json under your root folder. In our case it is mean-demo. Contents of both the files are as below −
.bowerrc - This will tell Bower where to place our files −
{
   "directory": "public/libs"
}
bower.json - This is similar to package.json and will tell Bower which packages are needed.
{
   "name": "angular",
   "version": "1.0.0",
   "dependencies": {
      "bootstrap": "latest",
      "angular": "latest",
      "angular-route": "latest"
   }
}
Next, install Bower components by using the below command. You can see bower pull in all the files under public/libs.
$ bower install
Our directory structure would be as follows −
mean-demo
   -app
   -config
   -node_modules
   -public
      -js
         --controllers
   -MainCtrl.js
   -StudentCtrl.js
      --app.js
      --appRoutes.js
   -libs
   -views
      --home.html
   --student.html
      -index.html
   -bower.json
   -package.json
   -server.js
Angular Controllers
Our controller (public/js/controllers/MainCtrl.js) is as follows −
angular.module('MainCtrl', []).controller('MainController', function($scope) {
   $scope.tagline = 'Welcome to tutorials point angular app!';
});
Controller public/js/controllers/StudentCtrl.js is as follows −
angular.module('StudentCtrl', []).controller('StudentController', function($scope) {
   $scope.tagline = 'Welcome to Student section!';
});
Angular Routes
Our routes file (public/js/appRoutes.js) is as follows −
angular.module('appRoutes', []).config(['$routeProvider',
   '$locationProvider', function($routeProvider, $locationProvider) {
   $routeProvider
      // home page
      .when('/', {
         templateUrl: 'views/home.html',
         controller: 'MainController'
      })
      // students page that will use the StudentController
      .when('/students', {
         templateUrl: 'views/student.html',
         controller: 'StudentController'
      });
   $locationProvider.html5Mode(true);
}]);
Now that we have our controllers, and routes, we will combine them all and inject these modules into our main public/js/app.js as follows −
angular.module('sampleApp', ['ngRoute', 'appRoutes', 'MainCtrl', 'StudentCtrl']);
View File
Angular uses the template file, which can be injected into the <div ng-view></div> in the index.html file. The ng-view directive creates a place holder, where a corresponding view (HTML or ng-template view) can be placed based on the configuration. For more information on angular views, visit this link.
When you are ready with routing, create smaller template files and inject them into index.html file. The index.html file will have following code snippet −
<!doctype html>
<html lang="en">
   <head>
      <meta charset="UTF-8">
      <base href="/">
      <title>Tutorialspoint Node and Angular</title>

      <!-- CSS -->
      <link rel="stylesheet" href="libs/bootstrap/dist/css/bootstrap.min.css">
      <link rel="stylesheet" href="css/style.css"> <!-- custom styles -->

      <!-- JS -->
      <script src="libs/angular/angular.min.js"></script>
      <script src="libs/angular-route/angular-route.min.js"></script>

      <!-- ANGULAR CUSTOM -->
      <script src="js/controllers/MainCtrl.js"></script>
      <script src="js/controllers/StudentCtrl.js"></script>
      <script src="js/appRoutes.js"></script>
      <script src="js/app.js"></script>
   </head>
   <body ng-app="sampleApp" ng-controller="MainController">
      <div class="container">

         <!-- HEADER -->
         <nav class="navbar navbar-inverse">
            <div class="navbar-header">
               <a class="navbar-brand" href="/">Tutorial</a>
            </div>
            <ul class="nav navbar-nav">
               <li><a href="/students">Students</a></li>
            </ul>
         </nav>
         <!-- ANGULAR DYNAMIC CONTENT -->
         <div ng-view></div>
      </div>
   </body>
</html>
Running Application
Execution
You can download the source code for this application in this link. Download the zip file; extract it in your system. Open the terminal and run the below command to install npm module dependencies.
$ cd mean-demo
$ npm install
Next run the below command −
$ node start
You will get a confirmation as shown in the image below −

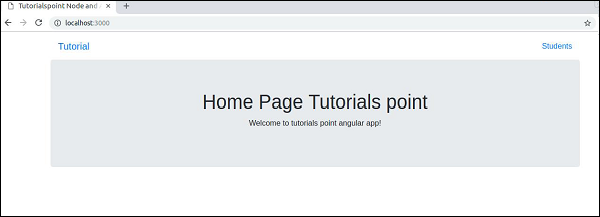
Now, go to browser and type http://localhost:3000. You will get the page as shown in the image below −
Click on Students link, you will see screen as below −

Our Angular frontend will use the template file and inject it into the <div ng-view></div> in our index.html file. It will do this without a page refresh.
