- Intellij Idea - Home
- Intellij Idea - Introduction
- Installation and Configuration
- Intellij Idea − Getting Familiar
- Create First Java Project
- Intellij Idea − Deep Dive
- Intellij Idea − Deep Dive into Editor
- Intellij Idea − Code Refactoring
- Intellij Idea − Running Projects
- Intellij Idea − Build Tools
- Intellij Idea − Unit Testing
- Intellij Idea − Debugging
- Intellij Idea − Profiling
- Intellij Idea − Version Control
- Intellij Idea − Databases
- Migrating from NetBeans
- Intellij Idea − Migrating from Eclipse
Intellij Idea - Migrating from NetBeans
NetBeans is another popular Java IDE. If you are a current user of NetBeans and want to migrate from it to IntelliJ then this will serve as a good starting point.
This chapter discusses the importing of NetBeans projects in IntelliJ, its terminologies equivalent to NetBeans, popular shortcuts and frequently asked questions.
Import NetBeans project
In this section, we will learn how to import NetBeans project. Follow these steps to import the project −
Navigate to File → New → Project from Existing Sources
Select your NetBeans project directory.
When the Import Project wizard opens, select the Create project from existing sources option.
Follow the on-screen instructions to continue.
IntelliJ vsNetBeans terminology
The following table compares IntelliJ and NetBeans terminology −
| IntelliJ | NetBeans |
|---|---|
| Module | Project |
| Global library | Global library |
| Module library | Project library |
| Module dependency | Project dependency |
| Module SDK | Project-specific SDK |
Popular shortcuts
IntelliJ is a keyboard-centric IDE. It provides shortcuts for most of the actions. The following table lists a few important shortcuts −
| Action | Shortcut |
|---|---|
| Run Java program | ctrl+shift+F10 |
| Organize imports | ctrl+alt+o |
| System.out.println() | Type sout and press ctrl+j |
| Delete current line | ctrl + y |
| Search | ctrl + shift + f |
| Generate getter and setter | alt + insert |
| Format code | ctrl + alt + l |
| Comment out code | ctrl + / |
| Go to line | ctrl + g |
| Go to declaration | ctrl + b |
| Rename | shift+F6 |
| Move lines | ctrl + shift + up/down |
Debugger shortcuts
The following table lists down a few important debugger shortcuts −
| Debug action | Shortcut |
|---|---|
| Debug a program | Shift + F9 |
| Choose configuration and debug | Shift+Alt+F9 |
| Step over | F8 |
| Step into | F7 |
| Smart step into | Shift + F7 |
| Step out | Shift + F8 |
| Force step over | Shift+Alt+F8 |
| Force step into | Shift+Alt+F7 |
| Resume program | F9 |
| Evaluate expression | Alt+F8 |
| Toggle breakpoints | Ctrl+F8 |
| View breakpoints | Ctrl+Shift+F8 |
FAQsand Tips
In this section, we will go through a few Frequently Answered Questions and Tips. The FAQs and tips are as follows −
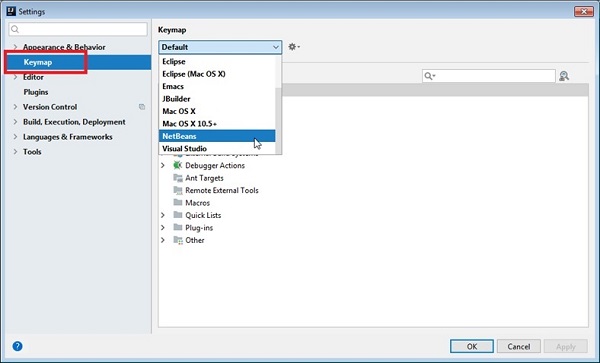
Can I use the NetBeans key bindings in IntelliJ IDEA?
Navigate to Files → Settings and select Keymap.
Select NetBeans from the drop down box
Is local history in IntelliJ IDEA different from that in NetBeans?
Local history in IntelliJ IDEA, generally, is more detailed. Whatever you do with a directory, file, class, method or field, or a code block is reflected in your local history. The local history also includes VCS operations.
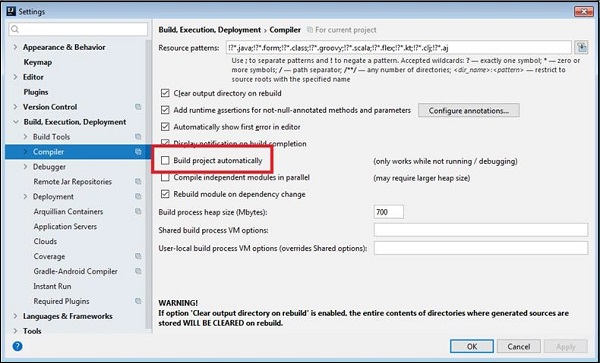
Can I enable compile on save' in IntelliJ IDEA?
- Navigate to File → Settings → Build, Execution, Deployment → Compiler
- Select Build Project Automatically option.
- Click on the OK button.
Can I use NetBeans plugins in IntelliJ IDEA?
No, you cannot.
Is it possible to build NetBeans RCP applications with IntelliJ IDEA?
It is possible; however, you will not get the same kind of support that you get with NetBeans (wizards, menu actions, etc.). For more details, visit this.
