
Article Categories
- All Categories
-
 Data Structure
-
 Networking
-
 RDBMS
RDBMS
-
 Operating System
-
 Java
Java
-
 MS Excel
-
 iOS
iOS
-
 HTML
HTML
-
 CSS
CSS
-
 Android
-
 Python
-
 C Programming
-
 C++
C++
-
 C#
C#
-
 MongoDB
-
 MySQL
MySQL
-
 Javascript
-
 PHP
PHP
-
 Economics & Finance
Locking Screen Orientation in Android
When talking about operating systems powering contemporary must have gadgets like smartphones, tablets and smartwatches Android tops the list without question. Its robust architecture offers almost limitless customizability options combined with an array of features built around elevating users' experiences to a different level entirely.
One remarkable addition to Androids capabilities is the screen orientation locking function which allows you to fix the display in either portrait or landscape mode irrespective of how you hold your device. In this write up we highlight why screening locking is critical to optimal use of modern day Android devices and provide intuitive steps for enabling this feature.
How to Make the Entire Application to be in Portrait Mode or Landscape Made?
-
Step 1 ? Create a new project in Android Studio.
Undertaking an Android Studio project may feel like a daunting task due to its intricate Java code embedded within. But fret not! By following some simple steps, you can direct yourself towards progress quickly. To commence this task, open up Android Studio and assign it an appropriate title that conveys its nature; then proceed to rename your primary activity file as "Activity1," while renaming the alternative one as "layout_activity_1"; this provides structure within your arrangement and readies you for transporting across different levels of complexities with confidence.
-
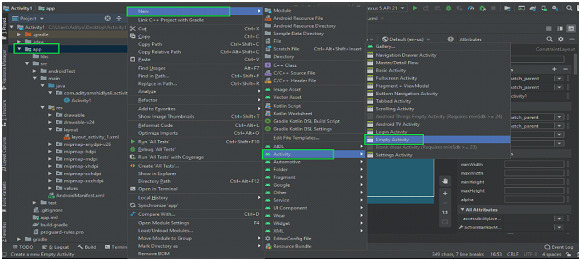
Step 2 ? Create another Empty Activity
Creating another activity with Android Studio is a relatively simple task. Start by right clicking the app, hovering over 'New' and selecting 'Activity', then selecting 'Empty Activity'. Next, rename the activity to 'Activity2' and the layout name to 'layout_activity_2'. Images are provided for reference, should any confusion arise. Once these basic steps are completed, the creation of a new activity is complete.

-
Step 3 ? Working with layout_activity_1.xml file
We need to include text and buttons in the layout_activity_1. So, open the layout_activity_1.xml and add widgets TextView and Button as there are being included so that we can differentiate the 2 activities.
-
Step 4 ? Working with the Activity file1
Now we need to handle Goto activity Button 2. So now I open Activity1.java and handle the buttons as invoking the following code.
Example
import androidx.appcompat.app.AppCompatActivity;
import android.content.Intent;
import android.os.Bundle;
import android.view.View;
import android.widget.Button;

class Activity1: AppCompatActivity() {
   // Invoke the button widget
   var gotoActivity2: Button? = null
   override fun onCreate(savedInstanceState: Bundle?) {
      super.onCreate(savedInstanceState)
      setContentView(R.layout.layout_activity_1)

      // Register the button with button ID
      gotoActivity2 = findViewById(R.id.goto_activity_2)

      // Set onclick Listener for the button as:
      // So that it can goto Activity2
      gotoActivity2.setOnClickListener(View.OnClickListener {
         val i = Intent(this@Activity1, Activity2::class.java)
         startActivity(i)
      })
   }
}
-
Step 5 ? Working with layout_activity_2.xml file
Now open the layout_activity_2.xml and add widgets TextView and Button.
-
Step 6 ? Working with the Activity2.java file.
We need to handle the above Goto activity 1 button. To handle this button open Activity2.java and invoke the following code ?
Example
import androidx.appcompat.app.AppCompatActivity;
import android.content.Intent;
import android.os.Bundle;
import android.view.View;
import android.widget.Button;

public class Activity2 extends AppCompatActivity {

   // Invoke the button widget
   Button gotoActivity1;

   @Override
   protected void onCreate(Bundle savedInstanceState) {

      // super keyword refers to parent class instance
      super.onCreate(savedInstanceState);
      setContentView(R.layout.layout_activity_2);

      // Register the button with appropriate button ID
      gotoActivity1 = findViewById(R.id.goto_activity_1);

      // Set onClick Listener for the button as:
      // So that it goes to Activity1
      gotoActivity1.setOnClickListener(new View.OnClickListener() {
         @Override
         public void onClick(View view) {
            Intent i = new Intent(Activity2.this, Activity1.class);
            startActivity(i);
         }
      });
   }
}
Conclusion
Maximizing the benefits of using an Android device can involve small yet effective changes - such as locking the screen orientation. This helps prevent sudden rotation shifts that might impact battery performance while also improving how users interact with their devices. You don't need to be a tech expert to lock or unlock the orientation; its' easy with just a few simple steps!

819 Views
