- Home
- CentOS Overview
- Basic CentOS Linux Commands
- File / Folder Management
- User Management
- Quota Management
- Systemd Services Start and Stop
- Resource Mgmt with systemctl
- Resource Mgmt with crgoups
- Process Management
- Firewall Setup
- Configure PHP in CentOS Linux
- Set Up Python with CentOS Linux
- Configure Ruby on CentOS Linux
- Set Up Perl for CentOS Linux
- Install and Configure Open LDAP
- Create SSL Certificates
- Install Apache Web Server CentOS 7
- MySQL Setup On CentOS 7
- Set Up Postfix MTA and IMAP/POP3
- Install Anonymous FTP
- Remote Management
- Traffic Monitoring in CentOS
- Log Management
- Backup and Recovery
- System Updates
- Shell Scripting
- Package Management
- Volume Management
Linux Admin - Remote Management
When talking about remote management in CentOS as an Administrator, we will explore two methods −
- Console Management
- GUI Management
Remote Console Management
Remote Console Management means performing administration tasks from the command line via a service such as ssh. To use CentOS Linux effectively, as an Administrator, you will need to be proficient with the command line. Linux at its heart was designed to be used from the console. Even today, some system administrators prefer the power of the command and save money on the hardware by running bare-bones Linux boxes with no physical terminal and no GUI installed.
Remote GUI Management
Remote GUI Management is usually accomplished in two ways: either a remote X-Session or a GUI application layer protocol like VNC. Each has its strengths and drawbacks. However, for the most part, VNC is the best choice for Administration. It allows graphical control from other operating systems such as Windows or OS X that do not natively support the X Windows protocol.
Using remote X Sessions is native to both X-Window's Window-Managers and DesktopManagers running on X. However, the entire X Session architecture is mostly used with Linux. Not every System Administrator will have a Linux Laptop on hand to establish a remote X Session. Therefore, it is most common to use an adapted version of VNC Server.
The biggest drawbacks to VNC are: VNC does not natively support a multi-user environment such as remote X-Sessions. Hence, for GUI access to end-users remote XSessions would be the best choice. However, we are mainly concerned with administering a CentOS server remotely.
We will discuss configuring VNC for multiple administrators versus a few hundred endusers with remote X-Sessions.
Laying the Foundation for Security with SSH for Remote Console Access
ssh or Secure Shell is now the standard for remotely administering any Linux server. SSH unlike telnet uses TLS for authenticity and end-to-end encryption of communications. When properly configured an administrator can be pretty sure both their password and the server are trusted remotely.
Before configuring SSH, lets talk a little about the basic security and least common access. When SSH is running on its default port of 22; sooner rather than later, you are going to get brute force dictionary attacks against common user names and passwords. This just comes with the territory. No matter how many hosts you add to your deny files, they will just come in from different IP addresses daily.
With a few common rules, you can simply take some pro-active steps and let the bad guys waste their time. Following are a few rules of security to follow using SSH for remote administration on a production server −
Never use a common username or password. Usernames on the system should not be system default, or associated with the company email address like: systemadmin@yourcompany.com
Root access or administration access should not be allowed via SSH. Use a unique username and su to root or an administration account once authenticated through SSH.
Password policy is a must: Complex SSH user passwords like: "This&IS&a&GUD&P@ssW0rd&24&me". Change passwords every few months to eliminate susceptibility to incremental brute force attacks.
Disable abandoned or accounts that are unused for extended periods. If a hiring manager has a voicemail stating they will not be doing interviews for a month; that can lead to tech-savvy individuals with a lot time on their hands, for example.
Watch your logs daily. As a System Administrator, dedicate at least 30-40 minutes every morning reviewing system and security logs. If asked, let everyone know you don't have the time to not be proactive. This practice will help isolate warning signs before a problem presents itself to end-users and company profits.
Note On Linux Security − Anyone interested in Linux Administration should actively pursue current Cyber-Security news and technology. While we mostly hear about other operating systems being compromised, an insecure Linux box is a sought-after treasure for cybercriminals. With the power of Linux on a high-speed internet connection, a skilled cybercriminal can use Linux to leverage attacks on other operating systems.
Install and Configure SSH for Remote Access
Step 1 − Install SSH Server and all dependent packages.
[root@localhost]# yum -y install openssh-server
'Loaded plugins: fastestmirror, langpacks
Loading mirror speeds from cached hostfile
* base: repos.centos.net
* extras: repos.dfw.centos.com
* updates: centos.centos.com
Resolving Dependencies
   --> Running transaction check
   ---> Package openssh-server.x86_64 0:6.6.1p1-33.el7_3 will be installed
   --> Finished Dependency Resolution
Dependencies Resolved
Step 2 − Make a secure regular use to add for shell access.
[root@localhost ~]# useradd choozer
[root@localhost ~]# usermod -c "Remote Access" -d /home/choozer -g users -G
wheel -a choozer
Note − We added the new user to the wheel group enabling ability to su into root once SSH access has been authenticated. We also used a username that cannot be found in common word lists. This way, our account will not get locked out when SSH is attacked.
The file holding configuration settings for sshd server is /etc/ssh/sshd_config.
The portions we want to edit initially are −
LoginGraceTime 60m
PermitRootLogin no
Step 3 − Reload the SSH daemon sshd.
[root@localhost]# systemctl reload sshd
It is good to set the logout grace period to 60 minutes. Some complex administration tasks can exceed the default of 2 minutes. There is really nothing more frustrating than having SSH session timeout when configuring or researching changes.
Step 4 − Let's try to login using the root credentials.
bash-3.2# ssh centos.vmnet.local
root@centos.vmnet.local's password:
Permission denied (publickey,gssapi-keyex,gssapi-with-mic,password).
Step 5 − We can no longer login remotely via ssh with root credentials. So let's login to our unprivileged user account and su into the root account.
bash-3.2# ssh chooser@centos.vmnet.local
choozer@centos.vmnet.local's password:
[choozer@localhost ~]$ su root
Password:

[root@localhost choozer]#
Step 6 − Finally, let's make sure the SSHD service loads on boot and firewalld allows outside SSH connections.
[root@localhost]# systemctl enable sshd

[root@localhost]# firewall-cmd --permanent --add-service=ssh
success

[root@localhost]# firewall-cmd --reload
success

[root@localhost]#
SSH is now set up and ready for remote administration. Depending on your enterprise border, the packet filtering border device may need to be configured to allow SSH remote administration outside the corporate LAN.
Configure VNC for Remote CentOS Administration
There are a few ways to enable remote CentOS administration via VNC on CentOS 6 - 7. The easiest, but most limiting way is simply using a package called vino. Vino is a Virtual Network Desktop Connection application for Linux designed around the Gnome Desktop platform. Hence, it is assumed the installation was completed with Gnome Desktop. If the Gnome Desktop has not been installed, please do so before continuing. Vino will be installed with a Gnome GUI install by default.
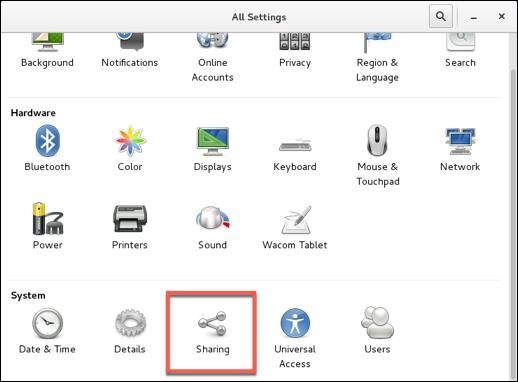
To configure screen sharing with Vino under Gnome, we want to go into the CentOS System Preferences for screen sharing.
Applications->System Tools->Settings->Sharing
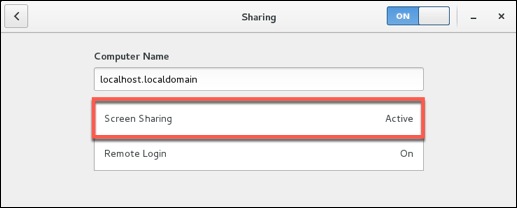
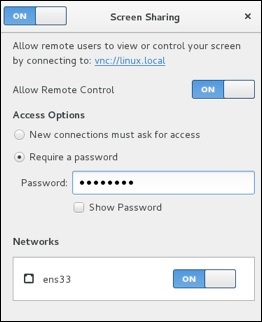
Notes to configuring VNC Desktop Sharing −
Disable New Connections must ask for access − This option will require physical access to ok every connection. This option will prevent remote administration unless someone is at the physical desktop.
Enable Require a password − This is separate from the user password. It will control the access to the virtual desktop and still require the user password to access a locked desktop (this is good for security).
Forward UP&P Ports: If available leave disabled − Forwarding UP&P ports will send Universal Plug and Play requests for a layer 3 device to allow VNC connections to the host automatically. We do not want this.
Make sure vino is listening on the VNC Port 5900.
[root@localhost]# netstat -antup | grep vino
tcp        0        0 0.0.0.0:5900        0.0.0.0:*        LISTEN        4873/vino-server
tcp6       0        0 :::5900                :::*          LISTEN        4873/vino-server

[root@localhost]#
Let's now configure our Firewall to allow incoming VNC connections.
[root@localhost]# firewall-cmd --permanent --add-port=5900/tcp
success

[root@localhost]# firewall-cmd --reload
success

[root@localhost rdc]#
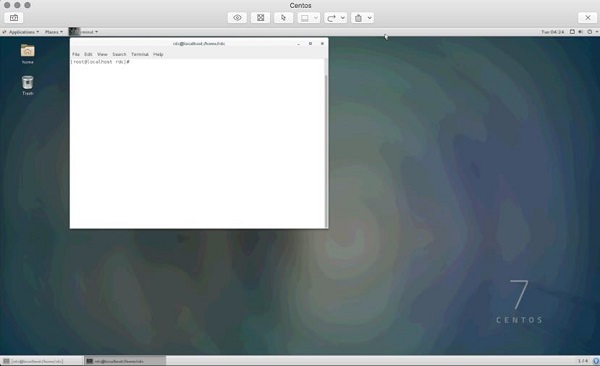
Finally, as you can see we are able to connect our CentOS Box and administer it with a VNC client on either Windows or OS X.
It is just as important to obey the same rules for VNC as we set forth for SSH. Just like SSH, VNC is continually scanned across IP ranges and tested for weak passwords. It is also worth a note that leaving the default CentOS login enabled with a console timeout does help with remote VNC security. As an attacker will need the VNC and user password, make sure your screen sharing password is different and just as hard to guess as the user password.
After entering the the VNC screen sharing password, we must also enter the user password to access a locked desktop.
Security Note − By default, VNC is not an encrypted protocol. Hence, the VNC connection should be tunneled through SSH for encryption.
Set Up SSH Tunnel Through VNC
Setting up an SSH Tunnel will provide a layer of SSH encryption to tunnel the VNC connection through. Another great feature is it uses SSH compression to add another layer of compression to the VNC GUI screen updates. More secure and faster is always a good thing when dealing with the administration of CentOS servers!
So from your client that will be initiating the VNC connection, let's set up a remote SSH tunnel. In this demonstration, we are using OS X. First we need to sudo -s to root.
bash-3.2# sudo -s
password:
Enter the user password and we should now have root shell with a # prompt −
bash-3.2#
Now, let's create our SSH Tunnel.
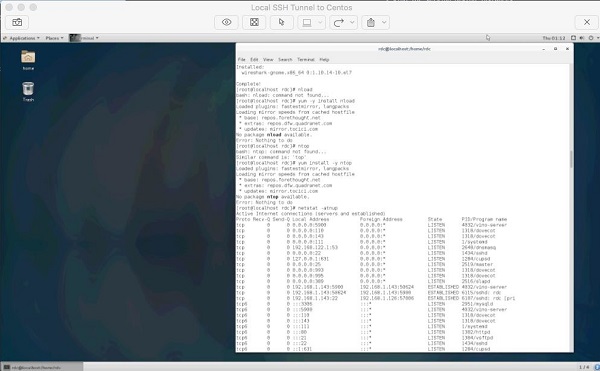
ssh -f rdc@192.168.1.143 -L 2200:192.168.1.143:5900 -N
Let's break this command down −
ssh − Runs the local ssh utility
-f − ssh should run in the background after the task fully executes
rdc@192.168.1.143 − Remote ssh user on the CentOS server hosting VNC services
-L 2200:192.168.1.143:5900 − Create our tunnel [Local Port]:[remote host]:[remote port of VNC service]
-N tells ssh we do not wish to execute a command on the remote system
bash-3.2# ssh -f rdc@192.168.1.143 -L 2200:192.168.1.143:5900 -N
rdc@192.168.1.143's password:
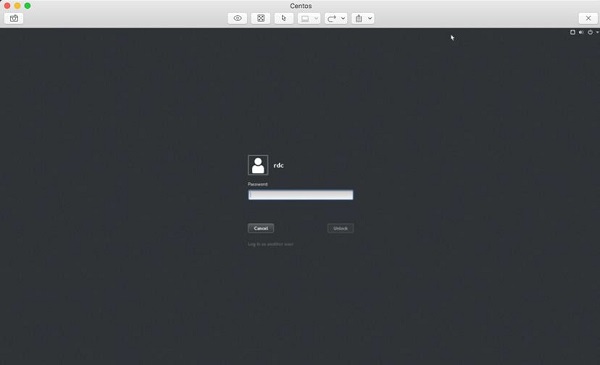
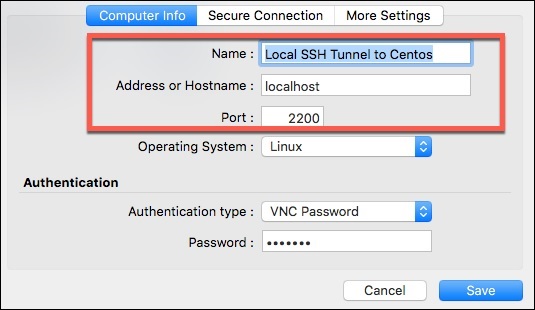
After successfully entering the remote ssh user's password, our ssh tunnel is created. Now for the cool part! To connect we point our VNC client at the localhost on the port of our tunnel, in this case port 2200. Following is the configuration on Mac Laptop's VNC Client −
And finally, our remote VNC Desktop Connection!
The cool thing about SSH tunneling is it can be used for almost any protocol. SSH tunnels are commonly used to bypass egress and ingress port filtering by an ISP, as well as trick application layer IDS/IPS while evading other session layer monitoring.
Your ISP may filter port 5900 for non-business accounts but allow SSH on port 22 (or one could run SSH on any port if port 22 is filtered).
Application level IPS and IDS look at payload. For example, a common buffer overflow or SQL Injection. End-to-end SSH encryption will encrypt application layer data.
SSH Tunneling is great tool in a Linux Administrator's toolbox for getting things done. However, as an Administrator we want to explore locking down the availability of lesser privileged users having access to SSH tunneling.
Administration Security Note − Restricting SSH Tunneling is something that requires thought on the part of an Administrator. Assessing why users need SSH Tunneling in the first place; what users need tunneling; along with practical risk probability and worst-case impact.
This is an advanced topic stretching outside the realm of an intermediate level primer. Research on this topic is advised for those who wish to reach the upper echelons of CentOS Linux Administration.
Use SSH Tunnel for Remote X-Windows
The design of X-Windows in Linux is really neat compared to that of Windows. If we want to control a remote Linux box from another Linux boxm we can take advantage of mechanisms built into X.
X-Windows (often called just "X"), provides the mechanism to display application windows originating from one Linux box to the display portion of X on another Linux box. So through SSH we can request an X-Windows application be forwarded to the display of another Linux box across the world!
To run an X Application remotely via an ssh tunnel, we just need to run a single command −
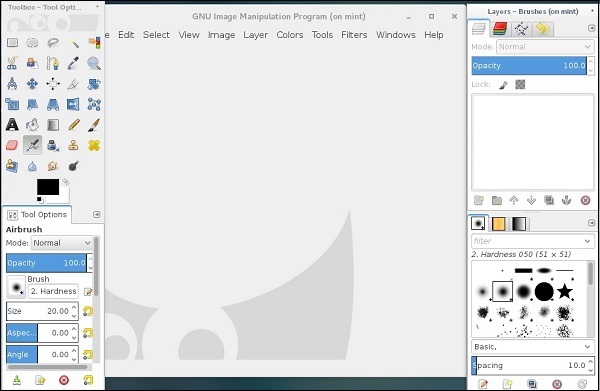
[root@localhost]# ssh -X rdc@192.168.1.105
The syntax is − ssh -X [user]@[host], and the host must be running ssh with a valid user.
Following is a screenshot of GIMP running on a Ubuntu Workstation through a remote XWindows ssh tunnel.
It is pretty simple to run applications remotely from another Linux server or workstation. It is also possible to start an entire X-Session and have the entire desktop environment remotely through a few methods.
XDMCP
Headless software packages such as NX
Configuring alternate displays and desktops in X and desktop managers such as Gnome or KDE
This method is most commonly used for headless servers with no physical display and really exceeds the scope of an intermediate level primer. However, it is good to know of the options available.
