- Kubernetes Tutorial
- Kubernetes - Home
- Kubernetes - Overview
- Kubernetes - Architecture
- Kubernetes - Setup
- Kubernetes - Setup on Ubuntu
- Kubernetes - Images
- Kubernetes - Jobs
- Kubernetes - Labels & Selectors
- Kubernetes - Namespace
- Kubernetes - Node
- Kubernetes - Service
- Kubernetes - POD
- Kubernetes - Replication Controller
- Kubernetes - Replica Sets
- Kubernetes - Deployments
- Kubernetes - Volumes
- Kubernetes - Secrets
- Kubernetes - Network Policy
- Advanced Kubernetes
- Kubernetes - API
- Kubernetes - Kubectl
- Kubernetes - Kubectl Commands
- Kubernetes - Creating an App
- Kubernetes - App Deployment
- Kubernetes - Autoscaling
- Kubernetes - Dashboard Setup
- Kubernetes - Helm Package Management
- Kubernetes - CI/CD Integration
- Kubernetes - Persistent Storage and PVCs
- Kubernetes - RBAC
- Kubernetes - Logging & Monitoring
- Kubernetes - Service Mesh with Istio
- Kubernetes - Backup and Disaster Recovery
- Managing ConfigMaps and Secrets
- Running Stateful Applications
- Multi-Cluster Management
- Security Best Practices
- Kubernetes CRDs
- Debugging Pods and Nodes
- K9s for Cluster Management
- Managing Taints and Tolerations
- Horizontal and Vertical Pod Autoscaling
- Minikube for Local Development
- Kubernetes in Docker
- Deploying Microservices
- Blue-Green Deployments
- Canary Deployments with Commands
- Troubleshooting Kubernetes with Commands
- Scaling Applications with Kubectl
- Advanced Scheduling Techniques
- Upgrading Kubernetes Clusters
- Kubernetes Useful Resources
- Kubernetes - Quick Guide
- Kubernetes - Useful Resources
- Kubernetes - Discussion
Kubernetes - Setup
It is important to set up the Virtual Datacenter (vDC) before setting up Kubernetes. This can be considered as a set of machines where they can communicate with each other via the network. For hands-on approach, you can set up vDC on PROFITBRICKS if you do not have a physical or cloud infrastructure set up.
Once the IaaS setup on any cloud is complete, you need to configure the Master and the Node.
Note − The setup is shown for Ubuntu machines. The same can be set up on other Linux machines as well.
Prerequisites
Installing Docker − Docker is required on all the instances of Kubernetes. Following are the steps to install the Docker.
Step 1 − Log on to the machine with the root user account.
Step 2 − Update the package information. Make sure that the apt package is working.
Step 3 − Run the following commands.
$ sudo apt-get update
$ sudo apt-get install apt-transport-https ca-certificates
Step 4 − Add the new GPG key.
$ sudo apt-key adv \
   --keyserver hkp://ha.pool.sks-keyservers.net:80 \
   --recv-keys 58118E89F3A912897C070ADBF76221572C52609D
$ echo "deb https://apt.dockerproject.org/repo ubuntu-trusty main" | sudo tee
/etc/apt/sources.list.d/docker.list
Step 5 − Update the API package image.
$ sudo apt-get update
Once all the above tasks are complete, you can start with the actual installation of the Docker engine. However, before this you need to verify that the kernel version you are using is correct.
Install Docker Engine
Run the following commands to install the Docker engine.
Step 1 − Logon to the machine.
Step 2 − Update the package index.
$ sudo apt-get update
Step 3 − Install the Docker Engine using the following command.
$ sudo apt-get install docker-engine
Step 4 − Start the Docker daemon.
sudo service docker start
Step 5 − To very if the Docker is installed, use the following command.
$ sudo docker run hello-world
Install etcd 2.0
This needs to be installed on Kubernetes Master Machine. In order to install it, run the following commands.
$ curl -L https://github.com/coreos/etcd/releases/download/v2.0.0/etcd
-v2.0.0-linux-amd64.tar.gz -o etcd-v2.0.0-linux-amd64.tar.gz ->1
$ tar xzvf etcd-v2.0.0-linux-amd64.tar.gz ------>2
$ cd etcd-v2.0.0-linux-amd64 ------------>3
$ mkdir /opt/bin ------------->4
$ cp etcd* /opt/bin ----------->5
In the above set of command −
- First, we download the etcd. Save this with specified name.
- Then, we have to un-tar the tar package.
- We make a dir. inside the /opt named bin.
- Copy the extracted file to the target location.
Now we are ready to build Kubernetes. We need to install Kubernetes on all the machines on the cluster.
$ git clone https://github.com/GoogleCloudPlatform/kubernetes.git
$ cd kubernetes
$ make release
The above command will create a _output dir in the root of the kubernetes folder. Next, we can extract the directory into any of the directory of our choice /opt/bin, etc.
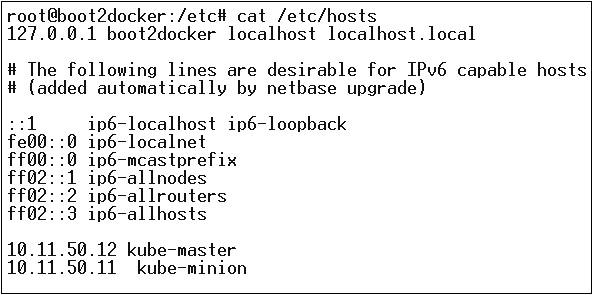
Next, comes the networking part wherein we need to actually start with the setup of Kubernetes master and node. In order to do this, we will make an entry in the host file which can be done on the node machine.
$ echo "<IP address of master machine> kube-master
< IP address of Node Machine>" >> /etc/hosts
Following will be the output of the above command.
Now, we will start with the actual configuration on Kubernetes Master.
First, we will start copying all the configuration files to their correct location.
$ cp <Current dir. location>/kube-apiserver /opt/bin/
$ cp <Current dir. location>/kube-controller-manager /opt/bin/
$ cp <Current dir. location>/kube-kube-scheduler /opt/bin/
$ cp <Current dir. location>/kubecfg /opt/bin/
$ cp <Current dir. location>/kubectl /opt/bin/
$ cp <Current dir. location>/kubernetes /opt/bin/
The above command will copy all the configuration files to the required location. Now we will come back to the same directory where we have built the Kubernetes folder.
$ cp kubernetes/cluster/ubuntu/init_conf/kube-apiserver.conf /etc/init/
$ cp kubernetes/cluster/ubuntu/init_conf/kube-controller-manager.conf /etc/init/
$ cp kubernetes/cluster/ubuntu/init_conf/kube-kube-scheduler.conf /etc/init/

$ cp kubernetes/cluster/ubuntu/initd_scripts/kube-apiserver /etc/init.d/
$ cp kubernetes/cluster/ubuntu/initd_scripts/kube-controller-manager /etc/init.d/
$ cp kubernetes/cluster/ubuntu/initd_scripts/kube-kube-scheduler /etc/init.d/

$ cp kubernetes/cluster/ubuntu/default_scripts/kubelet /etc/default/
$ cp kubernetes/cluster/ubuntu/default_scripts/kube-proxy /etc/default/
$ cp kubernetes/cluster/ubuntu/default_scripts/kubelet /etc/default/
The next step is to update the copied configuration file under /etc. dir.
Configure etcd on master using the following command.
$ ETCD_OPTS = "-listen-client-urls = http://kube-master:4001"
Configure kube-apiserver
For this on the master, we need to edit the /etc/default/kube-apiserver file which we copied earlier.
$ KUBE_APISERVER_OPTS = "--address = 0.0.0.0 \
--port = 8080 \
--etcd_servers = <The path that is configured in ETCD_OPTS> \
--portal_net = 11.1.1.0/24 \
--allow_privileged = false \
--kubelet_port = < Port you want to configure> \
--v = 0"
Configure the kube Controller Manager
We need to add the following content in /etc/default/kube-controller-manager.
$ KUBE_CONTROLLER_MANAGER_OPTS = "--address = 0.0.0.0 \
--master = 127.0.0.1:8080 \
--machines = kube-minion \ -----> #this is the kubernatics node
--v = 0
Next, configure the kube scheduler in the corresponding file.
$ KUBE_SCHEDULER_OPTS = "--address = 0.0.0.0 \
--master = 127.0.0.1:8080 \
--v = 0"
Once all the above tasks are complete, we are good to go ahead by bring up the Kubernetes Master. In order to do this, we will restart the Docker.
$ service docker restart
Kubernetes Node Configuration
Kubernetes node will run two services the kubelet and the kube-proxy. Before moving ahead, we need to copy the binaries we downloaded to their required folders where we want to configure the kubernetes node.
Use the same method of copying the files that we did for kubernetes master. As it will only run the kubelet and the kube-proxy, we will configure them.
$ cp <Path of the extracted file>/kubelet /opt/bin/
$ cp <Path of the extracted file>/kube-proxy /opt/bin/
$ cp <Path of the extracted file>/kubecfg /opt/bin/
$ cp <Path of the extracted file>/kubectl /opt/bin/
$ cp <Path of the extracted file>/kubernetes /opt/bin/
Now, we will copy the content to the appropriate dir.
$ cp kubernetes/cluster/ubuntu/init_conf/kubelet.conf /etc/init/
$ cp kubernetes/cluster/ubuntu/init_conf/kube-proxy.conf /etc/init/
$ cp kubernetes/cluster/ubuntu/initd_scripts/kubelet /etc/init.d/
$ cp kubernetes/cluster/ubuntu/initd_scripts/kube-proxy /etc/init.d/
$ cp kubernetes/cluster/ubuntu/default_scripts/kubelet /etc/default/
$ cp kubernetes/cluster/ubuntu/default_scripts/kube-proxy /etc/default/
We will configure the kubelet and kube-proxy conf files.
We will configure the /etc/init/kubelet.conf.
$ KUBELET_OPTS = "--address = 0.0.0.0 \
--port = 10250 \
--hostname_override = kube-minion \
--etcd_servers = http://kube-master:4001 \
--enable_server = true
--v = 0"
/
For kube-proxy, we will configure using the following command.
$ KUBE_PROXY_OPTS = "--etcd_servers = http://kube-master:4001 \
--v = 0"
/etc/init/kube-proxy.conf
Finally, we will restart the Docker service.
$ service docker restart
Now we are done with the configuration. You can check by running the following commands.
$ /opt/bin/kubectl get minions
