- JSF - Home
- JSF - Overview
- JSF - Environment Setup
- JSF - Architecture
- JSF - Life Cycle
- JSF - First Application
- JSF - Managed Beans
- JSF - Page Navigation
- JSF - Basic Tags
- JSF - Facelet Tags
- JSF - Convertor Tags
- JSF - Validator Tags
- JSF - DataTable
- JSF - Composite Components
- JSF - Ajax
- JSF - Event Handling
- JSF - JDBC Integration
- JSF - Spring Integration
- JSF - Expression Language
- JSF - Internationalization
JSF - Internationalization
Internationalization is a technique in which status messages, GUI component labels, currency, date are not hardcoded in the program. Instead, they are stored outside the source code in resource bundles and retrieved dynamically. JSF provides a very convenient way to handle resource bundle.
Following steps are required to internalize a JSF application.
Step 1: Define properties files
Create properties file for each locale. Name should be in <file-name>_<locale>.properties format.
Default locale can be omitted in file name.
messages.properties
greeting = Hello World!
messages_fr.properties
greeting = Bonjour tout le monde!
Step 2: Update faces-config.xml
faces-config.xml
<application>
   <locale-config>
      <default-locale>en</default-locale>
      <supported-locale>fr</supported-locale>
   </locale-config>

   <resource-bundle>
      <base-name>com.tutorialspoint.messages</base-name>
      <var>msg</var>
   </resource-bundle>
</application>
Step 3: Use resource-bundle var
home.xhtml
<h:outputText value = "#{msg['greeting']}" />
Example Application
Let us create a test JSF application to test internationalization in JSF.
| Step | Description |
|---|---|
| 1 | Create a project with a name helloworld under a package com.tutorialspoint.test as explained in the JSF - First Application chapter. |
| 2 | Create resources folder under src → mai folder. |
| 3 | Create com folder under src → main → resources folder. |
| 4 | Create tutorialspoint folder under src → main → resources → com folder. |
| 5 | Create messages.properties file under src → main → resources → com → tutorialspoint folder. Modify it as explained below. |
| 6 | Create messages_fr.properties file under src → main → resources → com → tutorialspoint folder. Modify it as explained below. |
| 7 | Create faces-config.xml in WEB-INFf older as explained below. |
| 8 | Create UserData.java under package com.tutorialspoint.test as explained below. |
| 9 | Modify home.xhtml as explained below. Keep the rest of the files unchanged. |
| 10 | Compile and run the application to make sure the business logic is working as per the requirements. |
| 11 | Finally, build the application in the form of war file and deploy it in Apache Tomcat Webserver. |
| 12 | Launch your web application using appropriate URL as explained below in the last step. |
messages.properties
greeting = Hello World!
messages_fr.properties
greeting = Bonjour tout le monde!
faces-config.xml
<?xml version = "1.0" encoding = "UTF-8"?>
<faces-config
   xmlns = "http://java.sun.com/xml/ns/javaee"
   xmlns:xsi = "http://www.w3.org/2001/XMLSchema-instance"
   xsi:schemaLocation = "http://java.sun.com/xml/ns/javaee
   http://java.sun.com/xml/ns/javaee/web-facesconfig_2_0.xsd"
   version = "2.0">

   <application>
      <locale-config>
         <default-locale>en</default-locale>
         <supported-locale>fr</supported-locale>
      </locale-config>

      <resource-bundle>
         <base-name>com.tutorialspoint.messages</base-name>
         <var>msg</var>
      </resource-bundle>
   </application>
</faces-config>
UserData.java
package com.tutorialspoint.test;

import java.io.Serializable;
import java.util.LinkedHashMap;
import java.util.Locale;
import java.util.Map;

import javax.faces.bean.ManagedBean;
import javax.faces.bean.SessionScoped;
import javax.faces.context.FacesContext;
import javax.faces.event.ValueChangeEvent;

@ManagedBean(name = "userData", eager = true)
@SessionScoped
public class UserData implements Serializable {
   private static final long serialVersionUID = 1L;
   private String locale;

   private static Map<String,Object> countries;
      static {

      countries = new LinkedHashMap<String,Object>();
      countries.put("English", Locale.ENGLISH);
      countries.put("French", Locale.FRENCH);
   }

   public Map<String, Object> getCountries() {
      return countries;
   }

   public String getLocale() {
      return locale;
   }

   public void setLocale(String locale) {
      this.locale = locale;
   }

   //value change event listener
   public void localeChanged(ValueChangeEvent e) {
      String newLocaleValue = e.getNewValue().toString();

      for (Map.Entry<String, Object> entry : countries.entrySet()) {

         if(entry.getValue().toString().equals(newLocaleValue)) {
            FacesContext.getCurrentInstance()
               .getViewRoot().setLocale((Locale)entry.getValue());
         }
      }
   }
}
home.xhtml
<?xml version = "1.0" encoding = "UTF-8"?>
<!DOCTYPE html PUBLIC "-//W3C//DTD XHTML 1.0 Transitional//EN"
"http://www.w3.org/TR/xhtml1/DTD/xhtml1-transitional.dtd">
<html xmlns = "http://www.w3.org/1999/xhtml"
xmlns:h = "http://java.sun.com/jsf/html"
xmlns:f = "http://java.sun.com/jsf/core">
<h:head>
<title>JSF tutorial</title>
</h:head>
<h:body>
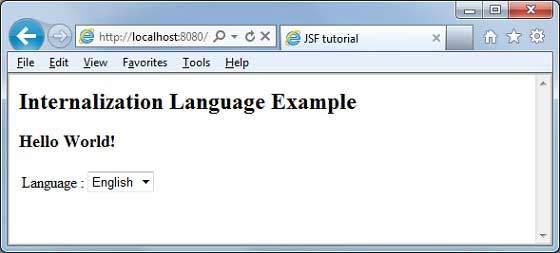
<h2>Internalization Language Example</h2>
<h:form>
<h3><h:outputText value = "#{msg['greeting']}" /></h3>
<h:panelGrid columns = "2">
Language :
<h:selectOneMenu value = "#{userData.locale}" onchange = "submit()"
valueChangeListener = "#{userData.localeChanged}">
<f:selectItems value = "#{userData.countries}" />
</h:selectOneMenu>
</h:panelGrid>
</h:form>
</h:body>
</html>
Once you are ready with all the changes done, let us compile and run the application as we did in JSF - First Application chapter. If everything is fine with your application, this will produce the following result.
Change language from dropdown. You will see the following output.

