- Java RMI - Home
- Java RMI - Introduction
- Java RMI - RMI Application
- Java RMI - GUI Application
- Java RMI - Database Application
Java RMI - Quick Guide
Java RMI - Introduction
RMI stands for Remote Method Invocation. It is a mechanism that allows an object residing in one system (JVM) to access/invoke an object running on another JVM.
RMI is used to build distributed applications; it provides remote communication between Java programs. It is provided in the package java.rmi.
Architecture of an RMI Application
In an RMI application, we write two programs, a server program (resides on the server) and a client program (resides on the client).
Inside the server program, a remote object is created and reference of that object is made available for the client (using the registry).
The client program requests the remote objects on the server and tries to invoke its methods.
The following diagram shows the architecture of an RMI application.
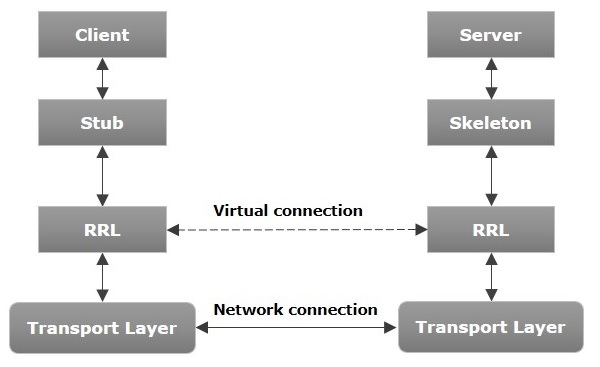
Let us now discuss the components of this architecture.
Transport Layer − This layer connects the client and the server. It manages the existing connection and also sets up new connections.
Stub − A stub is a representation (proxy) of the remote object at client. It resides in the client system; it acts as a gateway for the client program.
Skeleton − This is the object which resides on the server side. stub communicates with this skeleton to pass request to the remote object.
RRL(Remote Reference Layer) − It is the layer which manages the references made by the client to the remote object.
Working of an RMI Application
The following points summarize how an RMI application works −
When the client makes a call to the remote object, it is received by the stub which eventually passes this request to the RRL.
When the client-side RRL receives the request, it invokes a method called invoke() of the object remoteRef. It passes the request to the RRL on the server side.
The RRL on the server side passes the request to the Skeleton (proxy on the server) which finally invokes the required object on the server.
The result is passed all the way back to the client.
Marshalling and Unmarshalling
Whenever a client invokes a method that accepts parameters on a remote object, the parameters are bundled into a message before being sent over the network. These parameters may be of primitive type or objects. In case of primitive type, the parameters are put together and a header is attached to it. In case the parameters are objects, then they are serialized. This process is known as marshalling.
At the server side, the packed parameters are unbundled and then the required method is invoked. This process is known as unmarshalling.
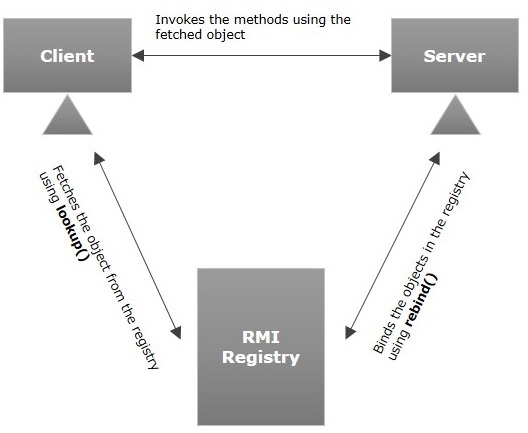
RMI Registry
RMI registry is a namespace on which all server objects are placed. Each time the server creates an object, it registers this object with the RMIregistry (using bind() or reBind() methods). These are registered using a unique name known as bind name.
To invoke a remote object, the client needs a reference of that object. At that time, the client fetches the object from the registry using its bind name (using lookup() method).
The following illustration explains the entire process −
Goals of RMI
Following are the goals of RMI −
- To minimize the complexity of the application.
- To preserve type safety.
- Distributed garbage collection.
- Minimize the difference between working with local and remote objects.
Java RMI Application
To write an RMI Java application, you would have to follow the steps given below −
- Define the remote interface
- Develop the implementation class (remote object)
- Develop the server program
- Develop the client program
- Compile the application
- Execute the application
Defining the Remote Interface
A remote interface provides the description of all the methods of a particular remote object. The client communicates with this remote interface.
To create a remote interface −
Create an interface that extends the predefined interface Remote which belongs to the package.
Declare all the business methods that can be invoked by the client in this interface.
Since there is a chance of network issues during remote calls, an exception named RemoteException may occur; throw it.
Following is an example of a remote interface. Here we have defined an interface with the name Hello and it has a method called printMsg().
import java.rmi.Remote;
import java.rmi.RemoteException;

// Creating Remote interface for our application
public interface Hello extends Remote {
   void printMsg() throws RemoteException;
}
Developing the Implementation Class (Remote Object)
We need to implement the remote interface created in the earlier step. (We can write an implementation class separately or we can directly make the server program implement this interface.)
To develop an implementation class −
- Implement the interface created in the previous step.
- Provide implementation to all the abstract methods of the remote interface.
Following is an implementation class. Here, we have created a class named ImplExample and implemented the interface Hello created in the previous step and provided body for this method which prints a message.
// Implementing the remote interface
public class ImplExample implements Hello {

   // Implementing the interface method
   public void printMsg() {
      System.out.println("This is an example RMI program");
   }
}
Developing the Server Program
An RMI server program should implement the remote interface or extend the implementation class. Here, we should create a remote object and bind it to the RMIregistry.
To develop a server program −
Create a client class from where you want invoke the remote object.
Create a remote object by instantiating the implementation class as shown below.
Export the remote object using the method exportObject() of the class named UnicastRemoteObject which belongs to the package java.rmi.server.
Get the RMI registry using the getRegistry() method of the LocateRegistry class which belongs to the package java.rmi.registry.
Bind the remote object created to the registry using the bind() method of the class named Registry. To this method, pass a string representing the bind name and the object exported, as parameters.
Following is an example of an RMI server program.
import java.rmi.registry.Registry;
import java.rmi.registry.LocateRegistry;
import java.rmi.RemoteException;
import java.rmi.server.UnicastRemoteObject;

public class Server extends ImplExample {
   public Server() {}
   public static void main(String args[]) {
      try {
         // Instantiating the implementation class
         ImplExample obj = new ImplExample();

         // Exporting the object of implementation class
         // (here we are exporting the remote object to the stub)
         Hello stub = (Hello) UnicastRemoteObject.exportObject(obj, 0);

         // Binding the remote object (stub) in the registry
         Registry registry = LocateRegistry.getRegistry();

         registry.bind("Hello", stub);
         System.err.println("Server ready");
      } catch (Exception e) {
         System.err.println("Server exception: " + e.toString());
         e.printStackTrace();
      }
   }
}
Developing the Client Program
Write a client program in it, fetch the remote object and invoke the required method using this object.
To develop a client program −
Create a client class from where your intended to invoke the remote object.
Get the RMI registry using the getRegistry() method of the LocateRegistry class which belongs to the package java.rmi.registry.
Fetch the object from the registry using the method lookup() of the class Registry which belongs to the package java.rmi.registry.
To this method, you need to pass a string value representing the bind name as a parameter. This will return you the remote object.
The lookup() returns an object of type remote, down cast it to the type Hello.
Finally invoke the required method using the obtained remote object.
Following is an example of an RMI client program.
import java.rmi.registry.LocateRegistry;
import java.rmi.registry.Registry;

public class Client {
   private Client() {}
   public static void main(String[] args) {
      try {
         // Getting the registry
         Registry registry = LocateRegistry.getRegistry(null);

         // Looking up the registry for the remote object
         Hello stub = (Hello) registry.lookup("Hello");

         // Calling the remote method using the obtained object
         stub.printMsg();

         // System.out.println("Remote method invoked");
      } catch (Exception e) {
         System.err.println("Client exception: " + e.toString());
         e.printStackTrace();
      }
   }
}
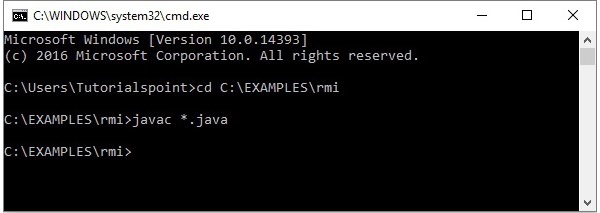
Compiling the Application
To compile the application −
- Compile the Remote interface.
- Compile the implementation class.
- Compile the server program.
- Compile the client program.
Or,
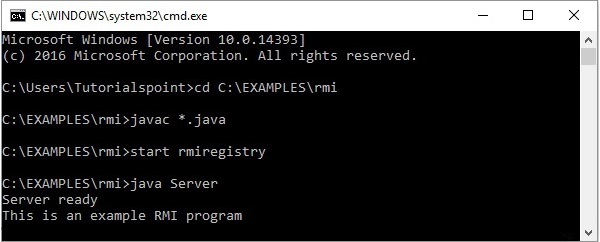
Open the folder where you have stored all the programs and compile all the Java files as shown below.
Javac *.java
Executing the Application
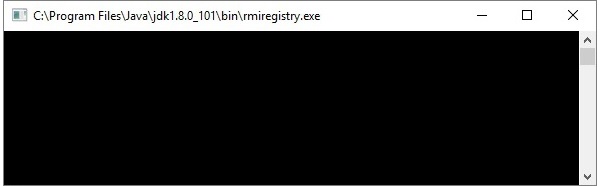
Step 1 − Start the rmi registry using the following command.
start rmiregistry
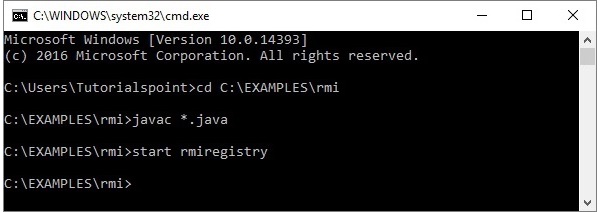
This will start an rmi registry on a separate window as shown below.
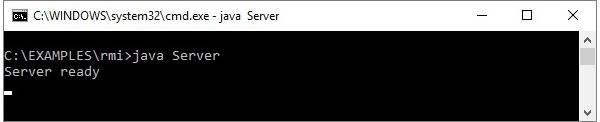
Step 2 − Run the server class file as shown below.
Java Server
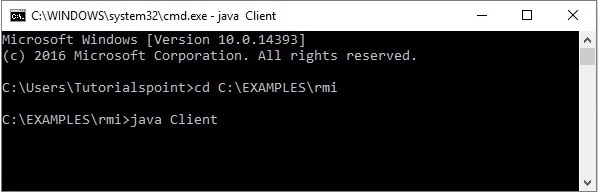
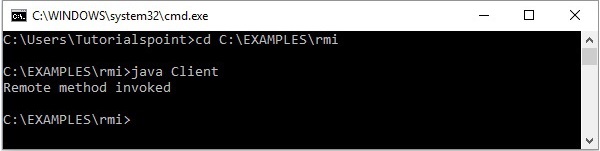
Step 3 − Run the client class file as shown below.
java Client
Verification − As soon you start the client, you would see the following output in the server.
Java RMI - GUI Application
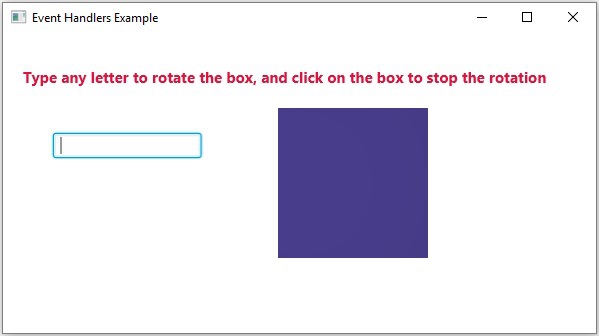
In the previous chapter, we created a sample RMI application. In this chapter, we will explain how to create an RMI application where a client invokes a method which displays a GUI window (JavaFX).
Defining the Remote Interface
Here, we are defining a remote interface named Hello with a method named animation() in it.
import java.rmi.Remote;
import java.rmi.RemoteException;

// Creating Remote interface for our application
public interface Hello extends Remote {
   void animation() throws RemoteException;
}
Developing the Implementation Class
In the Implementation class (Remote Object) of this application, we are trying to create a window which displays GUI content, using JavaFX.
import javafx.animation.RotateTransition;
import javafx.application.Application;
import javafx.event.EventHandler;

import javafx.scene.Group;
import javafx.scene.PerspectiveCamera;
import javafx.scene.Scene;
import javafx.scene.control.TextField;
import javafx.scene.input.KeyEvent;
import javafx.scene.paint.Color;
import javafx.scene.paint.PhongMaterial;

import javafx.scene.shape.Box;
import javafx.scene.text.Font;
import javafx.scene.text.FontWeight;
import javafx.scene.text.Text;
import javafx.scene.transform.Rotate;

import javafx.stage.Stage;
import javafx.util.Duration;

// Implementing the remote interface
public class FxSample extends Application implements Hello {
   @Override
   public void start(Stage stage) {
      // Drawing a Box
      Box box = new Box();

      // Setting the properties of the Box
      box.setWidth(150.0);
      box.setHeight(150.0);
      box.setDepth(100.0);

      // Setting the position of the box
      box.setTranslateX(350);
      box.setTranslateY(150);
      box.setTranslateZ(50);

      // Setting the text
      Text text = new Text(
         "Type any letter to rotate the box, and click on the box to stop the rotation");

      // Setting the font of the text
      text.setFont(Font.font(null, FontWeight.BOLD, 15));

      // Setting the color of the text
      text.setFill(Color.CRIMSON);

      // Setting the position of the text
      text.setX(20);
      text.setY(50);

      // Setting the material of the box
      PhongMaterial material = new PhongMaterial();
      material.setDiffuseColor(Color.DARKSLATEBLUE);

      // Setting the diffuse color material to box
      box.setMaterial(material);

      // Setting the rotation animation to the box
      RotateTransition rotateTransition = new RotateTransition();

      // Setting the duration for the transition
      rotateTransition.setDuration(Duration.millis(1000));

      // Setting the node for the transition
      rotateTransition.setNode(box);

      // Setting the axis of the rotation
      rotateTransition.setAxis(Rotate.Y_AXIS);

      // Setting the angle of the rotation
      rotateTransition.setByAngle(360);

      // Setting the cycle count for the transition
      rotateTransition.setCycleCount(50);

      // Setting auto reverse value to false
      rotateTransition.setAutoReverse(false);

      // Creating a text filed
      TextField textField = new TextField();

      // Setting the position of the text field
      textField.setLayoutX(50);
      textField.setLayoutY(100);

      // Handling the key typed event
      EventHandler<KeyEvent> eventHandlerTextField = new EventHandler<KeyEvent>() {
         @Override
         public void handle(KeyEvent event) {
            // Playing the animation
            rotateTransition.play();
         }
      };

      // Adding an event handler to the text feld
      textField.addEventHandler(KeyEvent.KEY_TYPED, eventHandlerTextField);

      // Handling the mouse clicked event(on box)
      EventHandler<javafx.scene.input.MouseEvent> eventHandlerBox =
         new EventHandler<javafx.scene.input.MouseEvent>() {
         @Override
         public void handle(javafx.scene.input.MouseEvent e) {
            rotateTransition.stop();
         }
      };

      // Adding the event handler to the box
      box.addEventHandler(javafx.scene.input.MouseEvent.MOUSE_CLICKED, eventHandlerBox);

      // Creating a Group object
      Group root = new Group(box, textField, text);

      // Creating a scene object
      Scene scene = new Scene(root, 600, 300);

      // Setting camera
      PerspectiveCamera camera = new PerspectiveCamera(false);
      camera.setTranslateX(0);
      camera.setTranslateY(0);
      camera.setTranslateZ(0);
      scene.setCamera(camera);

      // Setting title to the Stage
      stage.setTitle("Event Handlers Example");

      // Adding scene to the stage
      stage.setScene(scene);

      // Displaying the contents of the stage
      stage.show();
   }

   // Implementing the interface method
   public void animation() {
      launch();
   }
}
Server Program
An RMI server program should implement the remote interface or extend the implementation class. Here, we should create a remote object and bind it to the RMIregistry.
Following is the server program of this application. Here, we will extend the above created class, create a remote object, and registered it to the RMI registry with the bind name hello.
import java.rmi.registry.Registry;
import java.rmi.registry.LocateRegistry;
import java.rmi.RemoteException;
import java.rmi.server.UnicastRemoteObject;

public class Server extends FxSample {
   public Server() {}
   public static void main(String args[]) {
      try {
         // Instantiating the implementation class
         FxSample obj = new FxSample();

         // Exporting the object of implementation class
         // (here we are exporting the remote object to the stub)
         Hello stub = (Hello) UnicastRemoteObject.exportObject(obj, 0);

         // Binding the remote object (stub) in the registry
         Registry registry = LocateRegistry.getRegistry();

         registry.bind("Hello", stub);
         System.err.println("Server ready");
      } catch (Exception e) {
         System.err.println("Server exception: " + e.toString());
         e.printStackTrace();
      }
   }
}
Client Program
Following is the client program of this application. Here, we are fetching the remote object and invoking its method named animation().
import java.rmi.registry.LocateRegistry;
import java.rmi.registry.Registry;

public class Client {
   private Client() {}
   public static void main(String[] args) {
      try {
         // Getting the registry
         Registry registry = LocateRegistry.getRegistry(null);

         // Looking up the registry for the remote object
         Hello stub = (Hello) registry.lookup("Hello");

         // Calling the remote method using the obtained object
         stub.animation();

         System.out.println("Remote method invoked");
      } catch (Exception e) {
         System.err.println("Client exception: " + e.toString());
         e.printStackTrace();
      }
   }
}
Steps to Run the Example
Following are the steps to run our RMI Example.
Step 1 − Open the folder where you have stored all the programs and compile all the Java files as shown below.
Javac *.java
Step 2 − Start the rmi registry using the following command.
start rmiregistry
This will start an rmi registry on a separate window as shown below.
Step 3 − Run the server class file as shown below.
Java Server
Step 4 − Run the client class file as shown below.
java Client
Verification − As soon you start the client, you would see the following output in the server.
Java RMI - Database Application
In the previous chapter, we created a sample RMI application where a client invokes a method which displays a GUI window (JavaFX).
In this chapter, we will take an example to see how a client program can retrieve the records of a table in MySQL database residing on the server.
Assume we have a table named student_data in the database details as shown below.
+----+--------+--------+------------+---------------------+
| ID | NAME   | BRANCH | PERCENTAGE | EMAIL               |
+----+--------+--------+------------+---------------------+
|  1 | Ram    | IT     |         85 | ram123@gmail.com    |
|  2 | Rahim  | EEE    |         95 | rahim123@gmail.com  |
|  3 | Robert | ECE    |         90 | robert123@gmail.com |
+----+--------+--------+------------+---------------------+
Assume the name of the user is myuser and its password is password.
Creating a Student Class
Create a Student class with setter and getter methods as shown below.
public class Student implements java.io.Serializable {
   private int id, percent;
   private String name, branch, email;

   public int getId() {
      return id;
   }
   public String getName() {
      return name;
   }
   public String getBranch() {
      return branch;
   }
   public int getPercent() {
      return percent;
   }
   public String getEmail() {
      return email;
   }
   public void setID(int id) {
      this.id = id;
   }
   public void setName(String name) {
      this.name = name;
   }
   public void setBranch(String branch) {
      this.branch = branch;
   }
   public void setPercent(int percent) {
      this.percent = percent;
   }
   public void setEmail(String email) {
      this.email = email;
   }
}
Defining the Remote Interface
Define the remote interface. Here, we are defining a remote interface named Hello with a method named getStudents () in it. This method returns a list which contains the object of the class Student.
import java.rmi.Remote;
import java.rmi.RemoteException;
import java.util.*;

// Creating Remote interface for our application
public interface Hello extends Remote {
   public List<Student> getStudents() throws Exception;
}
Developing the Implementation Class
Create a class and implement the above created interface.
Here we are implementing the getStudents() method of the Remote interface. When you invoke this method, it retrieves the records of a table named student_data. Sets these values to the Student class using its setter methods, adds it to a list object and returns that list.
import java.sql.*;
import java.util.*;

// Implementing the remote interface
public class ImplExample implements Hello {

   // Implementing the interface method
   public List<Student> getStudents() throws Exception {
      List<Student> list = new ArrayList<Student>();

      // JDBC driver name and database URL
      String JDBC_DRIVER = "com.mysql.jdbc.Driver";
      String DB_URL = "jdbc:mysql://localhost:3306/details";

      // Database credentials
      String USER = "myuser";
      String PASS = "password";

      Connection conn = null;
      Statement stmt = null;

      //Register JDBC driver
      Class.forName("com.mysql.jdbc.Driver");

      //Open a connection
      System.out.println("Connecting to a selected database...");
      conn = DriverManager.getConnection(DB_URL, USER, PASS);
      System.out.println("Connected database successfully...");

      //Execute a query
      System.out.println("Creating statement...");

      stmt = conn.createStatement();
      String sql = "SELECT * FROM student_data";
      ResultSet rs = stmt.executeQuery(sql);

      //Extract data from result set
      while(rs.next()) {
         // Retrieve by column name
         int id  = rs.getInt("id");

         String name = rs.getString("name");
         String branch = rs.getString("branch");

         int percent = rs.getInt("percentage");
         String email = rs.getString("email");

         // Setting the values
         Student student = new Student();
         student.setID(id);
         student.setName(name);
         student.setBranch(branch);
         student.setPercent(percent);
         student.setEmail(email);
         list.add(student);
      }
      rs.close();
      return list;
   }
}
Server Program
An RMI server program should implement the remote interface or extend the implementation class. Here, we should create a remote object and bind it to the RMI registry.
Following is the server program of this application. Here, we will extend the above created class, create a remote object and register it to the RMI registry with the bind name hello.
import java.rmi.registry.Registry;
import java.rmi.registry.LocateRegistry;
import java.rmi.RemoteException;
import java.rmi.server.UnicastRemoteObject;

public class Server extends ImplExample {
   public Server() {}
   public static void main(String args[]) {
      try {
         // Instantiating the implementation class
         ImplExample obj = new ImplExample();

         // Exporting the object of implementation class (
            here we are exporting the remote object to the stub)
         Hello stub = (Hello) UnicastRemoteObject.exportObject(obj, 0);

         // Binding the remote object (stub) in the registry
         Registry registry = LocateRegistry.getRegistry();

         registry.bind("Hello", stub);
         System.err.println("Server ready");
      } catch (Exception e) {
         System.err.println("Server exception: " + e.toString());
         e.printStackTrace();
      }
   }
}
Client Program
Following is the client program of this application. Here, we are fetching the remote object and invoking the method named getStudents(). It retrieves the records of the table from the list object and displays them.
import java.rmi.registry.LocateRegistry;
import java.rmi.registry.Registry;
import java.util.*;

public class Client {
   private Client() {}
   public static void main(String[] args)throws Exception {
      try {
         // Getting the registry
         Registry registry = LocateRegistry.getRegistry(null);

         // Looking up the registry for the remote object
         Hello stub = (Hello) registry.lookup("Hello");

         // Calling the remote method using the obtained object
         List<Student> list = (List)stub.getStudents();
         for (Student s:list)v {

            // System.out.println("bc "+s.getBranch());
            System.out.println("ID: " + s.getId());
            System.out.println("name: " + s.getName());
            System.out.println("branch: " + s.getBranch());
            System.out.println("percent: " + s.getPercent());
            System.out.println("email: " + s.getEmail());
         }
      // System.out.println(list);
      } catch (Exception e) {
         System.err.println("Client exception: " + e.toString());
         e.printStackTrace();
      }
   }
}
Steps to Run the Example
Following are the steps to run our RMI Example.
Step 1 − Open the folder where you have stored all the programs and compile all the Java files as shown below.
Javac *.java
Step 2 − Start the rmi registry using the following command.
start rmiregistry
This will start an rmi registry on a separate window as shown below.
Step 3 − Run the server class file as shown below.
Java Server
Step 4 − Run the client class file as shown below.
java Client

