- DIP - Home
- DIP - Introduction
- DIP - Java BufferedImage Class
- DIP - Image Download & Upload
- DIP - Image Pixels
- DIP - Grayscale Conversion
- DIP - Enhancing Image Contrast
- DIP - Enhancing Image Brightness
- DIP - Enhancing Image Sharpness
- DIP - Image Compression Technique
- DIP - Adding Image Border
- DIP - Image Pyramids
- DIP - Basic Thresholding
- DIP - Image Shape Conversions
- DIP - Gaussian Filter
- DIP - Box Filter
- DIP - Eroding & Dilation
- DIP - Watermark
- DIP - Understanding Convolution
- DIP - Prewitt Operator
- DIP - Sobel Operator
- DIP - Kirsch Operator
- DIP - Robinson Operator
- DIP - Laplacian Operator
- DIP - Weighted Average Filter
- DIP - Create Zooming Effect
- DIP - Open Source Libraries
- DIP - Introduction To OpenCV
- DIP - GrayScale Conversion OpenCV
- DIP - Color Space Conversion
Java DIP - Introduction to OpenCV
OpenCV is released under a BSD license and hence it is free for both academic and commercial use. It has C++, C, Python, and Java interfaces, and it supports Windows, Linux, Mac OS, iOS, and Android.
OpenCV was designed for computational efficiency and with a strong focus on real-time applications. Written in optimized C/C++, the library can take advantage of multi-core processing.
Some of the basic features of OpenCV are described below −
| Sr.No. | Feature & Description |
|---|---|
| 1 |
Smoothing Images This involves applying Blur, GaussianBlur, medianBlur, and bilateral Filter. |
| 2 |
Eroding and Dilating It can apply two very common morphology operators − Dilation and Erosion. |
| 3 |
Morphology Transformations OpenCV function morphologyEx to apply Morphological Transformation such as opening, closing, TopHat, and BlackHat etc. |
| 4 |
Image Pyramids OpenCV functions pyrUp and pyrDown to down sample or up sample a given image. |
| 4 |
Basic Thresholding Operations It can perform basic thresholding operations using OpenCV function threshold. |
| 5 |
Adding borders to your images OpenCV function copyMakeBorder is used to set the borders(extra padding to your image). |
| 7 |
Remapping In OpenCV, the function remap offers a simple remapping implementation. |
| 8 |
Histogram Calculation For simple purposes, OpenCV implements the function calcHist, which calculates the histogram of a set of arrays (usually images or image planes). It can operate with up to 32 dimensions. |
Integrating OpenCV
These following steps explain how to integrate OpenCV into your applications.
Download OpenCV
You can download OpenCV from their official Website here.
Create User Library
Further, we create a user library of OpenCV, so that we can use it as a future project.
Launch Eclipse
Select Window -> Preferences from the menu.
Navigate under Java -> Build Path -> User Libraries and click New.
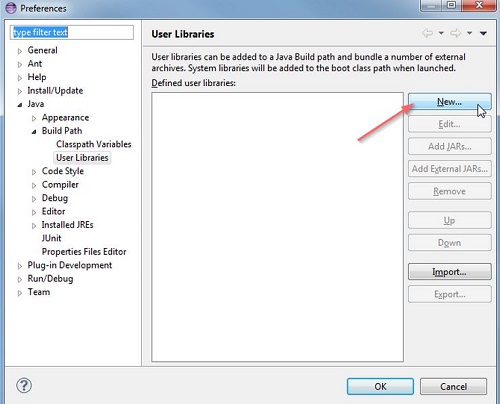
Now enter the name for your library. For example, OpenCV-2.4.6.
After that, select your new user library(i.e. OpenCV-2.4.6) and click on Add External JARs.
Browse through C:\OpenCV-2.4.6\build\java\ and select opencv-246.jar. After adding the jar, extend the opencv-246.jar and select Native library location and press Edit.
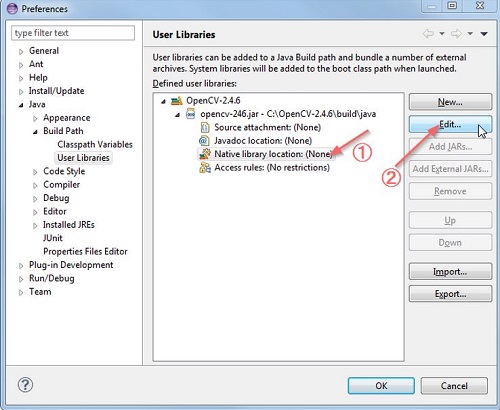
Select External Folder... and browse to select the folder C:\OpenCV-2.4.6\build\java\x64. If you have a 32-bit system, you need to select the x86 folder instead of x64.
Press Ok and you are done.
Now your user library is created. Now you can reuse this configuration in any of the project.
Create OpenCV Project
Create a new java project in eclipse.
On the Java Settings step, under Libraries tab, select Add Library... and select OpenCV-2.4.6, then click Finish.
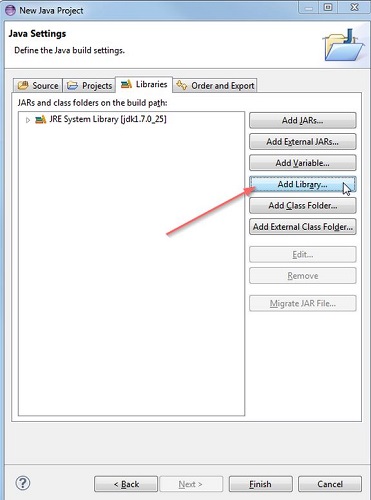
Click finish and you are done.
