- DIP - Home
- DIP - Introduction
- DIP - Java BufferedImage Class
- DIP - Image Download & Upload
- DIP - Image Pixels
- DIP - Grayscale Conversion
- DIP - Enhancing Image Contrast
- DIP - Enhancing Image Brightness
- DIP - Enhancing Image Sharpness
- DIP - Image Compression Technique
- DIP - Adding Image Border
- DIP - Image Pyramids
- DIP - Basic Thresholding
- DIP - Image Shape Conversions
- DIP - Gaussian Filter
- DIP - Box Filter
- DIP - Eroding & Dilation
- DIP - Watermark
- DIP - Understanding Convolution
- DIP - Prewitt Operator
- DIP - Sobel Operator
- DIP - Kirsch Operator
- DIP - Robinson Operator
- DIP - Laplacian Operator
- DIP - Weighted Average Filter
- DIP - Create Zooming Effect
- DIP - Open Source Libraries
- DIP - Introduction To OpenCV
- DIP - GrayScale Conversion OpenCV
- DIP - Color Space Conversion
Java DIP - OpenCV Color Space Conversion
In order to change color space of one image to another using OpenCV, we read image into BufferedImage and convert it into Mat Object. Its syntax is given below −
File input = new File("digital_image_processing.jpg");
BufferedImage image = ImageIO.read(input);
//convert Buffered Image to Mat.
OpenCv allows many color conversion types, all of which can be found in the Imgproc class. Some of the types are described briefly −
| Sr.No. | Color Conversion Type |
|---|---|
| 1 | COLOR_RGB2BGR |
| 2 | COLOR_RGB2BGRA |
| 3 | COLOR_RGB2GRAY |
| 4 | COLOR_RGB2HLS |
| 5 | COLOR_RGB2HSV |
| 6 | COLOR_RGB2Luv |
| 7 | COLOR_RGB2YUV |
| 8 | COLOR_RGB2Lab |
From any of the color conversion type, just pass the appropriate one into method cvtColor() in the Imgproc class. Its syntax is given below −
Imgproc.cvtColor(source mat, destination mat1, Color_Conversion_Code);
The method cvtColor() takes three parameters which are the source image matrix, the destination image matrix and the color conversion type.
Apart from the cvtColor() method, there are other methods provide by the Imgproc class. They are described briefly −
| Sr.No. | Method & Description |
|---|---|
| 1 |
cvtColor(Mat src, Mat dst, int code, int dstCn) It converts an image from one color space to another. |
| 2 |
dilate(Mat src, Mat dst, Mat kernel) It dilates an image by using a specific structuring element. |
| 3 |
equalizeHist(Mat src, Mat dst) It equalizes the histogram of a grayscale image. |
| 4 |
filter2D(Mat src, Mat dst, int ddepth, Mat kernel, Point anchor, double delta) It convolves an image with the kernel. |
| 5 |
GaussianBlur(Mat src, Mat dst, Size ksize, double sigmaX) It blurs an image using a Gaussian filter. |
| 6 |
integral(Mat src, Mat sum) It calculates the integral of an image. |
Example
The following example demonstrates the use of Imgproc class to convert an image from one color space to another.
import java.awt.image.BufferedImage;
import java.awt.image.DataBufferByte;

import java.io.File;
import javax.imageio.ImageIO;

import org.opencv.core.Core;
import org.opencv.core.CvType;
import org.opencv.core.Mat;
import org.opencv.imgproc.Imgproc;

public class Main {
   public static void main( String[] args ) {

      try {
         System.loadLibrary( Core.NATIVE_LIBRARY_NAME );
         File input = new File("digital_image_processing.jpg");
         BufferedImage image = ImageIO.read(input);
         byte[] data = ((DataBufferByte) image.getRaster().getDataBuffer()).getData();
         Mat mat = new Mat(image.getHeight(),image.getWidth(), CvType.CV_8UC3);
         mat.put(0, 0, data);

         Mat mat1 = new Mat(image.getHeight(), image.getWidth(), CvType.CV_8UC3);
         Imgproc.cvtColor(mat, mat1, Imgproc.COLOR_RGB2HSV);

         byte[] data1 = new byte[mat1.rows()*mat1.cols()*(int)(mat1.elemSize())];
         mat1.get(0, 0, data1);
         BufferedImage image1 = new BufferedImage(mat1.cols(), mat1.rows(), 5);
         image1.getRaster().setDataElements(0, 0, mat1.cols(), mat1.rows(), data1);

         File ouptut = new File("hsv.jpg");
         ImageIO.write(image1, "jpg", ouptut);

      } catch (Exception e) {
         System.out.println("Error: " + e.getMessage());
      }
   }
}
Output
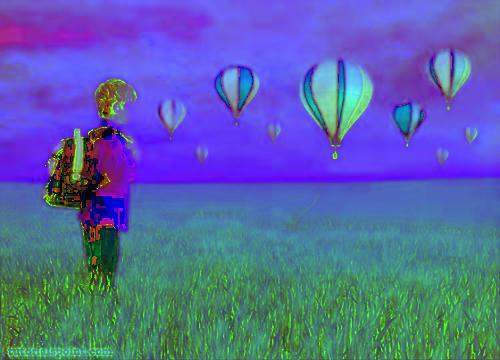
When you execute the given example, it converts an image name digital_image_processing.jpg to its equivalent HSV color space image and writes it on hard disk with name hsv.jpg.
Original Image (RGB)

Converted Image (HSV)