- iOS - Home
- iOS - Getting Started
- iOS - Environment Setup
- iOS - Objective-C Basics
- iOS - First iPhone Application
- iOS - Actions and Outlets
- iOS - Delegates
- iOS - UI Elements
- iOS - Accelerometer
- iOS - Universal Applications
- iOS - Camera Management
- iOS - Location Handling
- iOS - SQLite Database
- iOS - Sending Email
- iOS - Audio & Video
- iOS - File Handling
- iOS - Accessing Maps
- iOS - In-App Purchase
- iOS - iAd Integration
- iOS - GameKit
- iOS - Storyboards
- iOS - Auto Layouts
- iOS - Twitter & Facebook
- iOS - Memory Management
- iOS - Application Debugging
Selected Reading
iOS - Tab Bar
Use of Tab Bar
It's generally used to switch between various subtasks, views or models within the same view.
Example for tab bar is shown below.

Important Properties
- backgroundImage
- items
- selectedItem
Sample Code and Steps
Step 1 − Create a new project and select Tabbed Application instead of the View Based application and click next, Give the project name and select create.
Step 2 − Here two view controllers are created by default and a tab bar is added to our application.
Step 3 − The AppDelegate.m didFinishLaunchingWithOptions method is as follows −
- (BOOL)application:(UIApplication *)application
   didFinishLaunchingWithOptions:(NSDictionary *)launchOptions {
   self.window = [[UIWindow alloc] initWithFrame:[[UIScreen mainScreen]
   bounds]];

   // Override point for customization after application launch.
   UIViewController *viewController1 = [[FirstViewController alloc]
   initWithNibName:@"FirstViewController" bundle:nil];
   UIViewController *viewController2 = [[SecondViewController alloc]
   initWithNibName:@"SecondViewController" bundle:nil];
   self.tabBarController = [[UITabBarController alloc] init];
   self.tabBarController.viewControllers = @[viewController1,
   viewController2];
   self.window.rootViewController = self.tabBarController;
   [self.window makeKeyAndVisible];
   return YES;
}
Step 4 − Here, two view controllers are allocated and made as view controllers of our tab bar controller.
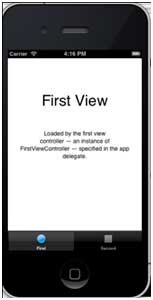
Step 5 − When we run the application, we'll get the following output −
ios_ui_elements.htm

Advertisements