- iOS - Home
- iOS - Getting Started
- iOS - Environment Setup
- iOS - Objective-C Basics
- iOS - First iPhone Application
- iOS - Actions and Outlets
- iOS - Delegates
- iOS - UI Elements
- iOS - Accelerometer
- iOS - Universal Applications
- iOS - Camera Management
- iOS - Location Handling
- iOS - SQLite Database
- iOS - Sending Email
- iOS - Audio & Video
- iOS - File Handling
- iOS - Accessing Maps
- iOS - In-App Purchase
- iOS - iAd Integration
- iOS - GameKit
- iOS - Storyboards
- iOS - Auto Layouts
- iOS - Twitter & Facebook
- iOS - Memory Management
- iOS - Application Debugging
iOS - Scroll View
Use of Scroll View
Scroll View is used for displaying content more than the size of the screen. It can contain all of the other UI elements like image views, labels, text views and even another scroll view itself.
Important Properties
- contentSize
- contentInset
- contentOffset
- delegate
Important Methods
- (void)scrollRectToVisible:(CGRect)rect animated:(BOOL)animated
- (void)setContentOffset:(CGPoint)contentOffset animated:(BOOL)animated
Important Delegate Methods
- (void)scrollViewDidEndDecelerating:(UIScrollView *)scrollView
- (void)scrollViewDidEndDragging:(UIScrollView *)scrollView
willDecelerate:(BOOL)decelerate
- (void)scrollViewWillBeginDecelerating:(UIScrollView *)scrollView
- (void)scrollViewWillBeginDragging:(UIScrollView *)scrollView
Update ViewController.h as follows −
Make your class conform to scroll view delegate protocol by adding < UIScrollViewDelegate> and declaring a scroll view instance as shown below in ViewController.h.
#import <UIKit/UIKit.h>

@interface ViewController : UIViewController<UIScrollViewDelegate> {
   UIScrollView *myScrollView;
}
@end
Add a Custom Method addScrollView
-(void)addScrollView {
   myScrollView = [[UIScrollView alloc]initWithFrame:
   CGRectMake(20, 20, 280, 420)];
   myScrollView.accessibilityActivationPoint = CGPointMake(100, 100);
   imgView = [[UIImageView alloc]initWithImage:
   [UIImage imageNamed:@"AppleUSA.jpg"]];
   [myScrollView addSubview:imgView];
   myScrollView.minimumZoomScale = 0.5;
   myScrollView.maximumZoomScale = 3;
   myScrollView.contentSize = CGSizeMake(imgView.frame.size.width,
   imgView.frame.size.height);
   myScrollView.delegate = self;
   [self.view addSubview:myScrollView];
}
Note −
We have to add an image named as "AppleUSA1.jpg" to our project, which can be done by dragging the image to our navigator area where our project files are listed. The image should be of resolution higher than the device to see scrolling of image.
Implement the scrollView Delegates in ViewController.m
-(UIView *)viewForZoomingInScrollView:(UIScrollView *)scrollView {
   return imgView;
}

-(void)scrollViewDidEndDecelerating:(UIScrollView *)scrollView {
   NSLog(@"Did end decelerating");
}

-(void)scrollViewDidScroll:(UIScrollView *)scrollView {
   // NSLog(@"Did scroll");
}

-(void)scrollViewDidEndDragging:(UIScrollView *)scrollView
   willDecelerate:(BOOL)decelerate {
   NSLog(@"Did end dragging");
}

-(void)scrollViewWillBeginDecelerating:(UIScrollView *)scrollView {
   NSLog(@"Did begin decelerating");
}

-(void)scrollViewWillBeginDragging:(UIScrollView *)scrollView {
   NSLog(@"Did begin dragging");
}
Update viewDidLoad in ViewController.m as follows −
(void)viewDidLoad {
   [super viewDidLoad];
   [self addScrollView];
   //Do any additional setup after loading the view, typically from a nib
}
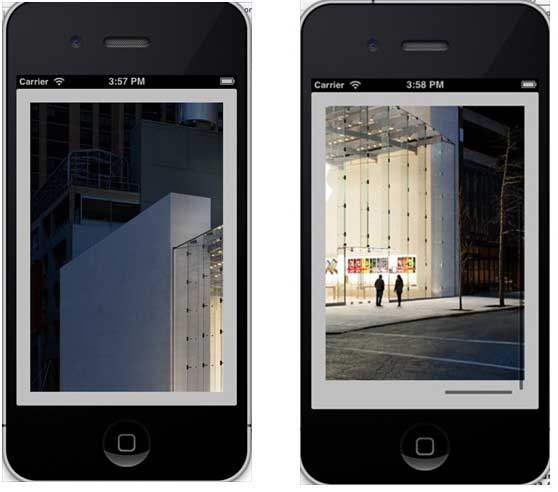
Output
When we run the application we'll get the following output. Once you scroll the scroll view, you will be able to see the remaining part of the image.